

Introduction
Choosing paint colors for oak cabinets means selecting finishes that complement the wood, look right in your room, and stand up to kitchen wear. This article walks you through testing samples, considering light, and picking a sheen that fits a busy kitchen. It keeps the tone practical and hands-on, so you can see what actually works in real life.
Think about how natural light, artificial lighting, and room mood affect color choices when you test swatches on the cabinet faces. Try samples in different lighting conditions and compare how they read next to the oak’s grain and nearby surfaces. And before you commit, check how the chosen color performs with your kitchen’s functionality and the tone you want to set, including the right sheen for cabinets.
Key takeaways
- Understand oak grain and undertone when selecting paint colors for cabinets.
- Test paint samples under natural and artificial light to gauge true color.
- Choose sheen that balances durability and mood for kitchen use.
- Match cabinet tones to room function and daylight, not trends alone.
- Plan a practical step-by-step from sample to final paint job.
- Leave a Reply Cancel reply and note safety: ventilation, mask, and fumes warnings.
Table of Contents
- Introduction
- Key takeaways
- Quick Overview: Why Oak Cabinets Need Special Color Decisions
- Establish the Design Hierarchy Before Picking a Color
- Best Paint Colors and Tones for Different Oak Types
- Paint Finish, Sheen, and Durability for Cabinets
- How to Test Paint Samples Effectively and Affordably
- Practical Step-by-Step Plan from Selection to Painting
- Common Mistakes to Avoid and Troubleshooting
- Tools, Materials Checklist and Cost Considerations
- Conclusion
- FAQ
Quick Overview: Why Oak Cabinets Need Special Color Decisions
Oak brings a warm, honeyed base to cabinets, and that warmth shifts with stains, paints, and the lighting you use in your kitchen or shop. Its bold grain pattern — the growth rings and occasional blotch potential — can make colors either vanish, pop, or fight with the grain depending on finish and angle. Aging and patina matter too, because sunlight and time can deepen amber tones or yellowing, nudging your long‑term color choices toward or away from the vibe you start with.
That’s why testing is not optional, it’s essential: swatch finishes on real cabinet samples, trying matte, satin, and gloss, and watching under daylight and typical bulbs before you commit. The goal is a practical color strategy that aligns with oak’s warmth and grain, avoids cool or stark shades, and keeps sheen and hardware harmonized over time. Do the legwork now, and you’ll save rework later when you notice a color shift you didn’t expect as the room evolves.
Oak characteristics that influence paint
When choosing a paint color for your oak cabinets, consider the wood’s natural characteristics. Oak has warm undertones ranging from red to golden to neutral. These tones can shift the perceived color of stains, paints, and even lighting.
Oak is known for its bold grain pattern, with visible growth rings and potential blotching. This means that when you paint oak cabinets, the grain might still show through, or it could pop depending on the color and finish you choose. Some colors may even reveal more grain than others.
Testing is crucial here. Swatch different colors on actual cabinet samples to see how they interact with the oak’s natural tones and grain pattern. This way, you can make an informed decision before committing to a full paint job.
When to paint oak vs. refinish or stain
Before you decide to paint your oak cabinets, consider these factors:
Desired look: Painting can give a more uniform, modern look while staining or refinishing highlights the natural grain and color of the wood.
Cost: Refinishing or staining may be cheaper than painting, as it requires fewer materials. However, if your cabinets are in poor condition, you might need to repair them before refinishing, which could even out the costs.
Durability: Paint is generally more durable and easier to clean than stain or finish. If durability is a priority, painting might be the way to go. However, if you prefer the feel of natural wood, staining or refinishing might be better.
Establish the Design Hierarchy Before Picking a Color
Define the design hierarchy by naming fixed, high-impact elements—flooring, countertops, backsplash, and built-in wood tones—and decide how cabinet color should support or subdue them. Set an order of priority that guides color decisions rather than chasing aesthetics.
Then use the hierarchy to guide a practical test plan: swatches around the room, check at different angles and lighting, and compare matte versus satin textures. This matters because it keeps color choices anchored in real materials and space, so you don’t end up with a cabinet shade that fights the floor or countertops.
Assess fixed features and lighting first
Before you pick up a paint swatch, take a good look around your kitchen. The light bouncing off your countertops, the color of your flooring, even the way your backsplash catches the sun – these are all crucial elements that’ll guide your cabinet color choice.
The lighting in your space is key. Natural light can make a color look different at different times of day. Artificial light can change it too. So, consider both when you’re making your decision.
Your flooring, countertops, and backsplash – they’re all part of the big picture. Your cabinet color should either complement or contrast with these elements, depending on the look you want. But it shouldn’t clash.
Choose the mood you want the kitchen to convey
The color of your oak cabinets can set the tone for your whole kitchen. So, think about the mood you want to create.
For a calming atmosphere, consider soft blues or greens. They can help open up small spaces and make them feel more relaxed.
If you’re after a warm, inviting feel, think about rich reds, oranges, or yellows. These colors can make your kitchen feel cozy and welcoming.
For a modern look, consider neutrals like grays or blacks. They can create a sleek, sophisticated atmosphere. Or, for an eclectic vibe, mix and match different shades and finishes.
Best Paint Colors and Tones for Different Oak Types
Color choices should be tied directly to oak type: warm or golden oak, red oak, and neutral or grayish oak each carry undertones that push you toward different color families and contrasts. For warm oak, expect that creamier whites and soft yellows will blend gracefully, while deeper taupes can create a cohesive, low-contrast look; red oak often benefits from cooler beiges and gentle grays to temper its warmth, with stronger contrast possible against chalky whites; neutral oak invites cooler neutrals and muted greens or blues for a balanced, contemporary feel. Keep in mind that the mood you want—bright and open or layered and cozy—drives whether you blend with the wood or choose a contrasting lane.
Think in color families and test in layers: 2–3 color families per oak type, with 1–2 shade options from each family, then assess finish and sheen because eggshell versus satin can shift mood and perceived warmth. Do patch tests on bare wood, then large swatches on the wall, and place samples in different lighting to see how they age through the day; use that workflow to avoid common missteps like overmatching or underscanning the space. Quick decision guidance: let lighting, room function, and existing fixtures steer you toward the side of blending or contrast, and keep a short FAQ handy to resolve common confusions about oak undertones and color-conflict scenarios.
Warm oak recommendations (what to avoid and why)
Avoid colors that accentuate the yellow/orange undertones in warm/golden oak. Here are some mistakes to steer clear of:
- Bright Yellows: They’ll make your cabinets look like they’re glowing.
- Oranges: These can intensify the orange hues, creating an unbalanced look.
- Dark Browns: Deep browns can clash with warm oak’s natural color and make the space feel heavy.
- Jewel Tones: Rich blues, greens, or purples may overwhelm your cabinets’ warmth.
Instead, opt for neutral whites, creams, or soft grays that complement rather than compete with warm oak’s undertones.
Neutral or red-tinged oak options
For neutral/gray-ish or red-tinged oak, consider cool neutrals and muted colors to balance the warmth. Here are some suggestions:
Cool Neutrals: These help tame any red undertones. Think light grays, beiges with a hint of gray, or even soft whites.
Muted Greens/Blues: Subtle shades of these colors can complement red oak without overpowering it. Opt for greens with gray undertones or blues that lean toward gray.
Greiges: This blend of gray and beige works well with both neutral and red-tinged oak, providing a soft, balanced look.
Two-tone and accent color strategies
To modernize oak without full coverage, consider using paint for islands, uppers vs. lowers, or open shelving.
Islands: Paint your island a contrasting color to create a focal point and update the space.
Uppers vs. Lowers: Paint upper cabinets one color and lower cabinets another for visual interest. This works especially well with different oak types in the same room.
Open Shelving: Paint shelves a contrasting color to draw attention away from the natural wood and toward your dishes or other items on display.
Paint Finish, Sheen, and Durability for Cabinets
Sheen levels on oak cabinets dramatically alter how the color reads and how the wood’s grain shows or hides itself, while also steering durability and cleanability. Matte, satin, semi-gloss, and gloss each shift depth and warmth, so pick based on lighting, traffic, and how much grain you want to emphasize, with finishes that suit painted or stained surfaces for the best long-term result. For most kitchens, select a finish that balances appearance with ease of cleaning, and always confirm compatibility with the oak and the intended color from the label or manufacturer instructions.
This matters because your choice affects scratches, wear, and maintenance while shaping the room’s style from modern to traditional, especially with light neutrals or bold colors where gloss changes can amplify depth. Practical work means testing swatches on OEM oak veneer under nearby lighting, simulating everyday cleaning, and watching for color shift, gloss buildup, or grain telegraphing through the finish over time; then plan a topcoat or glaze if durability or appearance needs a boost. In everyday use, steer DIYers toward finishes that clean easily and withstand routine cleaning, avoid aggressive solvents unless approved, and check the label for cleaning recommendations and recoat guidance to keep cabinets looking their best.
Sheen comparisons (matte vs satin vs semi-gloss)
Sheen affects how your oak cabinets look and feel. Here’s what each sheen brings to the table:
Matte: Softens grain, hides imperfections. Great for modern looks, low-light areas.
Satin: Balance between matte and gloss. Hides minor flaws, reflects some light. Versatile, works in most kitchens.
Semi-gloss: Highlight grain, shows wear. Best for traditional styles, well-lit spaces. Easy to clean.
Paint types and durability (acrylic, alkyd, cabinet-specific)
Different paints have different lifespans. Here’s what to consider:
Acrylic: Water-based, low VOCs. Good for DIY, but may not last as long on high-traffic cabinets.
Alkyd: Oil-based, durable. Great for longevity, but has strong fumes and longer drying times.
Cabinet-specific: Designed for longevity, easy application. Often waterborne, combines best of acrylic & alkyd. Ideal for kitchen cabinets.
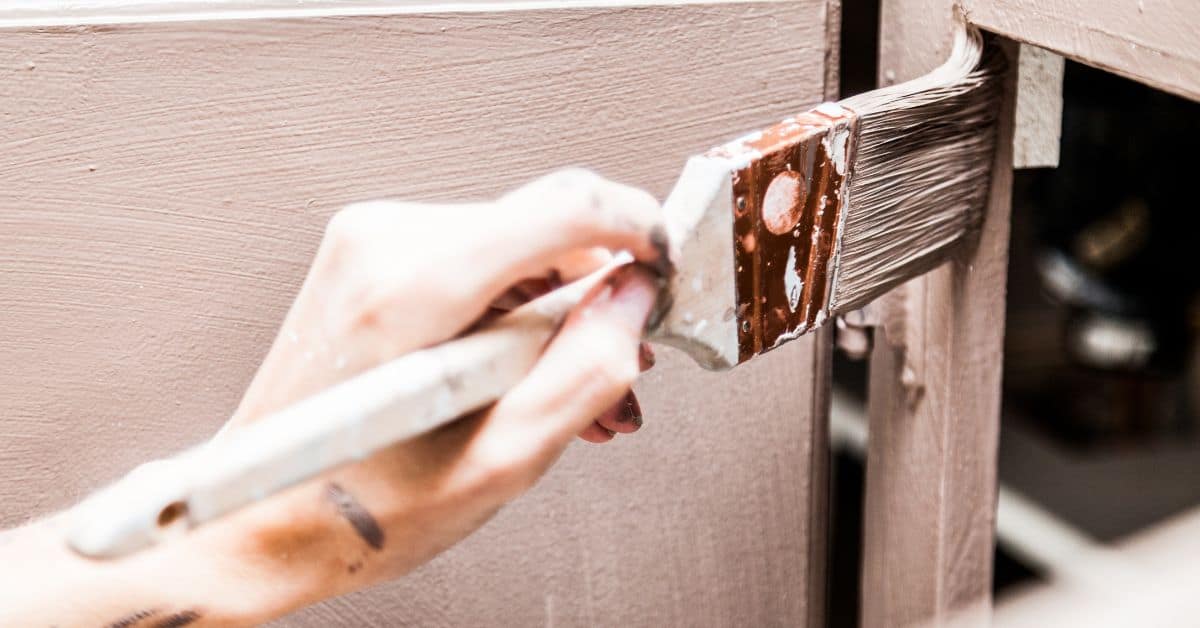
How to Test Paint Samples Effectively and Affordably
This plan uses small, transferable panels and real-life contexts to test finishes before you commit. Set up on actual oak surfaces like cabinets and on primer-coated samples, and compare across multiple wall areas. Test under different light times using economical options such as standard paint sample pots, peel-and-stick color swatches, and budget prepainted boards to compare finishes and sheens.
Keep a simple log: note color, sheen, drying behavior, and any wood-bleed or tannin effects, and photograph each test area with calibrated lighting. Use the results to narrow to 2 or 3 finalists with clear rationale, focusing on color neutrality, contrast with oak, and warmth. Repeatability matters, so mirror the plan on other oak surfaces or primed samples and avoid common missteps like testing on unprimed oak or chasing gloss that clashes with existing lighting.
Step-by-Step Process
Follow these practical steps to test paint samples effectively and affordably, ensuring you make the right choice for your oak cabinets.
- Prepare your workspace: Lay down drop cloths, ensure proper ventilation, and have safety gear (gloves, goggles) ready.
- Gather materials: Collect paint samples, test panels, painter’s tape, primer, brushes, and a notebook for recording observations.
- Create test panels: Paint or apply peel-and-stick swatches onto small, transferable panels, cabinet doors, or primed samples to mimic real-life conditions.
- Place test panels strategically: Position them on cabinets, adjacent walls, and other relevant areas. Observe under morning, midday, and evening light.
- Record observations: Note color, sheen, drying time, wood-bleed effects, and photograph each test area with consistent lighting. Clean up once testing is complete.
Preparing Test Panels and Placement Tips
Create representative test swatches and place them strategically for accurate color reading.
Use small, transferable panels or cabinet doors to mimic the actual surface. Apply paint samples using a brush or roller for even coverage.
For primed samples, apply paint directly. With unprimed oak, use a primer-sealer first to prevent tannin bleed and ensure accurate color representation.
Place test panels on cabinets, adjacent walls, and other relevant areas. Observe under different light sources and angles to simulate full-room outcomes.
What to Look for During a Multi-Day Test
Observe your test samples over several days to make informed decisions about color and sheen.
Check for undertone shifts at different times of day. Observe how the paint interacts with natural and artificial light, and how it complements or contrasts with your oak cabinets.
Pay attention to sheen perception. Matte finishes may appear flatter under harsh lighting, while glossier sheens can highlight imperfections in the wood grain.
Live with your samples for at least a week before deciding. This allows you to assess how the color affects the overall mood of the space and whether it complements fixed features like countertops or flooring.
Budget-Friendly Sampling Strategies
Implement these cost-saving tactics to test paint samples without breaking the bank.
Use tester quarts instead of full-sized gallons. These smaller containers offer enough product for multiple test panels and allow you to try different colors with minimal waste.
Paint cabinet door interiors or apply peel-and-stick swatches to see how the color looks from within the cabinet space. This helps you visualize the final result without committing to a full repaint.
Swap out trim colors temporarily using removable paint samples or peel-and-stick boards. This lets you test how different trim colors complement your chosen cabinet hue before investing in a full repaint.
Practical Step-by-Step Plan from Selection to Painting
This step-by-step plan guides you from picking a color to finishing with paint on oak cabinets. Start by choosing a color family (warm, cool, or neutral) that balances the oak undertones and sets your desired contrast, then buy samples and swatches to test. Include a quick decision point at each checkpoint before moving on to prep and paint.
Plan procurement and testing: you’ll paint on an oak sample panel, compare under daylight and interior lighting, and run simple wipe or scuff tests to document results. Then outline prep, priming, and painting steps with rough sequencing and how long things take to dry or cure, and pick a finish (gloss, satin, or matte) with regard to cabinet use. Every phase has clear checkpoints to confirm color, finish, hardware compatibility, and to schedule the final paint job.
Step-by-Step Process
Follow this clear, numbered sequence to transform your oak cabinets from start to finish.
- Preparation: Gather tools, safety gear, and materials. Check for any damaged areas on the cabinets.
- Safety checks: Ensure no one will disturb you while painting. Cover nearby surfaces with drop cloths.
- Main work: Apply paint in thin, even coats using a brush or roller. Allow drying time between coats (usually 2-4 hours).
- Final touches: Lightly sand between coats for a smooth finish. Wipe off dust and apply touch-ups if needed.
- Cleanup: Wash brushes and rollers thoroughly. Dispose of paint and solvent materials responsibly.
Surface prep and priming essentials
Thorough surface preparation ensures your paint adheres well to the oak cabinets.
Start by cleaning the surfaces with a degreasing cleaner. Let it dry completely.
Next, use fine-grit sandpaper (120-150 grit) to lightly sand the surface. This helps paint adhere better and creates a smooth finish.
Wipe off dust with a damp cloth, then let it dry. Apply a high-quality primer suitable for oak and cabinetry. This seals the wood and provides a uniform base for painting.
Application tips and safety considerations
Choose your application method wisely: brushes offer control, rollers speed, and sprayers convenience. Use a high-quality paint suitable for cabinets.
Ventilation is crucial when painting. Open windows or use fans to keep the area well-ventilated. Wear a respirator to protect against fumes.
Always follow the manufacturer’s instructions for safe handling and disposal of paints and solvents. Store materials safely out of reach of children and pets.
Common Mistakes to Avoid and Troubleshooting
Common mistakes include choosing color by a small chip, ignoring how sheen interacts with oak, and skipping real oak testing under multiple lighting. Always test on real oak with large swatches, compare undertones, and check depth before committing. Plan for stain-blocking primer and light sanding to prevent tannin bleed.
Why it matters: oak reads color differently in real rooms and lighting, and sheen can make grain pop or fade. Quick fixes: if color shifts after topcoat, allow full cure and recoat with a compatible finish; if gloss or flat looks off, use a compatible sealer or re-sand and recoat; if coverage is blotchy, add a second coat or upgrade your roller/brush.
When the color pulls too warm or yellow
Oak cabinets can sometimes make paint colors look warmer and more yellow than they appear on a chip. This is due to oak’s natural undertones.
To correct this, consider adjusting the hue towards cooler tones or adding a cool undertone to your chosen color. For instance, if you’re considering a warm beige, try a cool gray-beige instead.
Changing the sheen can also help. A higher gloss sheen will reflect more light and make colors appear brighter, while a matte finish can mute them down.
Fixes for adhesion, chipping, or uneven finish
If your paint isn’t adhering well, is chipping, or has an uneven finish, don’t panic. Here are some fixes:
Re-sand: Lightly sand the affected areas with fine-grit sandpaper to smooth out any rough spots and improve adhesion.
Re-prime: If you’re using a latex paint, make sure your primer is also latex-based. A bonding primer can help with adhesion issues. For oil-based paints, use an oil-based primer.
If the problem persists, it might be time to consult a pro. They can provide expert advice tailored to your specific situation and ensure any touch-ups don’t leave visible repair lines.
Tools, Materials Checklist and Cost Considerations
This section lays out a practical tools, materials, and cost checklist for repainting oak cabinets, with a focus on keeping you organized, on budget, and moving from prep to finish without guesswork. List the hand tools you actually need (tape measure, utility knife, sanding block), the power tools you should have (deglosser, sander with 120–220 grit, cordless drill), the application gear (wax/paint roller, angled sash brush, mini rollers, foam rollers), and the safety gear (gloves, respirator, eye protection), plus a rough sense of price ranges you can verify locally. Materials cover primer appropriate for oak, whether you choose a stain-blocking or bonding type, compatible water- or oil-based paints or stains, plus sanding supplies, painter’s tape, drop cloths, caulk, wood filler, wood conditioner if needed, and a durable clear topcoat; note the sheen options (satin vs. semi-gloss) for kitchens.
Approximate sample costs are given as rough project totals, but you should verify exact prices for tools (rental vs. purchase), primer, paint, finish, brushes, and hardware by checking local suppliers. Budget guidance helps you decide between DIY and a pro repaint by weighing surface prep and multiple coats against time, labor rates, and potential rework, and it reinforces the value of good prep for a durable finish. Check local paint suppliers for current prices, bulk deals, and quotes from 2–3 sources to tighten the budget.
Must-have tools and recommended products
Use this checklist before starting your painting project to ensure you have everything needed for a smooth job.
- Sander (Orbital or Random Orbital): For smoothing surfaces. Check it has a suitable grit (60-120) and is in good working condition.
- Deglosser: To prepare surfaces for paint. Ensure it’s compatible with your surface type (wood, metal, etc.).
- Paint Brushes: Natural bristle for oil-based paints, synthetic for latex. Check bristles are secure and not splayed.
- Paint Rollers: 9″ or 12″, 3/8″ or 1/2″ nap. Ensure they’re suitable for your paint type (latex, oil) and surface texture.
- Primer: Essential for adhesion and coverage. Check it’s compatible with your paint type and surface.
- Cabinet Paint: High-quality, 100% acrylic latex is recommended. Check it’s suitable for your project (kitchen cabinets, trim, etc.).
- Respirator: Protects from fumes and overspray. Ensure it fits well and has a suitable filter (P100 or N95).
- Drop Cloths: Heavy-duty, canvas or plastic. Check they’re large enough to protect your floor.
Quick rule: When in doubt, rent tools rather than buying cheap ones that could cause rework.
Time and cost-saving tips
Use this checklist before starting your concrete project to save time, money, and avoid common mistakes.
- Check weather forecast: Ensure no rain is expected for at least 24 hours after pouring. Wet concrete can’t cure properly.
- Inspect forms: Check for any damage or leaks. Replace or repair as needed to prevent costly leaks and improper curing.
- Measure rebar spacing: Ensure it’s within the recommended range (usually 6″ to 12″) to provide adequate strength. Too close can cause cracking, too far apart weakens the slab.
- Batch prep tasks: Gather all tools and materials before starting. This saves time and prevents trips back and forth.
- Paint doors off-frames: Before pouring, remove door frames and paint them elsewhere to save time and prevent mess on the job site.
- Check water-to-cement ratio: Aim for 4-5 parts water to 1 part cement. Too much water weakens concrete, too little makes it hard to work with.
- Negotiate quotes (if hiring): Get multiple quotes and negotiate terms to save money without sacrificing quality.
- Check finish tools: Ensure trowels, floats, and edgers are in good condition. Damaged tools can leave marks or cause improper finishing.
Quick rule: Always check your work as you go. A few minutes spent inspecting can save hours of rework later on.
Conclusion
Take action with confidence by focusing on safety, proper testing, and durable results that look right in the space you use every day. The right color on oak cabinets comes from a simple plan, not guesswork, and a careful test now saves expensive mistakes later.
As you move forward, say these steps aloud and follow them in order: choose a color range that complements the oak type, test samples in the actual lighting and on similar surfaces, evaluate finish options for durability and cleanability, then commit to a practical step-by-step painting plan and budget. Start with small test patches in a discreet spot, compare under different light, verify the surface is clean and prepped, and keep to a clear surface prep and application routine before rolling on color everywhere.
Common mistakes to avoid include skipping proper prep, overloading brush or roller with paint, and choosing a color that looks wrong in your lighting or on the grain. A simple safety rule is to always ventilate the space, wear a mask when sanding or spraying, and test on a hidden area first to catch adhesion or compatibility issues before you commit. If the job involves extensive cabinet removal, structural work, or you see rotten wood, step back and plan a professional path instead of forcing a DIY fix.
If the project starts to feel overwhelming or you uncover hidden damage, it makes sense to call a pro rather than press on. When in doubt, aim for clean prep, conservative color choices, and staged testing, then finish with steady, controlled coats. Stay practical, stay safe, and you’ll finish with cabinets that endure and look sharp. You’ve got this to the finish line.
FAQ
How does lighting affect my oak cabinet color choices?
Light changes how paint looks. Natural light shifts during the day; artificial light can bias warm or cool tones. Check samples under the room’s typical lighting before committing.
Should I test paint samples in different lighting conditions?
Yes. View samples near the cabinet location in morning, noon, and evening if possible. Do another check under the kitchen’s main lamps or task lighting before deciding.
What sheen should I pick for kitchen cabinets with oak grain?
Choose a sheen that is easy to clean and hides flaws. Higher sheens show grain more, lower sheens hide it but can be harder to wipe. If in doubt, test the finish you’re considering on a small door or panel.
What should I look for when matching paint to oak grain and room mood?
Match the wood’s warm or cool undertone to your wall color and fixtures. Consider how the room will feel with the final color and how durable you need the finish to be in a kitchen. Always test in the actual space before buying large amounts.