
Introduction
The right moisture meter depends on your material, and using it correctly is straightforward.
You’ll learn how to choose between common types and steps for accurate readings, plus practical tips to interpret results and avoid common errors.
Key takeaways
- Understand why accurate moisture readings prevent wood rot and structural failure.
- Different meters assess moisture chemically, capacitively, or resistance; choose by material.
- Verify supplier reputation and model compatibility with your material types and temperature.
- Calibrate meter with known samples and document baseline readings for accuracy.
- Follow stepwise measurement procedure, ensuring surface dryness and correct probe depth.
- Store and maintain meters, clean probes, and replace batteries as needed.
Table of Contents
- Introduction
- Key takeaways
- Why Moisture Measurement Matters
- Types of Moisture Meters and How They Work
- How to Choose a Reputable Supplier and the Right Model
- Preparing to Measure: Materials, Temperature, and Visual Checks
- How to Take Accurate Moisture Readings — Step-by-Step
- Verifying and Calibrating Your Meter
- Common Mistakes, Troubleshooting, and Maintenance Routine
- Practical next steps and trusted sources
- Conclusion
- FAQ
Why Moisture Measurement Matters
Moisture measurement matters because moisture content drives how wood, concrete, drywall, soil, and finishes behave. When readings are off, you can spoil materials, waste money, and stall the project. Accurate moisture checks help you pick targets and avoid surprises.
Moisture levels guide decisions across woodworking, restoration, agriculture, construction, and mold prevention. Inaccurate readings lead to material spoilage, wasted material, delays, and hidden damage that surfaces later. Getting it right protects finishes, reduces rework, and helps your project stand the test of time.
Common applications and target moisture ranges
In woodworking, kiln-dried lumber typically aims for a moisture content of around 6-8%, while in-place building materials like flooring or framing should be closer to the local equilibrium moisture content (EMC) to prevent warping or cracking. For concrete, testing before finishing is crucial; moisture levels above 4% can lead to surface defects and poor adhesion of finishes.
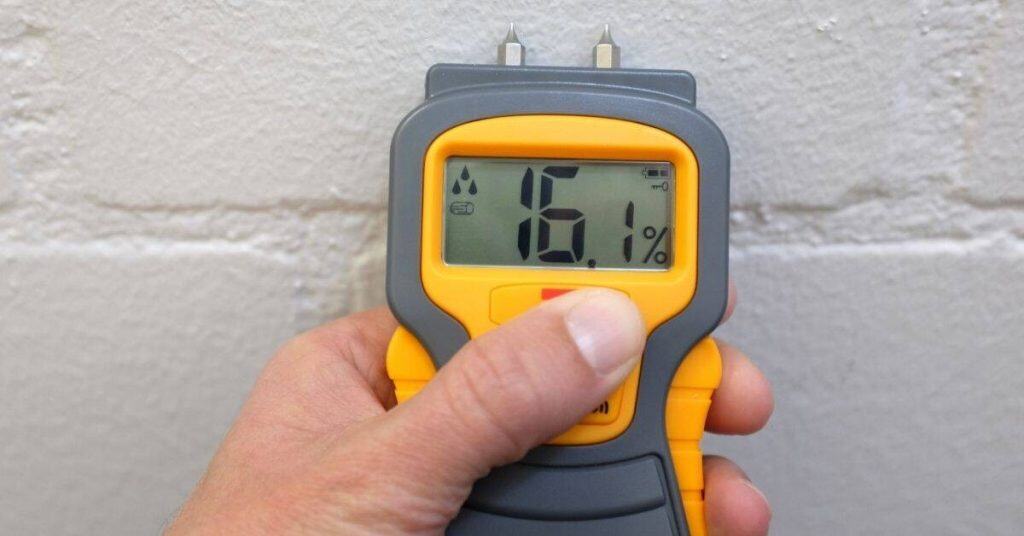
In restoration work, accurate moisture readings are essential for assessing mold risk. A reading over 18% in a wall cavity often indicates the presence or potential for mold growth. In agriculture, soil moisture is key; soil should be at field capacity, which varies by crop but generally means it’s moist enough to support plant roots without being waterlogged.
Different materials have their own specific targets: hardwood floors need a tight range of 6-8%, while gypsum drywall can tolerate slightly higher moisture levels. Understanding these ranges helps ensure that your project meets quality standards and avoids costly mistakes down the line.
How accuracy affects outcomes
Inaccurate readings can lead to significant issues, such as finish failure on concrete or wood surfaces. If you don’t test properly before applying a finish coat, moisture trapped beneath it can cause bubbling and peeling, leading to costly rework. In construction, even small errors in moisture measurement can result in structural damage over time.
Misreading the moisture content of wood during installation can lead to warping or cracking as the material adjusts to its environment. Similarly, failing to accurately assess soil moisture for crops can cause yield loss due to under- or over-watering. In restoration projects, inaccurate readings might miss hidden mold growth, leading to health risks and further structural damage.
By selecting a reliable moisture meter and using it correctly, you protect your investment in materials and labor. Ensuring that finishes adhere properly, structures remain sound, and crops thrive all hinge on getting the moisture measurement right from the start.

Types of Moisture Meters and How They Work
There are three main meter types: pin/contact meters, pinless/scanning meters, and specialized meters for grain, drywall, and concrete. Pins measure moisture by resistance and need probes that touch the material; pinless meters scan with RF/impedance and read surface moisture quickly; specialized meters use material-specific sensors to target drywall, grain, or concrete. Choose the tool based on what you’re checking and how you’ll use the reading.
In practice, match the tool to the task: quick surface check with pinless, or deeper/system-specific readings with specialized meters. Calibration and temperature compensation matter, so check the label or datasheet for guidance and keep probes clean between readings. Record readings and store the meter properly to keep it trustworthy over time.
Pin-type meters: pros, cons, and ideal uses
Pin-type moisture meters work by measuring electrical resistance between two pins inserted into the material. When you push the pins in, they make contact with the surface and measure how much current flows through it. This tells you if there’s moisture present because water conducts electricity better than air or dry wood.
The pros of pin meters are that they give precise spot readings and can detect moisture levels down to a fraction of an inch deep. They’re great for checking specific areas where you suspect issues, like around windows or plumbing fixtures. But there’s also a downside: the pins leave small holes in the material, which isn’t ideal if you’re working with surfaces that need to look perfect.
Another thing to watch out for is ensuring good contact between the pins and the surface. If the surface is rough or dirty, it can give false readings. Clean the area before testing and make sure the pins are fully inserted to get accurate results.
Pinless (non-destructive) meters: pros, cons, and ideal uses
Pinless moisture meters use a sensing pad or radio-frequency technology to scan the material without leaving holes. They work by sending out an electromagnetic field that penetrates the surface and measures how much it’s dampened by moisture.
The pros of pinless meters are they’re non-destructive, so you can test large areas quickly and easily. They’re perfect for checking walls or floors where you need to know if there’s widespread moisture without damaging the material. But these meters aren’t as good at detecting deep-seated moisture or pinpointing exact locations.
Also, pinless meters have limitations with very thick materials or when moisture is concentrated in a small area deep within the surface. They work best for scanning composite surfaces like drywall or concrete slabs where you need to know if there’s any dampness present but don’t require precise measurements.
Specialty meters (concrete, grain, drywall)
Specialized moisture meters are designed for specific materials like concrete, wood grain, or drywall. These meters have sensors calibrated to work best with the unique properties of each material. For example, a meter made for concrete will measure differently than one meant for wood because they conduct electricity in different ways.
The pros of using specialized meters are that they provide more accurate readings and can detect moisture content as a percentage rather than just presence or absence. This is crucial when you need to know exactly how wet something is, like before laying tile over concrete or installing drywall.
If you’re working with materials where precise measurements matter, it’s worth investing in the right meter for the job. General-purpose meters won’t give you the same level of detail and accuracy as a specialized tool designed specifically for that material.
How to Choose a Reputable Supplier and the Right Model
Choosing a reputable supplier and the right model starts with a solid vetting checklist. Look for clear signals of credibility like brand pedigree, years in business, third-party certifications, warranties, and transparent return policies. Then dig into the manufacturer’s quality controls, calibration traceability, and evidence of consistent production standards. Match the model features to your project needs—pin-type versus non-contact, concrete-specific moisture ranges, measurement depth, data logging, and how well it fits with your workflow. Don’t skip calibration support and service options, whether calibration is annual or event-based, and if service is on-site or mail-in, plus typical turnaround and costs you might face. Review the documentation and resources available, from manuals and quick-start guides to data sheets and warranty terms, and confirm there are clear repair or replacement procedures and online tutorials. Finally, assess after-purchase support and parts availability, such as responsive customer service, access to replacement probes or sensors, firmware updates, and straightforward return or exchange policies.
Step-by-Step Process
This sequence helps you pick a reliable supplier and the right moisture meter model for your needs.
- Research suppliers: Check their brand history, third-party certifications, and customer reviews to ensure they have a good track record.
- Contact potential suppliers: Ask about calibration support, warranty terms, and service options. Look for clear policies on returns or exchanges.
- Evaluate product features: Compare pin-type versus non-contact models based on your specific needs like measurement depth and data logging capabilities.
- Check documentation: Ensure the meter comes with comprehensive manuals, quick-start guides, and online tutorials to help you get started.
- Contact customer service: Ask about availability of replacement parts or sensors. Confirm they offer firmware updates and clear repair procedures.
Vetting suppliers and warranty/support
When choosing a supplier, look for industry experience, third-party calibration certifications, and clear product specifications. A good supplier should have a transparent return policy and offer reliable service options.
Ensure the meter comes with a solid warranty that covers both parts and labor. Look for suppliers who provide annual or event-based calibration services, either on-site or via mail-in options. Quick turnaround times and reasonable costs are also important factors to consider.
Responsive customer support is crucial. Make sure you can easily reach someone if you have questions or need repairs. Check that replacement probes or sensors are readily available and affordable.
Features to compare before buying
Before purchasing a moisture meter, compare its features carefully. Look at the measurement scale options, such as whether it measures in percentage or absolute values. Check if the meter can measure deep into materials like concrete.
Data logging capabilities are also important for tracking changes over time. Temperature compensation ensures accurate readings regardless of environmental conditions. Built-in calibration checks help maintain accuracy without frequent recalibrations.
Finally, consider the durability and construction quality of the meter. A rugged design can withstand tough jobsite conditions and last longer.
Cost vs. performance: safe guidance
Avoid making decisions based solely on price. While low-cost meters may seem attractive, they often lack the calibration support and warranty options of higher-end models.
Instead, focus on verifying the meter’s specifications and accepted accuracy ranges before purchase. Premium meters might cost more upfront but offer better performance and reliability over time.
Always check that a supplier offers clear calibration procedures and reliable service options to ensure your investment remains accurate and functional.
Preparing to Measure: Materials, Temperature, and Visual Checks
Before you measure, start with a clean, representative surface. Remove dust, loose concrete, curing compounds, oil, and sealers so the test spot reflects the structure. Let the substrate come to a stable ambient temperature and avoid measurements during heating or cooling.
Do a quick visual and hardware check: inspect the meter and probes for wear or damage, clean the probes per the manufacturer, check the battery, and confirm calibration or zero offset before testing. Use the correct meter type and settings for concrete and note any depth, calibration, or range controls per the manufacturer. Avoid coatings or moisture mischief—measure away from paint, epoxy, or glossy finishes, and keep measurements in a consistent micro-environment so results stay comparable.
Cleaning and storage best practices
Before each use, make sure your moisture meter is clean. Wipe down the pins or plates with a soft cloth to remove any dust or debris that could interfere with readings. If you’re using pin-type meters, also check for bent or damaged pins which can give false results.
Store your meter in a cool, dry place away from direct sunlight and moisture. Keeping it in a hard case is ideal. Neglecting to clean the meter regularly can lead to inaccurate readings over time, so make sure you have a routine for maintenance.
Avoid leaving the meter exposed to extreme temperatures or humidity levels. This can damage internal components and affect accuracy. Regularly check your battery level too; low batteries can also skew results.
Temperature and material corrections
The type of concrete or substrate you’re testing affects moisture readings, so it’s important to know the specific properties of each material. Temperature changes can also impact accuracy, especially if the surface hasn’t reached ambient conditions yet.
- Concrete: Use correction charts for different temperatures and materials; check manufacturer specs for temperature range.
- Masonry: Look for moisture content ratings specific to masonry. Avoid testing during extreme heat or cold.
- Wood: Adjust readings based on wood species and moisture levels; consult charts if unsure.
- Gypsum: Ensure gypsum is dry before testing; avoid wet conditions that can cause inaccurate results.
- Metallic surfaces: Use correction factors for metal, as it conducts differently than other materials. Check manufacturer guidance.
How to Take Accurate Moisture Readings — Step-by-Step
Take a repeatable, unit-agnostic approach to moisture readings by using the same steps for every zone and every day. Define a plan that covers multiple measurement points, specifies a fixed sample area, and sets depths or heights with consistent spacing so you cover the area without overlapping tests. Use a meter type you’re comfortable with, whether surface or pin/pinless, and keep the technique steady—same posture, same contact pressure, and same method of probe contact for every reading, then record everything in a simple, uniform way.
This matters because readings depend on substrate type and conditions, and consistency reduces operator drift that hides real moisture changes. Following a clear cadence—how many readings per zone, whether to swap sides, and how to avoid biased sampling near edges or joints—helps you compare zones reliably over time. Keep a straightforward data sheet or template with date/time, location, surface type, meter model, reading units, and any calibration or corrective factors, and perform pre-test checks, probe cleaning between tests, and post-test validation to catch drift. A quick one-minute audit and a simple visual/diagram guide make it practical to spot mistakes before you start, and a short summary cheat sheet helps you stay on track without slowing the job down.
Step-by-Step Process
This sequence ensures accurate moisture readings, from prep to cleanup.
- Check meter calibration and battery level. Ensure it’s ready for work.
- Select measurement points on the surface or substrate. Mark them clearly.
- Position the meter correctly: pin meters straight in; pinless meters flat.
- Take readings at each point, noting depth if necessary. Record data immediately.
- Clean probes between measurements to avoid cross-contamination of results.
- After all points are measured, review and log findings on a standardized sheet.
Taking multiple readings and spot strategy
For accurate moisture assessment, take at least three readings per area. Place them evenly apart to cover the surface thoroughly.
Identify potential moisture pockets by focusing on edges, joints, or areas showing signs of dampness. These spots often indicate hidden issues.
Average your readings for a reliable result. If there’s significant variation between points, take more samples in that area to pinpoint the issue.
Using pin vs pinless correctly
For pin meters, ensure pins penetrate straight and at consistent depths. Avoid tilting or bending them as this can skew readings.
With pinless meters, maintain steady contact with the surface using a smooth motion. Keep the scanning speed even to get reliable data.
Correct probe placement is key for both types. Pin meters should be perpendicular to the surface; pinless meters need full coverage without gaps or overlaps.
Recording and interpreting results
Note down all readings with location, depth if applicable, temperature, meter model, and any settings used. This data is crucial for analysis.
Compare your findings to established standards or target ranges specific to the material being tested. Drywall should be below 1%, concrete around 4-5%.
If readings are higher than expected, investigate further by taking more samples in that area. Consistent high readings indicate a moisture problem needing attention.
Verifying and Calibrating Your Meter
Verifying your meter’s accuracy is essential for reliable moisture readings, whether you’re a DIY homeowner or a pro. Different meters (pin vs non-contact/insertion) require calibration at different times, so check the manufacturer guidelines and plan when to test. Regular checks, using simple reference materials, help you catch drift before it costs you concrete quality.
You’ll get the most benefit by keeping a simple log, using occasional known reference blocks, and noting any temperature or handling issues that affect readings. That context helps you decide when recalibration or service is needed and keeps you from guessing. Avoid common mistakes like rough cleaning, exposing probes to heat, or misreading scaling—these undermine accuracy.
Using a Second Meter or Reference Device
To verify the accuracy of your moisture meter, grab another meter—ideally an identical one—and take readings side by side. This helps catch any discrepancies early on.
If you find significant differences between meters, check if environmental factors like temperature are affecting readings. Also, make sure both devices are set to the correct material settings and calibration modes as per manufacturer guidelines.
Interpreting discrepancies is key. If one meter reads consistently higher or lower than another on the same spot, it’s a red flag that needs addressing before you trust either reading fully.
Purpose-Built Testing Devices and Built-In Calibration Checks
For precise verification, use purpose-built testing plates or moisture content standards (MCS). These provide known reference points to compare your meter against.
Meters with built-in calibration features can also help. Follow the manufacturer’s instructions carefully for these checks. They often involve zeroing out the meter on a dry standard and then measuring a wet one to ensure accuracy.
Using these tools regularly keeps your readings reliable. Remember, consistency is key in concrete moisture testing, so don’t skip this step.
When to Send for Professional Calibration or Repair
If you notice inconsistent readings despite regular checks, it might be time to get your meter professionally calibrated. Physical damage like cracks or moisture ingress also signals a need for service.
Contact the manufacturer’s service center and explain the issues clearly. They’ll likely ask about specific symptoms such as erratic readings or visible wear on the probes.
Don’t wait until major problems arise; regular maintenance keeps your meter running smoothly and ensures accurate readings every time you use it.
Common Mistakes, Troubleshooting, and Maintenance Routine
Common mistakes wreck readings: picking the wrong meter type for the job, poor probe contact, skipping calibration, and hopping between measurement modes. Quick checks and a simple maintenance routine can prevent these errors from skewing results and wasting time. Regular cleaning and a clear calibration schedule help keep the meter accurate over its life.
This matters for DIYers because consistent care and a simple troubleshooting flow save you rework and guesswork. Knowing what to check, how to test reproducibility, and when to reference a calibration block keeps you honest about what the meter is telling you. A short maintenance log and proper storage prevent drift, damage, and surprises when you reach for the tool next time.
Top operator errors and how to avoid them
Avoid these common mistakes to ensure your moisture meter readings are accurate.
- Wrong meter type: Using a meter not suited for the material can give false readings. Always check compatibility before starting.
- Poor contact: Inadequate probe or plate contact leads to inaccurate results. Ensure full surface coverage and firm pressure.
- Rushing measurements: Taking quick, hasty readings without proper setup can skew data. Spend time setting up correctly for each reading.
- Neglecting corrections: Ignoring temperature or material-specific adjustments can lead to significant errors. Always apply relevant corrections as needed.
Maintaining these practices will keep your meter accurate and reliable.
Visual checkpoints and routine maintenance schedule
Use this checklist to ensure your moisture meter is in good working order before each use.
- Pins clean: Check for dirt or debris. Clean with a soft cloth if needed.
- Plates intact: Inspect plates for scratches or damage. Replace if compromised.
- Battery check: Ensure battery is fully charged and replace if low.
- Seals tight: Verify seals are secure to prevent moisture ingress.
- No visible wear: Look for signs of wear or damage on the meter body. Address any issues immediately.
- Clean probes: Regular cleaning prevents inaccurate readings due to contamination.
Quick rule: Perform a visual check before and after each use, and conduct a thorough maintenance review weekly.
Field troubleshooting flowchart (DIY)
If you encounter inaccurate readings, start by cleaning the probes thoroughly to ensure no dirt or residue is affecting your measurements.
Next, take multiple readings at different spots and compare them. Consistent results across various points indicate a reliable reading.
Check if environmental conditions like temperature are within acceptable ranges for accurate measurement. Adjust settings accordingly if necessary.
If issues persist, test the meter against a known reference or calibration block to verify its accuracy before considering professional service.
Practical next steps and trusted sources
Safety comes first when measuring moisture on concrete: inspect for live wiring, use insulated probes, and fit a GFCI where moisture contact is possible. Wear PPE if mold is suspected—gloves, eye protection, and a respirator when needed—and follow quick incident-prevention steps. Consult the relevant standards (such as ASTM F2170) and the manufacturer manuals for calibration charts and procedures before you start.
Keep a simple measurement log with date, location, readings, surface condition, and calibration status. Follow a concise workflow: surface prep, probe placement, lifting moisture from coatings, sample area, and recording ambient conditions. Use trusted sources like manufacturer tech notes and accredited trade resources for guidance, and defer to a licensed pro for interpretation when readings are unclear.
Safety tips for different environments
When working with moisture meters on concrete, always check for live electrical wires before probing. Use insulated probes and ensure you’re using a GFCI-protected outlet to prevent electric shock.
If mold is suspected in the area being tested, wear gloves, eye protection, and a respirator to avoid skin contact or inhalation of spores. Keep your work area well-ventilated and clean up any spills immediately.
Before starting, do a quick safety checklist: ensure all tools are insulated, inspect for electrical hazards, and have first aid supplies nearby in case of an incident. If you experience a shock or skin contact with mold, stop work immediately and seek medical attention.
Material specs, standards, and where to check them
The type of material being tested can significantly affect moisture measurement results. Always consult relevant industry standards before proceeding with testing.
- ASTM F2170: This standard specifies the correct procedures for measuring in-situ concrete moisture content. Follow it to ensure accurate readings and avoid common pitfalls like incorrect placement of probes.
- Local building codes: Check your local regulations regarding moisture levels in construction materials, especially when dealing with wood or flooring installations. Ensure compliance by verifying manufacturer correction charts for specific species and temperature ranges.
- Mold inspection guidelines: If mold is suspected, follow safety protocols to prevent contamination. Use appropriate PPE and ensure proper ventilation during testing.
Further reading, related posts, and subscribe prompt
To stay up-to-date with the latest tips and tricks for using moisture meters effectively, consider subscribing to our newsletter. We regularly update readers on new techniques and best practices.
Check out our related how-to guides such as measuring drywall moisture levels, testing grain storage conditions, and ensuring proper wood moisture content in woodworking projects. These resources will help you tackle a variety of scenarios with confidence.
Maintain your measurement log diligently by recording all readings, surface conditions, and calibration status. Bookmark our calibration chart and manual pages for easy reference during future tests to ensure accuracy every time.

Conclusion
Moisture work isn’t glamorous, but getting it right protects safety, keeps your project durable, and avoids costly mistakes down the line. When you measure correctly, you see what’s really going on and stop problems before they spread.
Run this check in plain language: verify you’re using the right meter for the material, confirm the meter is properly calibrated, prep the surface and temperature as needed, take readings in a consistent pattern, document the results, and compare them to safe thresholds from trusted sources before you act.
Avoid mistakes by not skipping calibration, not guessing from a single reading, not measuring over obviously damp or finished surfaces, and not ignoring temperature or material state. If readings show unknown moisture trends, or if you’re dealing with structural wood, concealed framing, or suspected mold, call a professional rather than press on. Stay focused, follow the steps, and you’ll finish with a dry, solid result you can trust.
FAQ
What type of moisture meter should I buy for wood?
Choose a meter that is made for wood or wood products. Look for pin or pinless options, and pick one with an easy reading scale. Check the manual for recommended wood species and moisture ranges.
Do I need a pin or pinless meter?
Pin meters are best for testing in bare wood and for checking internal moisture. Pinless meters work well on finished or rough surfaces and give a quick spot reading. If you work with both, get a model that covers both modes.
How do I test moisture with a meter?
Calibrate the meter first according to the manual. Make proper contact with the wood surface or insert pins as instructed, then read the display. Take multiple readings in different spots to get a reliable idea.
What are common mistakes to avoid?
Avoid skipping calibration. Don’t rely on a single reading in a large piece of wood. Don’t use a meter on damp areas or near metal, heat sources, or concrete without checking the manual.