
Table of Contents
- Introduction
- Understanding the Impact of Cold Weather on Concrete Curing
- Best Practices for Cold Weather Concreting
- The Importance of Preheating Water and Aggregates
- Step-by-Step Guide to Preheating Water and Aggregates
- Cost Implications of Using Winter Mixes and Additives
- Safety Precautions for Cold Weather Concreting
- Common Mistakes in Cold Weather Concrete Preparation and How to Avoid Them
- Understanding the Dangers of Freeze-Thaw Cycles in Concrete
- Planning Tips for Scheduling Concrete Projects in Cold Climates
- Conclusion
- FAQ
Introduction
To preheat water and aggregates for cold mixing, utilize heated storage tanks for water and insulated bins or steam heating for aggregates. This process is crucial in cold climates to ensure proper mixing and curing of materials, and in this article, you’ll learn step-by-step methods and tips for effective preheating.
Understanding the Impact of Cold Weather on Concrete Curing
Cold weather significantly impacts the curing process of concrete by slowing down the chemical reactions essential for hardening. Low temperatures can lead to delayed setting times and reduced strength, posing risks to the structural integrity of the concrete.
Understanding these challenges is crucial for anyone working with concrete in cold conditions, as improper curing can result in cracking and other structural issues. Monitoring temperature and moisture levels during the curing process helps prevent problems like freeze-thaw cycles, ensuring a durable and long-lasting concrete structure.
The Science of Concrete Curing
Concrete curing is all about chemistry. When water mixes with cement, a chemical reaction called hydration occurs. This process is what gives concrete its strength and durability. However, temperature plays a crucial role in how well this reaction takes place. In cold weather, the reaction slows down, which can lead to weaker concrete. To ensure your concrete sets properly, keep it warm enough for the hydration to happen effectively.
Cold temperatures can be a real problem. If the water in your mix freezes, it stops the hydration process altogether. This can leave you with a crumbly mess instead of a solid slab. To avoid this, you might need to use insulating blankets or heaters to maintain a suitable temperature. Remember, the goal is to keep the concrete above 50°F during the first few days of curing.
Don’t cut corners here. If the concrete doesn’t cure right, you’ll face issues down the line. Cracks, reduced strength, and surface defects are just a few problems that can arise. So, keep an eye on the weather and be prepared to take action. Proper curing in cold weather isn’t just about doing it right—it’s about avoiding costly mistakes later.
Common Cold Weather Challenges
When the temperature drops, concrete curing can hit a snag. One major issue is delayed setting. Cold weather slows down the chemical reaction in concrete, which means it takes longer to harden. This delay can throw off your timeline and leave your project vulnerable to damage from freezing temperatures.
Another problem is reduced strength. If concrete doesn’t cure properly, it won’t reach its full potential in terms of strength and durability. This can lead to cracks and other structural issues down the line. So, it’s crucial to monitor the temperature and take steps to keep the concrete warm.
Finally, watch out for surface defects. Cold weather can cause uneven curing, leading to scaling or spalling on the surface. To combat these challenges, consider using insulating blankets or heated enclosures to maintain a consistent curing environment. Remember, cutting corners now can lead to costly repairs later.

Best Practices for Cold Weather Concreting
Managing concrete projects in cold weather requires careful attention to maintaining optimal temperatures. Techniques such as preheating water and aggregates, using insulating blankets, and adjusting mix designs with accelerators are essential to ensure proper curing and strength development.
These practices are crucial for preventing delays and ensuring the structural integrity of the concrete. By monitoring curing temperatures and employing the right equipment, you can achieve successful results even in challenging conditions, safeguarding both the project timeline and safety on the jobsite.
Adjusting Your Concrete Mix
When the temperature drops, you need to modify your concrete mix to ensure it sets properly. Start by using a higher cement content. This increases the heat generated during curing, helping the mix to set even in cold conditions. You might also want to use a slightly lower water-to-cement ratio. This reduces the risk of the mix freezing before it sets.
Incorporate additives like accelerators to speed up the curing process. These additives are crucial because they help the concrete gain strength faster, reducing the time it spends vulnerable to cold weather. Avoid using calcium chloride as an accelerator if you’re working with reinforced concrete, as it can cause corrosion.
Consider using air-entraining agents. These create tiny air bubbles in the concrete, which improve its resistance to freeze-thaw cycles. Check your local supplier for specific products designed for cold weather concreting. Remember, the right mix adjustments can make all the difference between a strong, durable slab and a cracked mess.
Site Preparation Tips
Before pouring concrete in cold weather, make sure your site is ready to handle the chill. Start by ensuring the ground is not frozen. If it is, use ground heaters or insulated blankets to thaw it out. Pouring on frozen ground can lead to uneven settling and cracks. Check base compaction as well; a solid base is crucial for a stable slab.
Next, clear the site of snow, ice, and any debris. These can interfere with the concrete’s ability to bond and cure properly. If snow or ice melts, it can add unwanted water to your mix, affecting its strength. Keep your forms dry and warm by using insulated blankets or tarps. This helps maintain the right temperature for curing.
Plan your work to minimize exposure to the cold. Have everything ready before the concrete truck arrives. This means forms, rebar, and tools should be in place. Delays can be costly in cold weather, so keep things moving smoothly. Remember, timing is everything when working with concrete in the cold.
The Importance of Preheating Water and Aggregates
Preheating water and aggregates is essential for successful cold weather concreting. Cold temperatures can significantly hinder concrete curing and strength development, making it crucial to maintain optimal temperatures during mixing.
Using cold materials can lead to delayed setting times and reduced final strength, posing risks to the overall durability of the structure. Preheating helps prevent freeze-thaw damage and ensures that the concrete remains robust and long-lasting. For effective mixing and curing, it’s important to adhere to specific temperature thresholds when preheating materials.
Benefits of Preheating
Preheating water and aggregates is crucial when working with concrete in cold weather. It helps prevent freezing of the mix, which can lead to weak spots and cracking. When temperatures drop, water in the mix can freeze, causing expansion and disrupting the curing process. By preheating, you ensure that the mix stays at an optimal temperature, allowing it to set properly.
Another advantage of preheating is that it significantly improves the curing process. Warm materials help maintain a consistent temperature throughout the mix, which is essential for achieving the desired strength and durability. Remember, concrete needs warmth to cure effectively, so don’t skip this step if you want a solid, long-lasting result.
Lastly, preheating can save you time and money by reducing the risk of having to redo work due to poor curing. It’s a simple step that makes a big difference. So, make sure to check your materials and keep them warm before mixing. You’ll thank yourself later when your concrete stands strong against the elements.
Methods for Preheating
Preheating water is straightforward. Use a water heater or a hot water tank to bring the temperature up. Aim for about 140°F (60°C) to ensure it mixes well with the cold aggregates. Keep a thermometer handy to monitor the water temperature closely. If you don’t have access to a heater, consider using a propane torch to warm smaller quantities, but be cautious to avoid overheating.
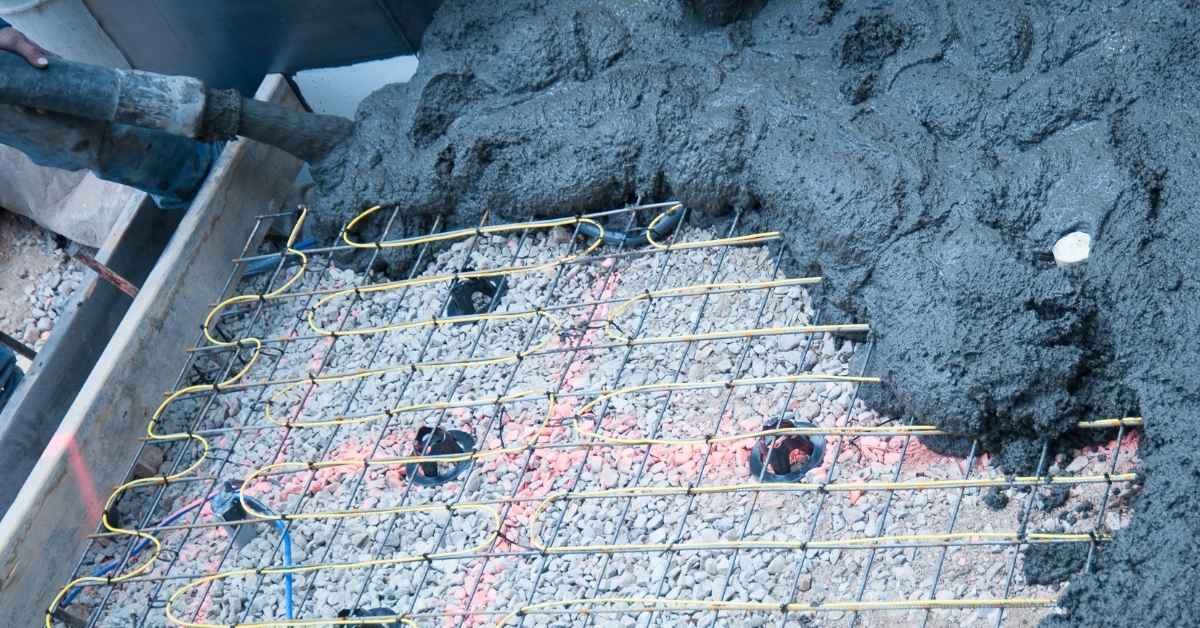
For aggregates, the key is to prevent them from freezing. Use tarps and insulated blankets to cover your stockpiles. If you have access to a steam generator, it’s a great tool for warming aggregates quickly. Just make sure to evenly distribute the heat to avoid creating hot spots. If you’re working on a smaller scale, consider using electric heating mats under the piles. They’re effective and easy to manage.
Remember, the goal is to keep everything above freezing. Check your materials regularly and adjust your methods as needed. Don’t cut corners here. Cold materials can ruin your mix and lead to weak concrete. Stick to these methods, and you’ll be on the right track.
Step-by-Step Guide to Preheating Water and Aggregates
Preheating water and aggregates is crucial for effective cold weather concrete mixing. This step-by-step guide will walk you through the necessary equipment and techniques to ensure your materials are at the optimal temperature for mixing.
Understanding how to properly preheat these components can significantly impact the quality and durability of your concrete. By following these instructions, you can avoid common pitfalls and ensure a successful project, even in challenging weather conditions.
Step-by-Step Layout Process
Let’s get your site ready by laying out a precise rectangle using string lines and the 3-4-5 method. This is crucial for ensuring your concrete pour goes smoothly.
- Drive the first stake into the ground at one corner of your intended rectangle.
- Measure and mark the desired length of the rectangle along one side, and place the second stake.
- Use the 3-4-5 method to ensure the corner is a perfect right angle. Measure 3 feet along one side from the first stake, 4 feet along the adjacent side, and adjust until the diagonal between these points is exactly 5 feet.
- Once the right angle is set, run a string line between the first and second stakes.
- Measure the width of the rectangle from the first stake, and place the third stake. Run a string line between the first and third stakes.
- Complete the rectangle by placing the fourth stake and running string lines to connect all stakes.
- Double-check the diagonals of the rectangle. They should be equal if the layout is square.
Common mistake: Don’t skip re-checking the diagonals. It’s easy to assume they’re correct, but even a small error can throw off your entire project.
Equipment and Tools Needed
To preheat water and aggregates effectively, you’ll need the right tools. These ensure the process is efficient and your concrete mix performs well in cold weather. Here’s what you’ll need:
- Water Heater: Essential for heating water to the desired temperature. Look for one with adjustable settings for precise control.
- Aggregate Heating System: Keeps aggregates warm. A portable heater or heated storage can do the trick.
- Thermometer: Crucial for monitoring temperatures. A digital one gives quick and accurate readings.
- Insulated Tarps: Helps retain heat in aggregates. Use them to cover piles and prevent heat loss.
- Concrete Mixer: Ensure it’s in good working order. A reliable mixer helps blend the heated components evenly.
- Protective Gear: Safety first. Wear gloves and goggles when handling hot equipment.
Pro tip: Choose tools that are easy to transport and set up on-site. This saves time and reduces hassle during the preheating process.
Detailed Preheating Procedure
First, ensure all your equipment is in good working order. This includes checking that heaters and thermometers are functioning correctly. Before you start, make sure the area is clear of any flammable materials. Safety is key, so always wear protective gear like gloves and goggles. Remember, preheating isn’t just about warming things up; it’s about doing it safely and efficiently.
Start by preheating the water. Use a water heater to bring the temperature up to the desired level. Aim for a temperature that will compensate for the cold conditions on site. Once the water is ready, move on to the aggregates. Spread them out in a thin layer and apply heat evenly. This prevents hot spots and ensures uniform temperature throughout the batch. Keep a close eye on the temperature to avoid overheating, which can cause moisture loss.
While preheating, constantly monitor the conditions. Use a thermometer to check temperatures regularly. If you notice any inconsistencies, adjust your equipment accordingly. Don’t rush this process. Taking your time ensures that both water and aggregates are at optimal temperatures before mixing. This attention to detail will make a big difference in the quality of your concrete.
Cost Implications of Using Winter Mixes and Additives
Understanding the cost implications of using winter mixes and additives is crucial for effective cold weather concreting. These specialized mixes often come with higher upfront costs compared to standard mixes, but they can significantly reduce the risk of concrete failure and the need for costly rework.
For those working on DIY projects or job sites, investing in winter additives can lead to long-term savings by ensuring durability and reducing delays. While the initial investment may seem high, the benefits of maintaining project timelines and minimizing labor costs make these additives a wise choice. Additionally, availability and pricing can vary by region, so it’s essential to source these materials strategically.
Budgeting for Winter Mixes
When planning for winter construction, it’s crucial to factor in the extra expenses that come with using winter-specific concrete mixes. These mixes often include additives that help the concrete cure properly in cold temperatures. Start by getting quotes from multiple suppliers to understand the price variations. Remember, the cheapest option isn’t always the best. Quality matters, especially in harsh conditions.
Consider the cost of additives like accelerators or antifreeze agents. These can significantly impact your budget. Make sure to account for them early on. If you’re unsure about the exact needs, consult with a professional who understands the local climate and conditions. This can prevent costly mistakes and ensure your project stays on track.
Don’t forget the potential costs of preheating water and aggregates. This step is crucial for successful winter pours and should be included in your budget. Look back at the earlier sections on preheating if you need a refresher. Skimping on these preparations can lead to poor results and even more expenses down the line. Plan wisely to avoid unnecessary setbacks.
Cost-Benefit Analysis
When considering winter mixes and additives, the upfront costs can seem daunting. However, it’s crucial to weigh these against the long-term benefits. Investing in additives and preheating techniques can significantly reduce the risk of project delays and costly repairs down the line. A little extra spent now can save a lot later by ensuring the durability and performance of your project.
Think of additives and preheating as insurance for your work. Yes, they add to the initial expense, but they also enhance the quality and longevity of your construction. Skimping on these can lead to poor results, which might mean redoing work or dealing with structural issues. In the end, the cost of redoing a job is often much higher than doing it right the first time.
Before deciding, evaluate your specific needs. Not every project requires the same level of preparation. Consider factors like local weather conditions and the scale of your project. Sometimes, the simplest solution is the best, but don’t cut corners if it compromises quality. Remember, a well-prepared site is a successful site.
Safety Precautions for Cold Weather Concreting
Ensuring safety during cold weather concreting is crucial for both worker protection and the quality of the finished product. Essential precautions include wearing appropriate personal protective equipment (PPE) like insulated gloves and boots, monitoring weather conditions to adjust work schedules, and handling heated materials with care to prevent accidents.
Understanding these safety measures helps prevent cold-related health issues such as hypothermia and frostbite, while also maintaining a safe and efficient worksite. Proper lighting, slip prevention, and emergency protocols are vital for minimizing risks and ensuring that the concreting process proceeds smoothly, even in challenging weather conditions.
Worker Safety Guidelines
When working with concrete in cold weather, keeping workers safe is just as crucial as the integrity of the concrete itself. Always ensure that everyone on site wears appropriate personal protective equipment. This includes insulated gloves, waterproof boots, and layered clothing to prevent hypothermia. Hard hats and safety glasses remain essential, regardless of the temperature.
Cold weather can make surfaces slippery, increasing the risk of falls. Regularly inspect and clear walking paths of ice and snow. Use sand or salt to improve traction. Ensure that all tools and equipment are in good condition and not compromised by the cold. If any equipment was covered in the ‘Equipment and Tools Needed’ section, check them thoroughly for any cold-related issues.
Finally, keep a close eye on workers for signs of cold stress, such as shivering or confusion. Rotate tasks to allow for warm-up breaks in heated shelters. Remember, a well-prepared team is a safe team, and cutting corners on safety is never worth the risk.
Ensuring Concrete Quality
When working with concrete in cold weather, maintaining its quality is crucial to avoid defects. Start by ensuring your mix design is suited for low temperatures. This means using winter mixes and additives, which you’ve budgeted for earlier. These mixes help concrete cure properly even when it’s cold outside.
Next, pay attention to the placement and compaction process. Check base compaction before pouring. A poorly compacted base leads to uneven settling and cracking. Also, make sure your forms are properly insulated to retain heat. This prevents the concrete from freezing before it gains enough strength.
Finally, monitor the curing process closely. Use insulated blankets or heated enclosures to keep the concrete warm. This step is non-negotiable. If concrete freezes during curing, it loses strength and durability. Regularly check the temperature of the concrete surface and adjust your insulation methods as needed.
Common Mistakes in Cold Weather Concrete Preparation and How to Avoid Them
Cold weather concrete preparation requires careful attention to avoid common pitfalls that can compromise the quality and durability of your project. Monitoring temperatures, maintaining the correct water-cement ratio, and ensuring proper insulation are crucial steps to prevent issues like improper setting and curing. Additionally, planning around weather forecasts and using accelerators correctly can significantly improve the outcome.
Understanding these factors is vital for anyone working with concrete in cold conditions, as they directly impact the structural integrity and longevity of the finished product. By avoiding these mistakes, you can ensure a smoother construction process and a more reliable result, saving time and resources in the long run.
Mistakes in Mix Design
Avoid these common mix design mistakes to ensure your concrete performs well in cold weather.
- Ignoring Temperature Effects – Cold weather slows down the hydration process. Use hot water or approved accelerators to maintain the right temperature for setting.
- Wrong Water-Cement Ratio – Too much water weakens the mix, especially in cold conditions. Stick to the recommended ratio and consider using water-reducing agents.
- Skipping Air-Entraining Agents – These agents help concrete resist freeze-thaw cycles. Always include them in your mix for cold weather applications.
- Using Inappropriate Aggregates – Certain aggregates can freeze and expand, causing cracks. Use aggregates that are suitable for low temperatures.
- Overlooking Additives – Additives can enhance performance in cold weather. Don’t skip them to save costs; they are crucial for durability.
Double-check your mix design to avoid these pitfalls. Proper preparation ensures your concrete withstands the cold and lasts longer.
Errors in Site Management
Avoiding these common site management mistakes can save you time, money, and headaches when working with concrete in cold weather.
- Poor Weather Monitoring – Ignoring the weather forecast can lead to unexpected delays and poor concrete curing. Always check the weather and plan accordingly.
- Inadequate Site Preparation – Failing to clear snow and ice from the site can weaken the concrete. Ensure the area is clean and dry before starting.
- Improper Material Storage – Leaving materials exposed to the cold can affect their performance. Store them in a warm, dry place to maintain quality.
- Neglecting Worker Safety – Overlooking safety gear and procedures can lead to accidents. Make sure everyone is equipped and follows safety guidelines.
- Ignoring Equipment Maintenance – Cold weather can be tough on tools. Regularly check and maintain equipment to prevent breakdowns.
Double-check these points to ensure your site is managed effectively and your concrete project succeeds, even in cold weather.
Understanding the Dangers of Freeze-Thaw Cycles in Concrete
Freeze-thaw cycles can wreak havoc on concrete structures, especially in cold climates. When water in the concrete freezes, it expands, creating internal pressure that can lead to cracks and surface damage. Understanding these risks is crucial for anyone working with concrete in cold weather. Proper preparation and maintenance can mitigate these issues and extend the lifespan of your concrete.
- Use Air-Entrained Concrete: Incorporate air-entraining agents in your mix. These create tiny air pockets that provide space for water to expand when it freezes, reducing internal pressure.
- Ensure Proper Drainage: Make sure your site has adequate drainage to prevent water from pooling on or around the concrete, which can exacerbate freeze-thaw damage.
- Apply Sealants: Use a high-quality sealant to protect the surface of the concrete from moisture infiltration, which is a primary cause of freeze-thaw damage.
- Monitor Weather Conditions: Keep an eye on the weather forecast. Avoid pouring concrete when a freeze is expected shortly after the pour, as this can prevent proper curing.
- Regular Maintenance: Inspect your concrete regularly for signs of damage. Early detection of cracks or scaling can allow for timely repairs, preventing further deterioration.
- Use Insulating Blankets: After pouring, cover the concrete with insulating blankets to maintain a stable temperature and protect it from sudden cold snaps.
- Consider Additives: Use chemical additives designed to enhance the freeze-thaw resistance of your concrete, especially in regions with frequent temperature fluctuations.
Planning Tips for Scheduling Concrete Projects in Cold Climates
Planning concrete projects in cold climates requires careful scheduling and strategic foresight. By assessing local climate patterns and historical temperature data, you can identify optimal windows for project execution. Incorporating buffer time for potential weather-related delays ensures that your timeline remains realistic and adaptable.
Utilizing technology and weather forecasting tools helps in monitoring conditions and making necessary adjustments to your plans. Coordinating with suppliers for the timely delivery of preheated water and aggregates can prevent disruptions. Having contingency plans in place for unexpected cold snaps or adverse weather conditions ensures that your project stays on track, minimizing costly delays and maintaining quality.
Timing and Weather Considerations
Choosing the right time for your concrete project in cold climates is crucial. Aim to schedule your pour during warmer parts of the day, typically late morning to early afternoon. This gives the concrete the best chance to set before temperatures drop at night. Always keep an eye on the weather forecast. Never pour concrete if a freeze is expected within 24 hours after your pour. Freezing can ruin the integrity of your concrete, leading to cracking and other issues.
Monitoring weather conditions goes beyond just checking the temperature. Pay attention to wind and humidity, as these can affect the curing process. High winds can cause rapid evaporation, leading to surface cracks, while high humidity can slow down the curing. If conditions aren’t ideal, consider rescheduling. It’s better to delay than to risk a poor outcome.
Remember, the success of your project heavily relies on timing and weather conditions. Don’t cut corners by ignoring these factors. If you’re unsure, consult with a professional who has experience with cold weather concreting. They can provide guidance on the best practices for your specific situation.
Project Management Strategies
When scheduling concrete projects in cold climates, you need to be flexible. Weather can change fast, so build some extra time into your schedule. If you plan for delays, you’re less likely to rush and make mistakes. Keep a close eye on the forecast. If a cold snap is coming, it might be better to wait a day or two rather than risk poor results.
Resource management is crucial. Make sure you have all the materials and equipment ready before starting. Running out of supplies halfway through a project is a recipe for disaster. Also, ensure that your team is well-prepared and understands the importance of timing in cold weather concreting. A well-coordinated team can adjust quickly to unexpected changes.
Communication is key. Keep everyone informed about the schedule and any changes. This includes your workers, suppliers, and even the client. If everyone knows what’s happening, it’s easier to manage expectations and avoid surprises. Remember, it’s better to be upfront about potential delays than to promise something you can’t deliver.
Conclusion
Preheating water and aggregates isn’t just a fancy step; it’s a necessity when you’re working with concrete in cold weather. Skipping this can lead to weak, cracked concrete that won’t last. Take the time to get it right, and you’ll save yourself a lot of headaches down the road.
Remember, the key is preparation. Make sure you have the right tools and materials ready before you start. Follow the steps for preheating carefully, and don’t rush the process. Cutting corners might seem like a time-saver, but it often leads to costly mistakes.
Lastly, always keep safety in mind. Cold weather concreting can be tricky, and it’s easy to overlook safety precautions when you’re focused on getting the job done. Stay warm, stay safe, and your project will turn out just fine.
FAQ
Why should I preheat water and aggregates?
Preheating helps prevent the mix from freezing in cold weather. It ensures a better bond and stronger final product.
Can I use hot water from my tap?
Yes, but don’t overdo it. Water that’s too hot can weaken the mix. Aim for warm, not boiling.
Is it okay to skip preheating if I’m in a hurry?
Skipping preheating is a bad idea. It can lead to weak spots and cracks. Take the time to do it right.
What’s the best way to preheat aggregates?
Spread them out in the sun or use a space heater. Just make sure they’re warm to the touch before mixing.
Can I preheat everything together?
No, keep water and aggregates separate until mixing. Combining them too early can cause uneven heating and poor results.