
Introduction
Keeping concrete tools from rusting means cleaning, drying, and storing them properly to prevent corrosion. This article walks you through practical steps you can take after a cement job to reduce rust on rakes, trowels, chisels, and other gear. You’ll learn how to clean concrete residue, dry thoroughly, and choose a simple storage setup.
Oil can protect metal, but using it incorrectly can cause finish defects on tools or mis-treat concrete surfaces. Use clean rags, apply thin coats only where needed, and keep oils away from the working faces to avoid staining or slick spots. Check manufacturer guidelines and local rules for any restrictions or specific instructions.
Key takeaways
- Rinse tools immediately after use to minimize concrete residue and rust buildup.
- Dry thoroughly with a rag or air blower before any storage to prevent corrosion.
- Apply light coat of oil only after cleaning; avoid excessive smearing.
- Store chisels, trowels, and floats off the ground in a dry cabinet.
- Wear gloves and eye protection when removing rust or handling solvents.
- Use manufacturer guidelines for rust inhibitors and avoid incompatible finishes.
Table of Contents
- Introduction
- Key takeaways
- Why Rust Is a Problem for Concrete Tools
- Cleaning Concrete Tools Effectively
- Preventative Coatings, Rust Inhibitors, and Product Choices
- Proper Storage Methods for Concrete Tools
- Maintenance Routines and Scheduling
- Safety Precautions for Cleaning Chemicals and Rust Removal
- Cost Comparison: Preventative Vs Reactive Rust Treatment
- Troubleshooting and Correcting Common Storage and Care Mistakes
- Conclusion
- FAQ
Why Rust Is a Problem for Concrete Tools
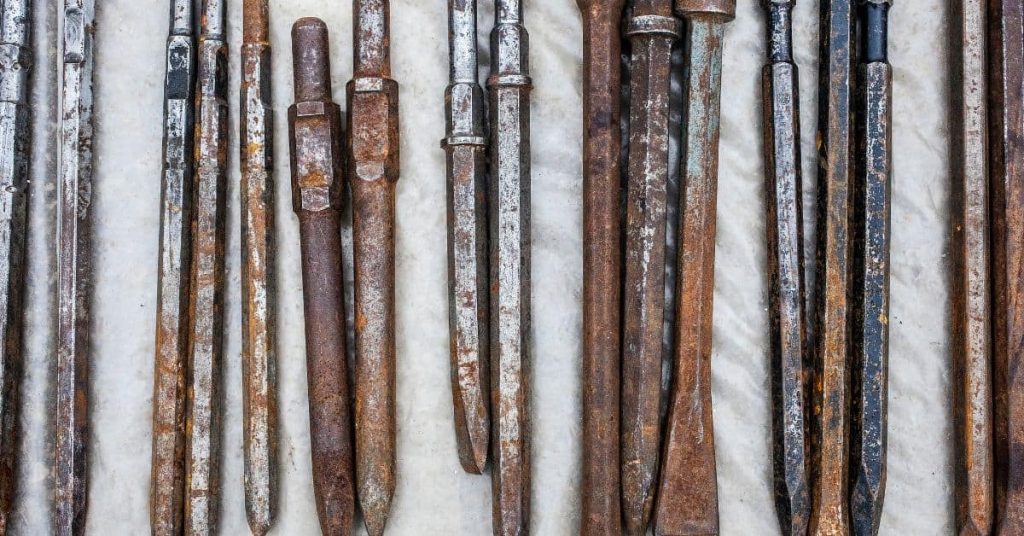
Iron in steel tools reacts with moisture and the highly alkaline, lime-rich environment found in fresh and set concrete, initiating corrosion that begins at the surface and progresses inward with use. The combination of concrete dust, water, and repeated soaking during cutting and smoothing cycles accelerates rust formation and weakens protective finishes. Rust not only dulls edges and stiffens cutting actions but can transfer to concrete and compromise the uniformity of patches and trowel passes over time.
Tools most at risk include trowels, screeds, floats, edgers, chisels, and handle hardware that contact cement; you’ll often see pink to orange staining, roughness, or pitting as early signs, with performance cues like harder cutting and shorter edge life indicating deeper corrosion. Moisture ingress through the tool pores, cement dust coating, and prolonged exposure after a cut or set all speed the process, especially under temperature fluctuations that drive condensation. Diagnostic checks—post-use inspection, humidity checks, surface cleanliness tests—set the stage for the preventive steps that follow later in this guide and help you decide when cleaning or storage changes are needed to protect tool life.
How rust affects tool performance
Rust can significantly impact your tools’ ability to perform their job effectively and safely. Here’s how:
- Reduced cutting/finishing ability: Rust weakens edges, making trowels, floats, and edgers less efficient at smoothing and finishing concrete surfaces.
- Weakened edges: Corroded tools can break or chip unexpectedly, leading to costly repairs or replacements. Expect to pay around $20-$50 for a new trowel.
- Dimensional changes: Rust can cause handles and other hardware to swell or warp, affecting tool fit and comfort.
- Safety risks: Loose or weakened parts may detach during use, posing a hazard to you and your team. Always inspect tools before starting work.
- Uneven strikes/passes: Rust can cause tools to strike concrete unevenly, leading to imperfect finishes that require additional effort to correct.
Common rust causes on concrete job sites
Concrete job sites present unique conditions that can accelerate tool corrosion. Here are some common culprits:
Moisture in concrete: Even after pouring, concrete retains moisture for weeks. This prolonged exposure to dampness encourages rust formation.
Wet storage: Leaving tools in damp or humid conditions allows moisture to ingress through pores and accelerate corrosion. Always store tools in a dry place when not in use.
Salts/contaminants: Certain admixtures, salts, or contaminants in concrete can exacerbate rusting. High humidity environments, like those found near bodies of water or in tropical climates, also speed up corrosion.
Cleaning Concrete Tools Effectively
Define the scope and purpose of cleaning: it matters for preventing rust, maintaining finish quality, and extending tool life, and it helps DIYers, hobbyists, and small shops alike. Start with a fresh concrete cleanup to remove surface material before it cures, using a rinse, gentle brushing, and a mild detergent so residues don’t harden and become harder to remove. For dried or hardened concrete, saturate with water to loosen material, then use a stiff brush, a plastic scraper, and appropriate cleaners, reserving mechanical abrasion for stubborn spots to avoid tool damage.
Address rust with a quick assessment of its extent, then apply a rust remover or nonaggressive acidic option if appropriate, and scrub only where safe; avoid aggressive metal brushes on plated surfaces to prevent coating damage. The sequence should be rinse, loosen, scrub, rinse again, dry, and protect, since each step reduces re-oxidation risk and minimizes finish defects from future cleaning cycles. Finally, follow safety guidelines, wear PPE, ensure ventilation, and dry and oil or season tools after cleaning while logging the maintenance in a simple record to track treatments.
Removing fresh and semi-fresh cement residue
Act fast when concrete is still wet to prevent it from curing on your tools. Here’s how:
Rinse with water immediately after use. A quick soft-bristle brush or cloth can help remove excess material.
For stubborn spots, apply a mild detergent. Rinse again thoroughly to avoid residue buildup.
Removing hardened concrete and scale
Once concrete has dried, it’s harder to remove. Here are some methods:
Soak the tool in water to loosen the concrete. Then, use a stiff-bristle brush or plastic scraper to remove it.
For tougher scale, you might need to use a chiseling hammer or wire brush. Be careful not to damage the tool’s surface.
Power tools like angle grinders with wire cups can speed up the process, but they require proper safety gear and technique.
Rust removal methods and when to use each
Rust comes in different forms. Here are ways to tackle it:
For light rust, abrasive pads or steel wool can do the trick. Be gentle on plated surfaces.
For heavier rust, consider electrochemical methods like electrolysis. Follow manufacturer guidelines carefully.
Acids like white vinegar can remove rust but may damage tool coatings. Always check manufacturer advice before using acids.
Preventative Coatings, Rust Inhibitors, and Product Choices
Clarify coating categories—polymer sprays, multifunction rust inhibitors, waxes, and barrier coatings—and determine which is appropriate based on tool material, finish, and exposure to humidity, salt spray, or workshop grime. When selecting, consider corrosion risk, surface compatibility with steel, aluminum, stainless, or painted parts, ease of reapplication, and how the coating will affect future sharpening or maintenance. Surface prep is key, so ensure cleaning and drying precede any coating and address minor rust spots to maximize adhesion and effectiveness.
Application protocols should cover prep, initial coat, curing or recoat intervals, and environmental conditions like temperature and humidity; be mindful of solvent compatibility with oiling routines and potential staining of wooden handles. If needed, know when to strip old coatings and how to test adhesion, as well as how coatings interact with warranties or resale value. Safety reminders include proper ventilation, PPE, and storage conditions after treatment to keep coatings performing as intended.
Rust Inhibitors and Application Best Practices
Rust inhibitors are your first line of defense against tool corrosion. They work by creating a protective barrier around the metal.
Application: Rust inhibitors can be applied via spray, wipe, or dip methods. For best results, ensure tools are clean and dry before application. Use a light, even coat for optimal protection.
Reapplication: Reapply rust inhibitors every 3-6 months, depending on tool usage and storage conditions. If tools are exposed to harsh environments like high humidity or salt spray, reapply more frequently.
Why Oil Can Cause Finish Defects
Oiling your tools might seem like a good idea to prevent rust, but it can lead to finish defects. Here’s why:
Oils can trap contaminants and moisture, creating an ideal environment for rust to form under the oil layer. This can cause discoloration or weak spots in the metal.
Moreover, oils can interfere with the adhesion of protective coatings. A poor bond between the tool surface and the coating can lead to flaking or peeling, exposing the metal to rust again.
Lastly, oil residues can prevent proper finishing, leading to dull or uneven surfaces. To avoid these issues, opt for rust inhibitors instead of oils.
Material Specs and Standards Explained
The right material choice is crucial for effective protection against rust. Here are some key factors to consider:
- Corrosion Class: Look for products with a high corrosion resistance rating, like C5-M or better.
- Compatibility: Ensure the product is compatible with your tool’s material – steel, aluminum, stainless, etc. Check manufacturer data sheets for compatibility notes.
- Dry Film Thickness (DFT): A higher DFT provides better protection but may require longer curing times.
- Temperature Range: Consider the product’s temperature range to ensure it works effectively in your job site conditions.
- Avoid: Products with high solvent content or strong acids, as they can damage tool finishes or cause discoloration.
Proper Storage Methods for Concrete Tools
Store tools in a dry, moisture-controlled environment with wipe-downs and complete drying before placement to prevent surface rust from forming on exposed metal. Ensure airflow and avoid sealed drawers or airtight containers that trap humidity, preferring open shelving or breathable covers so condensation doesn’t accumulate on metal faces. Off-ground placement on racks or pallets protects tooling from damp concrete and bearing surfaces, while anti-rust liners or felt pads reduce direct wood-to-metal contact.
Use hanging options like pegboards or wall-mounted racks to promote air exposure and quick access, grouping tools by type to minimize handling and friction. Protective covers should be breathable rather than plastic to avoid moisture entrapment, and storage zones should be labeled to separate damp versus dry tools. Short-term on-site bins and a dedicated rust-prevention cabinet for shop tools help with rapid deployment and long-term planning, supported by a quick debrief checklist: clean, dry, cover, and inspect before and after projects.
Short-term and jobsite storage tips
When you’re on a job site, keeping your concrete tools rust-free is a daily challenge. Here are some practical solutions:
Between shifts: Wipe down tools clean, let them air dry, then store in open containers or tool bags to encourage airflow.
Transporting tools: Use hard plastic cases with ventilation holes for short-term transport. Keep tools off the ground using racks or pallets when possible.
Rain protection: Cover tools with breathable cloth or canvas covers during rain breaks to keep them dry but allow air circulation.
Long-term shop storage and climate control
In your workshop, controlling humidity is key to preventing rust. Here’s how:
Humidity control: Use desiccants or a dehumidifier to keep moisture levels below 50%. Monitor with a hygrometer.
Shelving and layout: Opt for open shelving, not sealed drawers. Keep tools off the floor using racks, pallets, or shelves. Store similar tools together to minimize handling.
Alkaline materials: Avoid contact with alkaline substances like concrete dust. Wipe tools clean before storing and use anti-rust liners where metal rests on wood.
Visual checkpoints for stored tools
Conduct a monthly rust check to catch issues early. Here’s your checklist:
- Surface sheen: Check for dull spots, which could indicate rust.
- Discoloration: Look for reddish-brown or black spots, signs of rust or scale.
- Pitting: Inspect for tiny holes or indentations caused by rust.
- Residue: Check for any remaining cement or concrete dust, which can cause rust if left unaddressed.
- Tool edges: Examine cutting edges for signs of pitting or dulling due to rust.
- Tool handles: Inspect wooden handles for moisture or discoloration, which could indicate rust from nearby metal parts.
- Tool coatings: Check protective coatings for wear or damage that might expose metal to air and moisture.
- Tool movement: Gently move tools to ensure they’re not stuck due to rust buildup.
Quick rule: If you spot any of these issues, address them promptly to prevent further rust damage.
Maintenance Routines and Scheduling
Outline practical frequencies that fit usage and environment, such as daily quick checks, weekly wipe-downs, monthly lubrication, and seasonal inspections, without locking you into rigid timelines that don’t reflect real work cycles. For concrete-tool specifics, emphasize rust-preventive cleaning after each use, oiling patterns for blades and metal bodies, and periodic removal of stubborn rust using approved methods, adjusting intensity to tool material. Moisture control and proper storage should be part of the routine, with dry storage, desiccants, or dehumidification in cluttered spaces and elevated shelving to minimize contact with damp floors.
Provide checklists and templates to track adherence, including a pre-season prep checklist and a post-use quick-clean routine, and build in decision points for adjusting cadence after major projects or seasonal changes. Include indicators such as wear, corrosion progression, or finish defects that prompt maintenance or replacement planning, and offer a simple scheduling framework to customize routines by tool category and environment. This section is about turning habits into predictable, repeatable care that protects your investment.
After-use quick routine
After each use, follow this brief checklist to keep your concrete tools in tip-top shape.
Clean: Remove any cement residue with a wire brush or scraper. Use a damp cloth for fresh residue and a chisel for hardened bits.
Dry: Thoroughly dry all metal parts, especially blades and edges. Moisture is rust’s best friend.
Protect: Apply a light coat of your chosen rust inhibitor or oil. Don’t overdo it; just enough to create a barrier.
Monthly and seasonal maintenance
Regular deep checks help catch issues early. Here’s what to do monthly, and seasonally based on your climate.
Monthly: Inspect tools for signs of rust or wear. Reapply coatings if needed. Check moving parts for smooth operation.
Seasonally (Spring/Fall): In humid climates, wipe down tools with a dry cloth before storing. In cold regions, apply a heavier coat of protection to prevent winter rust.
Annually: Remove stubborn rust using approved abrasives or rust converters. Re-oil and re-coat as needed.
Tools and materials checklist
Use this list to ensure you’ve got everything on hand for routine maintenance.
- Wire brush: For removing cement residue. A stiff-bristled one works best.
- Scraper/chisel: For hardened concrete and scale. Use a flathead screwdriver if needed.
- Rust inhibitor/oil: Your chosen protectant. Keep it handy for regular application.
- Wire wool: For scrubbing off stubborn rust.
- Safety glasses: Protect your eyes from debris during cleaning and maintenance.
- Gloves: To keep your hands safe from sharp edges and chemicals.
- Dry cloths: For wiping down tools after cleaning.
- Desiccant packets: For moisture control in storage areas.
Quick rule: Review this list before each maintenance session. Missing something? Add it to your shopping list.
Safety Precautions for Cleaning Chemicals and Rust Removal
PPE and ventilation are non-negotiable: wear gloves, eye protection, long sleeves, and a respirator if the product label or SDS calls for it, and ensure the workspace has adequate airflow. Follow safe handling, mixing, and dilution practices exactly as directed by the product instructions, avoiding cross-contamination by keeping cleaners separate and clearly labeled. In case of exposure, know the emergency steps and first-aid actions, including eye rinsing and skin washing, and have spill kits and ventilation procedures ready for use in a timely manner.
Where possible, opt for safer alternatives and lower-toxicity cleaners or rust removers, and follow guidelines on compatibility with existing oils or finishes to prevent unwanted reactions. Store and label chemicals properly, segregate incompatible substances, and dispose of them according to local rules; keep containers away from heat sources and out of reach of children or pets to minimize risk during routine tool care. This section emphasizes practical, safer choices without compromising effectiveness.
Required PPE and safe handling
When working with cleaning chemicals and rust removers, safety is paramount. Start by wearing the right personal protective equipment (PPE). This includes:
Gloves: Protect your hands from chemical burns and cuts.
Eye protection: Use goggles or a face shield to safeguard your eyes from splashes and debris.
Respirator (if needed): If you’re using strong chemicals, wear a respirator with a particulate filter or an air-purifying respirator to protect against harmful fumes. Always follow the manufacturer’s instructions for proper use and maintenance.
Safer alternatives and neutralization
Opting for less-hazardous cleaners can make your job safer and easier. Here are some options:
White vinegar: A mild acid, it’s effective against rust and many stains. It’s also non-toxic and biodegradable.
Baking soda: This alkaline powder is a gentle abrasive that can help remove rust and stains. Mix with water to form a paste.
After using cleaners, neutralize them before disposal. For acids like vinegar, use baking soda; for alkalis like bleach, use citric acid or lemon juice. Always follow the manufacturer’s instructions for proper neutralization and disposal.
Disposal and environmental considerations
Proper disposal of cleaning chemicals is crucial to protect both you and the environment. Here are some guidelines:
Local rules: Always check local regulations for chemical disposal. Some areas have specific recycling or disposal centers.
Contain rinse water: Use a spill kit or containment barrier to collect rinse water. This prevents chemicals from entering the soil, groundwater, or storm drains.
Segregate and store properly: Store chemicals in their original containers, clearly labeled, away from heat sources, and segregated by type (acids, alkalis, corrosives). Follow manufacturer’s guidelines for container compatibility. Never mix different chemicals together as this can cause hazardous reactions.
Cost Comparison: Preventative Vs Reactive Rust Treatment
Discuss cost drivers for preventive maintenance, including materials like rust inhibitors, oil, desiccants, and storage solutions, versus reactive costs for repair, restoration, or replacement, noting that these figures scale with shop size and tool variety in your workspace. Introduce a simple total cost of ownership approach that contrasts annual preventive spend, tool lifespan extension, and the break-even point where proactive care outperforms reactive repairs, without promising exact figures. Compare scenarios for home DIYers, small shops, and professional shops to illustrate how climate, humidity, and inventory affect the math and decision-making process.
List evidence-based cost-saving practices—routine cleaning, timely lubrication, rust-preventive coatings on vulnerable metals, and proper humidity control—and present a practical decision framework for when to shift from reactive to preventive measures based on tool age or moisture events. Include a brief ROI note and actionable tips: start small with a basic preventive kit, track expenses for a few months, and scale up storage or coatings as savings justify the investment, keeping expectations grounded in observable results.
Typical costs to consider
Preventive maintenance isn’t free, but it’s cheaper than fixing rusted tools. Here are the main cost categories:
Protective products: Rust inhibitors, oils, desiccants. These keep your tools from rusting.
Replacement parts: Handles, blades, or entire tools when preventive care fails.
Downtime: Time spent repairing or replacing tools that could’ve been working.
Labor: Time spent on routine maintenance and repairs. This includes your time if you’re a DIYer.
Calculating ROI and budgeting for maintenance
To see the benefits of preventive care, track these:
Tool lifespan extension: How much longer your tools last with proper care.
Downtime reduction: Less time spent repairing or replacing tools means more time working.
Replacement cycles and repair frequency: Keep records of when you replace tools or fix them. This helps spot trends and plan ahead.
Divide the cost of preventive care by these savings to find your return on investment (ROI). For example, if you spend $50 a year on inhibitors and extend tool life by 2 years, that’s an ROI of 100%.
Cost-saving tips and product selection
Here are some ways to lower maintenance costs:
Consolidate purchases: Buy in bulk or when products are on sale. This saves money and ensures you’re always stocked.
Use multi-use inhibitors: Some rust preventatives can be used on multiple tool types, saving you from buying separate products.
Prioritize high-value tools: Spend more on protecting your most expensive or frequently-used tools. This keeps replacement costs down.
DIY where possible: If you’re comfortable doing so, perform routine maintenance yourself to save on labor costs.
Troubleshooting and Correcting Common Storage and Care Mistakes
Identify frequent storage mistakes such as storing wet tools, keeping tools in damp environments, blocking airflow, mixing metals, or using non-ventilated containers, and explain how each mistake promotes rust and finish defects. Provide a clear corrective workflow for tools showing rust: immediately dry, perform light rust abrasion with non-metallic pads or a rust eraser, then clean to remove residue before re-storage. Recommend rust-preventive finishes and oils compatible with cast iron, steel, and aluminum parts, while cautioning against oil buildup that can affect concrete surfaces or finishes.
Describe best-practice storage setups to minimize issues: dry, well-ventilated racks; humidity control; desiccants; separate zones; and a wipe-down station for quick-use tools. Build a practical prevention checklist and cadence, including post-use wipe-down, drying completely, thin oil coats, airflow rotation, and seasonal storage reviews. Offer quick troubleshooting signs, such as pitting versus surface rust, oil staining, or moisture odor, plus a one-page quick reference to guide readers through common fixes.
Identifying early signs of corrosion and defects
Regularly inspect your concrete tools for any signs of rust, pitting, or finish defects. Early detection helps prevent further damage and maintains tool lifespan.
Visual indicators: Look for reddish-brown flakes (rust), discoloration, or pitted surfaces. Tactile: Feel for rough spots or unusual textures that weren’t there before.
Check for trapped residue too – it can cause finish defects and harbor moisture, leading to more rust.
Corrective actions for common mistakes
Mistakes happen. Here’s how to correct them:
- Storing wet tools: Immediately dry them off. Use compressed air or a clean cloth.
- Rust spots: Lightly scuff with a non-metallic pad or rust eraser, then clean thoroughly.
- Oil buildup: Wipe off excess oil to prevent it from affecting concrete finish.
- Moisture buildup: Ventilate storage area and use desiccants to absorb moisture.
Remember, prevention is cheaper than cure. Keep tools clean and dry after each use.
When to repair vs replace
Repairing tools can save you money, but sometimes replacement is wiser. Here’s how to decide:
Repair: If rust is superficial (surface rust), pitting is minor, and the tool still functions well, repair it.
Replace: If rust has eaten deep into the metal (pitting), the tool is damaged beyond function, or its cost to repair exceeds a new one’s price, replace it. Always consult manufacturer limits for guidance.
Conclusion
Tool longevity and a clean finish come from steady, simple habits: treat your concrete tools like you would any other gear on the job site—inspect, clean, dry, and store correctly to keep them safe and ready when the next pour starts.
First, do a quick check after each use: look for any rust spots, then scrub with a suitable cleaner, rinse, and dry thoroughly before applying any coating or inhibitor. Follow a sensible order: remove built-up residue, dry completely, apply a preventative coating or rust inhibitor as directed, and then store tools in a clean, dry spot or protected rack. Build a small routine into your day and stick with it; a simple rule of thumb is to act before rust has a chance to take hold. Safety first, test on a small area, and keep proper storage in mind at every step.
Common mistakes to avoid are skipping the drying step, relying on oil alone which can cause finish defects, and ignoring the storage conditions or recommended product directions. Never rush cleaning or skip safety precautions, especially around chemicals. Always work in a ventilated area, wear gloves and eye protection, and verify that you’ve dried tools before applying any coating or returning them to storage.
If you see deep pitting, severe corrosion, or bent or compromised tools, call in a pro instead of forcing a repair. Otherwise, stay disciplined with the routine, choose tested products, and keep everything dry and protected. With consistent care, your concrete tools will stay safer, look better, and last longer through many jobs to come.
FAQ
How can I clean concrete tools effectively without leaving rust behind?
Rinse off concrete residue right after use with water. Scrub with a stiff brush and a mild detergent, then rinse again until the water runs clear. Dry thoroughly to prevent new rust from forming.
What’s the best way to store concrete tools to minimize rust long-term?
Keep tools clean and dry before putting them away. Store in a dry area with good ventilation, off the floor if possible, and avoid damp basements or garages. Use a simple desiccant or silica gel pack in tool boxes if the space is humid.
Which rust prevention methods work best for DIY users?
Light oil or tool wax can protect metal surfaces after cleaning, but check the label for compatibility with your tools. Wipe on a thin film and wipe off any buildup to avoid attracting dust. Avoid spraying onto concrete surfaces or porous gaps where it can bleed.
Are there safety tips I should follow when applying oils or rust inhibitors?
Read the product instructions for ventilation and skin contact guidance. Wear gloves and eye protection, and keep products away from food areas. If unsure about a product, check the label or manufacturer site for safe usage instructions and local rules.