

Introduction
Grout, mortar, and thinset are three distinct masonry materials used for different jobs: grout fills gaps between tiles, mortar binds bricks or blocks, and thinset is a cement-based adhesive for setting tiles.
In DIY work, choose based on whether you need bonding, filling, or leveling, and adjust for indoor vs outdoor use. Standard blends typically require mixing on site, while pre-mixed options can save time but may limit working time or coverage. Always check the product label and manufacturer instructions for substrate compatibility, cure times, and suitability for your climate or local rules before buying.
Key takeaways
- Grout fills joints between tiles; mortar binds bricks and blocks; thinset bonds tiles.
- Use standard vs pre-mixed versions; consistency and workability vary by product type.
- Mortar for structural adhesion, grout for joints, thinset for tile bonding in damp areas.
- Follow manufacturer instructions; set times depend on environment and product, avoid overwork.
- Pre-mixed grout easier but harder to customize; mix as directed and test cleanup.
- Safety: wear eye protection, gloves; work in ventilated area; clean up spills promptly.
Table of Contents
- Introduction
- Key takeaways
- Quick Definitions: Grout, Mortar, and Thinset
- Types and Formulations You’ll Encounter
- Properties and Performance Comparison
- Application Methods and Essential Tools
- Setting Time, Workability, and Curing Considerations
- Cost, Availability, and When to Choose Each Material
- Common Installation Mistakes and How to Avoid Them
- Safety, Best Practices, and Long-Term Maintenance
- Conclusion
- FAQ
Quick Definitions: Grout, Mortar, and Thinset
Grout is a cement-based filler used to occupy joints between tiles. Mortar is a cement-and-sand mix that bonds bricks or stone to each other. Thinset is a specialized tile adhesive that bonds tile to a substrate.
Grout fills joints and keeps tiles spaced and stable; mortar provides the structural bond for masonry, bricks, and stone; thinset sticks tiles to walls or floors over suitable substrates. In practice, use grout for tile joints, mortar for brickwork or stonework, and thinset for setting tile. Watch for color options, workability, and staining tendencies, and always check the product label or datasheet for guidance on surfaces and cure behavior.
What grout is
Grout’s primary role is to fill the joints between tiles, keeping out dirt and debris while allowing for slight movement.
It’s a cement-based mixture with sand, typically used in tile installations like floors, walls, or showers. Unlike adhesives, grout doesn’t stick tiles together; it holds them apart.
Key point: Grout is not an adhesive; it fills joints and prevents debris ingress.
What mortar is
Mortar is a traditional masonry cement mix used to bond bricks, stones, or other masonry units together.
It’s composed of cement, sand, and water. Unlike tile-specific adhesives, mortar has a higher sand-to-cement ratio for better stability in heavy masonry work.
Key point: Mortar is for laying bricks/stone; it differs from tile adhesives like thinset.
What thinset is
Thinset is a cement-based, sand-free adhesive specifically designed for setting ceramic and stone tiles.
It’s composed of cement, fine silica, and polymers. Thinset’s low water absorption makes it ideal for wet areas like showers or bathrooms. It’s the default choice for many tile installations due to its superior adhesion and flexibility.
Key point: Thinset is a cementitious tile adhesive; it’s sand-free and ideal for setting tiles.
Types and Formulations You’ll Encounter
You’ll encounter several clear product families at the store: bagged cementitious powders (both unmodified and polymer-modified mortars), pre-mixed mortars and grouts, epoxy resins (epoxy grout and epoxy adhesive), and specialty or rapid-set formulations. Look for naming clues like thinset, mortar, grout, epoxy grout, polymer-modified, unmodified, and rapid-set, and always read the bag label or datasheet for binders, additives, bag ratios, cure times, and whether water or an activator is required.
Understanding these categories helps you pick the right product for tile setting, grout joints, masonry repairs, or exterior concrete work, and to judge performance factors such as strength, water resistance, bond, shrinkage, work time, and substrate compatibility. It matters because you’ll save time, avoid mismatches, and prevent failed projects by checking premix versus powder options, indoor/outdoor suitability, and the exact usage instructions on mixing, pot life, and cure time, while noting shelf life, storage, environmental considerations, and safety steps when handling epoxy products. If you spot red flags like the wrong modifier, weak substrate compatibility, or unclear mixing ratios, pause and verify with the label, manufacturer instructions, or local guidance before proceeding.
Thinset variants (standard, modified, rapid-set, epoxy-bond)
You’ll come across different types of thinset mortar. Each has its own strengths and weaknesses. Here’s what you need to know:
Standard Thinset is your everyday workhorse. It’s got good adhesion, but it takes time to set – around 24 hours. Use it for most ceramic tile installations.
Modified Thinset has added polymers for extra strength and flexibility. It’s great for heated floors or areas with movement. But it’s pricier and can be harder to mix.
Rapid-Set Thinset speeds up the setting time – down to as little as 3 hours. Ideal when you’re in a hurry, but it can dry out faster, so keep an eye on it.
Epoxy-Bond Thinset is for heavy-duty jobs like industrial floors or areas with high chemical exposure. It’s strong and durable, but it requires proper ventilation during application and cleanup.
Always check the product datasheet to confirm it’s right for your job. And remember, no matter which one you use, proper surface preparation is key – that means checking base compaction and ensuring the substrate is clean, dry, and sound.
Mortar types (masonry mortar vs tile mortar)
Alright, listen up. You’ve got two main types of mortars here: masonry and tile. They’re not the same, so don’t go mixing them up.
Masonry Mortar – This one’s for laying bricks, blocks, or stones. It’s strong stuff, designed to hold those heavyweights together. You’ll find it in different strengths (like N, S, and O) depending on what you’re building. Check the label, it should tell you which one you need.
Tile Mortar – Now, this one’s for sticking tiles to walls or floors. It’s not as strong as masonry mortar, but it’s got better grip. You’ll usually see it labeled as ‘Type N’ or ‘Thinset’. Don’t go using masonry mortar for tiling, it won’t stick right.
Grout types (sanded, unsanded, epoxy, urethane)
When it comes to grout, you’ll mainly see four types. Each has its own use case based on joint width, tile material, and exposure conditions.
Sanded Grout is your go-to for wider joints (1/8″ – 3/8″). It’s got sand in it to fill up those gaps. But steer clear of natural stone tiles with this one; the sand can scratch ’em up.
Unsanded Grout is for narrower joints (<1/8″). No sand here, so it won’t scratch your fancy schmancy tiles. But it’s not as strong as sanded grout, so keep that in mind if you’re dealing with heavy traffic areas or chemicals.
Epoxy Grout is tough stuff. It’s great for high-traffic areas and can handle chemicals better than cement-based grouts. But it’s also more expensive and stinkier to work with, so check those local ventilation rules before you start.
Urethane Grout is another tough cookie. It’s flexible, stain-resistant, and can handle moisture like a champ. It’s perfect for showers and other wet areas. But it’s pricier than cement-based grouts, so check your budget before you decide.
Properties and Performance Comparison
This section breaks down how grout, mortar, and thinset differ in adhesion, how they handle tension and compression, how much they move with changes in temperature or moisture, and how they resist water, chemicals, freeze-thaw, and wear. You’ll see which material sticks best, where it can crack, and how its shrinkage or expansion can matter in real life. Think of it as a simple guide to pick the right mix for joints, masonry, or tile setting based on what your project actually does each day.
Understanding these properties helps you spot trouble before it starts: where grout can crumble if there is movement, where mortar may crack with substrate flex, or where thinset might debond if mixing or prep aren’t right. The practical payoff is a quick decision path for substrate, movement, moisture, and load—so you choose the right material and tweak mixing or additives to fit the job. A little foresight here saves you from frustrating repairs later and keeps your job solid from the first tile or brick to the last joint.
Adhesion and Bond Strength
Bond strength is crucial for your materials to stick together. It’s affected by substrate prep, additives, and tile backing.
Substrate Prep: Clean, dry surfaces help adhesion. Remove any dirt, grease, or old material.
Additives: Polymer-modified products boost bond strength. They’re added to grout, mortar, and thinset during mixing.
To test adhesion, try the pull-off test: glue a small disc to your surface, let it cure, then pull it off. If it breaks cleanly, you’ve got good adhesion.
Moisture, Mold, Heat, and Chemical Resistance
Resistance matters in harsh environments. Here’s what to expect:
Grout: Sanded grout resists moisture better than unsanded. Epoxy grouts are best for high-moisture areas.
Mortar: Type N and Type S mortars have good resistance, but they’re not suited for constant water exposure.
Thinset: Standard thinset resists moisture well. For harsh chemicals, use epoxy or modified thinsets.
Flexibility, Shrinkage, and Long-Term Dimensional Stability
Cementitious mixes shrink as they cure. Polymer-modified products help with flexibility and movement accommodation.
Shrinkage: It’s inevitable in cement-based materials. Control it with proper curing and mix design (lower water ratio, larger aggregate).
Flexibility: Flexible materials move with their substrate. This prevents cracking under stress or movement.
For long-term stability, match your material’s properties to the job’s demands. Consider expansion joints where needed.
Application Methods and Essential Tools
This section walks you through the main ways to apply tile, bricks or patches, and joints, with a clear list of the essential tools you’ll need and how to use them. You’ll see how to prep the surface, mix the material, gauge pot life, and choose the right trowel or float for each job, plus a focused tools checklist you can reference on day one. There’s also a practical nod to testing for adhesion and surface condition so you don’t waste time or materials.
What matters is knowing the steps in the right order and what can go wrong if you rush or skip a test, because DIY mistakes show up as lippage, cracks, or incomplete bonding. You’ll get a blunt view of why choosing the right tools and following the manufacturer’s guidance matters for long-term results, plus tips on cleanup, safety gear, and maintenance that keep your project moving without regrets. If you’re unsure about ratios or cure times, check the label or datasheet and plan around your local conditions, then stick to a steady rhythm from mixing through sealing or grouting.
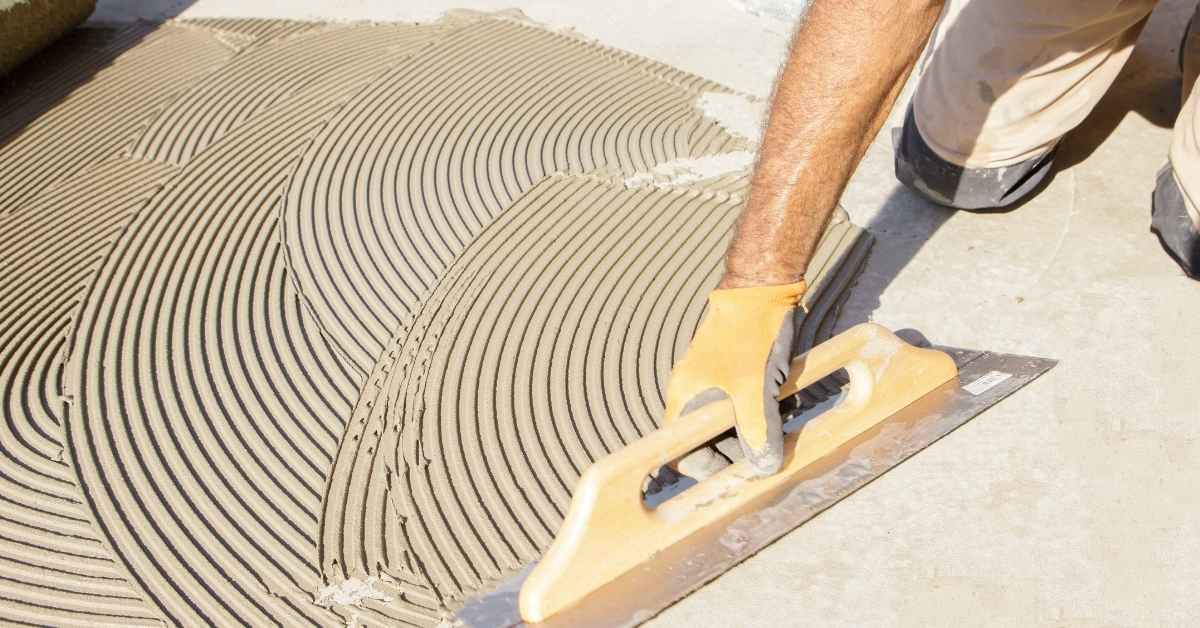
Applying thinset and mortar (trowels, notching, buttering)
Start by choosing the right trowel for your job. For thinset, a 1/4″ x 6″ or 1/2″ x 6″ trowel works best. For mortar, use a 1/2″ x 8″ or 3/4″ x 9″ trowel.
When applying thinset for tile, use the straight edge of the trowel to spread and level the material. Then, use the notched side to create grooves that help with suction and adhesion. Buttering is when you apply a thin layer of thinset directly onto the back of the tile before setting it in place.
For mortar applications like bricklaying or patching, start by spreading an even layer using the flat side of your trowel. Then, use the notched side to create grooves that help interlock with the bricks or fill cracks in patches.
Grouting technique and tools (floats, sponges, sealers)
Grout application starts with mixing the grout to a smooth, lump-free consistency. Use a grout float to press the grout into the joints, working diagonally across the tiles.
- Grout Float: Used to force grout into joints and remove excess. Tip: Hold it at a 45-degree angle for best results.
- Sponge: Needed to clean off excess grout from tile surface. Key: Use a damp, not wet, sponge to avoid pulling out grout from joints.
- Sealer: Optional but recommended for protecting grout and extending its lifespan. Tip: Apply sealer after the initial cleanup and allow it to dry before wetting the area again.
- Grout Removal Tool: A flexible, flat-bladed tool used to remove excess grout from joints before it dries. Rental cost: Around $20-$30 per day.
- Grinder with Diamond Blade: Used for removing stubborn grout haze or hard-to-reach areas. Rental cost: Around $40-$60 per day.
Surface preparation and substrate requirements
Before applying any material, ensure your surface is clean, dry, and structurally sound. Check for flatness, cleanliness, and porosity. Use a level to check flatness; remove any dirt, grease, or paint with a suitable cleaner; and test porosity by pouring water onto the surface – it should absorb quickly.
For thinset applications, install movement joints every 6-8 feet to accommodate expansion and contraction. For mortar, ensure your substrate can support the weight of the bricks or patch material.
If you’re unsure about any aspect of your substrate, consult a professional before proceeding with your installation.
Setting Time, Workability, and Curing Considerations
Pot life is how long a mixed batch stays usable in the bucket. Open time is when you can still bond to the surface, while cure time and dry time determine when you can move ahead with the next step without compromising adhesion.
Temperatures and humidity drive these windows, so plan small batches and predictable working times to avoid rushing or stalling. Sequencing matters: set, cure, open time, grout, and seal must follow logical order, or you’ll fight alignment or weak spots. Keep the conditions steady, manage your batches, and clean tools to preserve workability and cure integrity; don’t rush or delay beyond what the label or datasheet allows, and check those instructions as needed.
Open time, pot life, and working time — what to expect
When you’re planning your tile job, understanding the lifespan of your materials is crucial. Here’s a quick rundown:
Pot Life: That’s how long your mixed material stays usable before it starts to harden. It varies by product and conditions. Check your manufacturer’s data sheet.
Open Time: This is the time between when you apply a material (like thinset or mortar) and when you can grout over it without affecting adhesion. Again, check those specs.
Working time might seem like pot life, but it’s actually the time from mixing to when your tile needs to be set. Keep an eye on that clock!
Curing vs drying: when to grout and when to finish
Curing is when your material hardens. Drying is just water evaporating. Here’s how they differ:
Curing Time: This is when your tile bed or grout turns from a mushy mess into something solid you can walk on. Follow manufacturer claims, but also do a simple check: press gently with a finger. If it leaves an indentation, it’s not ready.
Dry Time: This is just water evaporating. It happens faster than curing, usually within 24-72 hours. But don’t grout until your tile bed is fully cured!
Remember, curing takes time. Be patient. Rushing can lead to weak bonds and cracked tiles.
Environmental effects (temperature, humidity) on cure and performance
Temperature and humidity affect your materials’ working time and cure rate. Here’s what to watch for:
High Temperatures: Heat speeds up curing but can also cause rapid drying, leading to shrinkage cracks. Keep your job site cool if possible, or adjust your water content.
Low Temperatures: Cold slows down curing. In winter, consider heating the area or using a faster-setting product. Never apply materials when it’s freezing!
High Humidity: Moisture in the air can cause your materials to cure too fast, leading to weak bonds. Keep your job site dry, and consider using a product designed for high humidity areas.
Cost, Availability, and When to Choose Each Material
Costs hinge on the material you pick, how you install it, and what kind of maintenance it needs over time. Compare price per square foot or per unit, but also look at packaging, shipping, and regional availability, since those can swing the real job cost more than the sticker price. Labor complexity matters too, because surface prep, mixing, cure times, and tool upkeep can push a straightforward install into a longer, more demanding project; professional-grade techniques often add time and skill requirements you should factor in.
This matters for a DIYer because the right choice is about balance—short-term cost, ease of install, and long-term upkeep all show up in the budget and the hassle. Expect quick decision cues from your job type: tile installs, interior versus exterior, high-traffic or wet areas, and repair scenarios, then weigh durability, stain resistance, and seal needs against upfront price. When in doubt, check product labels and manufacturer instructions for mixing, bonding, and sealing guidance, and consider local stock and lead times to avoid delays and surprise costs.
Recommended choices by job type (floors, walls, showers, exterior)
For most tile installations, thinset is your go-to. It’s versatile and bonds well to various surfaces.
On floors, use standard thinset. For walls, consider modified thinset for better flexibility. In showers, opt for waterproofing additives or premixed shower systems.
Exterior jobs need exterior-grade mortar. It’s more durable and resistant to freeze-thaw cycles. Avoid using interior mortars outside; they won’t hold up.
Material vs labor trade-offs and budget considerations
The cheapest option isn’t always the best. High-quality materials can save you labor and future maintenance.
- Epoxy grout: More expensive, but stain-resistant, durable, and easy to clean. Great for high-traffic areas like kitchens or entryways.
- Rapid-set thinset: Costs more, but allows faster installation and earlier grouting. Ideal for tight deadlines or cold weather.
- Mastic: Cheaper than thinset, but bonds poorly to some surfaces. Only use where thinset isn’t needed, like installing vinyl flooring.
- Specialty mortars: More costly, but offer specific benefits like increased flexibility or heat resistance. Use when you need these properties.
- Sealers and additives: They add cost, but protect your tile work from moisture, mold, and stains. Worth it in high-humidity areas or wet environments.
When to use specialty products (epoxy, rapid-set, mastic)
Epoxy grout is best for high-traffic areas or where stain resistance is crucial. It’s not ideal for showers due to its lack of water vapor permeability.
Rapid-set thinset is useful in cold weather (below 50°F/10°C) or when you need to speed up installation. It’s more expensive and has a shorter working time, so use it wisely.
Mastic should only be used where thinset isn’t required, like installing vinyl flooring. It doesn’t bond well to all surfaces and can fail over time if used improperly.
Common Installation Mistakes and How to Avoid Them
Common installation mistakes cost you time, money, and a lot of frustration. The big culprits are poor surface prep, choosing the wrong product for the job, and mixing or working with the mix in the wrong way. Start with the substrate: clean, dry, dust-free, and flat; contamination, laitance, or moisture will sabotage bonding. Pick the right mortar, grout, or thinset for the job and always check compatibility with the substrate and environment. When you mix, follow the manufacturer’s instructions, never guess, and mix in the planned batches to keep workability and open time predictable.
Doing this right saves you headaches at grout time or when you load a repair. If you skip steps, you risk cracks, debonding, or uneven tiles and grout. The payoff is a durable, faster cure and fewer callbacks. Always verify label directions and datasheets on the product you’re using, and if something isn’t clear, check the manufacturer instructions or local guidelines. Keep temperature, humidity, and cure in mind, protect from rapid drying, and inspect joints for gaps, voids, or delaminations before finishing. That extra attention pays off with a cleaner, safer job and fewer surprises.
Substrate and Coverage Failures
Debonding is a common issue caused by inadequate substrate preparation or uneven troweling. Ensure your surface is clean, dry, dust-free, flat, and sound before applying any material.
Inspect for voids or low spots. Fill these with fresh mortar or thinset, ensuring full coverage. Use a straight edge to check flatness and address any dips or high spots.
Key Tip: Always use a notched trowel for even application and proper embedding of tiles or masonry units.
Wrong Grout or Mortar for Joint Size or Tile Type
Choosing the right product is crucial. Sanded grouts are ideal for larger joints (1/8″ to 1/2″), while unsanded grouts work best for smaller joints (less than 1/8″).
Modified thinset is recommended for large format tiles (>15″ or heavy tiles (>30 lbs/sq ft). Unmodified thinset is suitable for smaller tiles and standard masonry work.
Remember: Always check the manufacturer’s recommendations based on your specific tile type, size, and joint width.
Mixing, Contamination, and Tool Mistakes
Proper mixing is vital. Follow manufacturer guidelines exactly. Over-watering or undermixing can lead to weak, crumbly material.
- Cleanliness: Keep your workspace clean. Remove any soil, oil, or old materials that could contaminate your mix.
- Mixing Tools: Use a drill with a paddle mixer for consistent results. Rentals are available at home improvement stores (around $25-$50 per day).
- Water Temperature: Use warm water (73-95°F) for optimal mixing and setting.
- Mixing Time: Allow 2-5 minutes of continuous mixing, ensuring all powder is fully incorporated.
- Tool Care: Clean your tools immediately after use to maintain their condition. Soap and water usually suffice.
Safety, Best Practices, and Long-Term Maintenance
Safety starts with the basics: wear eye protection, a dust mask or respirator, gloves, and hearing protection. Be aware of concrete dust, wet chemical splashes, and grinder hazards, and know how to respond with basic first aid for common exposures. Plan your work area with proper ventilation, secure barriers, and careful ladder use, and follow lockout or tagout steps when running power tools or grinders.
This matters because good habits prevent injuries and keep projects moving. It also guides long-term performance by outlining routine maintenance, tool cleaning, sealing and resealing joints, moisture control, and weather protection, plus a simple visual inspection checklist for cracks, discoloration, joint movement, and signs of water intrusion. Following a clear maintenance schedule and keeping notes helps you catch problems early and know when to call in a pro for structural concerns or major joint degradation.
PPE, Ventilation, and Handling Powdered or Epoxy Products
Working with cementitious powders and multi-component adhesives like thinset requires proper protection. Here’s what you need:
Personal Protective Equipment (PPE): Wear safety glasses, a dust mask or respirator, gloves, and hearing protection.
Ventilation: Ensure your workspace is well-ventilated to minimize dust inhalation. Use fans if needed, but keep them away from the work area to prevent dust scattering.
Always follow Safety Data Sheets (SDS) and manufacturer instructions for handling and mixing these products. They provide specific guidelines on safe exposure limits, proper disposal, and first-aid measures in case of accidents.
Sealing, Cleaning, and Routine Maintenance for Longevity
Maintaining your grout or mortar joints is crucial to extend their lifespan. Here’s how:
Sealing: Apply a suitable sealer to protect against moisture and stains. Choose between penetrating sealers (for natural stone) and topical sealers (for ceramic tile).
Cleaning: Regularly clean your surfaces using mild detergents or grout-specific cleaners. Avoid harsh chemicals that can damage the joints.
Maintenance Schedule: Inspect your work annually, looking for signs of wear, staining, or cracking. Re-seal when necessary and address any issues promptly to prevent further degradation.
Visual Checkpoints and Inspection Checklist
Use this checklist before and after installation to ensure quality workmanship:
- Coverage Verification: Ensure all areas are covered with an even layer of mortar or thinset.
- Grout Joint Uniformity: Check for consistent grout lines, free from voids or excessive buildup.
- Bond Checks: Tap tiles gently; a solid sound indicates good bonding. A hollow sound may indicate poor bonding or air pockets.
- Final Surface Condition: Inspect the surface for any imperfections, cracks, or discoloration.
- Cracks: Check for hairline cracks that could worsen over time.
- Efflorescence: Look for white, powdery deposits on the surface, indicating moisture issues.
- Joint Separation: Gently pull on tiles to ensure they’re securely bonded. Any movement indicates a problem.
- Grout/Stain Discoloration: Check for discolored grout or stains, which may indicate water intrusion or contamination.
- Effluent or Mold Buildup: Inspect for signs of mold growth, indicating trapped moisture.
- Water Intrusion Signs: Look for water spots, peeling paint, or warped materials around the installation area.
- Movement Indicating Substrate Stress: Check for any movement in the substrate that could cause stress on the installation.
Quick rule: Address any issues found during inspection promptly to prevent further damage and maintain long-term performance.
Conclusion
Choose the right material for the job now, because getting it wrong drains time, money, and confidence—start with safety, then durability and appearance as your guide.
Verify your plan in plain terms: confirm the correct material for the job, check the substrate and cure requirements, mix per the product instructions, have tools ready, work in the right temperature and humidity, test a small area first, mix only as much as you can use before it sets, keep edges clean, and protect cured work from moisture until it’s fully set.
Common mistakes to avoid are mixing the wrong material for the substrate, skipping surface prep or moisture control, and working too far ahead by mixing large batches or overworking the mix. Always wear proper safety gear, keep eyes and skin protected, and ventilate the area. Clean spills quickly and follow product directions to prevent failures that can crack, leak, or stain later.
If you’re dealing with structural masonry, large tile areas, radiant heat, or uncertain substrate conditions, it makes sense to call in a professional rather than guessing. Stay disciplined, test changes in a small area, and push forward with clear, simple steps—precision now prevents costly repairs later.
FAQ
What’s the practical difference between grout, mortar, and thinset for DIY projects?
Grout fills joints between tiles or blocks. Mortar binds masonry units to a wall or foundation. Thinset is a cement-based adhesive used to bond tiles to a substrate. Use each for its intended job to avoid weak spots or cracking.
When should I choose standard (traditional) versus pre-mixed versions?
Standard versions require mixing with water or additives and give you control in small batches. Pre-mixed products are convenient for simple jobs, but check if they meet the job’s substrate and environment. Always follow the label and manufacturer instructions to see if the product suits your project.
How do I choose the right material for different applications?
Use thinset for bonding tile to floors or walls. Use mortar to set bricks, block, or stone in masonry work. Use grout to fill joints after tile is laid or between masonry units, following joint width recommendations. Confirm substrate compatibility and environmental exposure on the product label.
What about adhesion and resistance to moisture, temperature, and weathering?
Adhesion depends on the product and substrate; read the label for compatibility. Some products resist moisture better than others, but no product is universal. Check the datasheet for cure times, water absorption, and freeze–thaw guidance, and follow local recommendations.