
Introduction
Delaminated plaster is plaster that has separated from its backing and often sounds hollow when you tap it. This article explains how to listen for those sounds, perform a basic tap test, and decide on non-destructive or repair methods. Use plain language and confirm with manufacturer guidance and local rules before any work.
Injection options involve applying a suitable adhesive or grout behind the delaminated layer to re-adhere it. After any internal repair, re-skimting or re-plastering a thin skim coat is typically done to restore a flat surface. Also cover common causes and what to verify, such as moisture, substrate integrity, and ventilation, before proceeding.
Key takeaways
- Understand delamination sounds indicate loose plaster from lath or substrate; investigate promptly.
- Tap test patterns help map delaminated areas for targeted injections and skim steps.
- Refer to FAQ 2/2 competitors for common questions and practical decisions.
- Choose injection method based on substrate, access, and adhesive compatibility with plaster.
- Re-skim after bonding follows clean surface prep, skim coat feathering, and curing time checks.
- Tools and safety: wear eye protection, dust mask, and follow local code for permits where required.
- DIY vs professional: assess scope, potential costs, and hire licensed pros for complex delamination.
Table of Contents
- Introduction
- Key takeaways
- Quick Overview: What “Delamination Sounds” Mean and Why They Matter
- Recognizing Delaminating Plaster — Visual and Audible Signs
- Tap Testing Technique — How to Locate and Map Delaminated Areas
- Injection Repair Options — Adhesives, Methods, and When to Use Each
- Re-Skim and Finishing Steps After Bonding — Restoring a Smooth, Durable Surface
- Tools, Materials Checklist, and Material Selection Guidance
- DIY Vs Professional Repair — Scope, Costs, and Contractor Selection
- Common Pitfalls, Safety, Seasonal Tips, and Advanced Finishing Notes
- Conclusion
- FAQ
Quick Overview: What “Delamination Sounds” Mean and Why They Matter
Hollow or pottery-like sounds when tapping plaster indicate separation from the backing and possible behind-the-wall issues. These sounds differ from surface cracks, hairline cracks, or water staining, which often point to surface defects or moisture after the fact. Understanding the sound helps distinguish true delamination from less serious conditions and guides the repair plan.
The diagnostic goal is to reveal what lies behind the plaster—moisture, lath support problems, or substrate failures—and to map severity and location. A quick assessment focuses on corners, around windows and doors, and joints, plus visible signs like staining or edge crumbling to support a plan for next steps such as injection, re-skim, or skim-coat approaches.
What causes hollow sounds and delamination
Hollow or ‘pottery’ sounds when tapping on plaster indicate a potential issue behind the surface. Several factors can cause this phenomenon, known as delamination:
Age: Over time, plaster can lose its bond with the underlying substrate due to natural aging processes.
Failed keys, vibration, or impact: Physical forces can cause the plaster keys (the rough surface that helps plaster adhere) to fail, leading to delamination. Moisture intrusion can also weaken the bond between the plaster and its support.
Understanding the cause is crucial as it influences repair strategy. For instance, if age or vibration are the culprits, re-keying and reinforcing may be necessary. If moisture is the cause, addressing the source to prevent recurrence is vital before proceeding with repairs.
When delamination is cosmetic vs. structural
Not all delamination requires immediate or extensive repair. Determining whether the issue is purely cosmetic or structurally significant helps assess DIY eligibility and repair urgency:
Cosmetic delamination: This occurs when only the finish is loose, with no risk of collapse. It may appear as small areas of hollow sound with no visible signs of damage beyond the surface.
Structural delamination: This indicates a failure of the keys or supporting lath, posing a risk of ceiling instability or collapse. Signs include large areas of hollow sound, crumbling edges, or moisture staining.
Professional assessment is recommended for structural delamination due to safety risks. DIY re-skimming may be sufficient for cosmetic delamination, but regular monitoring is crucial to prevent progression. Misjudging the severity can lead to inadequate repairs and safety hazards.
Recognizing Delaminating Plaster — Visual and Audible Signs
Key visual cues include cracks ranging from hairline to wider gaps, bulging or sagging patches, blistered surfaces, and moisture marks. Moisture intrusion often accompanies darkened patches or efflorescence that signal underlying issues. These indicators help identify where to focus non-invasive checks first.
Audible cues come from tapping tests, where delaminated areas sound dull or drum-like compared with solid sections. Homeowners can also feel for soft or spongy spots, flaky textures, and edges that separate from the substrate. Use a flashlight at oblique angles and document findings with photos for later professional review.
Visual checkpoints and touch tests
Before performing any invasive tests, use this checklist to visually inspect your plaster walls for signs of delamination.
- Check corners: Delaminated areas often start here. Look for cracks or separation from the substrate.
- Inspect seams: Check where walls meet ceilings or other walls for any gaps, bulging, or sagging plaster.
- Examine overhead areas: Use a step ladder to check ceiling-to-wall junctions for signs of delamination.
- Look for cracks: Hairline to wide cracks can indicate delamination. They may be visible only at certain angles or with a flashlight.
- Check for bulging or sagging: Plaster that appears to be pushing out or drooping can signify detachment from the lath or substrate.
- Feel for soft spots: Gently press on suspect areas. Softness or sponginess may indicate delamination.
- Check edges: Run your fingertips along edges to feel for flakiness or separation from the substrate.
- Look for moisture stains: Efflorescence (salt deposits) or darkened patches can suggest moisture intrusion and potential delamination.
Quick rule: If areas show signs of delamination, mark suspicious spots with a non-permanent marker and proceed with tapping tests to confirm.
When moisture or pests mimic delamination
Water stains, mold growth, and insect damage can sometimes resemble plaster delamination. Before proceeding with repairs, ensure you’ve correctly identified the issue.
Check for musty odors: A distinctive smell often accompanies mold growth or moisture problems.
Look for visible signs of water entry or plumbing issues nearby. These can cause similar symptoms to delamination but require different solutions.
If moisture, mold, or pests are present, address the underlying cause before attempting any delamination repairs. Incorrectly attributing these issues to plaster delamination can lead to ineffective repairs and further damage.
Tap Testing Technique — How to Locate and Map Delaminated Areas
Tap testing aims to locate hollow zones and chart them for repair sequencing and cost planning. Mapping results inform where injections or skim steps should occur first. The process emphasizes accuracy and repeatability as you work across the wall surface.
Tools are kept simple: a small rubber mallet, a plastic tapper, a stud finder, and chalk for marking. Work with safety in mind to avoid damaging plaster or injuring yourself. A regular grid helps you compare tones and note muted or dull areas consistently.
Tools, Sound Cues, and Mapping Tips
The right tools ensure accurate tap testing without damaging the wall. Here’s what you’ll need:
- Non-metallic mallet or screwdriver handle: To gently tap the wall without causing damage.
- Tape measure: For precise measurements to create a grid and mark delaminated areas.
- Marker: To clearly mark hollow spots on the wall for further investigation or repair.
- Stud finder (optional, rentable): While not essential, it can help locate solid studs to avoid damaging them during testing.
- Chalk (optional): For marking grid lines on the wall. You can use a marker if chalk is not available.
Safety Precautions During Tap Testing
Prioritizing safety ensures no harm comes to individuals or property. Here are some crucial safety measures:
Wear appropriate personal protective equipment (PPE), such as safety glasses and gloves, to protect yourself from potential debris.
Avoid standing under sagging ceilings while testing. If you suspect severe instability in the ceiling or walls, cease testing immediately and consult a professional. Large or rapidly expanding hollows may indicate structural issues that require immediate attention.
If you find any areas with extensive delamination or signs of severe instability, it’s best to stop testing and recommend a professional evaluation. They have the tools and expertise to assess the situation safely.
Injection Repair Options — Adhesives, Methods, and When to Use Each
Three main injection categories cover most delamination repairs: cement/gypsum-compatible adhesives, epoxy consolidants, and expanding polyurethane foams. Each has typical uses linked to failure modes such as internal cracking, moisture exposure, or substrate crumbiness. Selection should consider plaster type and substrate history to avoid compatibility issues.
Choose based on plaster type (lime, gypsum, or cement-based) and backing conditions (lath presence, brick, or gypsum blocks). Moisture history and permeability will influence drying needs and how sealants affect humidity transfer, shaping adhesive performance and long-term stability.
Low-pressure injection vs. gravity-feed vs. pin-and-adhesive methods
When injecting adhesives into delaminated plaster, choosing the right access method is crucial. Here are three common techniques:
Low-pressure injection uses small drill holes and specialized equipment to deliver adhesive at controlled pressure. It’s ideal for thin hollows and small cavities where precision is key.
Gravity-feed involves drilling larger ports and allowing the adhesive to flow in by gravity. This method suits larger cavities or broken keys but requires careful control to prevent overfilling.
Pin-and-adhesive employs small pins inserted into the plaster to create injection points. It’s useful for accessing hard-to-reach areas or when a more targeted approach is needed. However, it may require additional support for larger cavities.
Preparing holes, inserting pins/bridges, and sealing
The success of an injection repair depends on proper preparation. Follow this standard sequence:
Drill access ports using a masonry drill bit to create small holes into the delaminated area. Ensure they’re clean and dry before proceeding.
If support is needed, install support pins or bridges into the holes to provide additional stability, especially for large cavities.
Inject the adhesive or foam in a controlled pattern, following manufacturer’s instructions. After curing, plug/patch holes using appropriate materials to restore the surface integrity and prevent further moisture intrusion.
When not to inject — red flags requiring removal or structural work
Injection repair is not suitable for all situations. Be aware of these red flags that indicate further action is required:
If there are active leaks or signs of rot, consult a plaster specialist or structural contractor immediately. Injection will not address the underlying moisture issue and may cause further damage.
Detached lath or large sagging ceilings suggest structural issues that need professional evaluation before any repair work. Attempting injection in these cases could lead to catastrophic failure.
Always err on the side of caution. If you’re unsure about the cause or extent of delamination, consult a professional for expert advice and assessment.

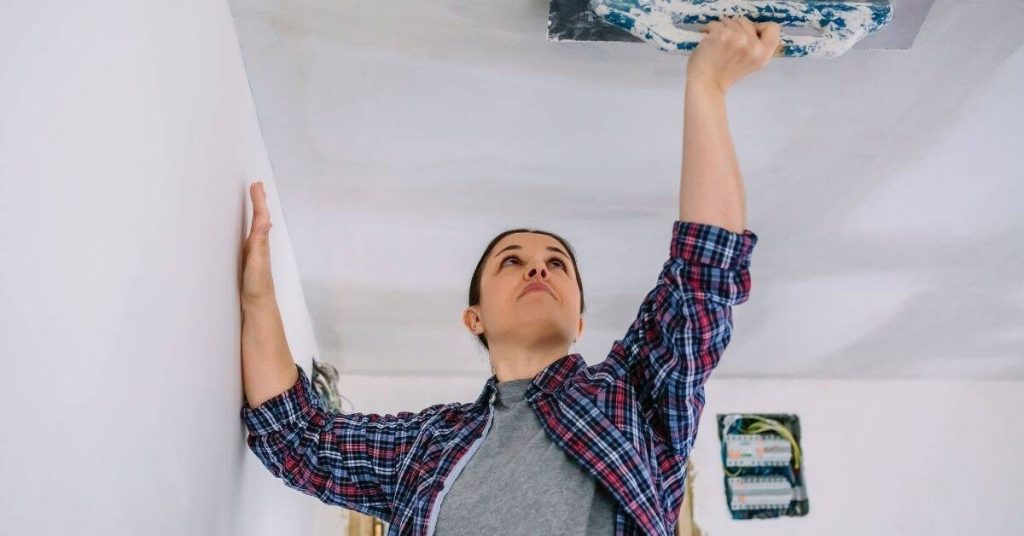
Re-Skim and Finishing Steps After Bonding — Restoring a Smooth, Durable Surface
The staged re-skim workflow builds back a smooth, durable surface. It starts with surface prep, then bonding coats, followed by scratch, float, and finish skim coats. Each layer requires appropriate curing time and environmental control to prevent defects and misalignment with the original profile.
Texture restoration and detailing are focused on reproducing the original surface texture, cornice lines, and edge definitions. Plan for blending transitions and addressing any holes or grooves. Curing, moisture management, and proper priming ensure the final finish is stable and paint-ready.
Surface Preparation and Bonding Coats
Begin by thoroughly cleaning the surface using a suitable cleaner or water. Remove all loose material, dust, and contaminants to ensure good adhesion of subsequent coats.
Inspect the surface visually for any remaining loose or damaged areas. Use a scraper or wire brush to remove them if necessary.
Apply a compatible bonding agent or scratch coat evenly across the surface. Follow the manufacturer’s instructions regarding application thickness and drying times. Reinforcing mesh may be used at transitions to strengthen the bond between old and new plaster.
Common issues include inadequate cleaning, leading to poor adhesion of bonding agents. Always ensure the surface is clean and free of contaminants before applying any coats.
Applying Skim Coats and Textures
Apply thin, successive coats of plaster using a suitable trowel and hawk. Work in manageable sections to maintain control over the material.
Feather each coat into the surrounding plaster to ensure a smooth, seamless finish. Inspect the edges for proper feathering after each application.
To match common textures, adjust your trowel angle and pressure. For more complex textures, use additional tools such as a sponge float. Always consult the manufacturer’s guidelines regarding recommended layering techniques and drying times between coats.
If the texture does not match the original, re-evaluate your technique and tool selection. Remove and reapply the coat if necessary to achieve the desired result.
Final Finishing: Sanding, Priming, and Paint or Wallpaper Prep
Once all coats are applied and cured, lightly sand the surface using fine-grit sandpaper (e.g., 220-320 grit). Follow safe sanding practices, including wearing appropriate protective gear.
Inspect the surface for any missed areas or imperfections after sanding. Remove dust and debris with a tack cloth before proceeding.
Apply a suitable primer designed for plaster surfaces. If wallpaper is to be applied, choose a primer specifically designed for wallpapering to ensure good adhesion. Always follow the manufacturer’s instructions regarding application thickness and drying times.
Common issues include sanding scratches or missed areas. Lightly re-sand any affected areas and apply additional primer as needed to achieve a smooth, uniform surface ready for painting or wallpapering.
Tools, Materials Checklist, and Material Selection Guidance
A practical detection and testing setup includes a tap hammer test protocol, a moisture meter, a light source for inspection, containment measures, and appropriate PPE. Record wall conditions, patterns of delamination, and seasonal factors that affect results. This foundation supports informed material choices.
Injection options and equipment span epoxy, polyurethane, and cementitious systems, along with delivery tools and safety measures. For re-skim, select compatible plaster mixes and bonding agents that suit the original substrate, and verify mix ratios and workability with patch-tests before larger application.
Basic tools for DIY inspections and small repairs
Having the right tools ensures accurate detection and effective repair of plaster delamination.
- Tap Hammer: Used to perform tap tests, detecting delaminated areas. Jobsite tip: Ensure it’s a standard hammer with a smooth face for controlled tapping.
- Moisture Meter: Measures moisture content in walls, helping identify potential causes of delamination. Rental cue: Consider renting if repairs are occasional.
- Drill and Bits: Required for creating injection holes and installing pins/bridges. Key spec: A cordless drill with variable speed is ideal for this task.
- Injection Kit: Contains necessary equipment for injecting adhesives into walls. Rental cue: Rent or borrow a kit for occasional use to save on costs.
- Trowels, Hawk, and Mixing Bucket: Essential for mixing and applying plaster during re-skim work. Jobsite tip: Ensure tools are clean before starting to avoid contamination.
- Personal Protective Equipment (PPE): Includes safety glasses, gloves, and dust masks to protect from debris and chemicals. Pro check: Regularly inspect PPE for damage and replace as needed.
Selecting adhesives, plasters, and reinforcement materials
Choosing compatible materials ensures strong bonds and durable finishes that match the original substrate’s composition and properties.
- Adhesive: Bonds delaminated plaster to the substrate. Spec to look for: High bond strength and flexibility to accommodate movement. Avoid: Adhesives with low vapor permeability that can trap moisture.
- Plaster Mix: Used to re-skin walls after injection repair. Practical tip: Match the original plaster’s composition if possible, or consult a professional for recommendations.
- Reinforcement Materials (Fibers, Mesh): Enhance strength and durability of repaired areas. Use: In conjunction with adhesives to reinforce bonds and prevent future delamination. Common mistake: Not using reinforcement materials in high-stress areas.
- Bonding Agent: Applies before plaster, promoting strong adhesion. Spec to look for: Compatibility with both the adhesive and original substrate. Avoid: Bonding agents that can stain or discolor walls.
DIY Vs Professional Repair — Scope, Costs, and Contractor Selection
Some repairs are suitable for DIY, such as small hollow sounds, localized injections, or cosmetic skim, while larger delamination or water-damaged areas typically require a licensed professional. Use clear criteria to decide when to escalate to a pro. This helps manage risk and outcomes over time.
Key factors driving professional involvement include potential structural movement, hidden leaks, asbestos considerations, and compromised ceiling integrity. Use credential checks, written estimates, scope clarity, and references to select a qualified contractor with plaster restoration experience and a transparent timeline.
How to evaluate bids and choose a plaster specialist
Selecting the right professional for your plaster repair is crucial to ensure quality workmanship and protect your investment. When evaluating bids, consider the following:
Credentials: Ensure they hold valid licenses and insurance. Ask about their experience with lath and plaster restoration specifically.
Project Evidence: Request before/after photos of similar projects to assess their work quality. A written scope of work, timeline, warranties, and references should also be provided.
Verify their credentials, insurance, and experience. If proven expertise and positive references are present, consider them for your project. However, if there’s a lack of relevant experience or negative feedback, reconsider and seek other candidates.
Cost considerations and how to budget
Understanding the variables that affect plaster repair costs helps manage expectations and make informed decisions. Here’s what to consider:
Delamination Extent: The size and severity of delamination impact labor and material costs.
Access Difficulty: Ease of access to the affected areas influences labor time and equipment needs.
Materials & Labor: Different materials and labor intensity can significantly vary costs.
When budgeting, get several written estimates with itemized scopes rather than fixed prices. Consider additional costs for inspection/monitoring and moisture barriers if required. If estimates vary significantly, request further breakdown or clarification from each candidate. If one estimate is notably lower, investigate why to ensure it’s not due to cutting corners or hidden fees.
Common Pitfalls, Safety, Seasonal Tips, and Advanced Finishing Notes
Avoid common mistakes such as overdrilling, using incompatible adhesives, skipping substrate prep, or painting over unbonded plaster. Proper moisture testing before injections or skim coats is essential. Planning with seasonal conditions in mind reduces the risk of defects.
Safety considerations include PPE for dust and chemicals, awareness of lead paint in older homes, ventilation, ladder safety, and electrical checks. Seasonal timing and environmental controls help ensure stable curing and durable finishes, while advanced finishing covers texture matching and long-term maintenance strategies.
Safety best practices and hazardous material precautions
Protecting your health and preserving your property are paramount when dealing with plaster repairs. Adhering to safety guidelines ensures a successful outcome.
- Personal Protective Equipment (PPE): Use appropriate gloves, respirator, and protective clothing to minimize dust inhalation and chemical exposure.
- Lead Paint Awareness: Before disturbing old finishes, test for lead paint. If present, use wet sanding or other safe methods to avoid lead dust.
- Asbestos Checks: In older homes, check for asbestos before starting work. If found, hire certified abatement professionals for safe removal.
- Ventilation: Ensure proper ventilation in the work area to reduce dust and chemical concentrations.
- Scaffold/Ladder Safety: Use secure scaffolding or ladders to prevent falls. Always maintain three points of contact.
- Electrical/GFCI Checks: Inspect electrical outlets and circuits near the work area for safety. Use GFCI protection where water is present.
- Mold/Water Intrusion Containment: If mold or water intrusion is found, immediately contain the affected area to prevent spread. Follow local regulations for proper disposal.
Climate Control During Repairs
Maintaining a stable indoor environment during repair work is crucial for durable results. Extreme temperatures and humidity can negatively impact adhesive curing and plaster drying.
Temperature Management: Maintain an indoor temperature between 50°F (10°C) and 77°F (25°C) during repairs to ensure optimal curing conditions. Avoid working in extreme heat or cold.
Humidity Control: Maintain a relative humidity level between 40% and 60%. Excessive humidity can cause cracking, warping, or weakened bonds, while low humidity can lead to rapid drying and shrinkage.
Monitor and control temperature and humidity levels using heaters, dehumidifiers, or humidifiers as needed. If extreme or unstable weather conditions persist, consider rescheduling work for optimal climate stability.
Advanced finishing: matching textures and ornamental details
Aesthetic consistency is key to preserving the overall look of your space. Replicating cornices, medallions, and local texture requires careful attention to detail.
Texture Replication: Use molds or trowels to create desired textures. Match existing plasterwork by replicating patterns and depths. Consult a specialist for high-value historic elements to ensure authenticity.
Color Matching: Blend pigments to match the existing plaster color. Test colors on a small, hidden area before applying to the entire surface. Consider using a professional color matching service if needed.
Feather edges of new plasterwork into existing surfaces for seamless integration. Regularly inspect and maintain your plasterwork to catch any issues early and prevent costly repairs in the future.
Conclusion
Addressing plaster delamination with care protects safety, preserves the wall, and prevents costly repairs later by following tested steps and basing decisions on what you observe in your space.
Begin by confirming the problem area with a careful tap test, map the delaminated zones, verify adhesion with the chosen repair approach from the article, apply the appropriate adhesive or injection method, and then proceed with re-skim and finishing steps while allowing proper cure times and ventilation. Check conditions first in a small, inconspicuous spot if you’re unsure, keep all materials at hand, and proceed in a logical, controlled sequence to avoid overloading the surface.
Common mistakes to avoid include starting work without confirming full surface stability, skipping small delaminations that grow later, and rushing the re-skim without allowing adequate cure. Safety rules like wearing eye and respiratory protection, using proper ventilation, and handling solvents or adhesives only as directed by labels help prevent harm or damage. If the area is large, shows signs of ongoing movement, or the substrate is structurally compromised, consider bringing in a professional instead of pushing forward, and remember that careful planning keeps repairs durable and appearances clean—steady progress now pays off later.
FAQ
How can tap testing help identify delaminated plaster and what should I listen for?
Tap testing involves lightly tapping the wall with a tool and listening for hollow or dull sounds. A change in tone across an area can indicate loose plaster or voids beneath the surface. Use a consistent tapping pattern and map the sounds to locate suspect regions.
What injection options are available for repairing delaminated plaster, and how do I choose among them?
Injection repairs use materials that bond the plaster and stabilize the panel. Choose the method based on access, wall condition, and the extent of delamination. Always follow the material maker’s instructions and consider a test patch before full application.
What are the steps to re-skim the plaster after bonding or injection, and how should I prep the surface?
Prepare the bonded surface by cleaning and smoothing to remove dust and loose material. Apply a skim coat evenly to restore a flat, durable finish. Allow the first coat to set and examine for uniform thickness before applying final finishing steps.
When should I DIY versus hire a professional for delaminated plaster issues?
Consider DIY for minor, localized delamination with clear access and basic finishing skills. For large areas, complex spreading, or signs of structural movement, consult a professional. Always verify material compatibility and local guidance before proceeding.