
Introduction
An evaporation reducer for concrete is a chemical spray or treatment that slows water loss from fresh concrete. Use it when drying conditions are hot, windy, or dry to help finish quality and reduce surface crazing. Always read the product label and follow local rules to determine if it’s appropriate for your mix and climate.
To apply, follow the manufacturer’s directions for timing, coverage, and reapplication, and apply only to the surface as instructed. It helps to compare a couple of related products and consider their features and benefits to choose what fits your project. If in doubt, check labels, manufacturer instructions, and local requirements for safe use and compatibility with your concrete mix.
Key takeaways
- Apply evaporation reducer at early set stages when ambient conditions threaten evaporation.
- Estimate usage by project area and follow label coverage ranges closely.
- Benefits include smoother finish, reduced plastic shrinkage, and improved cure consistency.
- Related products from Competitor A and Competitor B offer similar evaporation control features.
- Safety: wear gloves, goggles, and respiratory protection when applying near dust.
- Consider environmental impact and drying environment when selecting application method.
Table of Contents
- Introduction
- Key takeaways
- Overview and Key Features & Benefits
- When to Spray — Timing and Environmental Triggers
- How Much to Use — Calculating Quantities and Coverage
- Application Methods, Equipment, and Best Techniques
- What It Fixes — Common Failure Modes and Remediation
- Common Products, Related Products, and Packaging Options
- Cost, Planning, and Job Estimating
- Safety, Environmental Impact, and Sustainability
- Conclusion
- FAQ
Overview and Key Features & Benefits
A evaporation reducer is a product designed to slow moisture loss from fresh concrete during early hydration without forming a curing film on the surface.
It differs from curing compounds and sealers by focusing on moisture management during initial setting rather than long-term surface protection. Expect benefits such as reduced plastic shrinkage risk, improved surface feel, longer workable time in hot or dry conditions, and better slump retention when used appropriately.
What an Evaporation Reducer Does
An evaporation reducer is a liquid applied to fresh concrete to slow down water loss from the surface. It doesn’t form a film like curing compounds or sealers. Instead, it helps retain moisture during early hydration.
Here’s how it works: evaporation reducers create a thin layer on the concrete surface that reduces the rate of water evaporation. This helps maintain optimal moisture levels for proper cement hydration and strength development.
Outcome: With an evaporation reducer, you’ll see improved concrete finish and reduced plastic shrinkage cracking.
Primary Benefits and Performance Claims
Evaporation reducers offer several key benefits for fresh concrete. Here’s what to expect:
Reduced Plastic Shrinkage Cracking: By retaining moisture, evaporation reducers help minimize cracking due to plastic shrinkage, especially in hot or dry conditions.
Easier Finishing: The extended working time provided by evaporation reducers makes it easier to finish concrete surfaces smoothly and consistently.
Improved Surface Quality: With better moisture retention, evaporation reducers help achieve a more uniform and higher-quality surface finish. Always verify these claims on the product’s technical data sheet.
Material Specs and Standards Explained
Choosing the right evaporation reducer is crucial for achieving desired results. Here are key specifications to consider:
- Active Ingredient Type: Look for evaporation reducers with active ingredients like wax, fatty acids, or synthetic polymers. These provide good moisture retention.
- VOC Content: Check the volatile organic compound (VOC) content. Lower VOCs mean better environmental friendliness and reduced odor.
- Compatibility: Ensure the evaporation reducer is compatible with your cement type, admixtures, and aggregates. Incompatibility can lead to cracking, staining, or weak bond strength.
- Application Temperature Range: Check if the product’s application temperature range suits your job site conditions.
- Safety Data Sheet (SDS): Always consult the SDS for handling, storage, and disposal guidelines. It also provides information on potential hazards and protective measures.
When to Spray — Timing and Environmental Triggers
Use clear decision criteria tied to finishing operations, such as proximity to troweling, joint finishing, or the final texture, rather than fixed numbers.
Environmental triggers like surface temperature, humidity, wind, and solar exposure influence evaporation risk and should guide spraying decisions. If evaporation risk is high, spray; if finishing is imminent or finished, postpone; if unsure, pause and reassess with quick checks.
Before, during, or after finishing — timing checklist
Use this checklist to determine the right time to apply your evaporation reducer. It’s crucial to catch the sweet spot between bleeding stopping and final finishing.
- Check for no active bleeding: The concrete should have a consistent, matte appearance with no shiny spots. Bleeding makes the surface too porous for effective spraying.
- Feel the surface: It should be firm but not hard. If it’s still soft or mushy, wait until it sets further to avoid damaging the surface.
- Look for initial set: The concrete should hold its shape when pressed gently with a trowel. This indicates it’s ready for treatment.
- Avoid applying too early: If you spray before the initial set, the reducer may be absorbed into the concrete instead of forming a protective layer on the surface.
- Don’t wait too long: Once the concrete starts to harden and lose its sheen, it’s too late for effective spraying. You’ll miss the optimal timing window.
- Check the weather: Ensure there’s no rain in the forecast within 24 hours after spraying. Rain can wash away the reducer before it has a chance to bond with the surface.
- Temperature check: The concrete should be between 50°F and 90°F (10°C and 32°C) for optimal bonding. Too cold or too hot can affect performance.
- Humidity awareness: High humidity can slow down the evaporation reducer’s drying time, so plan accordingly to avoid delaying your finishing schedule.
Quick rule: Apply the evaporation reducer after initial set but before final finishing. Catch this window right, and you’ll maximize its benefits.
Environmental triggers to watch for
Certain conditions can increase evaporation risk, making it crucial to use an evaporation reducer. Here’s what to look out for:
High surface temperature: Hot concrete loses moisture faster, increasing the risk of cracking and curling. Apply a reducer when the surface temp is above 77°F (25°C).
Low ambient humidity: Low humidity speeds up evaporation. If the relative humidity drops below 40%, consider spraying to protect your concrete.
Windy conditions: Wind can evaporate moisture from the surface quickly, leaving it dry and prone to cracking. Apply a reducer when wind speed exceeds 10 mph (16 km/h).
Direct sunlight: Prolonged solar exposure can heat up the concrete surface, accelerating evaporation. Spray an evaporation reducer on sunny days, especially during peak hours.
Weather and scheduling considerations
Certain weather conditions may require you to postpone spraying or adjust your schedule. Here’s how to plan around them:
Impending rain: Rain can wash away the evaporation reducer before it bonds with the surface. Avoid spraying if rain is forecast within 24 hours.
Freezing temperatures: Concrete sets and hardens best between 50°F and 90°F (10°C and 32°C). If temps drop below freezing, consider delaying your pour or using accelerators to speed up setting time.
Extreme temperature changes: Sudden temperature swings can cause stress on the concrete, leading to cracking. Monitor forecasts for extreme fluctuations and adjust your schedule accordingly.
How Much to Use — Calculating Quantities and Coverage
Approach estimating material needs by assessing area type, spray pattern, and desired finish instead of relying on fixed quantities alone.
Manufacturer coverage rates come from product data sheets, technical manuals, packaging labels, SDS, and vendor support. Use a simple rule to estimate amounts and add a safety margin for variability.
Using the manufacturer coverage rate
The product label, datasheet, or tech manual will tell you how much evaporation reducer to apply per square foot. This is called the ‘coverage rate’.
Example: If it says ‘1 gallon covers 200 sq ft’, that’s your coverage rate.
But remember, this is a base rate. Rough surfaces or windy conditions might need more. So, adjust up if needed.
A simple calculation method
Here’s how to estimate: Required volume = Surface area ÷ Coverage rate + Contingency allowance.
Let’s say you’ve got a 1000 sq ft slab with a coverage rate of 200 sq ft per gallon. You’d need:
Required volume = 1000 sq ft ÷ 250 sq ft/gal + 10% (for overspray and absorption) = 4.8 gallons
Concentrate vs. ready-to-use and adjustment tips
Some evaporation reducers are concentrates. You mix them with water before use. Others are ready-to-use.
For concentrates, follow the label’s dilution instructions. Then, calculate using the diluted coverage rate.
Tip: Always do a small test application to check performance and adjust your estimate if needed.
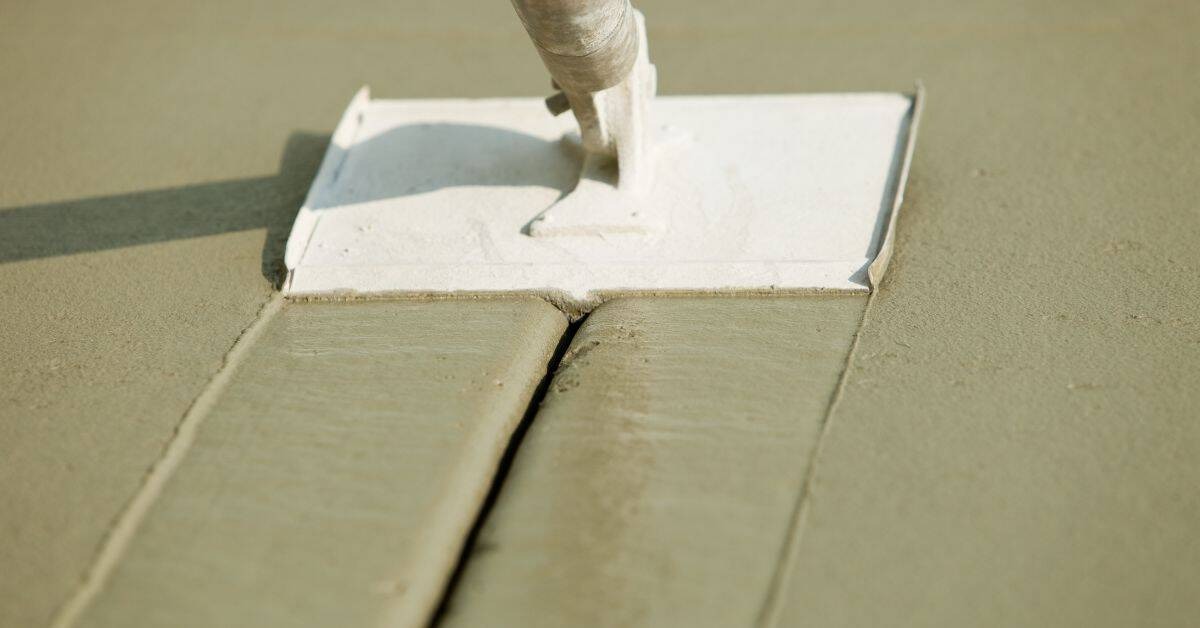
Application Methods, Equipment, and Best Techniques
Choose spray equipment appropriate for the job, such as the right type of sprayer and nozzle, based on concrete size and ambient conditions.
Define spray patterns and overlap to achieve uniform coverage without ponding. Follow a stepwise technique from prep through multiple passes and clean-up, adjusting for site conditions as needed.
Tools and materials checklist
Before you start, make sure you have all the necessary tools and materials to apply your evaporation reducer correctly.
- Sprayer: Choose an airless sprayer for larger surfaces or a handheld sprayer for smaller areas. Both work with typical evaporation reducers.
- Nozzle: Select a nozzle size based on the manufacturer’s recommendations and your surface finish – usually 0.8 to 1.5 mm for concrete.
- Pressure: Maintain pressure between 700 to 1200 PSI, depending on nozzle size and surface texture.
- PPE: Wear safety glasses, gloves, and a respirator to protect from chemical exposure.
- Measuring tools: Have a measuring tape or wheel and a calculator for accurate quantity estimation.
- Mixing containers: Use clean, dedicated containers for mixing evaporation reducer with water (if required).
- Cleaning supplies: Keep rags, soap, and water nearby to clean up any spills or residue.
- Ladder or lift: If spraying high surfaces, ensure you have safe access equipment.
Quick rule: Always check your evaporation reducer’s specific requirements – some may need thinning or special application methods.
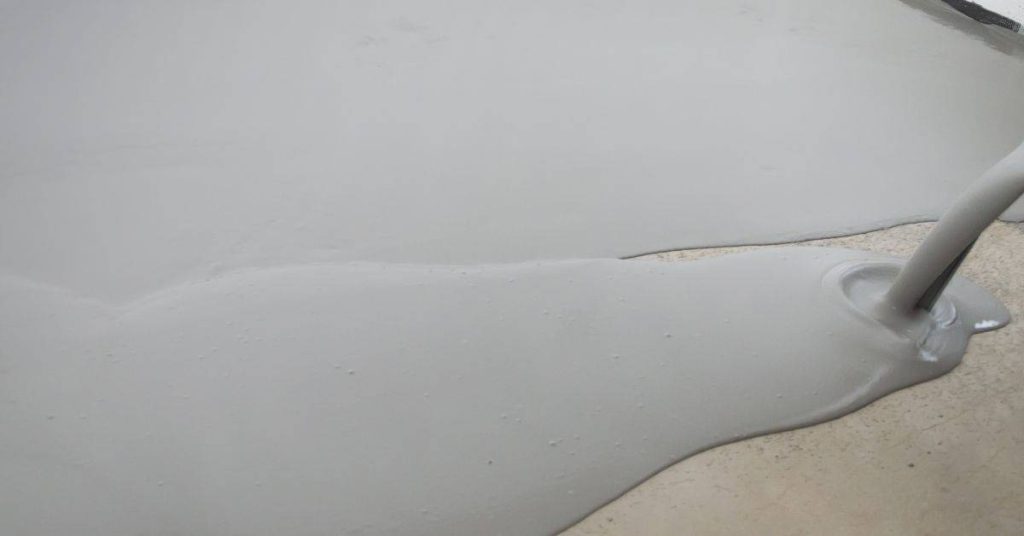
Spraying technique and visual checkpoints
Proper spraying technique ensures even coverage without gaps or ponding. Here’s what to watch for:
- Spray height: Maintain a consistent distance of 12-24 inches from the surface for even distribution.
- Overlap: Overlap each pass by about 50% to ensure no gaps. Avoid excessive overlap which can cause ponding.
- Speed: Move at a steady pace, typically around 1-2 feet per second, adjusting for surface size and complexity.
- Visual checkpoints: Look for even coverage – the surface should have a consistent sheen. No visible residue or pooling should remain after application.
Quick rule: If you see streaking, run marks, or ponding, rework those areas immediately to avoid uneven curing and reduced performance.
Surface preparation and post-application care
Proper surface preparation ensures your evaporation reducer adheres well and performs as expected. Here’s what to do:
Before application, ensure the concrete surface is clean, dry, and free of any debris or contaminants. Remove any standing water and allow the surface to dry completely.
After application, let the evaporation reducer cure according to the manufacturer’s guidelines – typically 12-24 hours before finishing crews can proceed. Keep the area protected from rain and excessive heat during this time.
Quick rule: Never apply an evaporation reducer to a wet or damp surface. Always allow sufficient curing time before proceeding with any further work on the concrete.
What It Fixes — Common Failure Modes and Remediation
Evaporation reducers address issues like plastic shrinkage and surface dusting by slowing moisture loss under suitable conditions.
They cannot fix problems such as incorrect water-cement ratio or poor compaction. Use them alongside proper curing practices and environmental controls for best results.
Problems reduced or prevented
Evaporation reducers tackle common concrete issues during early stages. They’re your first line of defense against:
Plastic Shrinkage Cracks: These appear when surface concrete loses moisture too quickly, causing it to shrink and crack before it’s set. Reducers slow down this process.
Surface Crazing: Fine cracks on the surface due to rapid drying. Evaporation reducers help prevent these by keeping the surface moist longer.
Premature Drying During Finishing: They give you more time to finish and trowel the concrete without it drying out too quickly, helping achieve a better final surface.
Issues not solved by evaporation reducers
While helpful, evaporation reducers aren’t miracle cures. They can’t fix everything:
Improper Water-Cement Ratio: Too much or too little water in your mix will lead to weak concrete. Reducers won’t change that.
Poor Compaction: Inadequate compaction leads to voids and weak spots. Evaporation reducers don’t address this.
Structural Cracking: Cracks due to settlement, rebar corrosion, or other structural issues need proper repair, not just surface treatment.
Remediation steps for common failures
If problems arise despite using evaporation reducers, don’t panic. Here’s what to do:
First, document the conditions: note temperature, humidity, wind speed, and other relevant factors.
Then, consult the manufacturer. They can provide guidance based on your specific product and conditions.
If necessary, consider reworking or alternative curing methods. If cracks are minor, you might be able to fill them and continue. For major issues, you may need to tear out and replace the affected area.
Common Products, Related Products, and Packaging Options
Differentiate evaporation reducers from related products such as curing compounds, sealers, and internal cures, plus understand where they fit in the workflow.
Packaging formats and labeling will vary; look for moisture seals, resealable containers, or spray-ready kits, and verify coverage and compatibility notes in product literature.
Representative brands and product names
When shopping for evaporation reducers, you’ll come across various brands and products. Here are some notable ones to consider:
Sika: Known for their Sikawax line of evaporation retarders. They offer both liquid and powder forms.
GCP Applied Technologies: Their AdvaCem series includes evaporation reducers like the AdvaCem Retarder. This brand is popular for its performance and ease of use.
MAPEI: MAPEI offers a range of products, including their Mapesil line of sealers and curing compounds. While not strictly evaporation reducers, they can help control moisture loss in certain applications.
Related products and alternatives
Evaporation reducers aren’t the only solution to control moisture loss. Here are some related products:
Curing Compounds: These form a protective layer on the concrete surface, preventing water from evaporating. Examples include Sikacure from Sika and Mapesil Curing Compound from MAPEI.
Dissipating Curing Agents: These products slow down the curing process, allowing concrete to maintain its moisture longer. An example is the GCP AdvaCem Retarder.
Internal Cures: These are added to the concrete mix and help maintain internal moisture during the curing process. Examples include Pozzolith from GCP Applied Technologies and Sika Viscocrete from Sika.
Packaging sizes and buying considerations
Evaporation reducers come in various packaging sizes to suit different job requirements. Here’s what to consider:
Job Size: For small jobs, 1-gallon jugs or resealable bottles are convenient. Larger jobs may require 5-gallon pails, 30-gallon drums, or even totes.
Storage: Consider storage space when choosing packaging. Smaller containers are easier to store but may not be cost-effective for larger jobs.
Shelf Life: Check the product’s shelf life and consider buying in quantities that can be used within that timeframe. Some products have a shorter shelf life once opened, so resealable packaging is beneficial.
Cost, Planning, and Job Estimating
Identify cost drivers such as product concentration, coverage rate, and equipment needs without quoting exact prices.
Develop a budgeting workflow that defines scope, estimates quantities, plans site prep, and accounts for contingencies. Create a simple estimator template to capture inputs and assumptions, then translate estimates into procurement steps.
Estimating material and labor needs
The right materials and enough labor ensure a smooth job. Here’s how to estimate:
- Calculate area coverage: Measure square footage, divide by product coverage rate (gallons/sq ft).
Tip: Round up for overage. - Choose the right product: Select an evaporation reducer that matches your concrete type and climate.
Avoid: Using a general-purpose product on rapid-strength gain mixes. - Labor productivity: Estimate hours needed per 1,000 sq ft based on crew size and experience.
Tip: Add 10-20% for breaks, weather delays. - Equipment needs: List sprayers, hoses, pumps, safety gear (PPE).
Avoid: Overlooking small but crucial items like goggles or gloves. - Cure time: Account for days needed before re-entering the area.
Tip: Coordinate with other trades to avoid delays.
Job planning tips for efficiency
Efficient planning reduces waste and speeds up work. Here’s how:
Stage materials: Keep evaporation reducers, safety gear, and equipment nearby but out of the way.
Tip: Set up a staging area before starting.
Define crew roles: Assign tasks clearly – one person for spraying, another for monitoring, etc.
Tip: Cross-train crew members for flexibility.
Time application right: Apply evaporation reducers after initial set but before final set (usually 3-6 hours).
Tip: Monitor concrete closely; timing varies based on temperature and humidity.
Cost-saving considerations and trade-offs
Savvy planning can lower costs. Consider these:
Higher concentration products: They cover more area but may require more passes.
Tip: Balance coverage with application time.
Larger packaging: Buying in bulk can reduce per-gallon cost, but requires proper storage and usage tracking.
Avoid: Overbuying and wasting product.
Renting equipment: Rentals can save money if not frequently used.
Tip: Consider long-term costs vs. buying.
Safety, Environmental Impact, and Sustainability
Establish safety practices tailored to evaporation reducers, including PPE, ventilation, and proper storage to prevent spills.
Address spill containment, disposal per local regulations, and read SDS and regulatory labels to understand VOC considerations and environmental claims critically.
Safety and PPE guidance
Always review the product’s Safety Data Sheet (SDS) before handling evaporation reducers. It’s your guide to safe use, storage, and disposal.
Personal Protective Equipment (PPE) is crucial:
- Wear gloves to protect your hands from direct contact.
- Use eye protection, like safety glasses or goggles, to shield your eyes from splashes.
Never rely solely on PPE. Keep work areas well-ventilated and avoid inhaling vapors. If you spill some, clean it up immediately to prevent skin contact.
Environmental and runoff considerations
Evaporation reducers can run off into storm drains or landscape if not managed properly. Here’s how to prevent that:
First, use containment strategies. Place storage containers on a stable, impermeable surface to catch any spills.
Second, follow immediate cleanup procedures. If you spill some, absorb it with rags or other suitable materials and dispose of them according to local regulations.
Lastly, always follow the product’s label for proper disposal. Some evaporation reducers can be disposed of in regular trash, while others need special handling. Never pour them down drains or into the ground.
Evaluating sustainability claims
Manufacturers often make green claims about their evaporation reducers. Here’s how to evaluate these claims responsibly:
First, check the product’s VOC content. Lower VOCs mean less impact on air quality.
Second, look into the product’s biodegradability. If it breaks down naturally in the environment, it’s better for water and soil.
Lastly, scrutinize the manufacturer’s sustainability documentation. Check if they have third-party certifications or independent testing results. Transparent sourcing is also a good sign. Don’t rely on marketing language alone; verify claims with facts.
Conclusion
Spray at the right time, use the correct amount, and follow proven techniques to keep the concrete durable, good looking, and crack-free, while avoiding costly mistakes or safety risks. Plan your steps, test in a small area, and follow the guidance from timing to coverage to finish.
First, confirm environmental conditions and follow the timing guidance, then calculate the quantity based on the surface area and your coverage rates, mix and test in a small area, apply with the recommended method and equipment, monitor the result and adjust if needed, and store or dispose of leftovers properly.
Be mindful of common missteps: never spray in rain, high wind, or extreme heat; avoid overapplication or underapplication; always wear proper PPE, follow product labels, and run a quick test patch before full use to prevent damage to the surface or surrounding materials.
If the site is large, complex, or you’re unsure about timing, coverage, or safety, consider bringing in a professional instead of pushing ahead alone, and stay focused on the plan so you finish safely and with a solid, lasting result. Stay steady, follow the steps, and you’ll protect the work and your investment.
FAQ
When should you apply an evaporation reducer in concrete work?
Apply it when the concrete surface is still workable and the weather is likely to cause rapid evaporation. Read the product label for timing guidance and follow local site practices. If in doubt, ask the supplier or the manufacturer’s instructions before spraying.
How much should you use?
Check the label or datasheet for the recommended coverage rate. The exact amount depends on the product and surface conditions. Do not guess—use the manufacturer’s instructions and adjust for your specific job if needed.
Where does it work best and what applications benefit most?
Evaporation reducers are most useful on hot, dry, or windy days and on large flat pours where surface evaporation runs high. They help slow moisture loss for better finishing and curing. Look for guidance on the product label for typical use on slab, deck, or vertical pours.
How should I handle packaging and safety on site?
Keep containers closed when not in use and store as directed on the label. Wear the recommended PPE and follow the manufacturer’s safety instructions. If you’re unsure about a product’s availability or packaging, check with the supplier or look up the exact packaging options on the manufacturer’s site.