
Introduction
Epoxy anchor guns rely on careful cartridge care, proper purge steps, and mindful nozzle reuse to stay reliable. Keeping cartridges clean, stored, and upright helps prevent jams and inconsistent mixing. Purge steps before use remove air and unmixed material, reducing the risk of cured epoxy affecting the next shot.
Nozzle reuse requires attention to technique, compatibility, and cleanliness, along with evaluating if reuse is appropriate for the job. Real-life limitations include residue buildup, seal wear, and the potential for degraded performance after multiple uses. Always check manufacturer instructions and local rules to confirm what is allowed and how to handle waste and disposal safely.
Key takeaways
- Inspect cartridges and nozzles for cracks or damage before loading and use.
- Purge new cartridges thoroughly per manufacturer guidance to prevent cure-lock.
- Store unused cartridges upright in a cool, dry location away from sunlight.
- Nozzle reuse may be limited; inspect for hardened material and loss of seal.
- Regular gun maintenance reduces jams; clean seals, trigger mechanism, and purge path after use.
- Follow safety rules; epoxy fumes, pressure hazards, and improper disposal require caution.
Table of Contents
- Introduction
- Key takeaways
- Quick Primer — What Epoxy Anchor Guns and Cartridges Are
- Tools, Materials Checklist, and Specs to Verify Before You Start
- Cartridge Care — Storage, Handling, and Shelf-Life Practices
- Daily and Periodic Maintenance for Epoxy Anchor Guns
- Purge Steps — Step-by-Step Procedure to Clear Nozzles and Gun
- Nozzle Reuse Reality — When Reuse Is Possible and When It Is Not
- Troubleshooting Common Issues and How to Avoid Them
- Safety, Compliance, and Cost-Effective Maintenance Decisions
- Conclusion
- FAQ
Quick Primer — What Epoxy Anchor Guns and Cartridges Are
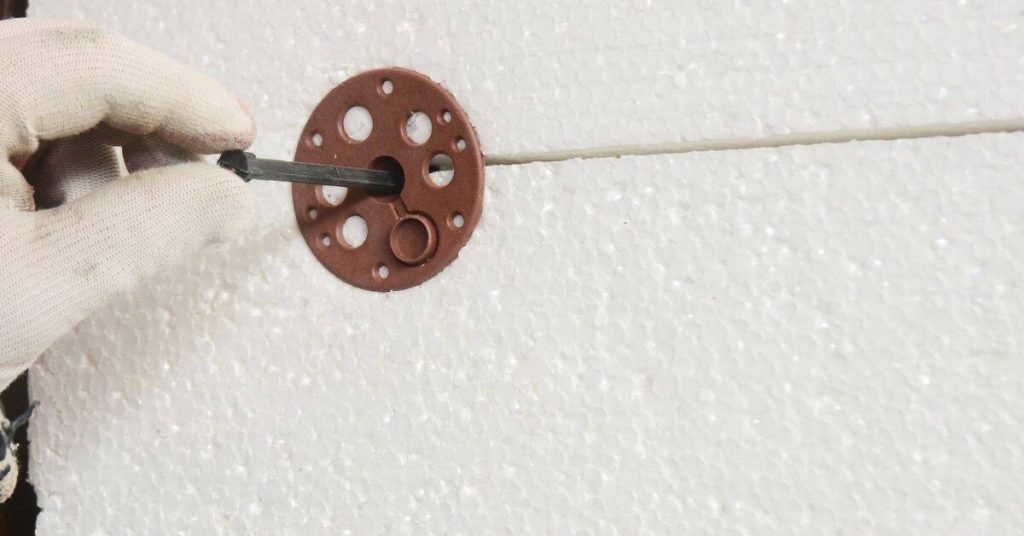
Epoxy anchor guns are tools designed to dispense two-part epoxy cartridges. They work with cartridges that mix resin and hardener through a static mixer as material is dispensed. Nozzles and mixers can wear, impacting mix quality on site.
Regular maintenance includes inspecting seals, barrels, and plungers; cleaning routines; and proper storage to avoid premature curing. Purge procedures help ensure the system is free of hardened residue before changes. Safety and compatibility notes cover choosing the right epoxy system and protecting the substrate, ventilation, and disposal of waste.
How the Cartridge, Gun, and Nozzle Interact
The epoxy anchor gun system consists of two-part cartridges that are mixed and dispensed through a nozzle. The gun applies pressure to the cartridges, forcing the components through the static mixer in the nozzle, where they combine and begin the curing process.
Proper interaction between these components is crucial for effective epoxy application. Regular inspection and care of the nozzle, along with proper purge procedures, ensure optimal cure quality and prevent waste.
Quick Check: Ensure the nozzle is clean and undamaged before use to prevent clogging or poor adhesion. Pro Check: Verify proper mixing and pressure delivery for optimal cure quality. If the nozzle shows signs of wear, replace it immediately to maintain cure quality.
Common Cartridge and Gun Types
Epoxy anchor guns come in various configurations to suit different application needs. Manual guns use a plunger to apply pressure, while pneumatic and battery-powered guns offer more force and convenience.
Cartridges can be used with either static mixers or reusable nozzles. Static mixers are disposable and designed for single-use applications, while reusable nozzles require additional cleaning and maintenance but offer cost savings over time.
Stake: Identifying your equipment helps you select appropriate maintenance and care procedures. Quick Check: Consult the user manual or label for specific equipment details. If using a reusable nozzle system, follow additional cleaning and maintenance steps to ensure optimal performance.
Tools, Materials Checklist, and Specs to Verify Before You Start
Prepare a concise Tools and PPE checklist, noting any model or rating requirements such as chemical‑resistant gloves or a respirator. Include items like safety glasses, hearing protection, and footwear suitable for the worksite. Have a plan for handling and storage on site.
Assemble materials and consumables: epoxy cartridge, mixing nozzle, static mixer, cleaning solvent, and disposal containers. Know typical quantities for your job size and how to dispose of spent components. Verify cartridge specs by reading the datasheet and SDS for adhesive type, cure time, temperature range, substrate compatibility, cartridge size, and ratios.
Essential tools and PPE
Ensure you have the right equipment for a safe and efficient job.
- Epoxy anchor gun: Compatible with your cartridge type. Quick check: Ensure it’s clean, undamaged, and functions properly.
- Mixing nozzle: Compatible with your cartridge size. Pro tip: Rent or borrow if needed to save costs.
- Static mixer: Suitable for your cartridge type. Common mistake: Using the wrong mixer can lead to improper mixing and reduced bond strength.
- Cleaning rags: For cleaning tools and workspace. Quick check: Ensure they’re clean and free of debris.
- Solvent or recommended cleaner: For cleaning tools and nozzles. Pro tip: Follow SDS guidelines for safe handling and disposal.
- Safety glasses: To protect your eyes from chemical splashes. Quick check: Ensure they fit well and provide adequate protection.
- Gloves (chemical-resistant): To protect your hands from chemicals. Pro tip: Check SDS for specific recommendations on glove type.
- Respirator (NIOSH-approved): For protection against epoxy fumes. Common mistake: Using an unapproved respirator can compromise your safety.
- Hearing protection: To protect your ears from noise. Quick check: Ensure it fits well and provides adequate noise reduction.
- Footwear (steel-toed boots): For foot protection. Pro tip: Ensure they’re clean and free of debris to prevent slips.
What to read on datasheets and labels
Before starting, review the following information on your epoxy cartridge’s datasheet or label.
- Pot life: Time until the mixed adhesive becomes too thick to use. Quick check: Ensure you can complete the job within this time frame.
- Shelf life: Duration cartridge remains usable when unopened. Pro tip: Store accordingly to maintain shelf life.
- Recommended storage: Conditions for optimal cartridge preservation. Common mistake: Improper storage can reduce pot life and bond strength.
- Recommended purge/discard volume: Amount to discard before use or after opening. Quick check: Ensure you have enough cartridge left for your job.
- Compatible nozzle types: Nozzles suitable for your cartridge. Pro tip: Using an incompatible nozzle can lead to improper mixing and reduced bond strength.
- Cure time: Time until the adhesive reaches full strength. Quick check: Ensure this fits with your job schedule.
- Temperature range: Optimal application temperatures. Pro tip: Adjust workspace temperature if needed for optimal curing.
- Substrate compatibility: Materials the adhesive can bond to effectively. Common mistake: Using an incompatible substrate can result in poor bonding.
- Cartridge size: Volume of adhesive provided. Quick check: Ensure it’s suitable for your job size.
- Dual-component ratios: Mixing ratio by volume or weight. Pro tip: Use a static mixer to ensure accurate mixing.
Quick rule: Always review datasheets and labels before starting work to ensure safe and effective use of your epoxy cartridge.
Cartridge Care — Storage, Handling, and Shelf-Life Practices
Store cartridges in a climate-controlled area away from direct sunlight and excessive humidity. Keep them upright and avoid exposing them to temperature swings that could affect resin integrity. Label shelves to track lot information.
Transport and handling should minimize impact; secure packing and avoid dropping. Implement a date-checking routine by reviewing lot numbers and expiration guidance, using FIFO rotation, and auditing inventory periodically. Look for signs of compromise such as swelling, leaks, odor, or unusual casing marks.
Epoxy Cartridge Storage
Protect epoxy cartridge integrity through proper storage. Keep them in a cool, dry area away from direct sunlight.
Follow manufacturer guidelines for temperature and humidity. If unsure, check the product label or contact the manufacturer.
Typical recommendations are 50°F to 80°F (10°C to 27°C) with a relative humidity of 40% to 60%.
Shelf life, date checks, and visual signs of spoilage
The shelf life of epoxy cartridges varies by product. Always check the manufacture and expiration dates before use.
Regularly inspect your inventory and rotate it using a First-In-First-Out (FIFO) system to ensure you’re using the oldest cartridges first.
Visually inspect cartridges for signs of spoilage. These can include separation or crystallization of the resin, hardening, bulging seals, cracks, leaks, or unusual odors. If a cartridge shows any of these signs, do not use it; dispose of it safely.
Safe handling and transport
Avoiding shocks, extreme temperatures, and contamination during transport and on-site staging is essential for maintaining cartridge integrity. Keep cartridges vertical or horizontal as per the manufacturer’s instructions.
Use secure packaging during transport to prevent damage from drops or vibrations. If a cartridge is exposed to extreme temperatures or shocks, inspect it for damage before use.
If a cartridge shows signs of damage, do not use it; dispose of it safely and replace it with a new one. Always follow manufacturer guidelines for handling and transport to ensure the best results from your epoxy cartridges.
Daily and Periodic Maintenance for Epoxy Anchor Guns
After use, dispose of spent epoxy safely and inspect nozzle seals and cartridge seals for wear. Clean the gun surface to prevent cross‑contamination and residue buildup. Keep replacement parts organized and labeled for quick access.
Purging and priming should be performed to confirm resin flow and reseat nozzles before the next use. Perform daily checks on grip integrity, trigger action, O‑rings, nozzle wear, and cartridge alignment. Schedule periodic maintenance for lubrication, seal replacements, and calibration checks as applicable.
After-use cleaning routine
The immediate steps after each use are crucial for maintaining your epoxy anchor gun’s reliability. Clear the gun and nozzle interface, protect exposed seals and threads until the next use.
Expel all epoxy: Ensure no residual epoxy remains in the gun or nozzle to prevent cross-contamination and clogging. Pull the trigger a few times after the cartridge is empty.
Inspect seals, threads, and nozzle interface: Check for any damage or residue. If present, clean gently with an approved solvent and a soft brush. This protects gun integrity and prevents cross-contamination during storage.
Periodic inspections and parts to watch
Regularly inspect your epoxy anchor gun to ensure consistent performance and prevent unexpected downtime. Use this checklist every 50-100 shots or monthly, whichever comes first.
- Plungers: Check for wear or damage that could cause inconsistent output or jams.
- Seals: Inspect for leaks or cracks. Replace if necessary to maintain a proper seal and prevent epoxy from leaking.
- Threads: Ensure they are clean and free of damage to maintain a secure connection with the cartridge.
- Drive mechanisms: Check for wear, damage, or excessive play that could affect performance.
- O-rings: Inspect for cracks, tears, or signs of wear. Replace if necessary to maintain a proper seal and prevent leaks.
- Nozzle: Check for wear, clogs, or damage that could affect epoxy flow.
- Cartridge alignment: Ensure the cartridge is properly seated in the gun to prevent jams and inconsistent output.
- Trigger mechanism: Test the trigger to ensure it functions smoothly and consistently.
Quick rule: If any wear or damage is detected, replace the affected parts immediately to maintain optimal performance and minimize downtime.
Replacement parts and consumables policy
Maintaining a small stock of replacement parts and consumables ensures you can perform regular maintenance and minimize downtime. Keep an eye on inventory levels monthly or when usage intensity increases.
Seals: Replace seals regularly to maintain a proper seal and prevent epoxy from leaking. Check your manufacturer’s recommendations for specific intervals.
Drive plates: Inspect drive plates for wear or damage. Replace if necessary to maintain consistent output and prevent jams.
Static mixers and nozzles: Keep a stock that matches your gun’s specifications. Regularly inspect them for wear, clogs, or damage and replace as needed. Always use manufacturer-approved parts to ensure compatibility and optimal performance.
Purge Steps — Step-by-Step Procedure to Clear Nozzles and Gun
Start with a pre‑purge check: confirm nozzle type, cartridge compatibility, gun model, and safe handling of heated components. Ensure battery or propellant status where relevant. Prepare cleaning solvent and a scrap surface for testing flow.
Follow the purge action: warm the cartridge if required, initiate the purge sequence, and observe flow quality to remove air pockets and contaminants from all nozzles. Afterward, verify seating of nozzle tips and check for leaks, documenting purge duration and performing a short test dispense.
Pre-purge checks
Before initiating the purge process, ensure all components are correctly seated and aligned. This step helps prevent potential issues during purging.
Inspect nozzle tip: Briefly check that it is properly seated and aligned with the gun to avoid any blockages or inconsistencies in flow.
Confirm component compatibility: Verify that the nozzle type matches both the cartridge and gun model. Ensure the epoxy cartridge is compatible with your specific gun. If heated components are involved, ensure safe handling as per manufacturer’s guidelines. For pneumatic or powder-actuated guns, check battery/propellant status.
If any component is incorrectly seated or mismatched, replace or realign it before proceeding to avoid common mistakes and ensure a successful purge.
Step-by-step purge procedure
The following steps guide you through efficiently removing air pockets and contaminants from your epoxy anchor gun.
- Warm the epoxy cartridge according to manufacturer’s instructions, if required. This helps achieve a consistent mix.
- Initiate the purge sequence following your specific gun’s procedures. Consult your gun’s manual for precise steps.
- Observe flow quality and color consistency as you advance material through the gun. Ensure all nozzles are expelling epoxy uniformly.
- Discard the initial mixed volume until a uniform mix appears in all nozzles. This indicates that air pockets and contaminants have been effectively removed.
- Secure the cartridge once the purge is complete to prevent any further curing or contamination.
Post-purge verification and containment
After purging, it’s crucial to verify the effectiveness of the process and safely contain/dispose of the initial purge material.
Inspect nozzle tips: Ensure they are properly seated with no leaks or cured residue. Document the duration of the purge for future reference.
Perform a short test dispense on a scrap surface to confirm flow quality and consistency. If leaks or cured residue are present, re-purge the gun and reinspect.
Contain and dispose of the initial purge material according to your site’s specific waste management guidelines and the manufacturer’s recommendations. This helps maintain a clean workspace and adheres to environmental regulations.
Nozzle Reuse Reality — When Reuse Is Possible and When It Is Not
Reusing static mixers or nozzles can introduce curing surface issues, clogging, or cross‑contamination. These risks should be weighed against any potential cost savings. Visual cues of residue should be considered before any reuse decision.
Consult manufacturer guidance for each brand to understand reuse allowances, warnings about residuals, and warranty implications. If reuse is allowed, follow a defined cleaning, drying, inspection, and labeling workflow to prevent cross‑use between products or substrates.
Single-use vs Reusable Mixers: Manufacturer Intent
Many static mixers for epoxy anchor guns are designed for single use. Reusing these mixers can lead to incomplete mixing and ultimately, failed anchors.
Before considering reuse, always check the mixer’s label or datasheet for an explicit ‘reusable’ rating. If it’s not clearly stated, assume it’s single-use.
Do not reuse a mixer if it’s labeled as single-use to avoid compromising your anchor’s integrity.
Common mistake is reusing mixers without checking their intended use. Always replace with new, compatible mixers to ensure optimal performance.
Safe Reuse Techniques and Reconditioning Limits
If your manufacturer allows nozzle reuse, follow their recommended methods for proper on-site reconditioning. This typically involves purging/flushing the nozzle, covering it to prevent contamination, and storing briefly on-site.
Always refer to the manufacturer’s guidelines for maximum reuse intervals. Exceeding these limits can lead to reduced bond quality.
Follow the manufacturer’s recommended methods for reconditioning if they allow nozzle reuse.
Common mistake is reusing nozzles without adhering to the manufacturer’s guidelines, leading to improperly prepared nozzles and compromised anchors.
Quality Control Checks If Reusing Nozzles
Before using a reused nozzle for actual anchoring, perform simple on-the-spot checks to ensure its functionality and prevent inconsistent anchor quality.
Check for:
- A uniform color of purge material
- Consistent flow rate
- Successful test cartridges
Proceed with reuse if all checks pass. If not, replace the nozzle to maintain anchor quality.
Common mistake is reusing nozzles without performing these simple yet crucial quality-control checks, leading to undetected issues and inconsistent anchors.
Troubleshooting Common Issues and How to Avoid Them
Identify root causes for problems like poor mix, slow flow, premature cure, or adhesion failures with quick test notes and symptom mapping. Use a pre‑use verification checklist to prevent issues before they start. Confirm temperatures, cartridge type, mixing ratio, and substrate readiness.
When issues arise, take immediate corrective actions such as re‑mixing in the correct ratio, purging air, unclogging nozzles, and adjusting flow settings. Maintain proper substrate cleaning and surface prep, and document outcomes to support traceability.
Poor mixing or inconsistent cure
Inconsistent mixing can lead to poor performance, reduced pot life, and waste. Before use, verify cartridge temperatures are within the recommended range.
Inspect cartridges for signs of under-mixing, such as unmixed material at the bottom. If suspect volume is present or the mixing ratio is incorrect, discard the affected volume, replace the nozzle, and re-mix in the correct ratio.
If cure is premature, discard affected material, clean the gun thoroughly, and ensure proper storage conditions for cartridges.
Flow problems, gun jams, and pressure issues
Gun malfunctions can result in wasted material, reduced productivity, and poor application quality. Perform pre-purge checks to ensure air is removed from the system.
Inspect the nozzle and gun components for signs of wear or damage before use. If the nozzle is clogged with cured resin, carefully purge, clean it, and inspect for any damage before reusing.
If drive parts are worn or damaged, replace them as per the manufacturer’s guidelines. If flow issues persist, consult the manufacturer’s troubleshooting guide or contact technical support.
Adhesion failures and environmental causes
Poor adhesion can lead to bond failure, reduced durability, and potential safety hazards. Verify ambient conditions are within the recommended range for application and cure.
Evaluate the substrate for cleanliness, moisture traps, and compatibility with the product. If the substrate is contaminated or not properly prepared, re-clean it, apply an appropriate primer/etch, and re-evaluate material suitability.
If environmental conditions are outside the recommended range, adjust them or consult the manufacturer for product-specific recommendations. If adhesion failures persist, perform quality-control checks on reused nozzles and document application details for traceability.
Safety, Compliance, and Cost-Effective Maintenance Decisions
Apply PPE and handling safeguards for daily epoxy gun use, including eye protection, gloves, and respirators where appropriate. Outline spill response and skin contact procedures for safety. Manage discarded cartridges according to site rules.
Use a decision framework for repair versus replacement of components, and document rationale in maintenance logs. Budget for consumables and disposables, and keep records like SDS, training, and calibration notes to support compliance. Consider lifecycle costs and potential downtime when choosing between repair and full replacement.
Safety and Environmental Compliance
Before starting work with epoxy anchor guns, ensure you have the appropriate personal protective equipment (PPE). This includes eye/face protection, gloves, and a respirator where necessary. Always consult the safety data sheet (SDS) for specific guidelines.
During use, take precautions to prevent spills and skin contact. In case of a spill, contain it immediately using appropriate materials. For skin contact, rinse thoroughly with water and seek medical attention if irritation persists.
Proper disposal is crucial for environmental compliance. Purged material should be contained and disposed of according to local regulations. Cured waste can typically be disposed of as regular trash but check local guidelines to be sure.
Cost vs. Benefit: Reuse, Repair, or Replace
When deciding whether to clean, repair, or replace components, consider the following:
Cleaning: Cost-effective for minor wear and tear. Check manufacturer guidelines for safe cleaning methods.
Repair: Consider when parts are still functional but need replacement due to wear. Ensure safety performance is not compromised.
Replace: Opt for this when components are cost-prohibitive to repair, or their safety performance degrades significantly. Always document the rationale in maintenance logs.
Preventative Maintenance Plan and Recordkeeping
A simple preventative maintenance plan can extend equipment life and reduce failures:
Inspection Intervals: Inspect your epoxy gun regularly, following the manufacturer’s recommended schedule. Check for wear on components like nozzles, plungers, and O-rings.
Parts Log: Keep a log of parts used, their condition, and when they were replaced. This helps track maintenance history and plan future replacements.
Maintenance Records: Maintain detailed records of all maintenance work done on the gun. Include dates, what was done, who did it, and any relevant notes. This aids in troubleshooting and ensures compliance with OSHA standards and industry regulations.
Conclusion
Careful cartridge handling, proper purge routine, and mindful nozzle reuse protect performance, keep appearances clean, and reduce costly mistakes on site. When you stick to validated steps and follow the tool’s safety requirements, you minimize failures and extend the life of your epoxy anchor system.
Verify the cartridge specs and tool settings, inspect the gun and nozzle before each use, perform the purge steps as described, and store materials in a controlled environment. After work, clean the gun according to manufacturer guidance, document any deviations, and schedule routine maintenance checks to stay ahead of wear and stubborn clogs. Always test a small, non-critical setting before committing to full work and keep emergency shutoff access clear.
Common mistakes include skipping purge steps, reusing nozzles beyond recommended limits, and ignoring shelf-life or storage conditions. Adhere to basic safety rules: wear protective gear, work in a ventilated area, keep solvents away from ignition sources, and never force a clogged nozzle. If you encounter persistent clogs, inconsistent mix, or uncertain cartridge compatibility, consider professional help rather than pushing through, and confirm local rules and manufacturer instructions. With disciplined practice, you can complete projects reliably and safely, keeping the result durable and professional-looking.
FAQ
What are best practices for cartridge care when using epoxy anchor guns?
Handle cartridges with clean hands or gloves to prevent contamination. Store them upright in a controlled area away from direct sunlight and extreme temperatures, and check the label for shelf-life guidelines. Refer to the cartridge datasheet or manufacturer instructions for any specific storage requirements.
What purge steps should be taken before using a new cartridge or nozzle?
Follow the purge procedure before the first use of a new cartridge or nozzle to remove air and uncured material. Depending on the system, purge with the appropriate solvent or trigger a partial expulsion until a clean, uniform flow begins. Always confirm the purge results meet the manufacturer’s instructions before proceeding with the job.
When is nozzle reuse appropriate, and what considerations apply?
Reuse of nozzles may be possible in some cases, but only if the nozzle is compatible with the cartridge and shows no signs of damage or clogging. Check the manufacturer’s guidance and inspect for cracks, excessive wear, or partial cures. If in doubt, replace the nozzle to avoid inconsistent dispensing or performance issues.
What are common issues with epoxy anchoring systems and how can they be troubleshooted?
Common issues include inconsistent flow, premature curing, or cartridge leaks. Verify cartridge compatibility, inspect seals and fittings, and ensure proper purge and cleaning procedures were followed. If problems persist, consult the manufacturer instructions or seek guidance on safe, sanctioned troubleshooting steps.