
Introduction
Epoxy anchor failure happens when the hole is dirty, wet, or the cure temperature is off. In real job sites, debris, moisture, or the wrong curing conditions keep the epoxy from bonding to the concrete. That shows up as low pullout, hairline cracks, or anchors that spin.
Always clean the hole, dry it, and follow the epoxy’s mixing and cure instructions. Check the product label and the manufacturer’s guidelines for surface prep, moisture limits, and cure time. If you’re unsure, test a small area or re-drill, and ensure the hole is dry and clean before installing.
Key takeaways
- Understand epoxy anchors require clean, dry holes; dirt and moisture degrade bond strength.
- Verify hole cleanliness with mechanical brushing and solvent wipe before placement.
- For wet holes, remove standing water and consider temporary dewatering methods.
- Respect manufacturer cure temperature guidelines; wear PPE and avoid temperature extremes.
- Use proper inspection and pull-through tests to verify anchor performance.
- If in doubt, pause work and consult instructions or local code requirements.
Table of Contents
- Introduction
- Key takeaways
- Quick Overview of Epoxy Anchors and Common Failure Mechanisms
- Dirty Holes — Causes and How They Degrade Bond
- Dirty Holes — Cleaning Methods and Verification
- Wet Holes — Types of Moisture and Their Impacts
- Wet Holes — Dewatering and Wet-Condition Installation Techniques
- Wrong Cure Temperature — How Temperature Affects Epoxy Performance
- Mitigation Strategies for Temperature Challenges
- Inspection, Testing, and Troubleshooting Workflow
- Conclusion
- FAQ
Quick Overview of Epoxy Anchors and Common Failure Mechanisms
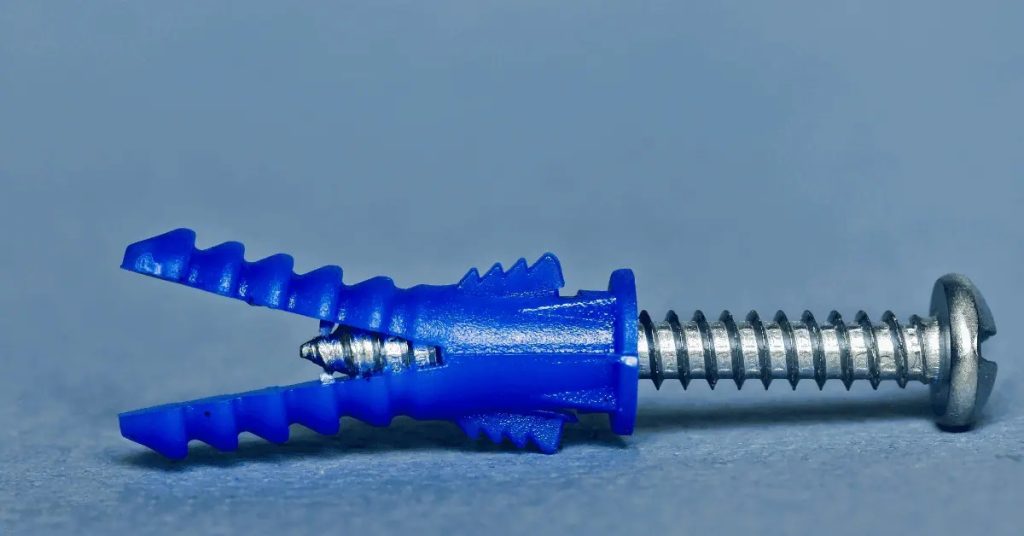
Epoxy anchors rely on a chemical bond between the adhesive, the substrate, and the hole surfaces. They are designed to transfer load through a cured epoxy mass. The article centers on three frequent failure modes: dirty holes, wet holes, and wrong cure temperature.
Expect a clear look at how these conditions disrupt adhesion and void-filling, along with practical checks you can perform on site. When in doubt, verify specs from product labels, data sheets, or manufacturer installation instructions to confirm proper use.
How bonded anchors work in concrete
Epoxy anchors rely on adhesion and mechanical interlock to carry loads in concrete. Here’s how:
Adhesion: The epoxy glue sticks the anchor to the concrete, transferring load directly.
Mechanical Interlock: The anchor’s threads or ribs bite into the concrete, creating a grip that resists pullout.
The quality of this bond is crucial. A poor bond means less load can be carried, and the anchor could fail under stress.
Why installation environment matters
The conditions when you install epoxy anchors greatly affect their performance. Here’s why:
Hole Cleanliness: Dirty holes mean less surface area for the epoxy to bond with. Dirt, grease, or old concrete can cause failure.
Moisture: Wet holes can dilute the epoxy, weakening the bond. Also, moisture can cause corrosion if it reaches the anchor’s steel.
Temperature: The right temperature is crucial for proper curing. Too hot or too cold can weaken the bond and affect long-term performance.
Dirty Holes — Causes and How They Degrade Bond
Contaminants such as dust, drilling fines, grease, and loose particles can line the hole and surface. These materials interfere with the epoxy’s ability to wet and grip the substrate. The result is reduced bond strength and potential voids in the adhesive bed.
Assess the hole condition before injecting adhesive by looking for visible debris and surface smearing. Always check the product label, data sheet, or manufacturer guidance for acceptable cleanliness standards and recommended cleaning steps.
Types of hole contamination and their sources
Contaminants can get into your anchor holes from various sources. Here are the common ones:
Drilling fines: These are tiny concrete particles created during drilling or coring. They’re like a fine dust that sticks to the sides of the hole.
Existing construction debris: If you’re working on an existing structure, there might be old grease, oil, or other contaminants from previous work. These can coat the inside of the holes.
Loose particles: Sometimes, small pieces of concrete break off during drilling and get stuck in the hole. These can also prevent epoxy from bonding properly.
Effects on bond: voids, gaps, and reduced contact
Contaminants in your anchor holes can cause several problems with the epoxy-to-concrete bond:
Voids and air pockets: Contaminants prevent the epoxy from filling the entire hole. This leaves tiny air pockets or voids where there should be solid epoxy.
These voids weaken the bond because they can’t transfer load as effectively as solid epoxy. Plus, water can get trapped in these voids and cause corrosion over time.
Gaps and reduced contact: Contaminants like grease or loose particles create a barrier between the epoxy and the concrete. This reduces the surface area where the two materials can bond.
With less surface area for bonding, the anchor’s holding strength is compromised. Plus, stress concentrations can form at these points of reduced contact, making them more likely to fail under load.
Dirty Holes — Cleaning Methods and Verification
Start with a dry brush to remove loose material and then use a proper cleaning method such as brushing, compressed air, or vacuuming. Follow a systematic approach to avoid recontamination. Ensure all surfaces and the hole mouth are free of debris before injection.
Verify cleanliness with a visual check and, if available, a wipe test or surface test recommended by the adhesive manufacturer. When in doubt, consult the product instructions or label for approved cleaning sequences.
Recommended cleaning sequence and field tips
Start by removing large debris with a wire brush or gloved hands. Then, use compressed air to dislodge smaller particles. Finish with a vacuum to remove any remaining dust.
Tip: Always wear safety glasses and gloves during this process.
Field tip: In awkward locations, use an extendable brush or attach the compressed air canister to a flexible hose.
Visual checkpoints and simple acceptance tests
Use this checklist before injecting epoxy to ensure clean holes. It’s best to do these checks after each cleaning step.
- Inspect visually: Look for any visible dirt, dust, or debris.
- Feel with gloved hands: Run your gloved fingers along the hole walls to check for rough spots or particles.
- Use a flashlight: Shine a light into the hole to check for shadows cast by hidden particles.
- Blow air gently: Use compressed air to dislodge any remaining particles. If they’re present, re-clean and re-check.
- Wipe with a damp cloth: Check for any dirt transferred onto the cloth.
- Check hole depth: Ensure the hole is deep enough for proper anchor embedment.
- Avoid over-cleaning: Be careful not to damage the concrete surface or enlarge the hole.
- Verify hole alignment: Make sure the hole is straight and aligned with the intended anchor placement.
Quick rule: If in doubt, re-clean and re-check. A clean hole ensures a strong bond.
Wet Holes — Types of Moisture and Their Impacts
Moisture in holes can be damp, water-bearing, or flooded. Each condition affects adhesive penetration and cure behavior differently. Moisture can create weak interfaces and hinder proper bonding development.
Differentiate between moisture conditions on site and choose the appropriate installation approach. Rely on product instructions or manufacturer data to confirm how each moisture type should be handled before injecting epoxy.
Why moisture changes adhesive behavior
The presence of moisture can significantly alter the performance of epoxy adhesives used for anchors. Here’s why:
Reduced Penetration: Moisture can prevent the epoxy from fully penetrating into the concrete, leading to a weaker bond.
Water Entrapment: If moisture is present during curing, it can become trapped within the epoxy, creating voids that weaken the anchor’s hold.
Moreover, Incomplete Cure or Bond Separation can occur if water interferes with the chemical reaction needed for the epoxy to set properly.
Recognizing signs of moisture-related failure
Moisture can compromise an anchor installation, and there are several observable symptoms to look out for:
Soft Set: If the epoxy feels soft or spongy after it should have cured, this could indicate that water interfered with the setting process.
Blanching: A whitish discoloration on the surface of the anchor or concrete can signal that moisture was present during installation.
Additionally, Separation between the anchor and the concrete, or within the epoxy itself, may be visible. These signs suggest that moisture has weakened the bond.
Wet Holes — Dewatering and Wet-Condition Installation Techniques
Use practical dewatering methods appropriate for the job site, such as suction, drying, or barrier-based methods when feasible. Consider anchors or systems designed for wet-hole installation if approved by the manufacturer. Decide whether to remove standing water or proceed with a product designed for wet conditions.
Document the chosen approach and verify its acceptability with the adhesive’s official guidance. When in doubt, check product labels, installation instructions, or local rules for wet-hole procedures.
Dewatering methods and when to use them
When you’ve got water in your holes, you need to get it out. Here’s how:
Sumping: This is like using a well pump. It’s good for small amounts of water and tight spaces.
Pumping: For bigger jobs, use a submersible pump. Rent one if you need to.
Use compressed-air bladders or absorbents for tiny holes or when you can’t pump. But remember, these aren’t as effective with lots of water.
Selecting adhesives and systems for damp or flooded holes
Some epoxy anchors can handle wet conditions. Others can’t. You need to pick the right one.
Check the manufacturer’s guidance. They’ll tell you what their product can handle – like ‘damp’ or ‘flooded’. Match that to your hole’s moisture level.
Use hydrophobic anchors if water’s a big problem. These repel water, giving you better bond strength.
But remember, even with the right product, water can still cause issues. So, dewater as much as possible before installing.
Wrong Cure Temperature — How Temperature Affects Epoxy Performance
Temperature in the work area and at the hole impacts viscosity, work time, and final strength development. Cold or hot conditions can slow cure or cause premature setting. The effect is on both handling and end performance, not just speed.
Avoid assuming a single temperature value fits all situations. Review the adhesive manufacturer’s guidance for how temperature relates to cure behavior and verify any temperature-related cautions on the label or data sheet.
Symptoms of temperature-related improper cure
The first sign that your epoxy anchor didn’t cure right due to temperature is tackiness. If it’s still sticky after what should’ve been enough time, something’s off.
You might also see the epoxy looking brittle and fragile. It should be tough and strong, not crumbling or breaking easily.
The bond between the epoxy and the concrete might feel weak too. Try tapping on it – if it sounds hollow or feels loose, that’s a bad sign.
Interaction of substrate and ambient temperatures
Temperature affects both the concrete you’re sticking to (substrate) and the air around it. Cold concrete can slow down cure time, making your epoxy take longer to harden.
Hot surfaces speed up cure time, but they can also make the epoxy set too fast. This can lead to a weak bond because the epoxy didn’t have enough time to flow into all the tiny pores in the concrete.
And remember, hot air can cause the epoxy to skin over before it’s had a chance to soak into the concrete properly. So, keep an eye on both the temperature of your substrate and the ambient temperature.
Mitigation Strategies for Temperature Challenges
Consider practical options such as warming the work area or the anchor material, or using products formulated for specific temperature ranges. Adjust installation timing to align with favorable cure conditions when possible. Sequence tasks to minimize exposure of uncured epoxy to adverse temperatures.
Consult product instructions for recommended temperature ranges and any required preconditioning steps. If in doubt, verify with the manufacturer guidance or technical data sheet before proceeding.
On-site measures to control temperature
Epoxy anchors need the right conditions to cure properly. Here’s how you can control temperature on site:
Warming Up: If it’s too cold, warm up your work area. You can use temporary heaters or enclosures. Follow manufacturer instructions for safe heating.
Cooling Down: In hot conditions, consider cooling the area. This could be as simple as providing shade or using portable air conditioners. Again, follow safety guidelines.
Remember, these are short-term solutions. You’re just giving the epoxy a fighting chance to cure right. Don’t forget to account for temperature changes after installation too.
Choosing the right epoxy formulation
Not all epoxies are created equal. Some are designed for hot conditions, others for cold. Here’s how to pick the right one:
Check the label: Look for temperature ratings on the product label or datasheet. Make sure it’s suitable for your site’s conditions.
Confirm cure schedule: Once you’ve found a suitable epoxy, check its cure schedule. This tells you how long it takes to set at different temperatures. You might need to adjust your installation timing accordingly.
If you’re unsure, don’t hesitate to contact the manufacturer’s technical support. They can guide you towards the right product for your job.
Inspection, Testing, and Troubleshooting Workflow
Develop a step-by-step plan from pre-install checks through post-install testing. Include clear criteria for rework, documentation, or engineering review if bond performance is suspect. Use a consistent checklist to ensure nothing is overlooked on site.
Refer to the adhesive’s official guidance to define acceptable test methods and rejection conditions. When issues arise, verify requirements in the product label, data sheet, or installation instructions before making repairs.
Pre-install checklist and acceptance criteria
Before you start epoxy anchoring, ensure your site is ready. Use this checklist to avoid common pitfalls.
- Check hole cleanliness: Remove all dust, debris, and contaminants. A dirty hole can’t bond properly.
- Assess moisture state: Check for signs of dampness or flooding. Moisture can ruin your bond (see Wet Holes).
- Measure temperature: Ensure it’s within the recommended range (60-90°F/15-32°C, see Wrong Cure Temperature).
- Verify tool readiness: Check your mixing equipment and tools are in working order.
- Check hole diameter: Ensure it matches the anchor’s size. A mismatch can cause failure.
- Confirm hole depth: It should be at least 5 times the anchor’s diameter for proper embedment.
- Inspect substrate: Look for cracks, delaminations, or other defects that could compromise bonding.
- Check anchor type: Ensure it’s suitable for your substrate and load requirements.
Quick rule: If any checks fail, halt installations and address the issue before proceeding.
Post-install inspection and simple pull-verification approaches
After installation, inspect your work to ensure a strong bond. Here’s what to check.
- Check for voids: Look for gaps or spaces in the cured epoxy. Voids weaken bonds.
- Inspect anchor head: Ensure it’s flush with the surface and not protruding.
- Feel for movement: Gently tug on the anchor to check for any play or movement.
- Look for cracks: Check around the anchor and in the substrate for any hairline fractures.
- Check cure time: Ensure it’s been at least 24 hours since installation (or as per manufacturer’s guidelines).
- Perform pull test: If bond quality is questionable, coordinate with manufacturers or engineers for a simple pull test.
- Inspect surrounding area: Ensure no damage was caused during installation to nearby structures.
Quick rule: If any checks raise concerns, consult the manufacturer or an engineer before proceeding with loading the anchor.
Conclusion
Keep the project safe, durable, and clean by finishing strong: address dirt, moisture, and temperature now so you don’t pay for it later. When you handle epoxy anchors with care, you protect the structure and your wallet.
You should check the hole condition in this exact order: verify there is no dirt or slurry, clean and wipe until the opening is clearly free, confirm the hole is dry or properly dewatered, then confirm the ambient and hole temperature are within the recommended range, mix and place the epoxy correctly, fill the hole and insert the anchor, allow full cure without disturbance, and finally test or inspect the bond to confirm a solid hold.
Common mistakes to avoid are skipping cleaning, using a dirty or damp hole, rushing cure time or ignoring temperature limits, and improvising with unsupported methods. Follow the rules: safety first, verify moisture, and maintain temperature control throughout the process. If you’re unsure about the surface condition, or the load is critical, don’t push through alone—call a professional and get a second set of eyes on the installation. When you stick to these steps, you’ll finish with a reliable anchor and a job you can be proud of.
FAQ
If I suspect a hole was dirty or wet after installing anchors, what should I do before proceeding?
Stop and assess. Do not rely on a single anchor. Remove the affected hardware, re-clean the hole if you can, and re-install with fresh epoxy and a new anchor according to the manufacturer’s instructions. Check that you’re following clean, dry, and properly sized hole guidelines for the product you’re using.
How can I tell if the cure temperature was outside the right range, and what should I do next?
Look for longer cure times and unusually soft or tacky surfaces after the stated cure window. If you suspect temperature was wrong, don’t load the anchors yet—wait and re-check the cure per the product label, then consider re-drilling and re-epoxying with temperature guidance from the manufacturer. Local rules or instructions may have specific steps to follow.
What on-site checks help you catch a bad epoxy bond before you load the anchor?
Inspect the anchor after cure for full surface set and absence of cracks around the hole. Perform a simple pull test only if you know the safe procedure from the product instructions. If anything looks off, stop and rework the hole and epoxy per the manufacturer’s cleanup and rework guidance.
How should I plan work when weather might affect epoxy curing to avoid these problems?
Schedule critical epoxy work for stable conditions. Have a backup plan for temperature or humidity swings and know the product’s recommended ranges. If you’re unsure, check the label, datasheet, or local guidance before starting.