

Introduction
Elastomeric paint is a high-build, flexible coating designed to bridge small hairline cracks and move with the wall, while masonry paint is a thinner, protective finish for porous surfaces; choose by how much movement and build you need. In plain jobsite terms: elastomeric lays on thicker and stretches, masonry paint lays on thinner and breathes more, so check product labels for recommended dry film thickness and crack-bridging claims before you buy. Keep in mind surface prep is where the job lives—clean, repair, and prime as the manufacturer directs.
If you’re doing the work yourself expect different handling and recoat rules between the two types, and always follow the paint can for recoat timing rather than guessing. For practical planning, pick a day with suitable weather, bring the right tools, and test a small area to confirm adhesion and appearance before coating the whole wall. When in doubt about structural cracks or warranty limits, consult the product instructions or a pro.
Key takeaways
- Choose elastomeric for hairline cracks, but ensure proper surface prep and substrate compatibility.
- Masonry paint builds thinner film; verify limitations for crack bridging before application.
- Apply multiple thin coats; avoid thick films that trap moisture and peel later.
- Recoat timing depends on product and climate; check label for guidance.
- Surface prep is key: clean, repair cracks, and prime where required before painting.
- Safety: use fall protection on ladders, ventilation for fumes, and PPE.
Table of Contents
- Introduction
- Key takeaways
- Quick Comparison: What Elastomeric and Masonry Paints Are
- Thickness and Film-Build Considerations
- Crack-Bridging Capability Explained
- Recoat Timing, Drying, and Cure — Practical Guidance
- Substrate Selection and Preparation
- Application Methods, Tools, and Quality Checkpoints
- Testing, Standards, and Material Specs Explained
- Maintenance, Troubleshooting, and Lifecycle Planning
- Conclusion
- FAQ
Quick Comparison: What Elastomeric and Masonry Paints Are
Elastomeric paint is a flexible, high-build coating designed to stretch with the substrate and mask minor surface imperfections. It’s typically chosen where movement, hairline cracks, or heavy weathering are common concerns.
Masonry paint is a more traditional, stiffer exterior coating formulated for breathability and abrasion resistance on brick, block, or rendered surfaces. Use it where a lower-build, harder surface finish and simpler preparation are acceptable rather than heavy crack-bridging performance.
Formulation and physical properties
Elastomeric paint is formulated with a high percentage of binder, making it thick and flexible. This gives it excellent crack-bridging capabilities.
Masonry paint, on the other hand, has a lower binder content, resulting in a thinner film that’s less flexible but more breathable.
The water-vapor permeability is higher in masonry paints due to their formulation. This makes them suitable for porous surfaces like brick or concrete.
Common use cases and limitations
Elastomeric paint is typically used on surfaces that experience movement, like newly poured concrete or areas prone to settling. It can stretch and contract without cracking.
Masonry paint is often chosen for its breathability, making it ideal for older masonry structures where moisture buildup could be an issue. However, it’s not as durable and may crack if the substrate moves significantly.
Aesthetically, masonry paints offer a wider range of colors and finishes, while elastomeric paints often have a more industrial look due to their thicker consistency.
Thickness and Film-Build Considerations
Required film thickness varies between product families because elastomeric systems rely on higher wet and dry film build to deliver stretch and crack-bridging. Thicker films affect how many coats you need, drying times, and final appearance, so confirm the manufacturer’s target dry film thickness on the product data sheet.
Masonry paints generally achieve intended protection and appearance with lower film build and more emphasis on substrate breathability and UV resistance. Check the label or technical sheet for recommended application rates and whether the product expects multiple thin coats or a single heavier coat to meet performance goals.
How manufacturers specify thickness and what to check
Consult the product datasheet before you start painting. It’s your guide to getting the right film thickness.
- Wet-film thickness: Check the recommended range for a single coat. Too thin, it won’t protect; too thick, it’ll drip and waste material.
- Dry-film thickness: This is what you’re aiming for after the paint has cured. It’s usually less than the wet-film thickness due to solvent evaporation.
- Application method: Some paints need specific tools or techniques, like spraying or rolling with a certain nap roller cover.
- Temperature and humidity: These can affect how paint dries and its final thickness. Follow the manufacturer’s guidelines for ideal conditions.
- Primer use: Some paints require a primer to achieve the right film build. Skip it, and you might end up with an inadequate finish.
- Recommended coats: Check how many coats are needed for full coverage and protection. One coat might not be enough.
- Cure time: This is how long you should wait between coats or before washing the surface. Rush it, and you’ll mess up the film build.
Quick rule: Always follow the manufacturer’s guidelines. They know their paint best.
Measuring and controlling film build during application
Achieving consistent film thickness isn’t about hitting a specific number, it’s about using the right tools and techniques.
Wet-film combs: These are your best friend for controlling film build. They’re cheap, easy to use, and ensure a consistent wet-film thickness across your surface.
Apply paint in multiple coats. Start with a thin first coat to seal the surface and prevent absorption issues. Then apply heavier coats, using your comb to maintain a consistent thickness.
Adjust application method: If you’re not getting the right film build, adjust how you’re applying the paint. Roll it on instead of brushing, or use a different roller cover nap. Spraying might give you more control over film build than rolling or brushing.
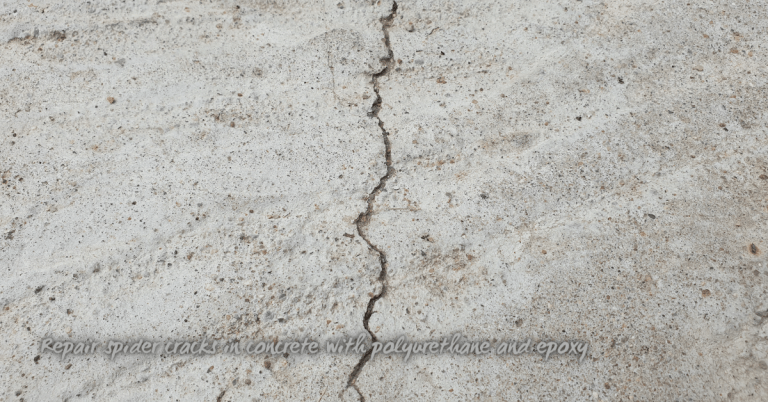
Crack-Bridging Capability Explained
Elastomeric coatings bridge cracks by forming a continuous, flexible membrane that elongates with substrate movement; this is a polymer-property-driven mechanism rather than a filler-only effect. The capacity to bridge a specific crack width or movement range should be verified on the technical datasheet or manufacturer instructions.
Masonry paints are formulated to be comparatively rigid and rely on surface adhesion and film hardness, so they won’t reliably span active cracks and can show fracture if the substrate moves. For hairline or active cracks, the product selection and proper substrate repairs are critical—consult the product literature to determine if primer, mesh, or crack repair compounds are required first.
How to evaluate crack-bridging performance
Before you buy, check the manufacturer’s test data. Look for third-party reports or certifications.
For a quick onsite check, try this:
Flex Test: Apply some paint to a small area. Once dry, use a screwdriver to gently bend the surface. The paint should flex with it without cracking.
Adhesion Test: Use a coin or nail to lightly score through the dried paint. It should pull off cleanly if you try to lift an edge.
When paint alone is insufficient
Elastomeric paints are great, but they’re not magic. Here’s when you need more:
Structural Movement: If your walls are moving or settling, paint won’t fix that. You might need to address the underlying issue first.
Large Cracks: If cracks are wide (more than 1/8 inch), they’ll show through even elastomeric paint. Seal them first with a flexible sealant or membrane system.
Recoat Timing, Drying, and Cure — Practical Guidance
Surface dry, recoat window, and full cure are distinct stages that affect when you can apply subsequent coats and when the coating reaches its design properties. Always follow the recoat window and cure guidance on the product label or technical data sheet, as ambient conditions and film thickness change those intervals.
Applying an additional coat too soon can trap solvents or prevent proper bonding; waiting too long can require light sanding or a primer to promote adhesion. If conditions (temperature, humidity, wind) are atypical, check manufacturer instructions for adjusted recoat and cure expectations before proceeding.
Factors that change recoat windows
Recoat timing isn’t one-size-fits-all. It depends on several factors. Here’s what you need to know:
Temperature and humidity play a big role. Too hot or humid, paint dries fast. Too cold or dry, it takes longer.
Film thickness matters too. Thicker coats take more time to recoat than thinner ones. Same goes for substrate porosity. The more porous the surface, the slower the drying.
Don’t guess. Verify conditions and follow manufacturer’s guidelines. Better safe than sorry.
Pre-recoat checks and adhesion tests
Before you grab that paintbrush for the next coat, do these simple checks:
Visual inspection: Look for any signs of peeling or flaking. If you see any, wait until it’s fixed.
Touch test: Gently touch the surface. It should feel dry and not stick to your fingers. If it’s still tacky, wait.
Adhesion tests or cross-hatch tests: Use a utility knife to score the paint in a crosshatch pattern. Apply painter’s tape over it, press down firmly, then pull off quickly. If any paint comes off, wait until it’s fully cured.
Substrate Selection and Preparation
The right product depends on substrate: new concrete, rendered masonry, brick, and previously painted surfaces each present different porosity and adhesion challenges. Prepare the surface per the manufacturer’s prep guide—this often includes cleaning, removing loose material, repairing cracks, and applying an appropriate primer or sealer.
For previously painted walls, test adhesion and compatibility before full application and address any failing coatings or contamination first. When in doubt about mortar, efflorescence, or new cementitious substrates, refer to the product technical sheet for recommended primers and moisture limits.
Cleaning, repairs, and priming essentials
Before applying any paint, you must ensure your substrate is clean and sound. Here’s how:
Remove contaminants: Use a pressure washer or scrub brush with water and detergent to eliminate dirt, grease, and loose material.
Repair cracks and holes: Fill gaps with an appropriate filler, like concrete repair mortar for new concrete. For masonry, use a flexible repair compound. Let it cure before proceeding.
Prime or seal: If your surface is porous (like new concrete) or previously painted, apply a suitable primer or sealer to improve adhesion and paint compatibility.
Special situations: efflorescence, rising damp, and contamination
Some substrates need extra attention before painting. Here’s what to look for:
Efflorescence: White powdery deposits on masonry indicate salt buildup. Remove with a wire brush or acid solution (follow safety guidelines), then rinse and let dry.
Rising damp: Dark patches or mold near the ground level suggest rising damp. Treat with a damp-proof course, let it cure, then clean and prepare the surface as usual.
Contamination: Oil, grease, or other substances can prevent paint adhesion. Clean thoroughly using appropriate solvents, rinse, and allow to dry before painting.
Application Methods, Tools, and Quality Checkpoints
Different application methods change how thick and even the protective film will be. Brushes and rollers lay material on thicker in small areas and can leave texture; spraying gives a smoother, thinner film but needs steady overlap and masking. Know that tool choice affects how many passes you make and how the finish looks when it dries.
List and keep the right tools: good brushes, the correct naps for rollers, a suitable sprayer, mixing and measuring gear, and a wet film gauge or consistent sight lines to check coverage. Getting these right saves you rework and gives a uniform thickness, so check the product label or datasheet for specific guidance and follow it on overlap, thinning, and inspection steps.
Tools and materials checklist
Before you start painting, make sure you have all the necessary tools and materials to ensure a smooth application process.
- Safety gear: Gloves, goggles, and a respirator for protection.
- Measuring tools: Tape measure and level for accurate application.
- Applicators: Brushes (2-3 inches), rollers (9-18 inches), or spray equipment depending on the method chosen.
- Mixers: Paint stirrer or drill mixer to ensure even consistency.
- Surface prep items: Scraper, sandpaper (120-grit), putty knife, and primer for proper surface preparation.
- Drop cloths: To protect surfaces from paint spills.
- Paint cans or buckets: For easy access to the paint during application.
- Ladders or scaffolding: For reaching high areas safely.
Quick rule: Skipping any of these can lead to poor coverage, inconsistent finish, and potential safety hazards.
Visual checkpoints during and after application
Regularly inspect your work during and after application to ensure a high-quality, even finish.
- Sags: Check for any thick areas that may drip or run. Immediately scrape off excess paint with a putty knife.
- Pinholes: Look for small holes in the film caused by insufficient coverage. Reapply paint to these areas.
- Holidays: Inspect for any missed spots or thin areas where the substrate is visible. Touch up with a brush or roller.
- Sheen inconsistency: Ensure the sheen is even across the entire surface. Adjust application method if necessary.
- Bubbles: Check for trapped air under the paint film. Gently pop them with a needle and reapply paint.
- Cissing (orange peel effect): Look for areas where the paint has beaded up instead of leveling out. Lightly sand and repaint these spots.
- Orange peel texture: Inspect for an uneven, textured finish. This could indicate improper application or surface preparation. Sand lightly and repaint.
Quick rule: Regular visual checks help catch issues early, saving time and paint in the long run.
Testing, Standards, and Material Specs Explained
Common lab tests and specifications—such as elongation, tensile strength, vapor permeability, and recommended dry film thickness—translate into on-site expectations like flexibility, breathability, and durability. Rather than deciphering raw reports, look for the performance claims on the technical data sheet and verify the specific test metrics the manufacturer provides.
If a particular property matters for your job (for example elongation for movement-prone walls), ask for the exact test result and method from the product literature and compare like-for-like between products. When in doubt about a standard or test method, request clarification from the manufacturer or supplier so you know what the numbers mean in practice.
Which test results matter (adhesion, elongation, permeability)
The lab reports you get from manufacturers are filled with numbers. But which ones really matter for your job? Let’s break down the key tests:
- Adhesion: This tells you how well the paint sticks to the surface. Poor adhesion can lead to peeling and flaking.
- Elongation/Elastic Recovery: These show the paint’s flexibility. High numbers mean it can stretch and snap back without cracking, crucial for crack-bridging.
- Water Vapor Transmission (WVTR): This measures how much water vapor can pass through the paint. You want a balance – too low, and moisture gets trapped; too high, and water comes in from outside.
- Weathering: This tests how the paint holds up to sunlight, temperature changes, and other outdoor conditions. It’s key for long-lasting performance.
How to read a datasheet and choose based on performance goals
Product datasheets are like treasure maps, guiding you to the right paint. Here’s how to navigate them:
- Crack-Bridging: Look for claims about crack-bridging capability. If your surface has cracks, this is a top priority.
- Breathability: Check the WVTR. For masonry, you want some breathability to prevent moisture buildup. Too low, and you might see efflorescence or dampness.
- Adhesion: Ensure it’s suitable for your substrate. Some paints are better on concrete than others.
- Durability: Check weathering data to ensure it can handle your climate’s conditions.
Maintenance, Troubleshooting, and Lifecycle Planning
A maintenance roadmap starts with periodic inspections for cracking, delamination, chalking, and dirt accumulation and proceeds to cleaning, local repairs, or full recoats as dictated by condition. Keep a record of the original product used, application dates, and any repairs so future interventions match the system requirements.
Common failures include inadequate surface prep, incorrect film thickness, and moisture issues; fix these by removing failed areas, repairing substrate problems, and applying the correct primer and coating system per instructions. If you’re unsure how to repair a specific failure mode, consult the product technical literature or the manufacturer for recommended remediation steps.
Common problems and fixes
Elastomeric and masonry paints, while durable, can face issues over time. Here’s how to spot them and fix:
Peeling or Blistering: This could be due to poor adhesion or moisture trapped under the paint. Scrape off loose paint, clean the surface, and apply a primer before repainting.
Hairline cracks reappearing: If cracks are reappearing, it might mean the substrate is still moving or there’s an underlying issue like settlement. Fill cracks with an elastomeric filler, let it dry, then sand and repaint.
For masonry paint, efflorescence (white salt deposits) can appear due to moisture. Scrub off with a stiff brush and diluted muriatic acid, rinse, and let dry before repainting.
Expected service actions and decision points for repainting
Instead of recoating on a set schedule, assess your paint’s condition to decide when to clean, touch up, or fully recoat:
Cleaning: If dirt or mildew is the only issue, a good cleaning might be all you need. Use a pressure washer or a solution of water and bleach for mold.
Touch-up: For minor chips or scratches, touch up with leftover paint. No need to recoat the entire area if it’s still in good condition.
Full Recoat: If you notice multiple cracks, peeling, or the paint is failing in large areas, it’s time for a full recoat. Check your paint’s datasheet for recommended recoating intervals based on conditions and follow the application guidelines from earlier in this article.
Conclusion
One critical takeaway: pick the right coating for your situation, but do the prep work and follow the cure and recoat timing to keep the job durable and looking good for years. Safety and proper technique guard against costly mistakes and bad finishes.
Start by cleaning and repairing any cracks, assess the substrate, choose elastomeric or masonry paint based on movement, verify film-thickness targets, apply any primer if required, follow the proper recoat window, work in good weather, test a small area first, and keep notes on results so you can reproduce or adjust as needed, then inspect after the coating cures and seal joints where specified. Safety first means wearing the right PPE, keeping the area ventilated, and never rushing a coat or a cure.
Common mistakes to avoid: skipping crack repair, using the wrong product for the substrate, or ignoring drying and cure times; never overbuild in one pass and never coat wet or freezing surfaces. Keep it simple: test a small area, follow manufacturer guidelines, and don’t mix products unless you know they’re compatible. If you’re unsure, use protective gear and plan for reasonable weather windows to prevent damage and costly retries.
When to call a professional: if you see active movement, large or unrepaired cracks, persistent moisture, uncertain substrate conditions, or the project involves structural elements or critical surfaces. If in doubt, get a pro on board to save time and avoid costly mistakes, then proceed with confidence and finish with a solid, durable coat.
FAQ
Can elastomeric paint bridge small hairline cracks in masonry, and how does that compare to masonry paint?
Elastomeric paint is designed to form a thicker, flexible film that can span small cracks. Masonry paint is thinner and less likely to bridge cracks on its own. Check the product label or manufacturer instructions for crack-bridging claims and limitations.
Will either paint affect moisture movement through the wall, and how do I choose?
Elastomeric coatings tend to be less permeable than traditional masonry paints. If you have moisture coming through the wall, test the wall and check the product’s breathability rating. Always verify guidance on the label and with local conditions.
What should I expect for recoat timing between coats in a DIY project?
Follow the product label for recoat windows and cure expectations. Environmental conditions like temperature and humidity matter. If in doubt, check the manufacturer instructions and plan for a window where the surface is clean and dry before applying the next coat.
Which substrates are suitable and how should I prep before painting?
Both paints work on masonry, but prep varies by product. Clean, rinse, and allow to dry; repair any severe damage per product directions. If you’re unsure about your substrate, read the label and consult the manufacturer instructions or local guidance before proceeding.