
Introduction
EIFS below-grade terminations are where the exterior foam and finish system meet the soil and must be protected from moisture.
In practice, foam right at the soil line tends to fail when moisture wicks in or freeze-thaw cycles push against it. Check the product label and local building guidelines for approved details, and adapt the setup to your site.
Safer transitions use proper flashing, drainage, and a clean reveal between soil and the foam. Follow the manufacturer instructions and local rules for materials and clearances, and plan for a solid moisture barrier. If in doubt, consult the label or a local pro before proceeding.
Key takeaways
- Avoid foam-isolation at soil line; maintain continuous drainage and flashing.
- Use approved transition details that terminate EIFS above grade and away from soil.
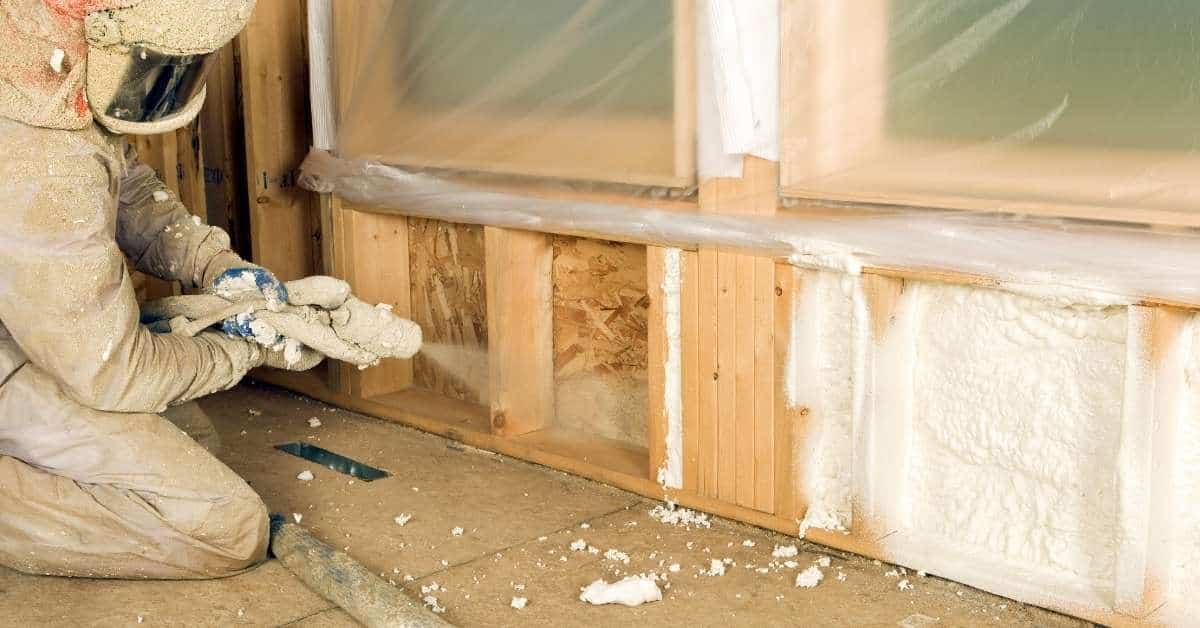
- Always wear eye protection and gloves when trimming foam or applying sealants.
- Inspect for gap-free backing and proper adhesive, sealant, and waterproofing compatibility.
- Document manufacturer guidance and local codes before starting grade-related EIFS work.
- Plan safe drainage planes and termite barrier concepts incorporated into transitions.
Table of Contents
- Introduction
- Key takeaways
- Overview of EIFS and Below-Grade Risks
- Failure Modes and Root Causes at Soil Line
- Codes, Standards, and Manufacturer Limitations
- Safer Design Principles for Grade Transitions
- Detailed Transition Solutions and Details
- Retrofit and Repair Strategies for Existing Installations
- Material Selection, Specs, and Tools
- Inspection, Maintenance, and Long-Term Performance
- Conclusion
- FAQ
Overview of EIFS and Below-Grade Risks
EIFS systems rely on a layered assembly that protects, insulates, and finishes the wall surface. Understanding each component helps you spot weak points at grade. Directly placing foam against soil invites moisture ingress, biological growth, and mechanical damage that can propagate underground and upward.
Terminations at grade are the critical boundary between the wall system and the ground. Proper detailing at this boundary guards against capillary pull, water migration, and physical impacts from soil or mulch. Verify that the chosen detailing method aligns with the product data and local guidance before proceeding.
What is EIFS (components and functions)
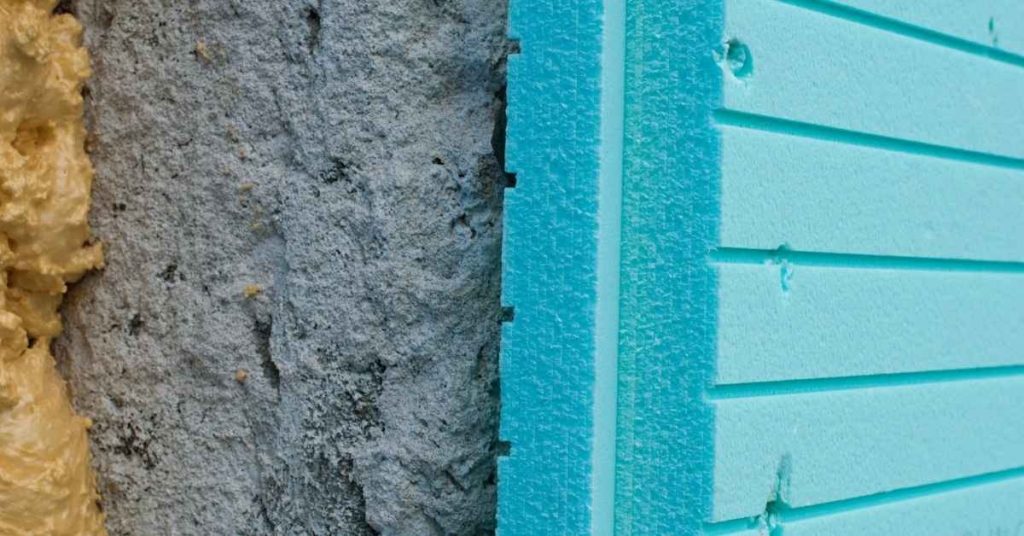
EIFS, or Exterior Insulation and Finish System, is a multi-layered cladding system used on exterior walls. It’s made up of five main components:
Substrate: This is the base layer, usually plywood or oriented strand board (OSB), attached to the building’s frame.
Insulation: Rigid foam boards are applied over the substrate. They provide the insulation for your home.
Base Coat with Mesh: A thick layer of cement-based adhesive is applied over the insulation, embedding a reinforcing mesh for strength and stability.
Finish Coat: The final layer is a thin, textured coating that provides the finished look and protects against UV rays. It also helps control water intrusion.
Why ‘foam near soil’ is problematic
Putting foam insulation in direct contact with soil creates a host of problems:
Soil stays wet for extended periods, promoting sustained wetting of the foam. This restricts drying, leading to moisture buildup that can compromise EIFS performance.
Moist soil invites pests and plant roots that can damage the foam and other layers of your EIFS system.
The soil also subjects the foam to abrasion from foot traffic or equipment, and chemical exposure from fertilizers or other substances. Both can undermine the integrity of the insulation.
Failure Modes and Root Causes at Soil Line
Common failure modes occur where the EIFS meets the soil line, such as moisture intrusion, foam degradation, and damaged or degraded flashing. Each mode often reflects gaps in detailing, incorrect material choices, or poor site grading. Tying these failures to specific conditions helps you target corrections more effectively.
Look for patterns like insufficient drainage, continuous moisture exposure, or incompatible sacrificial components. These symptoms usually point to design or installation shortcuts. Always cross-check against product instructions and local requirements when diagnosing causes.
Water ingress and capillary action
EIFS near soil faces constant water threats. Splash from rain, capillary rise, and retained moisture drive water into the assembly.
Blistering, delamination, and substrate decay follow as foam absorbs water.
Even small cracks can let water in, leading to hidden damage behind the finish.
Physical and biological degradation
Mechanical abrasion from soil, roots, termites, ants, and fungal activity degrade foam and finishes over time.
Roots seek moisture, growing into cracks or gaps. Termites and ants burrow through foam, weakening it.
Fungi feast on damp foam, breaking down its chemical bonds, leading to deterioration and structural compromise.
Codes, Standards, and Manufacturer Limitations
Consult the applicable building codes and local jurisdiction requirements for exterior wall terminations. Codes often set general rules, while local amendments may add specifics for below-grade interfaces. Manufacturer literature provides the recommended installation methods and limitations for each product line.
Be aware of common exclusions that pertain to below-grade terminations. When in doubt, verify with the product label, data sheet, and the authority having jurisdiction. If a requirement isn’t clear, document the consulted sources and proceed cautiously with permitted options.
Building codes and local jurisdiction issues
First things first, check your local building codes. They’re the law of the land for your project.
Look for rules about insulation at grade level, waterproofing continuity, and required inspections. These vary by region, so don’t assume one size fits all.
Example: Some areas might require a specific type of waterproofing membrane below the EIFS termination, or regular inspections during installation.
EIFS manufacturer installation limits and warranties
EIFS manufacturers know their stuff. They’ve tested their products under various conditions, so listen to what they say.
Check the manuals for installation limits. Many prohibit foam-to-soil contact or require specific flashing and drainage details at grade level.
Warranties: These are a big deal. They often depend on following manufacturer guidelines. Don’t void your warranty by ignoring these rules.
Safer Design Principles for Grade Transitions
Keep foam away from soil wherever practical and design a clear separation at the base of the wall. Use a drainage plan that channels water away from the EIFS plane and toward proper flashing and drainage paths. Incorporate durable sacrificial elements to shield the EIFS from incidental contact with soil or mulch.
Choose transition details that emphasize robust flashing, continuous moisture control, and easy inspection access. Align these choices with manufacturer instructions and local code expectations. When in doubt, compare multiple reputable sources and note any deviations for approval.
Maintain clearances and slopes
Maintaining a clear vertical space between your EIFS finish and soil is crucial. This break helps prevent water from the soil wicking up into your wall.
Horizontal clearance is just as important. Keep plants, mulch, or other organic materials at least 6 inches away from your EIFS to discourage pests and moisture buildup.
Grade and flash your walls properly to direct water away from the base of your structure. A 5% slope away from the wall is recommended for proper drainage.
Use of durable termination materials
Choosing robust materials at the grade transition is key to protecting your EIFS. The right materials can prevent cracking, staining, and weak bonds.
- Metal or composite flashings: Stainless steel or aluminum are good choices due to their durability and corrosion resistance. Look for products with a long warranty and avoid those with sharp edges that could damage your EIFS.
- Masonry skirts: Concrete, brick, or stone can provide a durable barrier. Ensure they’re properly flashed and sealed at the interface with your EIFS to prevent water intrusion.
- Concrete plinths: These are strong and long-lasting but require proper curing and sealing to prevent moisture migration into your EIFS.
Detailed Transition Solutions and Details
Incorporate flashing integration that overlaps a water-resistive barrier and terminates into a backchannel or drip edge. Ensure WRB overlaps are maintained and that drainage gaps are present to prevent capillary draw into the foam. Use backstops or terminating elements that can tolerate soil contact without compromising the substrate.
Consult drawings for exact dimensions and installation sequencing. Do not improvise critical gaps or terminations without verifying with the project’s detailing drawings and the product guidance. If references differ, choose the most conservative, code-compliant option and document the decision.
Flashing and cap systems
Continuous flashings are key to preventing water intrusion at grade transitions. They should slope positively, directing water away from the wall.
Tie flashings into the WRB and substrate using mechanical fasteners or adhesives. Don’t rely on caulking alone.
Use cap systems that overlap flashings, creating a double barrier against water entry. Ensure caps are securely fastened and slope away from the wall.
Integrating WRBs, air barriers, and drainage
The sequence of water-resistive barriers (WRB), drainage layers, and EIFS is crucial. Start with a continuous WRB at the base, lapping up onto the substrate.
Overlap WRBs by at least 6 inches when transitioning to the next layer. This ensures no gaps for water intrusion.
Install drainage layers over the WRB, allowing water to escape while preventing it from reaching the EIFS. Ensure these layers are continuous and slope positively.
The EIFS should be applied over this system, lapping onto the drainage layer and WRB. This creates a continuous, drainable plane that protects the EIFS and the structure behind it.
Retrofit and Repair Strategies for Existing Installations
Begin with a practical assessment to identify the easiest path to restore proper grade transitions. Localized remediation may involve targeted flashing, sealant replacement, or minor scaffold-accessible work. Full system replacement is considered when the underlying defects are widespread or recurrent.
Use decision criteria that weigh cost, downtime, and long-term performance. Refer to the product manuals and local rules when selecting repair methods. Always document the assessment, repaired details, and any deviations from standard practice.
Inspection checklist and damage assessment
Before starting any repair work, it’s crucial to understand the extent of damage. Use this checklist when you suspect issues at your EIFS below-grade termination.
- Visual Inspection: Check for cracks, gaps, or missing pieces. These could indicate physical degradation or water ingress.
- Probe Test: Gently probe the EIFS with a flathead screwdriver to check for delamination. Be careful not to cause further damage.
- Moisture Readings: Use a moisture meter to detect any hidden water intrusion. readings above 15-17% indicate potential problems.
- Contamination Check: Look for signs of biological growth like mold or mildew, which can cause structural issues over time.
- Structural Assessment: Check for any bulging, warping, or soft spots in the EIFS. These could indicate serious structural damage.
- Drainage Inspection: Ensure that water is draining away from the EIFS properly. Clogged or missing weep holes can lead to water buildup.
- Flashing Check: Inspect the flashing at the base of the EIFS. Damage here can allow water to seep behind the EIFS.
- Clearance and Slope Check: Ensure that there’s adequate clearance from the ground and proper slope away from the building. Improper clearances can lead to water pooling and damage.
Quick rule: Always inspect before you repair. Skipping this step could lead to costly mistakes and missed issues.
Common retrofit fixes and their limitations
When dealing with existing EIFS installations, there are several retrofit fixes you can employ. However, it’s important to understand their limitations.
Excavation and Protective Skirts: Excavating around the problem area and installing a protective skirt can help prevent further damage from soil contact. This is a temporary fix as it doesn’t address the root cause of water ingress. It also requires regular maintenance to ensure the skirt remains effective.
Through-Wall Flashings: Installing through-wall flashings can help direct water away from the EIFS. However, this is only effective if the flashing is properly installed and maintained. It’s also a temporary fix as it doesn’t address underlying issues like poor drainage or inadequate clearances.
Drainage Mat Installation: Installing a drainage mat behind the EIFS can help manage water intrusion. However, this is only effective if the mat is properly installed and maintained. It’s also a temporary fix as it doesn’t address the root cause of water ingress. In some cases, it may even trap water, leading to further damage.
Material Selection, Specs, and Tools
Prioritize materials that resist moisture migration, penetrating damp, and physical damage at grade. Check key standards and product data sheets to confirm compatibility with below-grade interfaces. Prepare a contractor-focused tools and materials checklist to keep on site.
Verify performance claims against the project requirements and local codes before purchasing. If a spec is unclear, rely on labeled product guidance or manufacturer instructions and record the reference. Do not rely on memory or generic statements for critical grade transitions.
Material specs and standards explained
The right materials make all the difference in a durable, long-lasting EIFS below-grade termination. Here’s what to look for:
- Insulation: Check R-value (higher is better), density, and moisture resistance.
- Sealants: Look for low modulus, good adhesion, and elongation. Avoid high-modulus sealants that can crack.
- Flashings: Specify wide, reinforced flashings with good adhesion and flexibility.
- Waterproofing membranes: Prioritize permeability (low), durability, and adhesion to EIFS and substrate.
- Fasteners: Use corrosion-resistant fasteners, check grip length, and ensure they’re suitable for your substrate.
Tools and materials checklist
Before starting any EIFS below-grade termination or repair, consult this checklist to ensure you have everything needed.
- Tape measure: Accurate measurements prevent mistakes.
- Level: Ensure your installation is plumb and level for proper drainage.
- Utility knife: For cutting materials cleanly. Dull blades cause damage.
- Caulk gun: Essential for applying sealants smoothly.
- Trowel or notched spreader: For applying thin, even coats of sealant and membranes.
- Fasteners and screws: Have the right type and size for your substrate.
- PPE (Personal Protective Equipment): Safety glasses, gloves, and dust masks are crucial.
- Testing equipment: Moisture meters and infrared thermometers help diagnose issues.
Quick rule: Always double-check your materials and tools before starting any job to avoid delays and mistakes.
Inspection, Maintenance, and Long-Term Performance
Set routine inspection intervals to monitor grade transitions, flashing integrity, and drainage paths. Establish maintenance tasks such as cleaning, resealing, and reinforcing protective elements as needed. Keep a simple record of observations and corrective actions taken.
Implement a forward-looking plan to capture early signs of failure and extend service life. Compare findings to manufacturer guidance and local requirements, adjusting the plan as products or codes change. If you detect uncertainty, verify with the appropriate documentation and update the maintenance log accordingly.
Visual checkpoints and monitoring
Regularly inspect your EIFS below-grade terminations to catch any issues early. Here’s a simple visual checklist.
- Check for stains: Discoloration can indicate water intrusion or moisture problems.
- Soft spots: Gently press the surface. Softness may signal hidden damage.
- Cracks: Even hairline cracks can let in water and should be sealed immediately.
- Insect tracks: Pests like termites or carpenter ants can cause structural damage.
- Mold or mildew: Fuzzy growth indicates moisture and potential mold problems.
- Check weep holes: Ensure they’re clear to allow water drainage.
- Inspect flashing: Cracked or missing flashing can lead to water intrusion.
- Examine caulking: Check for cracks or gaps that could let in water.
Quick rule: Inspect annually, or after heavy rain or snow melt. Address any issues promptly to prevent costly repairs.
When to call professionals and documentation practices
Knowing when to involve professionals can save you time, money, and headaches. Here’s a guide on when to call in the experts.
- Structural concerns: If you notice significant cracks, bulging, or other structural issues, contact a structural engineer immediately.
- Mold growth: If mold covers an area larger than 10 square feet, hire a professional mold remediator.
- Water intrusion: Persistent water problems may require a forensic specialist to find the source.
- Document inspections: Keep records of all visual inspections and any findings.
- Record repairs: Document all repairs, including what was done, when, and by whom.
- Keep manufacturer comms: Maintain copies of all communications with the EIFS manufacturer regarding warranties or maintenance advice.
Quick rule: Don’t wait until problems are severe before calling in professionals. Regular documentation supports warranty claims and future maintenance.
Conclusion
Protecting below-grade EIFS comes down to safe, durable transitions and sticking to proven details. Do the work with moisture control in mind, verify every transition against manufacturer guidance, and test changes in a small area before you scale up.
First, check the primary items in order: ground and grade are kept away from the EIFS, flashing and drainage paths are in place, the transition from wall to grade is solid and properly sealed, materials are compatible with the existing system, and you only proceed after confirming the details with risk-aware, field-proven methods. If any of these are missing, stop and address them before continuing. Do not skip flashing or moisture barriers; test critical changes on a small area first; and follow the exact installation steps recommended by the system maker.
Common mistakes to avoid are rushing the retrofit, neglecting the soil-contact requirements, and using foam or other foam-core components in contact with soil without proper protective detailing. Safety rules: work in dry conditions when possible, inspect for moisture intrusion regularly, wear appropriate eye and skin protection, and keep the area well-ventilated during any repairs. If you see water staining, soft spots, or concrete movement near the terminations, pause and reassess before proceeding.
When to call a professional: if you encounter persistent leakage, widespread damage, uncertain grade levels, or you lack confidence with flashing, backer support, or code-critical details. Otherwise, stay disciplined, follow the documented transition details, and stay focused on long-term performance. With careful steps and sound judgment, you can get a durable, safer finish that looks right and lasts.
FAQ
What are safe clearances and transitions for EIFS near soil?
Keep the foam and any moisture barrier away from direct soil contact. Use a proper gap and flashing detail at grade, and follow the manufacturer’s instructions for termination height and protection. If in doubt, check the product label and local rules for exact clearances.
How can I tell if my foam is at risk where it meets the ground?
Look for cracks, gaps, or water stains at the base. Any sign of dampness, staining, or deterioration means it’s not protecting the wall correctly. Stop and reassess the transition details and waterproofing before continuing.
What practical steps improve the transition from wall to ground?
Use a proper sill/bleed strip, flashing, and a solid finish cap to direct water away. Ensure the foam is covered by a protective layer or corrosion-proof edge so soil and mulch don’t soak in. Always follow the manufacturer instructions for almost any transition detail.
What should I check before I repair or retrofit an EIFS grade transition?
Confirm the existing system’s compatibility with any repair kit or new materials. Read labels and datasheets for the exact installation requirements. If local rules apply, follow them and get professional guidance if the retrofit is complex.