

Introduction
Edge-and-Corner Concrete Polishing with a Small Grinder is about using a compact handheld grinder to smooth and shine the edges and corners of a concrete surface. It’s a practical, do-it-yourself approach that fits tight spots and uneven edges. Plan for safety and steady, slow passes to avoid gouging or overheating.
For small spaces, choose a grinder with a slim profile and good maneuverability, and pair it with diamond tooling designed for edge work. Check the tool’s instructions and labeling for compatible discs, grit ranges, and best practice in corners, and follow local safety rules on eye, ear, and dust protection. Start with light passes, keep the grinder flat or angled as needed, and let the tool do the work without forcing it, pausing to cool when needed.
Key takeaways
- Choose a compact handheld grinder with a narrow profile and adjustable guard for edges.
- Diamond tooling options: segmented, turbo, or continuous rim adapt to edge shape.
- Setup and safety: inspect guards, PPE, and stable position before grinding corners.
- Practice light passes along edges, avoiding flat grinding to preserve edges.
- Use dust control: connect extractor, use water if allowed, and monitor debris.
- Common mistakes: misaligning tooling, overheating, or skipping corner finish; check results.
Table of Contents
- Introduction
- Key takeaways
- Why Choose a Small Handheld Grinder for Edges and Corners
- Types and Configurations of Small Grinders
- Diamond Tooling Map for Edges and Corners
- Pre-Job Edge-and-Corner Preparation
- Step-by-Step Handheld Polishing Workflow
- Dust Control, Extraction, and Wet Vs Dry Choices
- Safety for Working in Corners and Confined Areas
- Common Mistakes, Troubleshooting, and Fixes
- Conclusion
- FAQ
Why Choose a Small Handheld Grinder for Edges and Corners
A small handheld grinder shines in tight spaces where larger machines won’t fit. It provides portability and a slim profile that helps you reach stubborn corners and curved edges with better control. This is about precision detailing rather than bulk material removal.
For edge work, a handheld unit excels at shaping and spot remediation, while larger walk-behind grinders handle broad, flat surfaces and heavy leveling. Setups and accessories matter, including guards, dust-collection compatibility, and the right discs for the job. Practice flat stays against walls, feather passes, and center-to-outside motion to prevent gouges and overheating.
Key benefits for finish quality and access
A small handheld grinder is your secret weapon for top-notch edge and corner polishing. Here’s why:
Improved Access: Slip into tight spaces where larger machines can’t reach. Get right up against walls, under cabinets, or around obstacles.
Reduced Edge Feathering: With a small grinder, you can feather edges smoothly. No more harsh lines or abrupt transitions.
Better Control: Polishing and profiling small zones is a breeze with precise control. Keep your tool flat to walls, work from the center outward, and maintain even contact for perfect results.
Limitations and when not to use a handheld
A small grinder is mighty, but it’s not always the right tool. Know its limits:
Area Size: For large flat areas, a walk-behind grinder is faster and more efficient. Don’t struggle with a small grinder where it’s not needed.
Throughput: Small grinders remove material slower than larger machines. If you’re in a hurry or have a big job, consider escalating to heavier equipment.
Operator Fatigue: Working at arm’s length and maintaining control can tire you out quickly. If the job is large or complex, switch to a floor-level machine before fatigue sets in.
Types and Configurations of Small Grinders
The common categories include single-disc handheld units, multi-head machines, and angle grinders adapted for concrete. Each has its own use case and expected performance, especially on edges and corners. Choose based on the task and tool balance you need on site.
Head geometry affects reach and finish: more heads or larger discs reach differently and influence edge access. Look at compatibility for attachments, shrouds, and dust kits, and understand how corded or cordless power, RPM, and torque play into control and heat. Ergonomics and technique matter to minimize gouging and chatter.
Head styles and wheel sizes to consider
When choosing a small grinder for concrete work, you’ll encounter different head styles. Each has its pros and cons.
Single-disc grinders are lightweight and easy to maneuver. They’re great for edges and tight corners but lack power for heavy-duty tasks. Disc sizes typically range from 4″ to 7″.
Offset disc grinders offer better reach into corners due to their angled head. They’re useful for polishing edges and hard-to-reach areas, with discs usually ranging from 5″ to 9″.
Multi-head (3-head) machines provide faster coverage but are bulkier. They excel at large, flat surfaces but struggle with edges and corners. Disc sizes can range up to 12″ or more.
Power sources, mounts, and dust ports
Small grinders come in various power configurations. Here’s what you need to know:
Corded grinders offer consistent power but limit mobility. They’re ideal for long-duration tasks with a nearby power source.
Battery-powered (cordless) grinders provide portability but may run out of juice mid-job. Choose ones with high-capacity batteries and fast chargers.
Pneumatic grinders are lightweight and powerful, requiring an air compressor. They’re great for professional use but need careful maintenance.
Most grinders have dust ports for vacuum attachment. Check the port size (usually 1-1/4″ or 2-1/2″) and ensure your vacuum hose fits. Some may require adapters.
Diamond Tooling Map for Edges and Corners
Diamond tooling options for edges include pucks, small cup wheels, segmented cups, and resin pads. Each type has strengths for profiling, blending, or cutting, with typical grit ranges to match the task. Match tool selection to the edge condition and expected sheen.
Tooling shape and contact geometry determine access in tight corners and near walls. Check flange size compatibility and ensure guards don’t interfere. Also verify that RPM limits and machine speed align to prevent glazing or dulling during use.
Tool selection by task: removal, prep, and polish
Choose the right tool for each stage of your edge polishing job. Here’s what works best:
- Heavy Removal (Cutting):
Use metal-bond diamond pucks or small cup wheels (40-60 grit).
These are tough and fast-cutting, perfect for removing old concrete. - Smoothing (Grinding):
Opt for resin pads or segmented cups (80-120 grit).
They smooth out the surface and prepare it for polishing. - Polishing Transitions:
Switch to fine-grit resin pads or small cup wheels (200-400 grit).
These give a smooth, polished finish in tight corners. - Final Polish (Buffing):
Use very fine resin pads or small cup wheels (800-1500 grit).
This gives the final glossy shine. Rentable tools available at 200-400 grit. - Optional: Edge Profiling:
Consider using a profile wheel for clean, sharp edges.
Rentable, but requires practice to avoid damaging edges.
Bond and grit guidance for small-area work
The bond type and grit size affect how your tool cuts and finishes. Here’s what to consider:
Metal Bond: Harder, faster-cutting. Great for heavy removal but can leave scratches if not followed up properly.
Resin Bond: Softer, slower-cutting. Ideal for finishing and polishing. Less aggressive on the surface.
Start with a coarse grit (40-60) for removal, then progress to finer grits (80-1500) for smoothing and polishing. Check manufacturer charts for substrate-specific recommendations and contamination guidelines.
Pre-Job Edge-and-Corner Preparation
Start with cleaning to remove loose debris, dust, and degraded mortar. Mark high-suction areas that could clog the grinder and ensure all loose particles are removed to reduce heat and gouging. Confirm readiness before masking.
Repair cracks and voids with appropriate material and ensure full cure before grinding. Create a simple inspection checklist to verify adhesion and levelness. Isolate the work area and plan masking for edges and nearby surfaces to stay protected.
Cleaning, repairs, and priming tips
Before you start grinding, follow this best-practice order: clean, fill, cure. Here’s how:
Cleaning: Remove loose debris, dust, and degraded mortar using a stiff-bristled broom or brush. This ensures your grinder won’t clog and reduces heat buildup.
Repairs: For cracks and voids, use an appropriate patching material like epoxy or polymer-modified concrete. Ensure it’s fully cured before grinding to maintain adhesion and integrity.
Priming: Apply a thin layer of primer to the repaired areas. This helps with dust control during grinding and promotes better bonding with the new surface.
Masking, transitions, and visual checkpoints
Before you start masking, ensure your area is clean and all repairs are complete. Here’s a checklist to guide you:
- Choose materials: Use tape, film, or aluminum edge separators to protect walls and trim from dust and scratches.
- Test adhesion: Lightly press the masking material onto surrounding surfaces to ensure it sticks. This prevents edges lifting during grinding.
- Cover transitions: Mask where the floor meets walls or other surfaces for a smooth, dust-free transition.
- Check corners: Ensure all corners are well-covered to prevent damage from grinder approach or dust extraction.
- Seal edges: Press down firmly on masking tape edges to create a tight seal and prevent dust leakage.
- Inspect repairs: Verify that repaired areas are flush with the surrounding slab, with no visible gaps or loose mortar.
- Check surface feel: Run your hand over the area to confirm a uniform surface feel. Any rough spots need attention before grinding.
- Avoid overlapping: Keep masking material from overlapping onto areas you’ll be grinding. This can cause gouging or uneven results.
Quick rule: Always do a final walkthrough to verify no edges are exposed and all surfaces are well-protected before starting the grinder.
Step-by-Step Handheld Polishing Workflow
Follow a clear sequence from coarse profiling to fine polishing, progressing through grits to achieve the desired edge finish. Use a small-diameter cup or diamond plug and keep orientation correct to avoid gouges. Edge guards help maintain contact and control.
Manage dust and safety by matching extraction to the grinder and selecting the proper bonding for edges. Inspect frequently with a straightedge or feeler gauge, and blend transitions to match the main floor sheen. Track progress and document results for repeatability.
Step-by-Step Process
The following sequence will guide you through the handheld polishing workflow, ensuring a consistent and professional finish on your concrete edges and corners.
- Preparation: Ensure safety with proper PPE, secure the work area, and check your tools. Tip: Always inspect diamond tooling before use.
- Start Coarse: Begin with 40/60 grit to remove heavy imperfections. Work in small sections, keeping the grinder level.
- Progressive Gritting: Move up through 80, 120, 200, and 400 grits, allowing ample time for dust extraction between steps.
- Final Polish: Use 800 grit to achieve a smooth, polished finish. Be patient; this step may take longer.
- Cleanup & Final Check: Vacuum the area, remove masking, and inspect your work with a straightedge or feeler gauge. Note: If you find any issues, address them immediately.
Techniques for consistent passes in tight spaces
Mastering these techniques will help you achieve a uniform finish even in the most challenging areas.
Assume a stable stance, keeping your body close to the wall. Angle the grinder at 45 degrees to avoid gouging and maintain contact with the surface.
Use overlapping passes, moving the grinder in a ‘Z’ or ‘N’ pattern. This ensures no area is missed and prevents halos from appearing.
Tip: For tight radii, use edge guards to protect adjacent surfaces and maintain tool contact.
Transitioning from edge work to the main floor
Blending the polished edges with the main floor requires careful technique. Here’s how:
Start by back-feeding into the main area, using light passes and a lower grit (e.g., 200 or 400) to gradually blend the two surfaces.
Overlap the edge work onto the main floor, ensuring consistent sheen across both zones. Tip: Use a straightedge to check for flatness and uniformity during this process.
Finally, make several light passes over the entire transition area with your finest grit (e.g., 800) to ensure a seamless blend between the edge work and main floor.
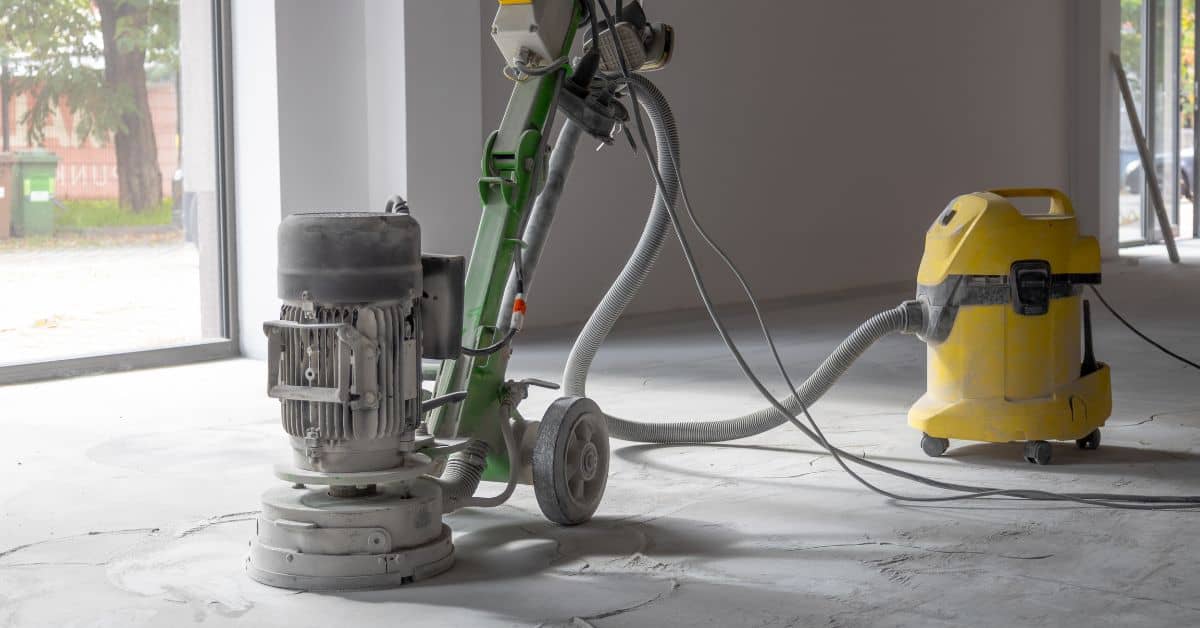
Dust Control, Extraction, and Wet Vs Dry Choices
Dust control options include on-tool extraction, portable HEPA vacuums, and external dust-collection setups. Each has trade-offs for tight edge work, so choose based on space and containment needs. Good shrouds and seals help maximize capture.
Dry grinding is not always required; wet methods can reduce dust but require containment and splash control. Plan hose routing with short bends and avoid snag points. Verify compatibility with local regulations for silica control when applicable.
On-tool extraction setup and hose management
Keeping dust under control while grinding edges and corners is crucial. Here’s how to set up on-tool extraction and manage hoses for smooth work.
- Adapter selection: Choose an adapter that fits your grinder’s dust port. Most small grinders use 1.25″ or 2″ ports.
- Stub hose length: Use a short, flexible stub hose (3-4′) between the adapter and vacuum to minimize resistance. Keep it clear of the work area to avoid snagging.
- Hose routing: Route hoses along walls or ceilings, securing them with cable ties or clips. Avoid sharp bends that can restrict airflow or cause kinks.
- Vacuum compatibility: Match your vacuum’s CFM rating to the grinder’s dust extraction needs. Rentable vacuums start around $50/day, offering high CFM at low cost.
- Hose maintenance: Regularly clean and inspect hoses for tears or blockages. Replace worn-out hoses promptly to maintain suction.
Wet grinding considerations for edges
Wet grinding can be practical in small areas, but it comes with its own set of considerations. Here’s when and how to use wet methods.
When to consider wet grinding: Use wet grinding in tight spaces where dry dust could accumulate and pose a health risk. It’s also useful for cutting back excess material or removing old, crumbling concrete.
Wet grinding generates slurry, which needs containment. Use a wet/dry vacuum with a large capacity tank to collect the slurry. Regularly empty and clean the tank to prevent clogging.
Trade-offs: While wet grinding controls dust, it introduces other challenges. Slurry can splash, so wear appropriate PPE. Wet conditions may also affect tool performance, requiring slower speeds or more frequent diamond tool changes.
Safety for Working in Corners and Confined Areas
Edge work in tight spaces requires a careful stance, grinder orientation, and setup to minimize kickback and distortion near walls. Define the scope and position the tool to maintain control. Keep the work area stable and within reach.
Provider PPE should include eye protection, respirators or masks, hearing protection, cut-resistant gloves, and appropriate clothing. Manage the workspace layout to protect bystanders and maintain ventilation. Use guards and stable supports to reduce slip and tool bounce in corners.
Personal protective equipment and fit
The right gear keeps you safe. Here’s what you need:
- Respirator with P100 filter: Cuts dust exposure, < $50.
- Safety glasses or face shield: Protects eyes from debris, < $20.
- Hearing protection: Blocks loud grinding noise, < $10.
- Cut-resistant gloves: Shields hands from sharp edges, < $30.
- Long sleeves/pants and non-slip shoes: Covers skin, prevents slips, included in workwear costs.
For angled work:
- Dust containment hood: Keeps dust out of face, < $30.
- Respirator fit testing: Ensure proper seal before starting, < 5 min.
Ergonomics and preventing fatigue or repetitive-strain
Working in tight spaces can be tough on your body. Here’s how to keep fatigue at bay:
Stance: Keep feet shoulder-width apart, knees slightly bent for stability.
Rest cycles: Take breaks every 15-20 minutes to stretch and relax muscles. Set a timer if needed.
Tool-holding tips: Use both hands for better control. Keep the grinder close to your body, not extended outwards. Switch hands occasionally to share the load.
Common Mistakes, Troubleshooting, and Fixes
Common finish faults include haze, flat spots, and uneven polish, usually tied to tooling choices or improper passes. Link each symptom to a likely cause such as incorrect grit progression or poor dust control. Use a systematic approach to diagnose.
Check tooling setup and edge-specific attachments, monitor dust setup, and review heat or chatter indicators. If finish is off, adjust feed rate, smooth passes, or switch to a more suitable pad or diamond configuration. Use a quick decision path to decide re-skim, re-polish, or mask for touch-up.
Typical finish defects and remedies
Burn marks, uneven edges, halos, and insufficient bonding for coatings are common issues in concrete polishing. Let’s tackle each one.
Burn Marks: Over-grinding or too much pressure causes heat buildup, leading to discoloration. Fix: Lighten your passes, reduce pressure, and ensure dust control.
Uneven Edges: Inconsistent grinding due to tooling or technique can leave edges rough or over-polished. Remedy: Use consistent feed rate and pressure, switch tools if needed, and re-walk the area with lighter passes.
Halos: These occur when the edge isn’t properly prepared or masked off. Solution: Ensure edges are clean, dry, and well-masked before grinding. Consider touch-up repairs if necessary.
Tooling and machine troubleshooting checklist
Before starting or mid-job, use this quick checklist to ensure your grinder and tools are in top shape.
- Diamond Wear: Check for dull or missing diamonds. Sign: Diminished cutting power, longer grinding time.
- Loose Flanges: Tighten if wobbling or vibrating. Result: Uneven finish, tool damage.
- Electrical Issues: Inspect cord, plug, and switch. Check: No sparks, no tripping circuit breakers.
- Extraction Performance: Ensure vacuum/collector is working. Sign: Excessive dust, reduced grinding torque.
- Pad Bonding: Check for loose or missing diamonds. Result: Inconsistent finish, tool failure.
- Tool Attachment: Ensure it’s secure and suitable for edges/corners. Check: No wobbling, proper fit on grinder.
- Grinder Power: Test before use. Sign: Consistent power, no sparks or smoke.
- Machine Vibration: Check for excessive vibration. Result: Uneven finish, tool damage.
Quick rule: Regular checks prevent mid-job surprises and ensure a consistent finish.
Conclusion
Finishing edges and corners with a small grinder comes down to good tool choice, careful preparation, and steady, safety-minded technique. When you’re patient and disciplined, you get safer work, durable results, and a clean, professional look that lasts.
Run the right setup: confirm you have the correct grinder and diamond tooling for edges, plan your dust control and extraction before you start, decide wet or dry based on the job and your dust plan, test a small, inconspicuous area, start with light passes and basic grit, and keep the tool moving to avoid heat buildup while protecting adjacent surfaces and edges.
Common mistakes to dodge include grinding too aggressively, skipping prep or dust control, and mixing wet and dry methods without proper rinsing or containment. Safety rules to follow are simple: wear protection, secure the work, keep hands clear of the wheel, never force the tool, and stop to reassess if you see glazing, glazing, or chips. If you’re unsure about edge geometry, mounting a tool, or achieving a consistent finish, pause and reassess rather than pushing through.
If the corner is tight, or if the concrete is unusually hard or mixed with troublesome aggregates, it’s wise to bring in a pro rather than risk expensive damage. Stay disciplined, follow your checklist, and you’ll finish confidently with solid results that stand up over time. You’ve got this—take it one pass at a time and keep safety at the forefront.
FAQ
What grinders work best for tight edges and corners?
Look for small, handheld grinders with slim bodies or chamfered guards. Check that the guard and handle configuration fits into tight spaces and that the grinder accepts the diamond tooling you plan to use. Always follow the manufacturer’s instructions for clearance and compatibility.
What diamond tooling options should I consider for edge and corner polishing?
Choose tooling designed for edge work, such as edge-specific segments or cup wheels with manageable widths. Verify compatibility with your grinder’s arbor size and rotation direction. Refer to the tool label or datasheet for recommended surfaces, grits, and max RPM.
How should I set up and ensure safety when grinding in confined spaces?
Secure the work area, wear proper PPE, and use a guard that protects hands and feet. Keep a clear path for dust extraction and avoid loose clothing. Always consult the grinder’s manual for setup steps and safe operating procedures before starting.
What are practical tips for grinding technique and maintenance?
Use light, steady passes and let the tool do the work; avoid pressing hard. Inspect and clean the grinder after use, removing dust and debris from vents and bearings. If you notice overheating or unusual vibration, stop and check the tooling, guards, and mounting per manufacturer instructions.