

Introduction
Drainage mats and dimple boards are protective layers placed against basement walls to manage moisture. They both create a gap for water to drain and help keep insulation and framing dry, but they work a bit differently. Choose based on how the wall will be finished and the ease of installation.
In practice, you’ll compare ease of installation, availability, and how they pair with your wall setup. Think about benefits and features, then check manufacturer instructions or local rules for any requirements before you buy. Plan your steps step by step and be ready to adapt based on what you find on the wall and in your materials.
Key takeaways
- Drainage mats and dimple boards serve different backfill drainage roles behind walls.
- Verify manufacturer instructions and local code requirements before starting installation.
- Plan for moisture control, hydrostatic relief, and indoor air quality benefits.
- Prepare a materials checklist with backfill, fasteners, tapes, and protective barriers.
- Safety note: keep electricals and gas lines clear when trenching or sawing.
- Assess site conditions to choose retrofit vs new construction drainage strategy.
Table of Contents
- Introduction
- Key takeaways
- Definitions and Quick Comparison
- How They Protect Basement Walls — Hydrostatic Pressure, Moisture Control, and Indoor Air Quality
- Materials, Durability, and Sustainability
- Installation: Step-by-Step for Drainage Mats and Dimple Boards (with Safety Notes)
- Tools, Materials Checklist, and How to Read Product Specifications
- Cost Comparison and Lifecycle Maintenance
- Performance by Site Conditions — Soil Types, Water Table, and Retrofit Vs New Construction
- Choosing the Right System and Common Mistakes to Avoid
- Conclusion
- FAQ
Definitions and Quick Comparison
Drainage mats are rolled or sheet products with a textured surface that channels surface water and condensation away from the wall. They often have a fabric backing and are made from materials like HDPE or polypropylene. Dimple boards are wall drainage boards with a dimpled core that creates a continuous path behind the wall to move water toward a drainage system.
Core purposes differ: mats mainly redirect moisture at the interior face and prevent splash or surface seepage from reaching the wall, while dimple boards establish a persistent drainage channel behind the wall to relieve hydrostatic pressure. Typical installation contexts include basement, crawlspace, and foundation interiors or exteriors, depending on moisture sources and existing waterproofing. Consider surface prep, compatibility with membranes, and how each system interacts with backfill drainage paths. Use quick decision cues to guide the choice and consider layering or combining systems when conditions demand. Be mindful of corners, transitions, and substrate flatness to avoid gaps that undermine performance.
What is a drainage mat?
A drainage mat, also known as a drainage board, is a waterproofing product designed to protect basement walls and manage moisture. It’s typically made from extruded polystyrene (XPS) or expanded polystyrene (EPS), with a continuous core or channeling layer that moves water away from the wall.
Drainage mats are usually applied vertically on basement walls, but they can also be used horizontally in crawlspaces. They come in rolled or sheet form and have a permeable face to allow water entry while preventing soil intrusion.
Key features: Continuous core or channels for water movement, permeable face for water entry, impermeable back for waterproofing.
What is a dimple board?
A dimple board, also known as a wall drainage board or dimpled HDPE sheet, is another type of waterproofing product used to protect basement walls. It’s made from high-density polyethylene (HDPE) with small dimples on one side, creating an air gap between the wall and the board.
The dimples allow water to flow behind the board while preventing hydrostatic pressure buildup. Dimple boards are typically used in combination with a waterproofing membrane or spray-applied product for optimal protection.
Key features: Dimpled surface creating an air gap, HDPE material for durability, designed to manage hydrostatic pressure.
Side-by-side functional comparison
Here’s a quick side-by-side comparison of drainage mats and dimple boards:
Drainage Mats: Channel water away from walls, prevent soil intrusion, typically used with existing waterproofing, easy to install.
Dimple Boards: Create an air gap for continuous drainage, manage hydrostatic pressure, often used in combination with membranes or sprays, may require additional surface prep.
How They Protect Basement Walls — Hydrostatic Pressure, Moisture Control, and Indoor Air Quality
Drainage mats relieve hydrostatic pressure by directing surface water away from the interior wall, reducing the amount that can seep inward. They redirect moisture near the surface to lessen interior exposure. Dimple boards create a continuous drainage path behind the wall, which helps keep backfill water from pressing directly against the interior finish.
In moisture management, mats bypass soil water toward the exterior drainage path, while boards redirect it behind the wall. That difference influences relative humidity and indoor air quality by changing moisture transport paths and condensation potential. Practical thresholds and indicators come from moisture measurements, surface dampness, and mold signs. In installation contexts, consider basement slope, soil type, and drain outlet location to gauge long-term performance. Remember that more material is not always better; proper drainage path and coverage matter most, and verify compatibility with existing coatings or membranes. Visual prompts can help map hydrostatic paths to observed conditions indoors.
Hydrostatic pressure relief and structural protection
The main job of drainage mats and dimple boards is to deal with hydrostatic pressure – the force of water pushing against your basement walls. Here’s how they do it:
Drainage Mats: These are like a net, catching water moving sideways through soil and turning it into vertical flow. This reduces the pressure on your walls, preventing cracks and stopping water from seeping in.
Dimple Boards: They work similarly but have tiny cups that hold water, then release it slowly downwards. This also reduces lateral pressure, protecting your walls.
Both systems need a continuous drainage path to work properly. That means water has to flow freely from the mat or board, through your footer drain, and out of your home.
Moisture control and impact on indoor air quality
Keeping moisture under control is key to a healthy basement. Here’s how drainage mats and dimple boards help:
Drainage Mats: They let water bypass the wall, preventing it from soaking in and making the walls damp. This reduces mold growth and musty odors, improving indoor air quality.
Dimple Boards: These redirect moisture away from the wall, keeping it dry. While they don’t stop all water like mats do, they significantly reduce dampness, limiting mold and improving comfort.
Remember, relative humidity should stay below 60% indoors to prevent mold growth. Effective drainage helps keep your basement within this range.
Materials, Durability, and Sustainability
Material options include HDPE, polypropylene, and composite-core options; each offers a balance of stiffness, puncture resistance, and long-term stability. Core choice affects how well the product resists deformation under backfill load and moisture exposure. Look for a construction that holds up in cold basement conditions and remains compatible with backfill materials.
Common degradation modes involve chemical exposure from concrete, thermal cycling, moisture ingress, and potential microbial concerns if seams or edges allow water entry. Check durability indicators like thickness, puncture resistance, seam integrity, and compatibility with sealants or membranes. Installation orientation and fastening methods influence how well the system stays intact over time. Consider sustainability aspects such as recyclability and warranty implications, and compare lifetime expectations against code or green-building targets. Use a practical checklist to judge durability through field cues and simple tests grounded in manufacturer guidance.
Common materials, expected durability, and degradation modes
The material you choose for your basement drainage mat or dimple board will significantly impact its performance and lifespan. Let’s look at the common materials and their properties.
- HDPE (High-Density Polyethylene): Lightweight, flexible, and resistant to chemicals and moisture. Spec: Check for UV-stabilized HDPE to prevent degradation from sunlight exposure. Tip: Avoid using non-UV stabilized HDPE if your basement is prone to flooding.
- Polypropylene: Strong, rigid, and resistant to chemicals and moisture. Spec: Look for high molecular weight polypropylene for better durability. Tip: Be aware that polypropylene can become brittle over time due to thermal cycling.
- Composite-core materials: Combines the benefits of multiple materials, often including plastic and foam cores. Spec: Check the compressive strength rating to ensure it can handle backfill pressure. Tip: Avoid composite cores with low compressive strength to prevent cracking under load.
- UV exposure: Can degrade plastics over time, leading to brittleness and reduced performance. Avoid: Using non-UV stabilized materials in basements with potential sunlight exposure.
- Chemical and alkali resistance: Concrete can release alkaline substances that may degrade some materials. Spec: Ensure the material is resistant to alkalis for long-term stability.
Environmental impact and recyclability
When choosing a drainage mat or dimple board, consider the environmental impact and sustainability of the material. Here’s what to look for:
Recyclability: Check if the product can be recycled at the end of its lifespan. Some materials may not be recyclable in your area, so it’s worth checking with local recycling centers.
Embodied plastic content: Consider the amount of plastic used in production and how that impacts the environment. Lower embodied plastic content is generally better for sustainability.
Sustainable options and certifications: Look for products with eco-friendly materials, recycled content, or certifications like GreenGuard or EcoLogo to ensure you’re making an environmentally responsible choice.
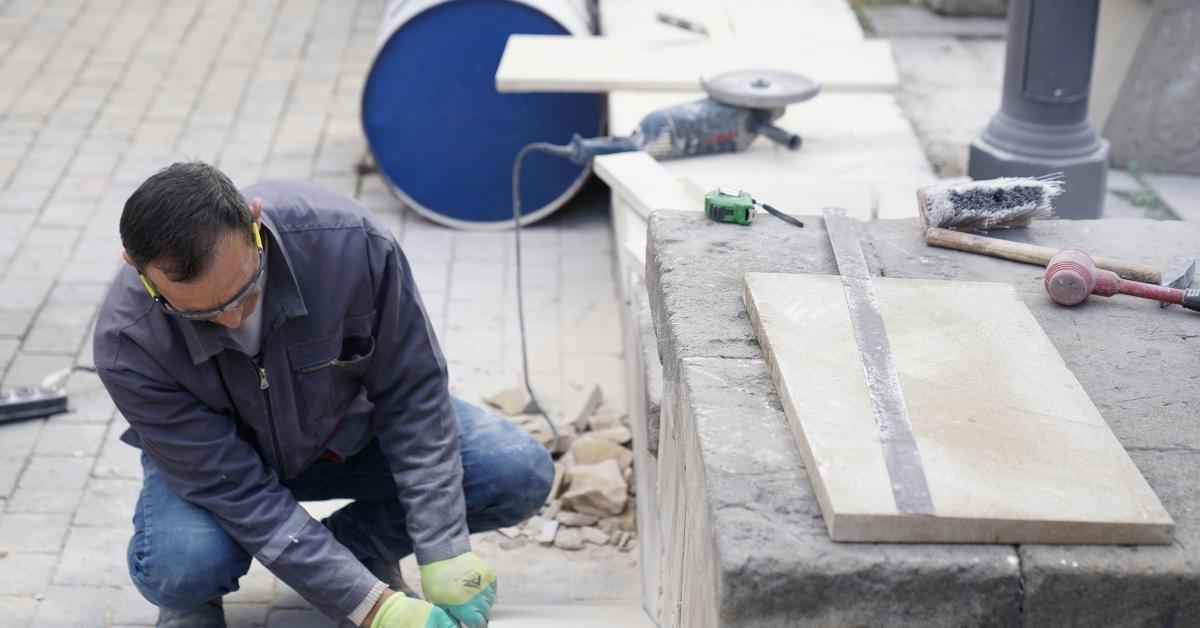
Installation: Step-by-Step for Drainage Mats and Dimple Boards (with Safety Notes)
Outline the full installation sequence: start with surface and wall prep, then secure the drainage mat or dimple board, and finally connect to perimeter drainage and any wall membrane. Plan for a clean, flat substrate to prevent gaps that trap backfill. Verify seams and overlaps follow the system’s guidelines before proceeding.
Describe attachment methods and substrate prep: adhesives, mechanical fasteners, or tape, with attention to cleanliness and levelness. Explain integration points with waterproofing membranes, including sequencing and seal details at seams. Outline routing to perimeter drains, with cleanouts and weep paths, and emphasize safety steps like PPE and proper lifting. Use a quick post-install verification checklist to catch issues early and ensure slopes and tolerances align with the next remediation steps.
Step-by-Step Installation Process
The following steps guide you through installing drainage mats and dimple boards, ensuring a safe and effective outcome.
- Preparation: Inspect the site for hazards. Wear appropriate PPE, including safety glasses, gloves, and sturdy boots.
- Surface Prep: Clean and level walls and floors. Apply compatible primer if required.
- Main Installation: Secure drainage mats or dimple boards using recommended adhesives, mechanical fasteners, or tapes.
- Integration with Membranes: Ensure proper sequencing, overlaps, seals at seams, and no voids or penetrations compromise the membrane.
- Connections to Drains: Route, terminate, and clean out connections to perimeter drains or sump systems. Create weep paths to prevent clogging.
Installing drainage mats (vertical and horizontal basics)
Drainage mats are installed both vertically on walls and horizontally at the base. Start from the bottom, working upwards.
Surface Prep: Ensure walls and floors are clean, dry, and free of debris. Apply a compatible primer if required.
Attachment: Use recommended adhesives or mechanical fasteners to secure mats. Follow manufacturer’s guidelines for spacing and overlap.
Seams & Terminations: Seal seams with manufacturer-recommended tape or sealant. Ensure terminations are properly routed to collector drains or sump systems.
Installing dimple boards (attachment, backfill interaction)
Dimple boards provide a drainage plane and protect the waterproofing membrane. Here’s how to install them:
Attachment: Secure dimple boards using recommended fasteners or adhesives. Ensure they are level and properly spaced.
Protecting Membrane: Carefully place dimple boards over the waterproofing membrane, ensuring no damage occurs during installation.
Backfill Interaction: After backfilling, visually inspect for any signs of displacement or damage. Compact soil gently around dimple boards to maintain their position and drainage function.
Safety and site-prep considerations during installation
Ensure a safe working environment by addressing these key aspects:
On-Site Hazards: Identify and mitigate potential hazards, such as unstable soil, trip hazards, or electrical hazards.
PPE: Wear appropriate personal protective equipment, including safety glasses, gloves, hard hat, and sturdy boots.
Shoring & Soil Safety: If working in an excavated area, ensure proper shoring is in place to prevent soil collapse. Be cautious when handling heavy rolls or boards to avoid injury.
Membrane Handling: Handle waterproofing membranes with care to avoid punctures or tears. Keep them clean and dry until installation.
Tools, Materials Checklist, and How to Read Product Specifications
Provide a stage-based tools list for site prep, installation, and post-install checks to keep the workflow steady. Include items for measuring, cutting, fastening, and handling rolls or boards. Plan for storage and transport on-site to avoid damage.
Assemble a materials inventory that covers mats vs. boards, fasteners, sealants, membranes, and backfill needs, while noting soil and moisture considerations. Bring official spec sheets and installation guides, plus warranty terms and certifications. When reading specs, focus on performance drivers like drainage capacity, puncture resistance, and chemical exposure tolerance. Also verify compatibility with backfill materials and any required environmental controls or protective coatings.
Tools, PPE, and consumables checklist
Before you start, ensure you have all the necessary tools and safety gear to keep your job site efficient and safe.
- Tape measure: To ensure accurate cuts and installations.
- Utility knife: For cutting drainage mats and dimple boards to size.
- Cordless drill: With appropriate bit for fasteners. (Without it, installation will be slow)
- Fasteners (screws/nails): Suitable for your chosen drainage mat or dimple board.
- Seam tape/adhesive: To seal joints and prevent water intrusion. (Skipping this can lead to leaks)
- PPE (Personal Protective Equipment): Safety glasses, gloves, and work boots.
- Level: To ensure proper installation and alignment of drainage mats or dimple boards.
- Trowel: For applying sealants and membranes. (Without it, application will be messy)
- Inspection tools (moisture meter, flashlight): To verify proper installation and detect any issues early.
Quick rule: Always double-check your tools and consumables before starting to avoid delays.
How to interpret specs: dimple height, compressive strength, flow capacity
Understanding product specifications is key to choosing the right drainage mat or dimple board for your project.
- Dimple height: Larger cavities allow more water flow. (Lower dimples may not drain efficiently)
- Compressive strength: Higher ratings resist soil loads better. (Lower strength can lead to board failure under pressure)
- Flow capacity (permeability): Measure in gallons per square foot per minute. (Lower flow rates may not drain water quickly enough)
- Puncture resistance: Important for protecting the drainage layer from backfill damage.
- UV/chemical exposure rating: Ensures longevity when exposed to sunlight or chemicals in soil.
- Temperature range: Confirm it suits your climate’s extremes. (Inadequate temperature range can cause material degradation)
- Compatibility with backfill materials: Check if the product works well with your chosen backfill type.
Quick rule: Always verify spec values on manufacturer datasheets to ensure you’re getting what you need.
Cost Comparison and Lifecycle Maintenance
Compare upfront costs by considering material price per area, thickness, and any required accessories, while noting packaging and waste considerations that affect DIY planning. Understand that tool wear and how easy the material is to cut can impact initial costs. Expect variation by project size and substrate conditions.
Evaluate durability and maintenance costs by considering resistance to hydrostatic pressure, soil type, and chemical exposure. Include routine inspections, potential cleaning or resealing, and repair scenarios. Assess replacement intervals and warranty terms to understand long-term value. For budget-minded homeowners, weigh upfront price against reliability and potential moisture-related damage costs during the life of the project.
Upfront costs and installation labor drivers
When comparing drainage mats and dimple boards, consider these factors that impact upfront cost and installation labor.
Material price: Drainage mats are typically more expensive per square foot than dimple boards. However, they often come in DIY-friendly rolls with minimal waste.
Thickness and accessories: Mats can be thicker but easier to handle due to their flat design. Boards may require additional sealants, fasteners, or adhesive, adding to the cost. Retrofit jobs might need extra materials for surface prep.
Long-term maintenance, inspection, and repair costs
Regularly inspect your basement walls to maintain the performance of drainage mats or dimple boards. Use this checklist:
- Annual Inspection: Check for cracks, gaps, or signs of damage. Confirm proper water flow through drains.
- Moisture Checks: Regularly test walls for moisture using a simple meter. High readings may indicate issues with the protective layer.
- Resealing (Every 5-10 years): Reapply sealant to joints and fasteners as needed to maintain waterproofing.
- Soil Pressure Monitoring: Keep an eye on soil pressure behind walls, especially in expansive clay soils. This can cause damage over time.
- UV Exposure (if exposed): Inspect for sun damage if boards or mats are exposed to sunlight during installation or after backfilling.
- Salt/Chemical Exposure: Check for signs of corrosion or degradation due to exposure to salts or chemicals in the soil.
- Curing Time (after install): Allow proper curing time before backfilling to ensure materials set correctly and maintain their integrity.
- Professional Inspections: Consider hiring a professional every 5-10 years for a thorough inspection, especially in high-risk areas.
Quick rule: Regular inspections help prevent small issues from becoming expensive repairs. Address any concerns promptly to extend the lifespan of your chosen protective layer.
Performance by Site Conditions — Soil Types, Water Table, and Retrofit Vs New Construction
Identify site drivers such as soil type, typical groundwater levels, and drainage burdens that shape hydrostatic pressure against walls. Consider how these factors influence the choice between mats and boards. Evaluate practical constraints for retrofit vs new construction scenarios.
Develop rules of thumb to match product to conditions, such as prioritizing boards in retrofit projects with moderate hydrostatic exposure and mats where soil permeability supports external drainage. Include installation and compatibility notes for backfill, sump connections, and potential vapor barrier work. Provide a simple decision framework and field cues to verify the chosen system aligns with site conditions and construction stage.
Suitability by soil type and water table
Soil type and groundwater levels significantly impact your choice between drainage mats and dimple boards. Here’s how:
Clay soils and high water tables demand robust drainage systems due to increased hydrostatic pressure. In these cases, consider:
– Rolled drainage mats for continuous external drainage where soil permeability is high.
– Combined solutions: dimple boards with additional exterior drainage or a membrane.
Retrofitting basements vs new-build best practices
Retrofitting and new builds have different constraints. Here’s how to tackle each:
Retrofits: Prioritize minimal disruption.
– Use dimple boards for moderate hydrostatic exposure, as they’re easier to install in tight spaces.
– Consider hybrid approaches: combine mats and boards based on wall height and pressure.
New builds: Optimize layer thickness and integration.
– Install rolled drainage mats for continuous external drainage where possible.
– Integrate with vapor barriers and connect to sump pumps or footing drains.
Choosing the Right System and Common Mistakes to Avoid
Frame a joint decision checklist for homeowners and contractors that clarifies goals, constraints, and a quick priority scoring to guide selection. Emphasize dry basement outcomes, ease of retrofit, and compatibility with existing moisture loads. Ensure the checklist helps decide between a rolled-matrix drainage mat and a dimple board.
Summarize essential performance criteria to verify in specs and data sheets, including thickness, puncture resistance, UV exposure (if applicable), and warranty terms. Create a practical decision flow based on wall type, moisture source, and drainage needs, with quick field tests for slope, weep holes, and surface cleanliness. List common mistakes to avoid, such as selecting the wrong system for soil conditions, poor seam and fastener spacing, and skipping moisture assessments before finishing.
Decision checklist for homeowners and contractors
Use this checklist before choosing between drainage mats and dimple boards to ensure you’re making an informed decision that suits your project’s needs.
- Assess water risk: High priority goes to projects with high hydrostatic pressure or frequent flooding.
- Evaluate repair urgency: If the basement is already damp, prioritize a quick fix over cosmetic concerns.
- Consider ease of retrofit: For existing structures, access and installation complexity may influence your choice.
- Check budget constraints: Both systems have varying upfront costs and long-term maintenance needs.
- Examine timeline: Installation time and drying periods should fit within your project schedule.
- Evaluate soil conditions: Clay soils may require a different approach than sandy or loamy soils.
- Consider wall exposure: Exposed walls may need additional protection from UV degradation.
- Check membrane compatibility: Ensure your chosen system works with existing waterproof coatings and air/vapor barriers.
- Plan for future finishing: Consider how each system will integrate with drywall, insulation, or other finishing materials.
- Set inspection expectations: Regular checks can help catch any issues early, so plan who will do them and when.
Quick rule: The higher the water risk and repair urgency, the more you should prioritize a robust drainage solution over budget or aesthetic concerns.
Common specification and installation mistakes and how to prevent them
To ensure your chosen system performs as expected, avoid these common pitfalls during specification and installation.
- Improper connections: Ensure drainage mats or dimple boards connect correctly to perimeter drains. Check manufacturer’s guidelines for proper connection methods.
- Ignoring geotextile filtration: Using a geotextile layer prevents clogging of drainage channels. Install a geotextile fabric between the drainage system and backfill to filter out fines.
- Poor backfill compaction: Inadequate compaction can lead to voids that trap water. Follow manufacturer’s recommendations for backfill material and compaction methods.
- Skipping diagnostic testing: Pre-installation moisture tests help identify any underlying issues. Conduct a thorough inspection before installation to address any moisture problems.
- Insufficient protection during backfill: Without proper protection, drainage systems can be damaged during backfilling. Use protective boards or other measures recommended by the manufacturer to safeguard the system during backfilling.
By avoiding these common mistakes and following manufacturer guidelines, you’ll increase the likelihood of a successful installation that performs as expected over time.
Conclusion
Safety and durability come first when choosing protection and drain layers for basement walls, and getting this right now saves you from costly mistakes and unhappy finishes later. A solid setup keeps hydrostatic pressure in check, controls moisture, and helps maintain clean indoor air without trapping hidden problems behind the walls.
Start with a simple, practical check: confirm site conditions (soil type and water table), decide which system fits your wall and space, compare product specs for drainage and durability, ensure proper clearances and slopes, read installation safety notes, assemble the needed tools and materials, and test a small area before a full install; keep the plan and measurements on hand so you can follow it step by step.
Common mistakes to avoid include underestimating the water situation, skipping site testing, and rushing installation without following the manufacturer’s safety notes and required clearances; never twist or crush the mats or boards, and always verify drainage paths and venting to avoid trapping moisture or creating hidden leaks.
If you’re up against high groundwater, uncertain soil conditions, or retrofit work in an existing finished space, it makes sense to call a professional rather than push on alone; when in doubt, get a second opinion on the layout and product specs, and stay focused on safe testing and gradual progress—steady work now protects your basement for years to come.
FAQ
What is the difference between drainage mats and dimple boards, and how do they function on basement walls?
Drainage mats are typically a textured layer that creates space for water to flow down to the drainage system. Dimple boards have a raised dimpling pattern that creates a continuous air gap and channels moisture away. Both aim to reduce hydrostatic pressure and keep walls drier, but their shapes and how they move water differ.
What are the main benefits you should expect from each system?
Drainage mats ease flow of water behind the wall and help keep the interior surface drier. Dimple boards provide a rigid barrier with space for moisture to move, often adding rigidity to the wall and a consistent drainage path. Check the product label for exact performance claims and installation notes.
How do I approach the installation process for these systems?
Follow the manufacturer’s instructions for substrate prep, sealing, and fastenings. Ensure the wall is clean and free of loose material before applying either system. If in doubt, verify compatibility with your wall type and local conditions on the product datasheet.
What should I consider for cost and long-term maintenance?
Compare material costs, labor time, and potential need for additional drainage components. Look for durability indicators and warranty terms on the label or datasheet. For maintenance, check guidance from the manufacturer on inspection intervals and any replacement parts.