
Introduction
Salt damage prevention for steps means preparing concrete stairs to resist freeze-thaw and salt exposure before winter. This involves inspecting surfaces, cleaning debris, and checking the edge seals so water and salt don’t penetrate. Keep an eye on cracks or chips and plan resealing if you spot trouble.
Before the cold sets in, look at drainage paths and make sure water can shed away from the steps. Tweak slope or clear downspout outlets as needed and apply the right sealer per label after cleaning. If you’re unsure about product compatibility or local rules, check the label and manufacturer instructions.
Key takeaways
- Freeze-thaw cycles crack and spall concrete; seal sooner to protect treads.
- Inspect edges for chipped mortar, loose grouting, and uneven step surfaces.
- Test drainage slope visually and with a simple flow check after rain.
- Choose penetrating sealers compatible with existing concrete and application climate.
- Clear debris and fix minor cracks before sealing to enhance bond.
- Avoid salt-heavy de-icers near bare concrete to protect finishes and rebar.
Table of Contents
- Introduction
- Key takeaways
- How Salt and Winter Cycles Damage Steps
- Pre-Winter Inspection: Visual Checkpoints and Quick Tests
- Tools and Materials Checklist for DIY Sealer Checks and Drainage Tweaks
- DIY Surface Repairs Before Sealing
- Pre-Winter Sealer Checks and Testing Procedure
- Choosing and Applying the Right Sealer for Steps
- Low-Cost Drainage Tweaks That Protect Steps
- Winter Maintenance: Snow Removal, Safe De-Icers, and Monitoring
- Conclusion
- FAQ
How Salt and Winter Cycles Damage Steps
Steps and risers face a double threat from freeze-thaw cycles and chemical salt attack. The height and loading of steps concentrate water and salt where damage concentrates most. Repeated cycles drive microcracking, surface scaling, and occasional spalling, while salt lowers the effective freezing point and pushes moisture inward.
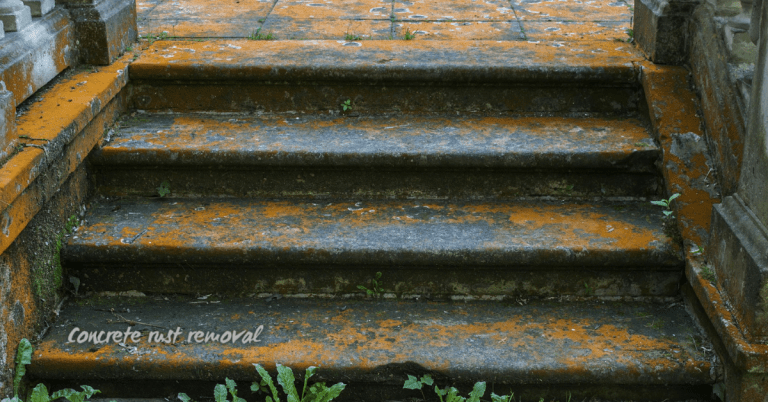
Pay attention to vulnerable zones such as exposed edges, treads, risers, joints, and any old sealant or porous concrete that invites salt intrusion. Salt can move through capillaries, hairline cracks, joints, and porous toppings, and vertical risers can channel meltwater toward the concrete. Observable indicators include scaling, flaking, crusty deposits, efflorescence, and frost heave symptoms that guide pre-winter maintenance decisions.
Freeze-thaw mechanics on steps
Water seeps into tiny pores and cracks in your concrete steps during fall. When winter hits, that water freezes and expands.
This expansion puts pressure on the concrete, like a tiny jackhammer. Over time, it opens up microcracks and weakens the surface.
The next freeze-thaw cycle repeats this process, making existing cracks bigger and creating new ones. This repeated stress is what causes scaling, spalling, and eventually structural cracking in your steps.
Chemical effects of de-icers and salts
De-icing salts like sodium chloride or calcium chloride lower the freezing point of water. This means they can melt ice at temperatures where plain water would freeze solid.
But here’s the catch: these salts draw moisture into the concrete, promoting corrosion of any embedded metals and accelerating surface breakdown. They also leave behind a salty residue that attracts more moisture, setting up a vicious cycle.
The salt can even cause efflorescence – those white, crusty deposits you see on steps. This is a sign that too much moisture is being drawn into the concrete by the salts.
Long-term consequences of neglected damage
Small winter damage might seem harmless at first, but it compounds over seasons. Those tiny cracks become bigger, weakening your steps’ structure.
Neglected damage can lead to costly repairs, like replacing entire treads or risers. It can also create safety hazards – tripping hazards from loose debris, or even structural failure if the damage is severe enough.
Plus, once water gets into those cracks, it can freeze and thaw all winter long, making the problem worse with each cycle. That’s why it’s crucial to address any signs of damage as soon as you see them.
Pre-Winter Inspection: Visual Checkpoints and Quick Tests
Create a room-by-room scope for exterior steps, handrails, and nearby surfaces like porches and landings to keep checks focused. Look for obvious trouble spots across the area to avoid missing weak points. Use simple, no-special-equipment tests as part of your routine.
Note signs such as cracks, spalling, flaking sealant, efflorescence, loose edge finishes, and corrosion on metal handrails. Quick diagnostics include a water bead test for drainage, a moisture feel test on the concrete surface, and a soft edge or coin test to check crack widening. Verify drainage paths by testing slopes away from doors and clearing any blocked weep holes or scuppers.
Visual checkpoints to scan for problems
Before the first freeze, walk around your property and visually inspect all exterior steps, handrails, porches, and landings. This quick checklist helps you spot issues early.
- Cracks: Hairline cracks can widen with temperature changes. Check for any length or width.
- Scaling/Spalling: Flaking concrete indicates deeper damage. Look for missing chunks or powdery surfaces.
- Efflorescence: White, chalky deposits mean moisture is present. Check for any signs on steps and nearby surfaces.
- Exposed Aggregate: Bare aggregate indicates sealant failure. Look for exposed stones or sand.
- Delamination: Peeling or bubbling paint/coating signals delamination. Check for any signs of lifting.
- Pooling Areas: Standing water near treads can seep into concrete. Look for low spots where water collects.
Quick rule: If you spot any of these issues, note them down and plan repairs before winter sets in.
Simple field tests (water-bead test, sound test)
After your visual check, perform these simple tests to confirm your findings and uncover hidden issues.
- Water-Bead Test: Drip water onto steps. If it beads up and rolls off, the sealant is intact. If it soaks in, resealing is needed.
- Sound Test: Gently tap steps with a hammer or coin. A dull thud indicates delamination; a clear ring means solid concrete.
Quick rule: If your tests reveal problems, address them promptly. For complex issues, consider lab testing or hiring a pro.
Inspecting slope, joints, and adjacent drains
Proper drainage is key to preventing winter damage. Here’s how to check it quickly.
- Slope: Steps should slope away from doors at a minimum of 1/4 inch per foot. Check with a level or string line.
- Joints: Clogged control joints can cause cracking. Clean out any debris with a wire brush.
- Downspouts: Ensure downspouts direct water away from steps. Check for any that send water towards them.
Quick rule: If you find drainage issues, fix them before the first freeze to prevent water from seeping into concrete.
Tools and Materials Checklist for DIY Sealer Checks and Drainage Tweaks
Organize a prioritized Tools and Materials Checklist grouped into hand tools, safety gear, cleaners, sealers, and drainage materials. Mark which items are multi-use versus single-use and note any special handling or storage needs. This helps you plan a sane project footprint.
Provide brief rationales for category choices, such as why a certain trowel size suits step corners or why PPE is essential for chemical sealers. Include drainage essentials like slope-enhancing materials, weep hole extensions, gravel or perforated pipe, and downspout adapters for temporary drainage during curing. Remember to follow product labels for compatibility and handling, and keep safety in mind when mixing or applying chemicals.
Tools and PPE to have on hand
Before you start, make sure you’ve gathered all the necessary tools and personal protective equipment (PPE) to ensure your safety and efficiency.
- Plastic Shovel: For clearing debris. Skip this, and you’ll struggle with a clean working surface.
- Stiff Brush: To scrub steps. Without it, dirt and grime will resist cleaning efforts.
- Pump Sprayer: For applying sealers evenly. Miss this, and application could be uneven or wasteful.
- Caulk Gun: Essential for filling cracks. Neglect this, and water can seep into cracks causing damage.
- Gloves: Protect hands from chemicals and sharp edges. Skip these, and you risk injuries.
- Respirator or Mask: Shield against sealant fumes. Without it, you could inhale harmful particles.
- Eye Protection: Safeguard eyes from debris and splashes. Overlook this, and you’re at risk of eye injuries.
- Tape Measure: For accurate measurements when applying sealers or making repairs. Without it, application could be inaccurate or wasteful.
Quick rule: Always check your tools and PPE before starting any task to avoid delays and ensure safety.
Materials: cleaners, patching compounds, and sealers
Having the right materials on hand will make your step maintenance tasks much easier.
- Mild Trisodium or Masonry Detergent: To clean steps gently. The wrong cleaner can damage steps.
- Crack Filler (Elastic or Epoxy): For filling gaps. Skipping this leaves steps vulnerable to water intrusion.
- Penetrating Sealer: Allows moisture to escape while preventing water absorption. Miss this, and steps can become damaged by trapped water.
- Film-Forming Sealer: Creates a protective barrier on the surface. Neglect this, and steps may not be protected from de-icers and salts.
- Concrete Repair Kit: For fixing minor damage. Without it, small issues can become bigger problems over time.
- Grout (if needed): To fill joints between steps. Skip this, and water can seep into joints causing damage.
- Sealer Applicator (Roller, Brush, or Sprayer): For applying sealers evenly. Without the right applicator, application could be uneven or wasteful.
Quick rule: Always check product labels for compatibility with your step material and any previous coatings or sealers to avoid damaging steps.
Drainage tweak materials
Proper drainage is crucial to prevent water damage. Here are the materials you’ll need for low-cost drainage fixes.
- Gravel: To create a base for proper water flow. Without it, water can pool and cause damage.
- Landscape Fabric: Prevents soil erosion and helps maintain gravel base. Skip this, and gravel may shift or wash away.
- Trenching Tools (Shovel, Mattock): For creating channels to direct water flow. Without these, you won’t be able to create effective drainage paths.
- Flexible Downspout Extender: Directs roof runoff away from steps. Miss this, and steps can become damaged by constant water exposure.
- Small Channel Drains (if needed): To collect and direct water flow. Without these, water may pool on steps causing damage.
- Perforated Pipe (if needed): For underground drainage systems. Skip this, and you won’t be able to effectively drain water from beneath steps.
Quick rule: Always consider the layout of your property when making drainage tweaks to ensure water is directed away from steps.
DIY Surface Repairs Before Sealing
Identify DIY-friendly repairs like hairline cracks, small delaminations, and shallow chips. Reserve larger cracks or structural concerns for a contractor. Not every flaw warrants replacement, but be honest about scope before sealing.
Focus on thorough cleaning, degreasing, removing loose material, and ensuring a clean, dry surface. Patch with cementitious products or epoxy injections for tiny cracks, and use resurfacer or patching compounds where appropriate. Drying time and temperature requirements matter for proper bond and long-term performance.
Cleaning and removing salt residues and efflorescence
Start by wetting down the steps to prevent dust. Use a stiff-bristle brush and a solution of water and mild detergent to scrub away salt residues and efflorescence. Rinse thoroughly with clean water.
Important: Never use high-pressure washers as they can damage the surface.
To neutralize any remaining salts, apply a solution of muriatic acid (one part acid to ten parts water) using a sprayer or brush. Let it sit for 10-15 minutes, then rinse off with clean water.
Filling hairline cracks and chips
For hairline cracks, use an epoxy crack filler. Mix according to the manufacturer’s instructions and apply using a putty knife or caulking gun. Smooth out the surface and feather the edges.
For small chips, use a cementitious patch or repair mortar. Apply with a trowel, ensuring it’s well packed into the chip. Smooth out the surface and allow to cure according to the manufacturer’s instructions.
Tip: Always wear gloves when handling these materials.
When to seek professional repair
If you notice cracks wider than 1/4 inch, active movement or shifting of the steps, spalling (flaking or crumbling), or widespread damage, it’s time to call a professional.
Also, if you suspect there are issues with the reinforcement (like corrosion) or the structural integrity of the steps, do not attempt DIY repairs. Document these issues with photos and notes for your contractor.
Safety first: If you notice any signs of active movement or shifting, stay off the steps until they can be inspected by a professional.
Pre-Winter Sealer Checks and Testing Procedure
Plan testing within the pre-winter window, noting typical temperature and humidity conditions and recording prior sealer age and history. Documentation helps decide if reseal is enough or if deeper repairs are needed. Follow a consistent routine that fits your climate.
Use simple penetration tests like a water bead test and absorption checks, and consider an optional solvent compatibility check to gauge film integrity. Adhesion tests such as tape pull or scratch tests can indicate bond strength. Interpret results to decide between reapplication, patching, or professional resealing, and document environmental conditions for later reference.
Water-bead and absorption observations
Apply a few small water droplets to various areas of your steps. Look for beading, where the water forms tight balls and doesn’t soak in. This indicates good water repellency.
If water is absorbed quickly or leaves dark spots, it’s a sign that the sealer’s water-repellent properties have diminished. Note these areas for targeted repair.
Remember: Test multiple areas to account for variations in concrete porosity and previous sealant application.
Spot adhesion checks and sample areas
If your sealer’s label allows, perform a spot check on an inconspicuous area to test adhesion. Use a cotton swab with a small amount of the recommended solvent or gently scratch the surface with a coin.
The sealer should not flake off or lift easily. If it does, adhesion may be compromised and you’ll need to consider reapplying or professional help.
Caution: Always follow manufacturer instructions to avoid damaging the sealer or causing harm.
Recording findings and prioritizing actions
Take photos of any issues you’ve found, noting their location and severity. This will help you create a priority list for repairs and sealing.
Start with the most severe problems or areas that could worsen quickly, like deep cracks or spots where water is absorbed rapidly.
Pro Tip: Keep a simple onsite log with test results, environmental conditions, and your planned maintenance window to stay organized.
Choosing and Applying the Right Sealer for Steps
Compare penetrating versus topical sealers to understand how they block moisture, affect slip resistance, and alter appearance on steps. Each type has pros and cons that influence durability and maintenance. Tailor your choice to the actual step material and exposure.
Match the sealer to concrete, natural stone, or brick steps, considering porosity and color-change potential. Assess surface condition, repairs done, and dryness to ensure compatibility with existing finishes. Use a step-by-step application framework without product names, and follow data sheets for curing times, temperature limits, and proper ventilation.
Sealer types and selection criteria
When choosing a sealer for your steps, you’ll come across two main types: penetrating and topical. Let’s break down each to help you make an informed decision.
Penetrating Sealers: These are typically silane/siloxane or silicate-based. They soak into the material, blocking moisture from within while allowing the surface to breathe. They’re great for slip resistance and salt damage prevention but may not provide a glossy finish.
Topical Sealers: Acrylic or urethane coatings sit on top of the surface, creating a barrier against water and salts. They can enhance appearance and offer good slip resistance, but they might trap moisture underneath if not properly applied. They’re also less breathable than penetrants.
Application best practices and safety
Applying sealer correctly is crucial for its performance. Here are some best-practice steps:
Surface Prep: Ensure your steps are clean, dry, and free of any contaminants or efflorescence. Refer to our earlier guide on cleaning and repairing surfaces before sealing.
Weather Conditions: Apply sealer when temperatures are between 50-90°F (10-32°C) and humidity is low. Check your chosen product’s data sheet for specific temperature limits.
Equipment & PPE: Use a sprayer or roller for even application. Wear gloves, safety glasses, and a respirator to protect against fumes. Ventilate the area if using a solvent-based sealer.
Visual checkpoints after application
After applying sealer, it’s essential to inspect your work for any issues. Use this checklist once the sealer has fully cured (check data sheet for curing times).
- Uniformity: Check if the sealer is evenly distributed across all steps.
- Tackiness: Gently touch the surface to ensure it’s no longer sticky. If it is, allow more time for curing.
- Trapped Debris: Inspect for any dirt or contaminants trapped under the sealer. These can cause early failure.
- Efflorescence: Look out for white powdery deposits, which indicate salt residue or moisture beneath the sealer.
- Cracking/Peeling: Check for any signs of delamination or cracking, indicating poor adhesion.
- Color Change: Ensure there’s no significant discoloration from the sealer. If there is, it might not be compatible with your material.
- Slip Resistance: Test the surface by walking on it to ensure it’s still slip-resistant.
- Wetting: Sprinkle water on the steps and observe how quickly it beads up or gets absorbed. This indicates sealer performance.
Quick rule: If you spot any issues, recheck your application process and consider seeking professional advice if problems persist.
Low-Cost Drainage Tweaks That Protect Steps
Redirect runoff on a budget with practical, low-cost methods like shallow swales, trenches, downspout extensions, and splash blocks. Quick installation helps keep water away from the step faces and joints. Use temporary measures where appropriate to buy time for bigger fixes.
Check grading and slope to maintain a modest outward tilt, correcting minor low spots without heavy excavation. Enhance drainage with gravel or small edging near the tread, and protect joints with simple temporary sealers as needed. Plan for temporary versus semi-permanent options and maintain a practical maintenance cadence to verify drainage after rainfall.
Adjusting slope and surface runoff
Water flows downhill. Ensure your steps are at the bottom of a gentle slope, not the top.
If water’s pooling near your steps, add tapered gravel to create a slope away from them. Start with a small pile at the high point, spread it out as you move downwards.
Check your threshold flashing – that metal strip at the bottom of your door. If it’s not sloping downwards, reinstall it so water doesn’t pool there. A simple adjustment can make a big difference.
Managing gutter, downspout, and splash zones
Gutters and downspouts should direct water away from your steps. If they’re not, it’s time for a tweak.
Extend your downspouts further away using inexpensive extenders or flexible tubing. The longer the better, but aim for at least 5 feet.
Add splash blocks under your downspouts to spread water out and slow its flow. This helps prevent erosion and keeps water from pooling near steps.
Regularly clean your gutters too. Clogs can cause water to overflow right where you don’t want it – near your steps.
Adding small channel drains and trenching options
Sometimes, you need a more robust solution to redirect water. That’s where small channel drains or trenches come in.
For a simple DIY fix, dig a shallow trench (about 4-6 inches deep) along the high side of your steps. Fill it with gravel or pebbles to create a drainage path.
If water’s still not moving away fast enough, consider installing a small channel drain. These are easy to install and can be found at most hardware stores. They’re perfect for redirecting runoff from flat surfaces like patios or driveways.
But remember, if your drainage problem is severe, it might be time to call in a professional. They have tools and knowledge to tackle bigger issues safely and effectively.
Winter Maintenance: Snow Removal, Safe De-Icers, and Monitoring
Choose snow removal tools and techniques that minimize surface damage, such as plastic shovels or snow pushers, and avoid metal edge scraping. Establish a practical cadence to reduce freeze-thaw cycles and care for the surface. Adapt the approach to your local climate and activity level on the steps.
Use concrete-friendly de-icers with caution and limit exposure to plants and joints. Follow guidelines for application to minimize chloride exposure, and plan post-storm rinsing when feasible. Emphasize safe footwear, traction aids, and appropriate PPE to protect people using the steps during winter.
Snow removal techniques and tool choice
Protect your concrete steps from damage during snow removal. Use the right tools and techniques to keep them looking good.
- Plastic shovels: Non-abrasive, won’t scratch or chip surfaces. Around $15-$25 each.
- Rubber-bladed snow pushers: Gentle on steps, easy to use. Rentable for about $30/day.
- Avoid metal-edged tools: They can gouge and scratch concrete.
- Shovel safely: Lift with legs, not back. Keep a steady pace to prevent freeze-thaw cycles.
- Optional: Snowblower with plastic auger: For heavy snow. Around $200-$400 new or rentable for about $100/day.
De-icer selection and cleanup
Choose the right de-icers to protect your concrete steps and surrounding plants. Clean up residues when you can.
Preferred: Calcium or magnesium chlorides in low concentrations (less than 30%). They’re less harmful to concrete and plants.
Avoid high-chloride products near plants and joints. They can damage both.
Rinse or sweep off residues when weather allows to limit chloride exposure and prevent crystallization in joints.
Ongoing winter monitoring and quick fixes
Keep an eye on your steps during winter. Catch issues early to prevent bigger problems.
Check regularly: Look for new cracks, spalls, or signs of damage.
Treat temporary fixes: Use concrete patching compounds (around $10-$20) for small hairline cracks or spalled spots until spring repairs.
Log issues: Keep a record of worsening problems. Prioritize repairs in the spring.
Conclusion
Protecting steps from salt damage and winter wear comes down to a solid plan, careful checks, and correct sealing. When you do it right, you keep the look, save money, and avoid costly repairs after the first freeze.
To finish strong, walk the process in order: note all damage and drainage issues, clean and dry surfaces, repair where needed, test a small area with the sealer, apply in thin coats as directed, and recheck drainage when a fresh snow or thaw hits. Do the checks in the same sequence you used for pre-winter and testing, and keep the area patrolled through cold snaps so you catch problems early.
Avoid common mistakes by not overdoing sealer, not sealing on wet or frozen surfaces, and not using incompatible products. Always wear eye protection and gloves, work in good daylight, and test a small patch first before committing to the whole step. Delay any major repairs if you see deep cracks, spalling, or persistent standing water, and never skip drainage tweaks that can funnel meltwater away from the surface.
If you’re unsure about the condition after a test patch, or if you find structural cracking, shifting, or persistent drainage problems, call a professional. Otherwise, stick to the plan, follow the sealer’s directions, and stay vigilant through winter—steady, practical steps now save you from headaches later.
FAQ
What happens to concrete steps during freeze-thaw cycles and why does that matter for DIY care?
Water can seep into cracks, freeze, and expand. That push cracks wider and weakens the step over time. Regularly inspecting for new cracks and sealing small gaps helps slow damage.
What should I focus on for winter maintenance of concrete steps?
Keep debris off the surface, ensure proper drainage, and limit ice buildup. Use safe de-icing methods and recheck seals after heavy freezes to catch early signs of wear.
How can I spot common winter threats to my steps right now?
Look for cracks, flaking, or powdery patches. Notice if water pools or drains slowly after rain or melt; pooling can mean blocked drainage and more freeze-thaw risk.
What’s a practical step-by-step approach to winter care for steps?
Inspect and clean the surface, clear drainage paths, apply or refresh a compatible sealer per label, and plan light re-sealing after major freezes. Keep de-icing products away from untreated edges and follow product instructions to protect the concrete.