
Introduction
A slump without a cone is a simple visual check of concrete’s workability, based on how it holds its shape and settles.
You compare the look to what you expect for your mix and application, not a hard number. Use this as a quick sanity check, then verify with the proper method if required by your project or local rules.
Start with a clean, level surface and observe how the concrete stays cohesive when you move it around.
Note if it seems too stiff or too wet, and consider factors like weather, admixtures, and any guidance on the bag or supplier label. Always follow manufacturer instructions and local rules for workability testing, and check the product label for any cautions or limits.
Key takeaways
- Prioritize visual workability indicators over cone readings for quick site decisions.
- Inspect slump-like appearance by sag, spread, and surface cracking patterns carefully.
- Prepare simple test panels and consistent mixed batches for repeatable checks.
- Use visual checks alongside field tests to better guide adjustments safely.
- Safety first: wear eye protection, gloves, and masks during mixing and testing.
- Document observed signs and adjust plan if concrete shows excessive flow or stiffness.
Table of Contents
- Introduction
- Key takeaways
- Why “Slump” Matters and What Visual Checks Can and Cannot Do
- Tools and Materials Checklist for DIY Visual Testing
- Quick Visual Checkpoints That Correlate to Workability
- Simple Field Tests That Mimic Slump Results
- Adjusting Mixes on Site — Safe, Stepwise Methods
- Common Problems, Root Causes, and Practical Fixes
- Visual Signs and Examples to Look for
- Conclusion
- FAQ
Why “Slump” Matters and What Visual Checks Can and Cannot Do
The slump is a rough proxy for how workable fresh concrete will be for certain placements. It helps you gauge flow, lift, and finishability in the field. But visual checks aren’t a substitute for standardized tests done in a lab or by a supervisor when required by the project or local rules.
Use slump visuals to guide immediate decisions, while noting that official tests may still be required for acceptance. Check product labels, the data sheet, and your local building rules to know when a formal test is needed. When in doubt, document observations and seek guidance from the project specs or a qualified laboratorian.
The concept of workability versus measured slump
Workability is how easily you can mix, place, and finish concrete. It’s what makes your job easier or harder.
Slump is a way to measure this workability. It’s the distance concrete drops when you pour it into a cone and then pull the cone away.
But slump doesn’t tell the whole story. It only measures how much the concrete flows, not how well it compacts or finishes. That’s where visual checks come in.
Visual cues like how the concrete moves when you shake the form, or how easily you can spread and compact it with a trowel, give you more insight into workability than slump alone.
Limitations of visual assessment and critical situations
Visual checks are great for quick, on-the-spot assessments. But they’re not enough in certain situations.
For structural pours, like foundations or beams, you need a formal slump test to ensure the concrete has the right consistency to bond and support the structure.
If your mix design specifies a particular slump, you’ll need to do a cone test to meet those requirements. Visual checks won’t cut it here.
And when it comes to legal or inspection requirements, like for commercial jobs or building codes, you’ll need lab tests or formal slump/cone tests to provide official records.
Tools and Materials Checklist for DIY Visual Testing
Keep a small, portable set of items for consistent observations. A flat, non-absorbent board or tray helps compare surface texture and flow. Have a simple level or straightedge to judge height and spread.
Include a notebook or app for quick notes, a pen, and a camera to document conditions. Use PPE as required and verify that any devices used are clean and calibrated per manufacturer instructions or local rules.
Minimal essential tools
Before you start, ensure you have these basic items to maintain consistency in your visual checks.
- Flat board (2×4): To level and smooth concrete surface for inspection.
- Hand trowel: To spread and level small amounts of concrete for checking workability.
- Stakes: To mark out areas for consistent visual checks.
- Gloves: For safety when handling concrete.
- Stopwatch or timer: To record and compare setting times.
- Tape measure: To ensure consistency in the depth of your visual checks.
- String line: To create a straight edge for leveling concrete.
- Level: To check and maintain a consistent surface for inspection.
Quick rule: No need to buy expensive gear. Keep it simple, safe, and consistent.
Optional aids and documentation gear
For more detailed records and better organization, consider these optional tools.
- Phone camera: To document conditions and progress for later reference.
- Simple templates (e.g., slump cone): For occasional direct comparison with measured slump.
- Notebook or smartphone form: To record observations, conditions, and results.
- Printable checklists: To ensure you cover all necessary checks consistently.
- Date and time stamps: To track progress and identify trends over time.
- Weather tracker (app or notebook): To note temperature, humidity, and other conditions affecting concrete.
- Concrete testing tools (optional): Such as air entrainment meter, slump cone, or non-destructive rebound hammer for occasional cross-checks.
Quick rule: Use these optional aids to enhance your records and consistency, but don’t let them complicate your process.
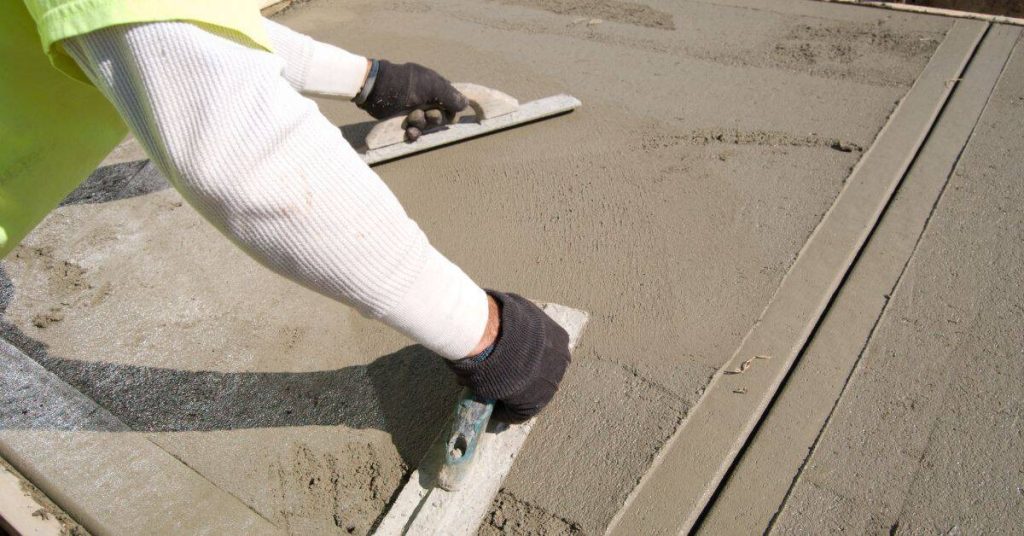
Quick Visual Checkpoints That Correlate to Workability
Look at surface smoothness, bleed, and how easily concrete spreads when touched with a trowel or paddle. Smooth surfaces with even distribution often indicate workable mix.
Check for uniform color, minimal streaking, and consistent moisture on the surface. These cues help you assess how the mix may behave during placement and finishing.
Surface sheen, bleed water, and initial texture
Check these aspects right after mixing to gauge water content and cohesion.
- Sheen: Too shiny? It’s too wet. Concrete should have a subtle sheen.
- Bleed water: Excess water rises to the surface. If it’s more than a thin layer, mix is too wet.
- Initial texture: Look at the paste. It should be uniform and slightly sticky. Lumps or dry spots mean improper mixing.
- Consistency: Squeeze some concrete in your hand. It should hold together, not crumble or run off.
- Color consistency: Uniform color indicates proper water distribution. Gray patches may signal dry spots.
- Air bubbles: Too many? Mix is too wet and may have excess entrained air.
- Cement paste: It should coat aggregates evenly, not be too thick or thin.
- Slump consistency: While you’re here, check slump. It should hold its shape but flow slightly when pushed.
Quick rule: If it’s too shiny, has excessive bleed, or doesn’t hold together, mix is likely too wet.
Flow, self-leveling tendencies, and edge spread
Observe these behaviors after placing concrete to assess flowability and internal friction.
- Spread rate: Concrete should spread evenly. If it’s too slow or patchy, mix is too stiff or has poor cohesion.
- Self-leveling: Watch how it settles. It should level out on its own, not leave humps or valleys.
- Edge spread: Check where concrete meets forms. If it doesn’t reach edges, mix is too stiff or has high internal friction.
- Flow lines: Observe flow patterns. They should be smooth and consistent, not wavy or broken up.
- Consolidation: Concrete should consolidate evenly with no voids or honeycombing.
- Segregation: Look for layers of aggregates or cement paste. This indicates poor mixing or excessive vibration.
- Air content: Too many air pockets? Mix is too wet or has excess entrained air.
- Finishability: Check how easily you can finish the surface with a trowel. It should be smooth and even.
Quick rule: If it doesn’t spread, level, or reach edges properly, mix is likely too stiff or has poor cohesion.
Cohesion and resistance to deformation (finger, trowel, or stake)
Perform these simple tests after placing concrete to check cohesiveness, aggregate mobility, and segregation.
- Finger poke: Gently poke the surface with your finger. It should leave a slight impression but not crumble or break apart.
- Trowel drag: Drag a trowel across the surface. Concrete should move as one, not leave chunks behind.
- Stake test: Push a stake into the concrete. It should leave a clean hole with no crumbling or segregation.
- Ball test: Squeeze some concrete in your hand, then roll it into a ball. It should hold together without falling apart.
- Slump cone test (if available): If you have a cone, use it to check slump and see how the mix holds its shape.
- Vibration: Check if excessive vibration is causing segregation or loss of cohesion.
- Aggregate mobility: Watch aggregates as concrete spreads. They should move freely but not segregate.
- Cohesion consistency: Concrete should hold together consistently across the entire pour.
Quick rule: If it crumbles, breaks apart, or leaves chunks behind, mix is likely too dry or has poor cohesion.
Simple Field Tests That Mimic Slump Results
Use a cone-free leveling test: place a measured amount, then spread with a straightedge and observe how far and how easily it settles. Compare the resulting surface to a simple reference you create for your project.
Document the time it takes for the surface to set slightly and how much it can be moved without tearing. Repeatability matters, so keep the same amount, the same spreading motion, and the same observer if possible.
The “stack and collapse” (cone-free deformation) test
Stack concrete into a small pyramid, about 6-8 inches high. Watch how it deforms.
If it holds its shape with minimal slumping, you’ve got low workability – think of it as ‘stiff’ concrete.
If it collapses quickly and spreads out, that’s high workability – ‘soft’ or ‘runny’ concrete. It’s like the slump test, but without a cone.
Flow-board or tray alternative for spread measurement
Use a shallow tray or board to slide concrete. Pour it in, then tilt and let it flow out.
The further it spreads, the more workable your mix is. It’s like measuring slump with a flow table.
Keep the tray clean between tests for consistent results. Use a straight edge to level off any excess.
Ball squeeze and cohesion check
Form a ball with your hands, about the size of a tennis ball. Squeeze it gently.
If it sticks together well and doesn’t crumble, you’ve got good cohesion – think ‘sticky’ concrete. It’ll hold its shape when placed.
If it falls apart easily, that’s low cohesion – ‘dry’ or ‘powdery’ concrete. It might not stick together well in the forms.

Adjusting Mixes on Site — Safe, Stepwise Methods
Make small, incremental adjustments to water or aggregate only if the project specs allow it and you have a clear path to restoration if strength or durability could be affected. Never exceed documented limits.
Rework with compatible admixtures following manufacturer instructions and local rules. Record changes and observe how the surface behaves with each adjustment before proceeding with a full pour.
Adding water safely: procedure and warnings
Start by adding small amounts of water, no more than a gallon at a time. Over-watering can weaken your concrete.
Mix well after each addition to ensure even distribution. Use your visual checks (like those mentioned earlier) to monitor workability.
Stop adding water when you reach your target consistency and check project specs to make sure you’re within limits.
Remember, too much water can hurt strength and durability. Be patient, add slowly, and mix thoroughly.
Using admixtures and aggregate adjustments
Plasticizers can boost workability without adding water. Follow manufacturer directions carefully. Retarders slow setting time, giving you more working time.
Adjusting aggregates? Be cautious. Too much fine material (sand) can make concrete weak. Too much coarse (rock) can cause issues with finishing and strength.
If unsure, consult a pro. They can advise based on your specific mix design and project needs.
Always keep records of any changes made to the original mix design for future reference and quality control.
Re-mixing, sampling frequency, and acceptance checks
Re-check your mixes every hour or so during a batch pour. Concrete can change quickly due to temperature and other factors.
Take samples at the start, middle, and end of each load. Test them using simple field tests (like those mentioned earlier) to ensure consistency.
Keep detailed records of all your checks and results. This helps maintain quality and proves compliance with project specs if needed.
Acceptance checks should match your initial visual assessments. If not, re-check your mix or consult a pro.
Common Problems, Root Causes, and Practical Fixes
Dry or stiff mixes often show reduced flow and rough surface texture. This can be caused by low slump, high cement content, or water loss during placement.
Learners should adjust by verifying moisture, retesting with a small batch, and adhering to the project’s specifications. If issues persist, escalate to a supervisor or consult the product instructions and local codes.
Segregation and excessive bleed
If your concrete looks like it’s separating into layers, with heavier aggregates sinking to the bottom and fine materials rising to the top, you’ve got segregation. Too much water can cause this.
Excessive bleeding, where too much water rises to the surface, is another sign of too much water in your mix. This weakens your concrete.
To fix these issues, gently remix the concrete to redistribute the materials evenly. If it’s still segregated after remixing, you might need to add some cement or reduce the water content.
Contain the bleed water if possible, so it doesn’t weaken the surrounding areas.
Stickiness, poor consolidation, and honeycombing risk
If your concrete is too sticky or tacky, it won’t consolidate properly. This can lead to honeycombing – a weak, porous surface.
To fix this, you might need to add some fine aggregate or reduce the water content. If you’re using a vibrator, make sure it’s working properly and that you’re not over-vibrating, which can also cause honeycombing.
If you don’t have a vibrator, consider using other methods to consolidate your concrete, like rodding or poker vibrating.
Also, ensure your forms are well-supported and level. This helps prevent honeycombing at the edges.
Rapid stiffening or unexpected retardation
If your concrete is setting too fast, it’s likely due to high temperatures or a retarding admixture that wasn’t supposed to be in the mix.
If you notice this happening, stop placing the concrete immediately. The last thing you want is for your concrete to set before it can be properly placed and finished.
Remix any remaining concrete in the truck or mixer. If possible, test a small batch with some additional water to see if that helps slow down the setting time.
If the problem persists, contact your supplier. They might need to adjust their admixtures or provide you with a new batch of concrete.
Visual Signs and Examples to Look for
Create a simple visual reference sheet with photos of acceptable and unacceptable conditions. Use consistent lighting and angles when capturing conditions.
Document the ambient conditions, surface texture, and any finishing attempts. This aids communication and helps future pours align with previous observations.
Creating a one-page visual reference and checklist
Use this checklist before, during, and after your pour to ensure consistency and quality.
- Check mix design: Ensure it matches the job’s requirements. Wrong proportions cause problems like segregation or excessive bleed.
- Inspect aggregates: Look for variations in size, shape, or color. Inconsistencies can lead to weak spots.
- Check water source: Ensure it’s clean and free of contaminants that could affect set time or strength.
- Observe mixing process: Watch for any signs of poor mixing like unmixed clumps or dry spots. Incomplete mixing causes weak, inconsistent concrete.
- Perform ‘stack and collapse’ test: Stack 3-4 inches of mix, let it sit briefly, then collapse it. It should reconsolidate quickly with no dry spots.
- Check flow-board spread: Spread the mix on a board, lift it off. The spread should be even and match your target slump (e.g., 4-6 inches for medium workability).
- Perform ball squeeze test: Squeeze a handful of mix. It should hold together briefly before crumbling gently.
- Check bleed rate: Observe how quickly water rises to the surface. Too fast or slow can indicate problems with mix proportions or admixtures.
- Document conditions: Note batch time, ambient temperature, humidity, and any other relevant factors that could affect your pour.
Quick rule: Regularly review and update this checklist to improve future pours.
How to photograph and log conditions for repeatability
Consistent, well-documented photos help you track changes and troubleshoot issues over time.
Use natural light: It provides the most accurate representation of colors and textures. Avoid flash or artificial lighting.
Shoot from consistent angles: Top-down shots work best for concrete surfaces. Keep your camera level to avoid perspective distortion.
Capture relevant details: Include mix design, batch time, ambient temperature, humidity, and any other factors that could affect your pour in the photo’s metadata or caption. This helps you compare conditions across different batches.
Conclusion
Final word: control the workability with smart visual checks, move with safety in mind, and avoid guesses that can ruin strength or finish.
First, carry out a quick visual check as you would on site: the concrete should look cohesive, the surface should hold its shape without sagging, and you should see even texture across the area. Then run a simple, on-site test by forming a small patch and comparing its look and feel to a trusted reference, making sure you record what you did. If it doesn’t match, adjust in small, measured steps—add a little dry mix or a touch of water, mix thoroughly, recheck, and repeat until the patch behaves like your reference. Finish with a clear note of the changes and keep your next batch consistent.
Common pitfalls to avoid are chasing a perfect cone or trying to fix everything with water, rushing the testing, and skipping the safety steps or proper curing. Don’t overwork the surface, don’t remove forms or masks too soon, and always wear gloves, eye protection, and a dust mask when handling concrete. Safety first pays off in durability and a clean appearance.
If you’re unsure about the mix, the size of the project, or repeated testing still doesn’t yield a workable result, it’s time to call in a pro. When in doubt, prioritize safety, protect structural integrity, and stop before you risk costly mistakes. You’ve got this—steady checks and disciplined tweaks keep you out of trouble and on track for a solid, lasting finish.
FAQ
How can I read concrete workability without a slump cone using visual cues?
Look for how the mix holds a mound or passes the surface with a smooth finish. If it looks speckled, crumbly, or dull, that can mean too dry or too wet. Compare what you see to a known-good batch from your own site to judge tendency to set or slump.
What should I check before changing the mix on site?
Read the label or manufacturer instructions for any limits on water or additives. Make incremental adjustments and test small batches to avoid overcorrecting. If unsure, confirm with the product guidance or local rules.
What surface and touch indicators tell me the mix is too dry, just right, or too wet?
Dry mixes feel firm and resist smoothing; workable mixes feel cohesive and plastic; overly wet mixes feel slick and may bleed. Use a simple drag or trowel pass and watch for cracking, dusting, or surface sheen as clues to workability.
How do I document results so I don’t overcorrect later?
Record what you changed, how it looked, and how long it took to set in plain notes. Label buckets or bags with their mix state and keep a quick log for each pour. If results vary, compare current batch to the last one that worked well and adjust cautiously.