
Introduction
Crack-resistant concrete prep means setting up the base, reinforcement, mix, and curing plan to minimize cracking and movement in the slab.
Start with a solid, well-drained base and clean forms, then place appropriate reinforcement and ensure everything is tied and supported before mixing. Follow the manufacturer’s instructions for any additives or metalwork, and check local rules or guidance if you’re unsure.
Pour on a calm, dry day and avoid extreme heat or freezing temperatures that affect curing.
Avoid adding excess water to the mix, and keep the surface moist during initial curing to slow shrinkage and reduce cracking risk.
Key takeaways
- Ensure proper site prep and stable subgrade before pouring to prevent cracking.
- Choose mix design and reinforcement based on project needs and load paths.
- Control water: avoid excess water to maintain mix strength and base integrity.
- Weather and curing: pour during favorable conditions and protect during curing.
- Joints, timing, and finishing decisions impact crack resistance and durability.
- Safety first: wear PPE, follow forms, and manage wet concrete hazards on site.
Table of Contents
- Introduction
- Key takeaways
- Why Concrete Cracks and What to Prevent
- Site Preparation and Subgrade/Base Construction
- Reinforcement: Rebar, Wire Mesh, and Fiber Options
- Mix Design for Crack Resistance: Cement, Scms, and Fibers
- Water Control and Workability: Avoiding Excess Water
- Pouring and Finishing: Timing, Sequencing, and Techniques
- Curing and Protection: Methods That Maximize Strength
- Joints, Maintenance, Safety, and Cost Trade-Offs
- Conclusion
- FAQ
Why Concrete Cracks and What to Prevent
Cracking comes from several different forces that act at different times. Plastic and drying shrinkage, thermal movement, settlement, and structural overload are the main culprits. Understanding these helps target our prep, mix design, reinforcement, and curing choices.
Site conditions and design decisions influence each mechanism. Base prep, formwork, joint layout, reinforcement, and curing all play a role in how cracks form and how wide they might be. The goal is to minimize shrinkage, movement, and overload-induced cracks through practical, repeatable steps.
Common crack types and root causes
Concrete cracks can be categorized into several types, each with its own cause:
Hairline cracks are thin, usually less than 0.2mm wide, often caused by minor settlement or thermal movement.
Shrinkage cracks, triggered by plastic shrinkage during early curing and drying shrinkage later on, appear due to moisture loss in the concrete.
Thermal cracks result from temperature changes causing expansion and contraction of the concrete. They typically occur at mid-depth or near joints.
Structural/overload cracks happen when loads exceed the concrete’s strength, often due to poor design, overloading, or settlement issues.
Performance goals and durability criteria
To ensure your concrete structure serves its intended purpose and lifespan, set clear performance goals:
Service life: Aim for a minimum service life of 30 years for most residential projects. Consult with engineers or local codes for specific targets.
Permitted crack width: Keep cracks narrow to prevent water intrusion and corrosion. Limit hairline cracks to less than 0.2mm, and wider cracks should be exceptional and infrequent.
Load capacity: Design concrete mixes and reinforcement to withstand anticipated loads, including live loads, dead loads, and environmental factors like wind or snow.
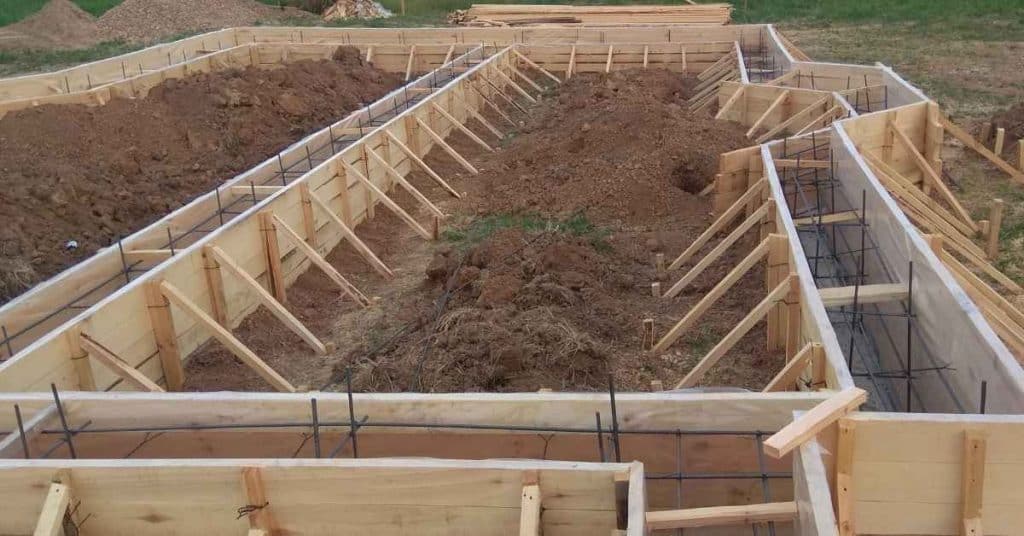
Site Preparation and Subgrade/Base Construction
Setting a stable platform starts with clearing, grading, drainage planning, and selecting the right subgrade material. Each step helps prevent differential settlement that leads to cracks. Look ahead at climate and soil when deciding the base details.
Assess bearing capacity, moisture content, and compaction targets to ensure a solid base. Plan for drainage that keeps water away from the slab and built-to-grade areas. Coordinate with utilities and protect the subgrade during framing and early construction.
Preparing the subgrade and compaction standards
The first step in creating a stable base for your concrete slab is to prepare the subgrade. Remove all organic material, rocks larger than 2 inches, and any debris from the site.
Uniform bearing is crucial to prevent differential settlement. To achieve this, spread the soil evenly across the area using a grader or bulldozer. Target a minimum thickness of 4 inches for proper compaction and support.
Compaction testing is essential to confirm stability. Use a nuclear density gauge or perform visual checks like the ‘kick test’ or ‘jump test’. Acceptance criteria should be based on Proctor/Modified Proctor tests, ensuring the soil meets the required compaction targets.
Base material selection and thickness guidance
Choosing the right base material is vital for a durable, crack-resistant concrete slab. The material should be well-graded to allow proper compaction and drainage.
- Well-graded gravel: Provides good drainage and compacts well. Look for materials with a wide range of particle sizes (e.g., ASTM C33). Avoid using pea gravel or crushed stone as the sole base material.
- Crushed stone: Offers excellent stability but can be more expensive. Check local codes for acceptable materials and ratings (e.g., CA6, 21AA). Beware of using uncrushed stone or poorly graded materials that may lead to weak compaction.
- Drainage layers: Incorporate a layer of clean sand or a geotextile fabric to facilitate water drainage away from the slab. This prevents moisture buildup and reduces the risk of cracking.
Visual checkpoints and pre-pour sign-offs
Before pouring concrete, perform a thorough inspection to ensure everything is ready. This checklist helps catch issues early, preventing costly repairs later.
- Slope: Verify the subgrade has the correct slope (usually 1/8 inch per foot) for proper drainage away from the structure.
- Compaction: Check that the base material is properly compacted, with no soft spots or voids. Use a shovel to probe the surface if needed.
- Drainage: Ensure all planned drainage systems (e.g., trench drains, French drains) are in place and functioning correctly.
- Forms: Inspect formwork for proper alignment, plumb, and level. Check for any cracks or gaps that could allow concrete to leak out.
- Reinforcement positioning: Verify that rebar is properly placed, aligned, and secured within the forms according to your design plans.
Quick rule: Always perform these checks before pouring. Skipping any step could lead to cracking, delamination, or other issues down the line.
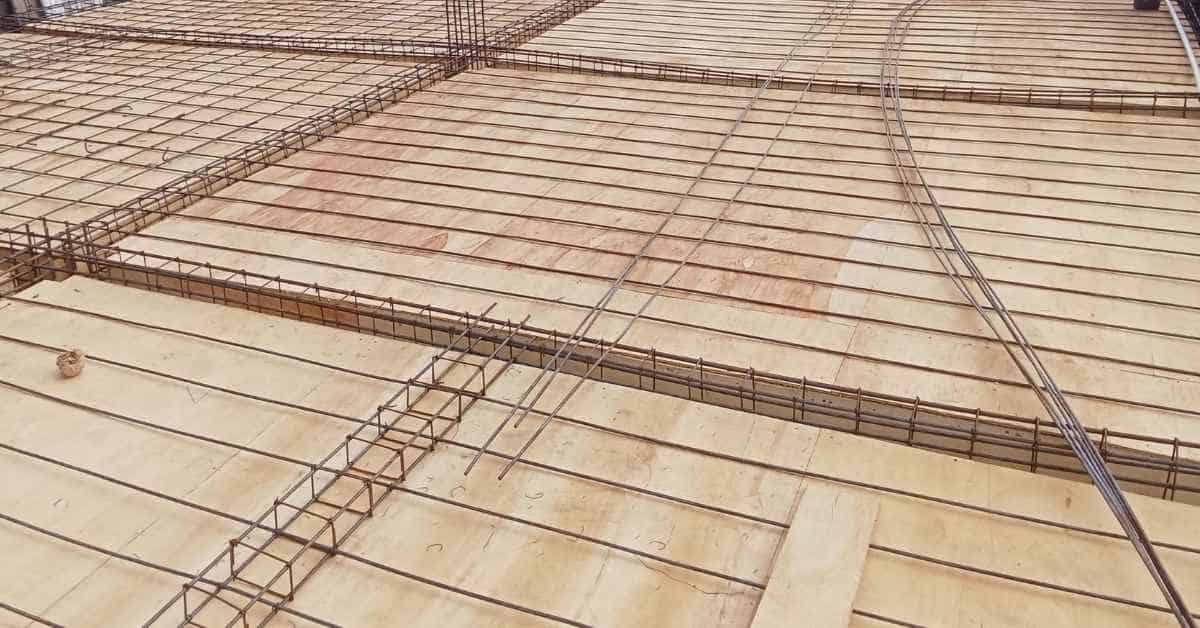
Reinforcement: Rebar, Wire Mesh, and Fiber Options
Reinforcement types each have use cases across slabs, footings, and beams. Rebar, welded wire mesh, and fibers influence crack control through their tensile properties and distribution. Proper selection affects crack width and post-crack behavior.
Follow guidelines for spacing, cover, laps, and edge distances to ensure effective anchorage. Describe seating, supports, and vibration practices to avoid voids and misalignment. Compare fiber options with traditional reinforcement for crack reduction and workability considerations.
Choosing rebar, welded wire mesh, or synthetic fibers
Each reinforcement option has its strengths and typical uses. Rebar, or reinforcing bars, are versatile and suitable for most concrete elements like slabs, footings, and beams. They’re ideal for controlling cracks in high-stress areas.
Welded wire mesh is a grid of wires welded together. It’s great for flatwork like slabs, providing even distribution of reinforcement. However, it may not be suitable for complex shapes or high-strength concrete.
Synthetic fibers, like steel, polypropylene, or glass fibers, are added to the concrete mix. They’re excellent for controlling micro-cracks and improving post-crack ductility. Use them in combination with traditional reinforcement for best results.
Proper placement, cover, and support details
Adequate concrete cover protects reinforcement from corrosion. It should be at least 2 inches for most applications. Spacing depends on the element’s size and loading. Use chairs or cradles to maintain reinforcement position during the pour.
For rebar, typical spacing is 6 to 12 inches on center. For welded wire mesh, use 3/8-inch or 1/2-inch mesh for slabs, and 4×4 or 6×6 for footings. Lap/splice requirements depend on the bar size and length.
Edge distances should be at least twice the bar diameter from the edge of the concrete. Vibration techniques help prevent voids around reinforcement.
Common reinforcement mistakes to avoid
Improper reinforcement can lead to cracking and structural issues. Here are some common mistakes:
- Inadequate cover: Insufficient concrete cover exposes reinforcement to corrosion.
- Unsupported mesh: Mesh that’s not supported can sag or shift during the pour, leading to voids.
- Tying after concrete starts: Tying rebar after concrete has begun to set can cause misalignment and stress points.
- Contaminated or misaligned mesh: Dirty or misaligned mesh reduces bond strength with the concrete.
Avoid these mistakes by following proper placement, support, and tying procedures. Always inspect reinforcement before pouring concrete.
Mix Design for Crack Resistance: Cement, Scms, and Fibers
The cement type and strength grade influence early shrinkage, thermal behavior, and long-term cracking potential. Fine-tuning these choices helps manage heat and movement. The mix design sets the baseline for crack resistance.
SCMs like fly ash, slag, silica fume, and metakaolin reduce shrinkage and improve toughness when used appropriately. Fibers interrupt crack propagation and affect workability, with different options offering distinct benefits and limitations. Plan water content, aggregate balance, and curing implications to support durable performance.
Selecting strength class and supplementary materials
The choice of cement type, strength class, and supplementary cementitious materials (SCMs) significantly impacts your concrete’s long-term performance. Lower heat of hydration SCMs like fly ash and slag help reduce thermal cracking and long-term shrinkage.
- Cement Type: Use Type I or II for general-purpose mixes. Type III accelerates setting, useful in cold weather.
- Strength Class: Choose based on loading needs (e.g., 2000 psi for driveways). Lower strength classes reduce heat of hydration and shrinkage.
- Fly Ash: Class F (silica-based) is common. Use 15-30% replacement for cement, improving workability and reducing shrinkage.
- Slag: Ground granulated blast-furnace slag (GGBFS). Use 25-70% replacement, enhancing long-term strength and durability.
- Avoid: High cement content increases heat of hydration, promoting cracking. Incompatible SCMs can weaken concrete.
Role of fibers and air entrainment
Fibers control crack propagation, while air entrainment improves freeze-thaw durability. Macro-fibers (steel, synthetic) bridge cracks, while micro-fibers (glass, PVA) improve toughness.
Macro-fibers: Use 0.5-2% by volume. They interrupt crack growth but can reduce workability and slump retention.
Micro-fibers: Use 1-4% by volume. They improve toughness without significantly affecting workability.
Air entrainment (3-7% by volume) creates tiny air bubbles, allowing water to expand during freezing without causing damage. It’s crucial in cold climates but can slightly reduce strength.
Admixture selection and compatibility
Admixtures enhance concrete properties, but ensure they’re compatible with your cement and SCMs to avoid issues like delayed setting or reduced strength.
Plasticizers: Improve workability. Use 0.5-2% by weight of cement. Ensure compatibility with SCMs to prevent setting delays.
Retarders: Delay setting time, useful in hot weather. Use 1-3% by weight of cement. Check for compatibility to avoid excessive retardation.
Bonding agents: Enhance rebar bond strength. Use 0.5-2% by weight of cement. Ensure they’re compatible with your cement and SCM type.
Water Control and Workability: Avoiding Excess Water
The water-to-cement ratio is the primary driver of strength, durability, and shrinkage. Too much water creates voids and reduces density. Manage workability without compromising quality by balancing the mix design.
On-site water addition carries risks like lower early strength and surface defects. Use admixtures or revised mix proportions to achieve target workability. Control moisture, pre-wet or dry-pack aggregates, and monitor slump to keep consistent results.
Why water-to-cement ratio matters
The water-to-cement ratio is the key to strong, durable concrete. Too much water makes it weak.
Excess water increases porosity. More holes mean less strength and more chance of cracks.
It also causes shrinkage as it dries out. Shrinkage leads to cracking too.
Confirm mix water content at delivery. Don’t rely on what’s written down. Check it yourself.
Alternatives to adding water: plasticizers and slump control
Adding water on-site is tempting but bad news. It lowers strength and makes finishing tough.
Use water-reducing admixtures instead. They make concrete more workable with less water. Ask your supplier for them.
Communicate your slump requirements. Slump tells you how fluid the mix is. Too much or too little can cause problems.
Plasticizers and slump control keep mixes right without extra water. No need to add it on-site.
On-site mixing and delivery checks
Check delivered concrete carefully. It’s your job site, you’re in charge.
Slump test: Check workability. Too much or too little can cause issues.
Check temperature. Concrete sets faster in hot weather. You might need to adjust timing.
Look at appearance. Concrete should be uniform, no lumps or separations. If it’s over- or under-slumped, follow supplier’s handling instructions.
Pouring and Finishing: Timing, Sequencing, and Techniques
Pour sequencing, whether in a gang pour or single lift, affects jointing and curing outcomes. Plan expansion joints and curing to minimize cold joints and cracks. A thoughtful sequence reduces stress concentrations during placement.
Consolidation, air release, and finishing timing matter for surface integrity. Stagger finishing operations to avoid sealing in air. Schedule joints, textures, and edge work to align with the curing plan and maturity of the concrete.
Pour sequencing and consolidation best practices
When pouring concrete, it’s crucial to sequence your pours right to avoid cold joints. These can weaken the final slab. Here’s how:
Continuous pours are key. Plan your forms so you can pour one section after another without stopping. If you must stop, make sure to overlap the next pour by at least a foot to avoid cold joints.
For each section, aim for layer depths of no more than 8 inches. This makes it easier to consolidate and finish the concrete. Check your mix design, but generally, you want a slump of around 3-5 inches for easy placement and consolidation.
Use a vibration/raking strategy to remove air pockets and ensure proper consolidation. Here’s how:
- Start vibrating as soon as the concrete hits the forms.
- Vibrate until you see no more bubbles rising, then rake off any excess water or bleed.
- Repeat this process for each layer until you reach the desired finish level.
Finishing timing: bleed water and when to trowel
After pouring your concrete, wait for the bleed water to evaporate before you start finishing. Bleed water is the excess moisture that rises to the surface as the cement begins to hydrate.
Check for bleed water: It’ll look like a sheen on top of your slab. Once it’s gone, you’re ready to trowel. But don’t rush it – finishing too early can lead to a weak surface.
Here’s what to watch out for:
– If the surface is still shiny or damp, bleed water hasn’t finished yet.
– If the surface looks dry but feels cool to touch, it might be ready. Check by sprinkling some water on it. If it soaks in within 15-30 seconds, you’re good to go.
– Be careful not to overwork the surface. Too much troweling can bring up more cement and leave a weak top layer.
Tools, surface texture, and anti-slip finishes
First off, you need to choose your tools wisely. A good quality concrete trowel set – straight edge, bull float, and finish trowels – will make all the difference. Check the labels or ask at the store if unsure.
Surface texture is where you can get creative. For a smooth finish, use your finish trowels sparingly and lightly. For a rougher, non-slip surface, consider these options:
- Use a broom finish – drag a stiff-bristled broom across the concrete while it’s still wet.
- Add aggregates to your mix – small stones or pebbles will create texture. Check manufacturer guidelines for proportions.
Now, anti-slip finishes. You can buy special additives that reduce surface tension and increase friction. Always check the label for safe use with your specific concrete mix. Alternatively, you could apply a slip-resistant sealer after the concrete has cured. But remember, nothing beats proper surface texturing for safety.
Curing and Protection: Methods That Maximize Strength
Curing goals focus on hydration, minimizing shrinkage, and preserving surface moisture for target strength. Choose methods that fit the project and climate. A clear plan helps prevent premature drying and cracking.
Compare moist curing, curing compounds, and wet covers to determine what suits the condition and timing. Protect the slab from weather changes and schedule curing around form removal and finishing. Monitor moisture and adjust as needed to support strength gains.
Moist Curing, Compounds, and Membrane Blankets
Curing fresh concrete is crucial to maximize its strength. Here are three common methods:
Moist Curing (Water or Misting): Spray water on the surface or use a misting system. This is best for hot, dry conditions and small pours.
Curing Compounds (Film-Forming Agents): Apply these liquid chemicals to form a protective layer. They’re ideal for large surfaces and exposed aggregates.
Membrane Blankets (Wet Covers): Use burlap or plastic sheets soaked in water, suitable for cold weather and protecting against wind and rain.
Hot- and Cold-Weather Curing Adaptations
Temperature affects concrete curing. Here’s how to adapt:
Hot Weather: Protect from sun and wind with wet covers or curing compounds. Keep the surface moist, especially in high heat.
Cold Weather: Insulate with straw or hay bales, or use heating blankets. Prevent freezing by keeping the concrete above 50°F (10°C).
In both cases, monitor and maintain moisture levels to prevent premature drying.
Visual and Simple Tests for Curing Effectiveness
Check if your concrete is curing properly with these quick methods:
Surface Appearance: Look for a consistent, matte surface. Shiny or cracked spots may indicate inadequate curing.
Hardness Progression: Gently press a coin into the surface after 24 hours. If it leaves an impression, re-wet and cover.
Probe Test: Use a sharp tool to scratch the surface. If it’s hard enough, you’ll see powder but no crumbling. If not, continue curing.
Joints, Maintenance, Safety, and Cost Trade-Offs
Plan joints by type and spacing to control crack paths across the slab. Distinguish control, expansion, and construction joints and keep them aligned between pours. Consider load-bearing needs when locating joints.
Establish a routine maintenance plan for cracks and joints, and practice safe work during joint cutting and sealing. Weigh upfront joint costs against long-term durability and reduced repair downtime. Document pour timing and curing decisions to support consistent performance.
Control, Contraction, and Construction Joints
Joints are crucial to manage concrete’s natural shrinkage and expansion. They direct where cracks will form, preventing random ones.
Control joints are saw-cut into the surface after initial set. They’re spaced based on slab thickness (usually 10-24″ for every 30″ of depth) to control crack width and location.
Contraction joints are deeper, allowing for greater movement. They’re placed where concrete can’t shrink freely, like at walls or columns.
Construction joints separate pours. They should be aligned and staggered to avoid weak points in the structure.
Long-term Inspection, Maintenance, and Repair Planning
Regular checks keep cracks at bay. Here’s a simple schedule:
- Annually in spring: Check for new cracks or joint deterioration.
- Every 2-5 years: Re-seal joints to prevent water intrusion.
- As needed: Clean, lubricate, or replace joint fillers.
- If cracks exceed 1/8″ wide: Consult a pro. Wide cracks can indicate structural issues.
Quick rule: Address minor issues promptly to prevent major repairs down the line.
Site Safety and Cost Implications of Prevention vs. Repair
Safety first: Wear PPE, secure forms during cutting/grinding, control dust/silica, and handle materials properly.
Upfront measures save money long-term: A well-prepared base, proper reinforcement, and effective curing reduce the risk of cracks. Repairs can cost 5-10 times more than prevention.
Proper joint layout also saves: It directs shrinkage/cracking, reducing repair costs. High-quality sealants extend service life, further saving on maintenance.
Document site-specific deviations to maintain consistent performance across sections.
Conclusion
Crack resistance comes from solid prep, smart reinforcement, and disciplined curing. Do it right, and you get durability, smooth appearance, and fewer expensive fixes down the line.
Check your work step by step as you go: confirm the subgrade is firm and dry, set and braced forms, lay in the right reinforcement, mix with correct proportions and workability, control water and timing in the pour, and finish with careful curing and protection. Plan the sequence ahead, test a small area if unsure, and proceed in daylight with clean tools and a clear work area.
Common mistakes to avoid are using too much water or adding additives that weaken the mix, skipping proper consolidation around rebar or mesh, and delaying curing or sealing joints. Safety rules are simple: wear eye and skin protection, keep kids and pets away, and never rush curing or in-place work. If the project site is damp, uneven, or you’re unsure about the reinforcement layout, pause and verify before proceeding.
If the task grows beyond your comfort zone—complex rebar layouts, large pours, or uncertain soil conditions—call in a pro. A quick check from a qualified person can save money by preventing cracking and costly repairs. Stay deliberate, stay safe, and you’ll finish with a solid, crack-resistant surface that you can trust for years to come.
FAQ
1. What’s the right way to prep the site before pouring concrete?
Clear debris and vegetation from the area. Check the subgrade and compact it so it won’t settle. Set your forms true and level, with proper drainage and a clean, dry surface for the pour.
2. How do I choose a concrete mix for crack resistance?
Match the mix to your project needs and read the label or manufacturer instructions. Look for guidance on slump, cement type, and any fibers or additives, and avoid adding extra water beyond what the mix specifies.
3. How do weather and conditions affect pouring, and what can I do about it?
Temp, wind, and humidity affect setting and strength. If it’s too hot, too cold, or windy, plan timing and protection accordingly. Check local forecasts and follow the product’s weather guidance on curing and protection.
4. How should I use reinforcement and finish a slab properly?
Place rebar or wire mesh where the plan calls for, with proper overlap and support so it stays in the middle of the pour. Finish with a consistent pass, avoid overworking the surface, and protect against rapid drying or freezing during curing.