

Introduction
Matte and gloss sealers define the look and reflectivity of a concrete surface.
A matte finish hides minor wear but can be harder to keep clean, while a gloss finish is clearer but may show wear and slip risk more readily. This article gives a practical, DIY‑friendly overview of what to expect and how to plan maintenance.
For any choice, start with a thorough cleaning and a quick patch test on a small area. When cleaning decks, use proven deep-cleaning techniques and follow product labels for surface compatibility, especially where drainage and water pooling matter. Always check local rules and the manufacturer’s instructions for specifics before sealing.
Key takeaways
- Choose shee n sheen based on traffic, weather exposure, and slip considerations.
- Matte finishes hide application flaws; gloss reveals coverage and surface material quality.
- Increase safety by testing slipperiness on dry and damp conditions before use.
- Deep clean decks before sealing; remove oils, mildew, and old coating residues.
- Plan maintenance with routine cleaning, visual checks, and timely recoating intervals.
- Document surfaces with color restoration options and UV-blocking sealants for longevity.
Table of Contents
- Introduction
- Key takeaways
- Why Sheen Matters for Concrete Sealers
- Matte Vs Gloss Sealers — Chemistry and Typical Applications
- Slip Risk — How Sheen and Conditions Change Traction
- Controlling Sheen Without Compromising Safety
- Maintenance Reality — Cleaning, Inspection, and Recoating
- Tools, Materials, and Visual Checkpoints for DIY and Pros
- Cost, Performance Trade-Offs, and Hiring Considerations
- Practical Test Plan and Case-Study Checklist for Your Surface
- Conclusion
- FAQ
Why Sheen Matters for Concrete Sealers
S sheen on concrete sealers affects more than looks. The finish changes how light reflects, how color depth appears, and how texture reads indoors versus outdoors. Understanding sheen helps you pick a surface that matches the space and traffic level.
Consider how dirt, water, and wear show up on different finishes. Matte hides dust better; gloss reveals footprints and stains more readily. A practical plan balances appearance with maintenance needs for each environment, whether in a garage, patio, or basement.
Aesthetics versus functional performance
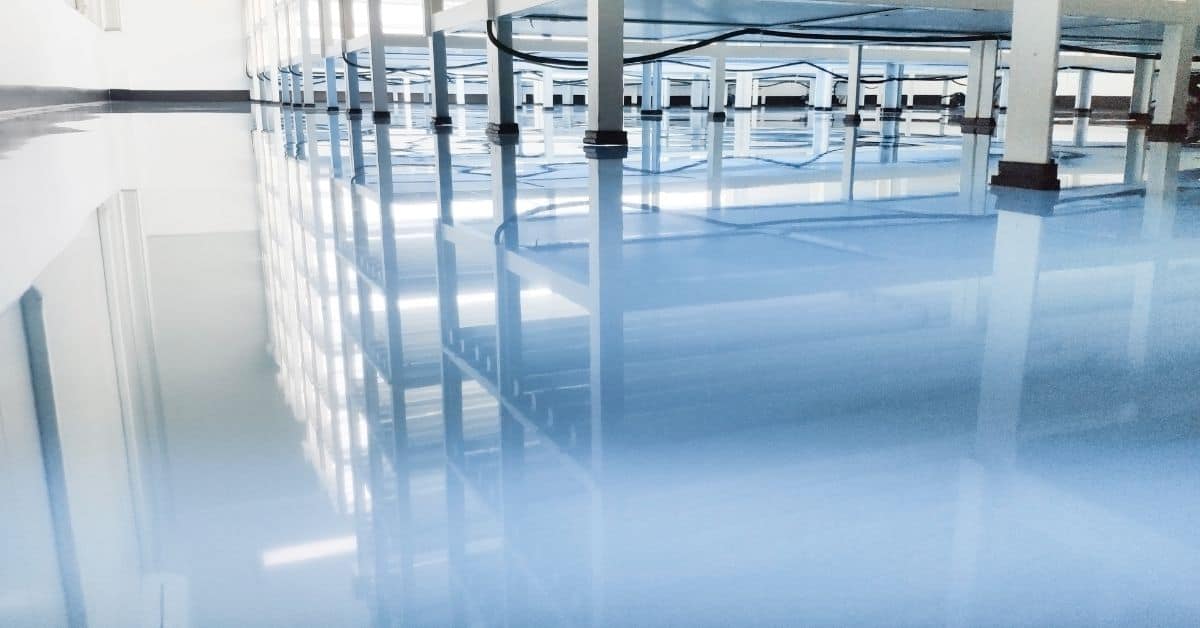
When choosing a concrete sealer, consider both the look you want and how it’ll perform. Glossier sealers give a shiny, reflective finish. They show off your concrete’s color and texture. But they also highlight every scratch and stain.
Matte or low-sheen sealers hide imperfections better. They’re great for high-traffic areas like garages or workshops. But they might not show off your concrete’s natural beauty as much.
Think about UV resistance too. Glossy finishes can fade and yellow over time, especially outdoors. Matte ones hold their color better but may not be as durable against heavy foot traffic.
It’s a trade-off. Decide what’s most important – looks or performance – for your space.
Common sheen terms and how they’re measured
Sheen levels in concrete sealers range from matte to gloss. But these terms can be vague. Here’s what they mean:
Matte: Low or no shine. Hides imperfections well.
Satin or Semi-Gloss: Somewhere between matte and gloss. Shows off color and texture a bit more but still hides imperfections.
Gloss: High shine. Reflects light and shows every detail in your concrete.
Check product datasheets for measured gloss units (like 60° or 20° gloss) or manufacturer’s gloss classifications. These give a better idea of the sheen level than vague labels.
How sheen influences cleaning and maintenance expectations
Higher sheens clean more easily. Dirt wipes off quickly with just water or a mild cleaner. But they show every speck of dust and every scuff mark.
Low-sheen finishes hide imperfections better. They might need different cleaning approaches, like using specialized cleaners or scrubbing gently to avoid scratches.
Matte sealers can look dirty faster than glossy ones because dirt blends in. But they’re easier to touch up if you do scratch them.
Regardless of sheen, regular maintenance is key. Sweep and mop regularly. Spot clean spills promptly. This extends the life of your sealer and keeps your concrete looking its best.
Matte Vs Gloss Sealers — Chemistry and Typical Applications
Penetrating sealers are usually matte and work by soaking in rather than forming a film. Film-forming sealers create a surface layer that can appear glossier and reflect more light. This chemistry drives the visible sheen you’ll see in the finished slab.
Appearance, breathability, and moisture handling change with the chemistry. Indoor and outdoor uses differ in how the finish ages, yellows, or fades gloss. Use-case mapping helps you choose based on traffic, substrate, and desired look, while noting climate effects on performance.
Penetrating (matte) sealers: pros and limits
Penetrating sealers are your best bet for a natural, matte look. They soak into concrete’s pores, protecting from within.
Pros: Breathable, allows moisture to escape. Keeps the natural texture and color of concrete.
Limits: Won’t enhance color or provide much stain resistance. May not be ideal for high-traffic areas due to reduced durability.
Film-forming (gloss) sealers: pros and limits
Film-forming sealers create a protective layer on top of concrete, enhancing its appearance.
Pros: Enhances color, easier to clean. Sheds water, reducing surface moisture.
Limits: Can peel or flake off over time, especially in high-traffic areas. May increase slip risk when polished or wet.
Choosing by substrate and use-case
Selecting the right sealer depends on your concrete’s nature and intended use.
Indoor floors: Go matte for a natural look. Gloss can work, but be mindful of slip risk.
Outdoor patios/driveways: Matte is great for its breathability. Gloss might be better for water-shedding and easier cleaning in high-traffic areas like garages.
Slip Risk — How Sheen and Conditions Change Traction
Sheen interacts with contaminants and moisture to alter slipperiness. Matte finishes tend to hide some slickness but can feel slick when wet in certain conditions. Gloss can feel grippier dry, yet may trap residue that reduces traction when wet.
Wear, UV exposure, and surface porosity shift traction over time. Plan maintenance around entrances, ramps, and loading zones, and tailor cleaning to keep grip consistent. For safety, consider test observations and professional guidance if required.
Wet, oily, and contaminated surfaces
Water, oils, pollen, and algae can drastically change how your sealed concrete feels underfoot. What’s grippy when dry might be slippery when wet.
Oils, for instance, make surfaces slipperier than water alone. Algae growth can create a slimy film that reduces traction. Even pollen can accumulate and cause slips.
Matte sealers often handle contaminants better than gloss ones. They don’t trap oils or dirt as much, reducing the slip risk over time. But remember, no sealer can prevent all slips on wet surfaces.
Laboratory tests and on-site verification
Before you buy, look for products with pendulum or coefficient-of-friction test results. These measure slip resistance.
Manufacturers often provide these in their product certifications. But don’t rely solely on lab tests. Conditions on your site might differ.
Do some on-site testing yourself. Use a simple, low-cost slip test kit or reference chart. Compare results with the manufacturer’s claims. This helps ensure the sealer performs as expected in your specific conditions.
Interpreting manufacturer slip claims
Manufacturers often list slip ratings on their datasheets. These give you an idea of the sealer’s performance under different conditions.
But treat these as starting points, not guarantees. A sealer that performs well in a lab might not work as expected on your site due to unique conditions like heavy foot traffic or frequent rain.
Always validate manufacturer claims with on-site testing. This helps ensure the sealer meets safety standards and reduces slip risks in your specific pedestrian or vehicular areas.
Controlling Sheen Without Compromising Safety
Set clear goals for sheen by area and safety needs, aligning with typical concrete surfaces like floors and patios. The right level supports both visibility and grip without sacrificing durability. Plan around expected traffic and cleaning routines.
Compare coatings (sealants, acrylics, epoxies) and how additives or top-coats influence sheen and traction. Prepare to test and adjust before committing to a full surface, especially where glare or glare-sensitive tasks matter.
Anti-slip additives and aggregates
To boost traction, consider adding anti-slip agents to your sealer. These come as beads or aggregates that you broadcast or mix in.
Silica sand is common but can scratch surfaces if not properly sealed. Aluminum oxide and polymer aggregates are tougher, lasting longer under foot traffic.
Follow manufacturer guidelines for approved particle types and application methods. Too much can reduce sheen, too little won’t provide enough grip.
Matting agents and low-sheen modifiers
For a matte finish, use matting additives or apply a separate matte topcoat. These reduce gloss but may affect other properties.
Matting additives can lower scratch resistance. Topcoats might need more frequent reapplication due to easier wear.
Test areas first to ensure the trade-off doesn’t compromise durability or cleanability for your specific use-case.
Texturing and application technique
Surface prep and application methods can impact sheen and grip. For instance, applying thin multiple coats instead of one thick coat can reduce gloss.
Brushed finishes or controlled broadcast techniques create texture, enhancing traction. But they might increase labor time and material usage.
Test different methods on small areas before committing to a full application. Always consider the balance between sheen reduction and safety enhancement.
Maintenance Reality — Cleaning, Inspection, and Recoating
Plan maintenance cadence by the sheen type and use-case, knowing that indoor and outdoor exposure shifts cleaning frequency. Cleaner choices and reapplication timing should reflect wear and environmental stress. Keep expectations aligned with actual conditions on the site.
Follow practical cleaning protocols for the surface and finish, including safe products, dilution, and drying times. Regular inspections help catch wear early and determine when re-coating is needed.
Cleaning protocols by sheen and contamination type
Use this checklist to determine the best cleaning approach for your sealed concrete surface based on its sheen and the type of contamination.
- Matte surfaces with dirt: Use a mild detergent and soft-bristle brush. Avoid harsh chemicals that can damage the sealer.
- Gloss surfaces with oil or grease: Apply a degreaser, let it sit for 10-15 minutes, then scrub gently with a non-abrasive pad.
- Biological films (mold, mildew): Use a solution of bleach and water (3:1 ratio), apply, let it sit for 20 minutes, then scrub and rinse thoroughly.
- Pressure washing: Consult product labels for recommended PSI. Too high can damage the sealer.
Quick rule: Always test cleaners on a small, hidden area first to ensure they won’t harm your specific sealer.
Visual and tactile indicators for recoating
Regularly inspect your sealed concrete surface using this checklist to identify signs that it’s time for a recoat.
- Loss of water repellency: Water no longer beads up. Drip water on the surface; if it soaks in, it’s time to recoat.
- Uneven sheen: Areas appear dull or shiny compared to others. Check for consistent sheen before recoating.
- Surface slickness: The surface feels slippery when dry. Test with a damp cloth; if it’s still slick, recoat is needed.
- Film degradation: Cracking, peeling, or flaking of the sealer. Inspect for these signs before recoating.
Quick rule: Always perform a trial spot with your chosen sealer to ensure compatibility and desired results.
Seasonal considerations and climate impacts
Consider these factors when planning maintenance for your sealed concrete surfaces to maximize their lifespan.
- Temperature swings: Extreme heat or cold can cause sealers to crack or peel. Inspect surfaces after temperature extremes.
- Freeze/thaw cycles: These can weaken sealers over time. Recoat before winter if the sealer is failing.
- Humidity: High humidity can cause moisture-related issues. Inspect surfaces in humid conditions for signs of failure.
- UV exposure: Prolonged sun exposure can degrade sealers. Recoat before summer if the sealer is failing due to UV damage.
Quick rule: Plan maintenance schedules around these factors to maintain optimal surface protection year-round.
Tools, Materials, and Visual Checkpoints for DIY and Pros
Prepare a core equipment checklist that includes PPE, mixing tools, applicators, and surface protection. Have a plan for both DIY and professional workflows. Stock cleaners and compatible sealers for your chosen sheen.
Assess surface condition visually and through simple tests to confirm porosity, moisture, and adhesion readiness. Document expectations for color, sheen uniformity, and cure under typical lighting.
Tools and materials checklist
Before you start, make sure you have all the necessary tools and materials. This checklist ensures you’re well-equipped for a smooth application.
- Safety gear: Gloves, goggles, and a respirator to protect yourself from chemicals.
- Mixing tools: A 5-gallon bucket with a mixing paddle attachment for your drill.
- Calibrated applicators: Rollers, non-metallic brooms, or spray equipment suitable for your chosen sealer.
- Protective coverings: Drop cloths and masking tape to keep nearby surfaces clean.
- Cleaning supplies: Solvents or detergents compatible with your sealer for post-application cleanup.
- Sealer: Choose a matte, satin, or gloss sealer that matches your desired sheen and substrate compatibility.
- Primer/cleaner: A recommended primer or cleaner to prepare the surface and enhance adhesion.
- Broadcast media (optional): For textured finishes, use non-slip aggregates or matting agents.
- Tape measure: To ensure even application and proper coverage.
Quick rule: Always check your sealer’s manufacturer guidelines for specific tool recommendations.
What to verify on product datasheets
Before purchasing, review the product datasheet to ensure the sealer meets your project’s needs and safety requirements.
- VOC content: Check for low or zero VOC emissions to comply with local regulations and maintain indoor air quality.
- UV resistance: Ensure the sealer can withstand sunlight exposure without yellowing or losing sheen.
- Recommended substrates: Confirm your chosen surface (concrete, wood, etc.) is compatible with the sealer.
- Cure time: Understand how long it takes for the sealer to dry and cure fully before exposing it to traffic or moisture.
- Gloss level: Verify the sheen level (matte, satin, gloss) matches your desired finish.
- Slip rating: Check the product’s slip resistance rating to ensure safety under various conditions.
- Moisture vapor transmission rate (MVTR): Ensure the sealer allows moisture to escape to prevent trapped moisture from causing damage or delamination.
- Cleaning and maintenance: Review recommended cleaning methods and expected maintenance requirements.
Quick rule: Always compare datasheets of multiple products before making a final decision.
Visual checkpoints during and after application
Inspect your work throughout the application process and after curing to ensure quality and safety.
- Sheen uniformity: Check for consistent sheen across the entire surface. Inconsistencies may indicate improper mixing, application, or substrate issues.
- Pooling: Look for areas where sealer has collected and formed puddles. This can lead to uneven sheen and increased slip risk after curing.
- Nibs (small bumps): Inspect for nibs, which may form due to improper mixing or application technique. Remove any nibs with light sanding before the sealer fully cures.
- Adhesion: Gently scratch the surface with a coin or utility knife to ensure the sealer adheres properly to the substrate.
- Color stability: After curing, check that the color and sheen remain consistent under various lighting conditions.
- Traction (slip resistance): Perform a simple slip test by walking on the surface with dry and wet feet to ensure adequate traction. Compare results to manufacturer claims.
- Curing progress: Monitor the curing process, following manufacturer guidelines for proper drying times before exposing the surface to traffic or moisture.
Quick rule: Regular visual inspections help catch and address potential issues early in the application process.
Cost, Performance Trade-Offs, and Hiring Considerations
Weigh upfront cost against lifecycle maintenance and performance when choosing sheen. Consider how cleaning, reapplication, and potential downtime affect total value. Use a practical lens for your goals and budget.
Understand safety, warranties, and contractor qualifications when hiring. Compare quotes with product specs and expected maintenance to estimate long-term costs. Plan for routine cleaning and timely recoat to preserve the chosen look and performance.
Upfront cost versus lifecycle value
When choosing a concrete sealer, it’s tempting to go for the cheapest option. But remember, cheaper isn’t always better in the long run.
Matte sealers might be less expensive upfront, but they may require more frequent recoating due to their lower durability compared to gloss counterparts. This means you could end up spending more over time.
Similarly, a low-cost sealer might not provide adequate protection against climate or foot traffic, leading to early deterioration and costly repairs. Always consider the projected lifecycle maintenance, cleaning, and recoating intervals when comparing costs.
Tip: Compare apples to apples. Look at the total cost of ownership, including maintenance and reapplication, not just the initial purchase price.
When to DIY and when to hire a professional
Knowing when to tackle concrete sealing yourself or call in a pro can save you time, money, and headaches.
DIY: Small areas with simple substrates are great for trial-and-error learning. You’ll gain experience without significant investment if mistakes happen.
Hire a Pro: For large areas, complex substrates like existing sealers or damaged concrete, or when lab-quality slip testing is required, it’s best to hire a professional. They have the equipment and expertise to handle these challenges safely and effectively.
Also consider hiring if you need a warranty that covers both product and labor. Pros often offer warranties, giving you peace of mind and recourse if something goes wrong.
Warranty, specifications, and risk management
Before making a purchase or hiring a pro, always verify the warranty. It should cover both product defects and application issues.
Carefully read the sealer’s application limits on the datasheet. This will help you understand if it’s suitable for your specific climate, substrate, and traffic conditions.
Document site conditions before starting work. Photos, notes, or videos can serve as evidence if performance falls short and you need to make a warranty claim or dispute.
Pro Tip: Keep records of all communications with the manufacturer or contractor, including emails, receipts, and any promises made regarding warranties or product performance.
Practical Test Plan and Case-Study Checklist for Your Surface
Outline objective, surfaces, and products to compare matte and gloss options fairly. Document concrete type, cure time, and environmental conditions for consistency. Use non-critical areas to run swatches if possible.
Develop a replicable workflow with identical prep and curing. Include slip tests, cleaning trials, and a simple data sheet to track results over time. This plan supports real-world decisions and potential future touch-ups.
Small-area trial protocol
Use this checklist when you want to compare matte and gloss sealers on your concrete surface before committing to a full application.
- Prepare test patches: Choose two non-critical areas, one for each sealer. Make them adjacent for easy comparison.
- Surface prep: Clean both patches thoroughly. If needed, etch the surface to improve sealer adhesion.
- Cure time: Ensure both patches have cured equally before testing.
- Apply sealers: Apply one matte and one gloss sealer according to manufacturer instructions.
- Drying time: Allow both patches to dry for the recommended time.
- Finish coats: If applicable, apply finish coats on both patches.
- Observe over time: Check both patches regularly under typical use scenarios. Note any differences in appearance or performance.
- Document results: Take photos and note observations to compare later.
Quick rule: Small-area trials help you make informed decisions, but they’re not a substitute for thorough testing on larger areas.
Documenting and interpreting results
Use this checklist to record and understand the performance of matte and gloss sealers on your concrete surface.
- Photographic records: Take photos of both patches under different lighting conditions. Include a reference scale for size comparison.
- Tactile checks: Feel both surfaces to compare texture and smoothness.
- Wet-surface checks: Sprinkle water on both patches. Observe how it beads up or spreads out.
- Cleaning behavior: Simulate common soil types. Note which sealer is easier to clean and leaves less residue.
- Gloss retention: Check both patches regularly for any changes in sheen over time.
- Slip observations: Perform a small, supervised walk test on both patches with different footwear. Note any slippery areas.
- Surface slope: If applicable, observe how sealers perform on sloped surfaces.
Quick rule: Thorough documentation helps you make the best choice for your needs and serves as a reference for future maintenance.
When to escalate to professional testing
Use this checklist when you need more detailed, scientific data about your concrete surface’s performance with matte or gloss sealers.
- Safety-critical slip data: If your project requires precise slip resistance data (e.g., public spaces), consider lab testing.
- Surface issues persist: If you’ve properly prepared and tested surfaces, but issues still occur, seek professional help to diagnose the problem.
- Warranty certification: If your project requires certified performance data for warranty purposes, hire a contractor or lab for testing.
- Complex surface types: For unique or complex surfaces (e.g., stamped concrete), professional testing can provide tailored insights.
- Large-scale projects: Before applying sealers on large areas, consider pilot tests to ensure consistent performance.
Quick rule: While DIY testing is valuable, professional testing provides more detailed, scientific data for critical projects.
Conclusion
Controlling sheen is about making concrete safe to use, easy to clean, and durable over time. Choose a finish that suits traffic, weather, and maintenance truth so you don’t pay for appearance you can’t keep.
First, test a small area and note how the surface looks dry and wet, then compare matte and gloss in those conditions. Decide on the finish based on traction needs and maintenance reality, then plan cleaning, inspection, and a realistic recoat window. If you’re DIY-ing, check substrate condition, apply in a proper weather window, and follow a simple schedule for cleaning and reapplication.
Common mistakes to avoid are using the wrong type of sealer for the job, skipping a dedicated test area, and applying when the surface is dirty, damp, or below the recommended temperature. Always wear proper PPE, provide ventilation, and avoid rushing coats or recoats. Don’t ignore edge conditions or traffic patterns; small mistakes here compound over time and can cause costly damage.
If the project involves a large area, extensive cracking, or ambiguity between penetrating and film-forming sealers, call a professional. Stay practical, stick to the plan, and you’ll finish with a surface that looks right, grips well, and stays easier to maintain for years to come.
FAQ
What are practical deep-cleaning steps for a wooden or concrete deck before sealing?
Sweep and rinse the surface first to remove loose dirt. Use a deck cleaner or a mild detergent with a stiff brush on concrete or wood, then rinse thoroughly and let it dry completely before applying sealer.
How can I inspect a deck for structural issues before sealing or staining?
Check for loose boards, cracked deck boards, and rusty fasteners. Look for sagging sections, rot, or insect damage, and address any unsafe areas before sealing or coating.
What options exist to restore color and protect against UV when sealing?
Consider UV-blocking stains or sealers if you want color protection. Follow the product label for application and recoat intervals, and test a small area first to confirm color and finish you prefer.
How do I prevent water damage and control drainage after sealing?
Ensure proper slope and drainage away from structures. Use sealers compatible with your surface and maintain clean gutters and downspouts to avoid pooled water near the deck.