

Introduction
CSP stands for Concrete Surface Profile, and it describes how rough or smooth a concrete surface is. Choosing the right CSP helps coatings and overlays grip well, without grinding away too much material. This article keeps it practical for DIYers and focuses on getting the profile right without overdoing it.
The ICRI CSP scale is a common reference that helps you compare surfaces before you coat. For a DIY project, aim for a surface you can feel with your hand and that looks uniform, then check the coating instructions and local rules. Use light mechanical profiling or light abrasion and thorough cleaning, and always verify with the product label or manufacturer guidance.
Key takeaways
- Define CSP as measured surface roughness affecting adhesive bonding and coating longevity.
- ICRI CSP scale overview: range from smooth to heavily profiled with practical interpretation.
- Incorrect CSP causes over-grinding risks, poor adhesion, and costly rework on-site.
- Use reputable comparators and verify CSP per manufacturer and ICRI guidelines.
- Surface prep sequencing matters: clean, etch, profile, and test adhesion before coatings.
- Safety and environmental controls: wear PPE, manage dust, and respect seasonal curing impacts.
Table of Contents
- Introduction
- Key takeaways
- Understanding Concrete Surface Profile (CSP) Fundamentals
- Why Correct CSP Prevents over-Grinding and Improves Adhesion
- Tools and Comparators for Selecting CSP
- Surface Preparation Techniques and Their Typical CSP Outcomes
- Measuring Adhesion and Verification on-Site
- Safety, Environmental Controls, and Seasonal Considerations
- Cost-Benefit and Decision-Making: Avoid over-Grinding
- Case Studies, Visual Checkpoints, and Practical on-Site Checklist
- Conclusion
- FAQ
Understanding Concrete Surface Profile (CSP) Fundamentals
CSP defines the roughness and geometry of a concrete surface, using a standard grading from CSP 1 to CSP 9. It communicates peak and valley spacing and the potential for bonding to coatings and overlays. This framing helps you pick the right target for your system.
Peaks and valleys matter because macro-roughness affects mechanical interlock, adhesive performance, and how a coating cures. Moisture entrapment and sealing issues can trace back to the chosen CSP. This section links CSP ranges to typical coating or overlay systems and explains what can go wrong if CSP is off.
What CSP is and why it matters
The concrete surface profile (CSP) is like the fingerprint of your slab – unique, with peaks and valleys that tell a story. It’s all about roughness, how rough or smooth your concrete is.
Think of it this way: imagine you’re painting a wall. If it’s too smooth, paint won’t stick. Too rough, it’ll look messy. Same goes for concrete coatings. You need just the right amount of texture to make sure your coating sticks and lasts.
CSP affects how well primers and topcoats infiltrate the surface. It also plays a big role in overall system longevity. Get it wrong, and you’re looking at early wear or failure.
ICRI CSP scale overview and how to use it
The ICRI (International Concrete Repair Institute) has a scale from 1 to 10 that tells us about our concrete’s surface profile. It’s like a grading system, with 1 being very smooth and 10 being extremely rough.
Now, you might think we need a specific number for each job. But it’s not that simple. The ICRI scale is more of a guide. Specifiers use it to map out preparation methods to CSP levels without picking just one number as the target.
For instance, if you’re applying a thin overlay, you might aim for a CSP of 6 or 7. But remember, it’s not just about the number. It’s about what works best for your specific job and coating system.
Why Correct CSP Prevents over-Grinding and Improves Adhesion
CSP matters for bonding because roughness creates a mechanical key for coatings and adhesives. Getting this right helps reduce delamination risks and improves long-term adhesion. Incorrect CSP can undermine performance from the start.
The balance is clear: too little roughness = poor adhesion; too much grinding = concrete loss and a weaker substrate. This section explains which CSP grades support common coatings and how to choose based on substrate and spec. It also covers quick on-site checks and when to bring in formal testing.
Mechanical interlock and matching CSP to materials
The right concrete surface profile (CSP) promotes mechanical interlock with your chosen coating or overlay. This means it grips the material, preventing peeling and delamination.
- Epoxy coatings: These need a CSP of at least 2-3 mils to achieve good adhesion. Look for products rated for ‘high build’ or ‘heavy duty’. Avoid over-grinding as it can weaken the concrete and cause cracking.
- Polyurea coatings: Polyureas require a CSP of around 1-2 mils. Check manufacturer specs for ‘medium build’ or ‘general purpose’ ratings. Be careful not to grind too much, leaving insufficient substrate thickness.
- Lightweight overlays: These typically need a CSP of 3-4 mils. Opt for products with ‘heavy duty’ or ‘thick build’ ratings. Ensure you don’t remove too much concrete near edges where the overlay is thinner.
Risks and consequences of over-grinding vs under-preparation
Over-grinding removes too much concrete, weakening the substrate. This can lead to cracking, especially near edges or around rebar. It also increases the risk of delamination, where the coating peels off prematurely.
Under-preparing the surface—using a CSP that’s too low—results in poor adhesion. The coating won’t grip properly, making it prone to staining and weak bond issues. This can cause premature failure, leading to added repair costs.
Uneven surfaces are another risk. If some areas are over-ground while others are under-prepared, the final finish will be inconsistent. This can affect both the appearance and performance of your coating or overlay.
Tools and Comparators for Selecting CSP
Tactile/visual CSP comparator chips, replica putty, and digital depth gauges each have a use on site. Tool choice depends on concrete type, moisture, and required accuracy. Use the right tool for the job at hand.
On-site workflow matters: calibrate instruments, clean the substrate, take samples, and record readings so crews stay consistent. This helps you track CSP across shifts and projects.
CSP Comparator Chips: Proper Use and Limitations
CSP comparator chips are tactile/visual tools used to estimate the surface profile of concrete. They’re great for quick, on-site checks.
To use, press each chip firmly onto the slab. Compare visually or by touch with the ICRI CSP scale. Matching tells you the profile’s roughness grade (e.g., 1-3 for light prep, 4-6 for heavy).
Limitations: Chips can be subjective and material limitations may cause mismatches. Glossy finishes might reflect light, making visual matching tough. Always double-check with other methods.
Digital and Quantitative Alternatives (ASTM D8271 and Devices)
For precise, quantitative data, use digital depth micrometers or replica measurements. These tools provide numerical CSP readings.
To measure, place the device on the slab, apply light pressure, and record the reading. ASTM D8271 is the relevant test method for this procedure.
When to use: For critical projects where precision matters, like high-performance coatings or thin overlays. Also useful when subjective methods don’t agree.
Surface Preparation Techniques and Their Typical CSP Outcomes
Common prep methods include shot blasting, grinding, scarifying, and acid etching, each with typical CSP implications and texturing effects. Discuss invasiveness and how each method impacts the substrate before selecting a method. The goal is the least-invasive path that still meets the spec.
Understanding how CSP readings relate to prep method helps avoid over-grinding and ensures coating compatibility. This section connects the dots between prep choice, CSP, and warranty implications.
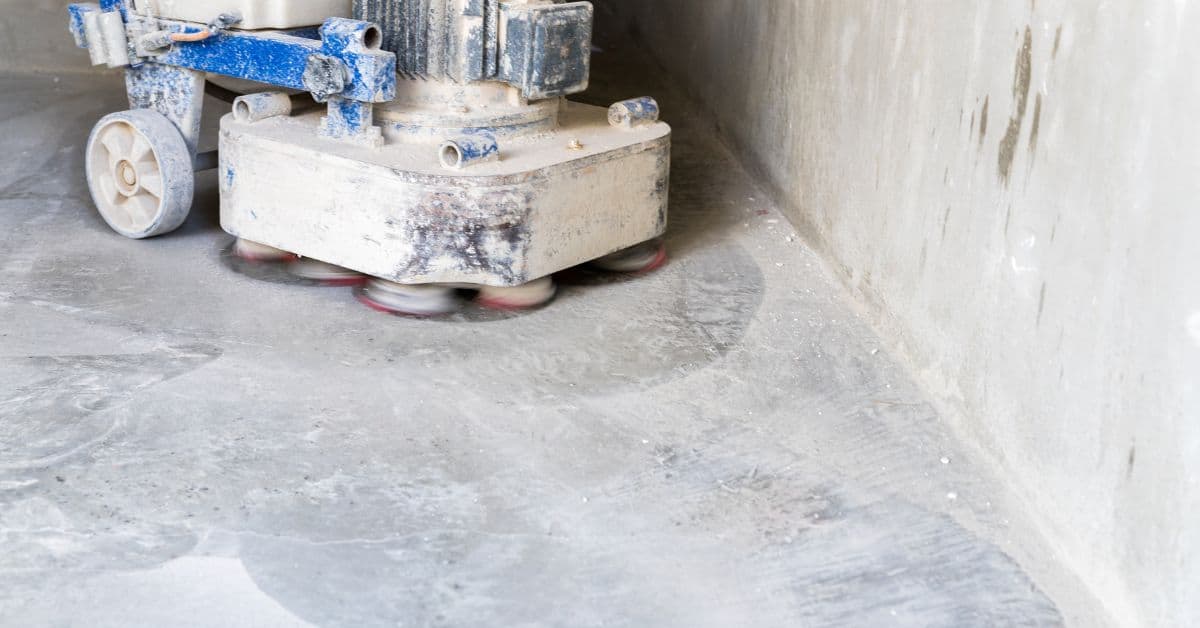
Shot blasting, grinding, and scarification — pros and cons
These methods are more aggressive, ideal for mid to high CSP needs. They remove contaminants and create a strong mechanical bond.
Pros
- Uniform texturing
- Effective contaminant removal
- High production rate
- Suitable for mid to aggressive CSP (2-7)
Cons
- Generates significant dust and noise
- Requires proper ventilation and safety gear
- Can be too aggressive, leading to over-grinding if not monitored
- May damage concrete if not done carefully
These methods are best used when you need a strong bond, have a clean surface, and can handle the dust and noise.
Acid etching and light-prep options — when they suffice
Acid etching is a low-impact method, suitable for thin sealers or light treatments. It’s quick, clean, and easy to apply.
Note: Acid etching doesn’t remove heavy contaminants or provide deep profiling. It’s not recommended for heavy-duty systems or contaminated surfaces.
Light-prep options like water blasting or soft brushing are even gentler. They’re ideal for maintaining existing profiles but won’t create new ones.
Use these methods when you need a light treatment, have a clean surface, and don’t require deep profiling. Always check your coating system’s compatibility with the chosen method.
Measuring Adhesion and Verification on-Site
On-site verification aims to confirm the CSP category matches the specification and that coating adhesion is sound before sign-off. This keeps your project from surprises later. Plan the sequence to avoid backtracking.
Diagnostic tests and pass/fail checks serve different purposes: use CSP quick checks and preliminary adhesion tests for guidance, then formal tests as needed. Document results, conditions, and any corrective actions taken.
Pull-off tests and quick adhesion checks
The pull-off test (ASTM D4541) is your go-to for checking coating adhesion. It’s destructive but gives you the most accurate bond strength measurement.
Here’s how to do it: glue a steel dollies onto the surface, let it cure, then pull it off with a testing machine. The force needed to break the bond tells you the adhesion strength.
For quick checks, use tape/peel tests. It’s non-destructive and great for screening. Just press a piece of tape firmly onto the surface, then rip it off quickly. If the coating stays put, that’s a good sign.
Sampling plans and conformance criteria
To ensure you’re getting representative results, follow sampling plans from organizations like AMPP/SP. They tell you how many measurements to take and where.
For CSP, check at least 5 points across the surface. For adhesion, test every 100 sq ft or so. Mark non-conforming areas for rework.
As for conformance criteria, that’s your pass/fail threshold. For CSP, it’s typically within one category of the spec (e.g., if you need CSP 2, accept CSP 1-3). For adhesion, aim for at least 80% of the coating’s tensile strength.
Safety, Environmental Controls, and Seasonal Considerations
Dust control and containment are essential: set up negative pressure, use HEPA filtering, and manage work zones to limit silica exposure. Clean air and surfaces protect workers and the coating you plan to apply. Keep a waste plan for slurry and debris as part of site logistics.
PPE, waste handling, and environmental controls matter for compliance and quality. Weather, humidity, and dew point can skew CSP readings and cure times, so plan around conditions and adjust pacing accordingly. Safety and accurate readings go hand in hand.
Dust control, PPE, and regulatory considerations
First things first: silica dust is nasty stuff. It’s a health hazard, so we need to keep it under control.
Dust control: Use HEPA vacuums or enclosures with negative pressure. Local exhaust systems can help too. Water suppression might be needed for heavy grinding.
PPE: Respirators, eye protection, hearing protection, gloves, and coveralls are a must. Make sure they fit right and everyone’s trained to use them.
Check local regulations for silica exposure limits and waste discharge rules. You don’t want any surprises later.
Temperature, humidity, and seasonal impacts on prep and testing
Weather can play tricks on your prep work. Here’s what to watch out for.
Temperature: Too hot or too cold can mess with curing times. Check the product data sheet for ideal temps before you start.
Humidity: High humidity can skew CSP readings and cause moisture issues. Plan your work around rain and keep surfaces dry.
Seasonal impacts: Dew point matters too. It can affect surface moisture levels, so check it before testing. Schedule your work to allow for proper curing time in different seasons.
Cost-Benefit and Decision-Making: Avoid over-Grinding
Start with a clear cost-benefit framework that weighs labor, equipment use, disposal, and the risk of rework against service life. This helps you pick the most economical CSP strategy without sacrificing performance. Keep the plan simple and repeatable.
Identify cost drivers and assess the risk of over-grinding as a spine of the decision. Link CSP to adhesion potential, coating compatibility, and how long the surface will last. Use a straightforward scoring approach to compare options and document your rationale.
Comparative cost factors and lifecycle trade-offs
When choosing a Concrete Surface Profile (CSP), consider both upfront prep costs and long-term maintenance. This helps you make the most cost-effective decision.
Upfront Costs: Lower CSP levels require less labor, equipment usage, and consumables. But they might need more frequent touch-ups or repairs down the line.
Long-Term Maintenance: Higher CSP levels provide better adhesion and durability, reducing repair costs over time. However, they come with higher upfront expenses. Weigh these factors to find your sweet spot.
Common mistakes and a quick decision checklist
Before you start prep work, use this checklist to ensure you’re on the right track. It helps avoid common pitfalls.
- Wrong comparator: Using incorrect CSP comparator chips can lead to over- or under-preparation.
- Skipping adhesion tests: Not checking adhesion can result in coating failure and costly rework.
- Ignoring manufacturer guidance: Disregarding CSP recommendations might void warranties and cause premature failures.
- Inadequate dust control: Poor dust management can lead to health hazards, regulatory fines, and contaminated coatings.
- Overlooking environmental factors: Not considering local codes and waste disposal options may result in additional costs or delays.
- Neglecting end-use requirements: Choosing a CSP that doesn’t meet finish needs can lead to poor aesthetics, reduced performance, or increased maintenance.
- Not verifying CSP levels: Failing to measure and confirm CSP levels may result in over-processing or under-preparation.
- Disregarding seasonal impacts: Not accounting for temperature and humidity changes can affect prep work quality and test results.
Quick rule: Always double-check your chosen CSP against these factors to avoid costly mistakes.
Case Studies, Visual Checkpoints, and Practical on-Site Checklist
Include brief real-world examples showing outcomes from misinterpreting CSP and the consequences of over-grinding. Use before/after visuals and clear takeaways you can apply on site. Visual checkpoints help crews gauge CSP quickly.
Provide a practical checklist covering measurements, acceptable ranges, and decision points. Include a framework for inspectors to re-profile vs proceed with coatings, with notes for warranty and maintenance considerations. Capture readings for traceability.
Short case examples: failure vs. successful specification
Before you start, understand these real-life scenarios to avoid common mistakes.
- Case 1: Over-grinding – A crew over-ground a concrete floor, exposing aggregate and causing dusting. Result: Floor failed adhesion tests, required re-profiling, and delayed project by weeks.
- Case 2: Under-preparation – An inspector missed visible trowel marks, leading to poor coating adhesion. Result: Coatings peeled off within months, costly redo was necessary.
- Case 3: Correct CSP – A foreman used CSP comparators, ensured proper profiling, and passed adhesion tests on the first try. Result: Floor coated successfully, project completed on time.
Quick rule: Always use CSP comparators to avoid over-grinding or under-preparation.
Tools and materials checklist plus visual checkpoints for inspectors
Before you start inspecting, ensure you have the right tools and visually confirm these points.
- CSP Comparator Chips – Check if they’re available in various grades (e.g., CSP 2-4).
- Depth Micrometer – Ensure it’s calibrated to measure profile depth accurately.
- Pull-Off Kit – Confirm all components are present for adhesion testing.
- Replica Putty – Check if it’s suitable for replicating the surface profile.
- PPE – Ensure you have proper safety gear, including gloves and eye protection.
- Roughness Feel – Run your hand over the surface. It should feel uniformly rough, not smooth or excessively coarse.
- Surface Uniformity – Inspect for any hollow spots, thin edges, or excessive sheen that may indicate over-grinding.
- Visible Trowel Marks – Check if trowel marks are still visible. If so, re-profile the surface.
Quick rule: Always use CSP comparators and visually inspect the surface to ensure proper profiling before proceeding with coatings.
Conclusion
Get the CSP right, and you protect safety, durability, and finish quality. If you misjudge the profile, you risk weak adhesion, costly touch-ups, and a rough surface you won’t want to look at.
In practical terms, verify your target CSP with the chosen comparator, inspect and clean the substrate, dry it thoroughly, set removal to the minimum needed, run a small patch, evaluate the CSP visually and with a quick adhesion check if you have one, document what you did, and proceed with coating only within the recommended window and environmental limits.
Avoid these pitfalls: rushing measurements or skipping a small-area test, grinding in wet or dusty conditions, ignoring ventilation and PPE, and failing to arrest the process if the CSP moves off target. Keep dust control, use proper protective gear, test first in a safe patch, and don’t push past the CSP you’ve set. When in doubt, call a professional rather than risking irreversible damage; better to halt early than regret it later. Stay disciplined, stay safe, and you’ll get a solid, lasting finish.
FAQ
What is Concrete Surface Profile (CSP) and why does it matter for adhesion?
CSP is the roughness pattern you create on the concrete surface. A good profile gives coating or topping something to grab onto, so it sticks better and lasts longer.
How does the ICRI CSP scale work and what should I look for in a good profile?
The ICRI CSP scale is a simple way to rate roughness from smooth to very rough. For DIY work, aim for a profile that clearly shows texture and tooth for better bonding; check the coating’s label or datasheet to confirm the recommended CSP range.
What practical techniques help achieve the ideal CSP on a DIY job?
Use a controlled abrasive method to roughen the surface without overdoing it. Light grinding, brushing, or scarifying with the right tool can create adequate texture; stop when the surface looks uniform and has dull sheen, not glossy.
How do I measure CSP on-site and decide which coating system fits?
Inspect the surface texture by touch and visual cues, then compare with the coating manufacturer’s CSP guidance. If in doubt, check the product label, datasheet, or instructions for the recommended CSP range and surface preparation steps. Always verify local rules or best practices before proceeding.