
Introduction
A concrete sealer recoat is best done when the surface is ready to bond again, so applying too soon or too late can cause problems. If you seal too soon, the new coat may not adhere well or cure correctly. If you wait too long, contaminants or the old film can prevent proper bonding.
A recoat means applying another layer after the first seal has cured enough to be weathered-free but before it loses its bond. How often you should apply depends on the sealer type and exposure, so check the label and talk to the manufacturer for safe intervals. There are water-based and solvent-based options; each has its own prep steps and curing times, so read the instructions and plan your prep accordingly.
Key takeaways
- A concrete sealer recoat is applying a second layer after cure to maintain protection.
- Recoat window matters for adhesion and film performance during surface cure.
- Recoating too soon can trap moisture, causing blistering or finish failure.
- Waiting too long reduces adhesion and can cause uneven coating or peeling.
- Check manufacturer guidelines and test a small area to confirm recoat readiness.
- Choose sealer types—water-based or solvent-based—and ventilate, wear PPE, follow labels.
Table of Contents
- Introduction
- Key takeaways
- What a Recoat Window Is and Why It Matters
- What Goes Wrong If You Recoat Too Soon
- What Goes Wrong If You Wait Too Long to Recoat
- How to Determine the Correct Time to Recoat
- Types of Concrete Sealers and How They Affect Recoating
- Signs That a Surface Needs Recoating or Full Replacement
- Preparing Concrete for a Successful Recoat
- Recoating Process, Tools Checklist, Common Mistakes, and Long-Term Planning
- Conclusion
- FAQ
What a Recoat Window Is and Why It Matters
A recoat window is the timeframe you have to apply a new coat after the first has been laid down and has begun to cure. It’s not a single number, but a range that depends on what you’re using and the conditions on site. Understanding this helps you avoid weak bonds and a poor final look.
Key factors shaping the window include product chemistry (solvent-based versus water-based, epoxy versus acrylic), surface condition (dryness, porosity, moisture), environmental conditions (temperature, humidity, dew point), and whether there was a previous coating. Practical checks include following the label and performing simple field tests such as touch tests and light scratches to gauge tack and cure state. If the concrete shows moisture or other issues, you’ll need to adjust expectations and plan for a flexible window with a fallback if weather shifts.
Definition and purpose
A recoat window is the optimal time frame between applying one coat of concrete sealer and applying the next. It’s like a sweet spot where your sealer sticks best, looks great, and lasts longest.
The timing matters because sealers need to cure – that’s when they harden and form a strong bond with the surface. If you recoat too soon, the new layer won’t stick right. Too late, and the old layer might not take the new one well.
Think of it like painting a wall. You wouldn’t want to slap on another coat before the first one’s dry, would you? Same goes for concrete sealers.
How recoat windows vary by product and conditions
The ideal recoat window isn’t one-size-fits-all. It depends on what kind of sealer you’re using and the conditions on your jobsite.
For instance, solvent-based sealers need less time to cure than water-based ones. But they also need proper ventilation. So, check the label for specific times and make sure there’s enough air moving around.
Temperature and humidity play a role too. Warmer temps speed up curing, while high humidity can slow it down or cause issues if not managed right. Dew point matters here – that’s when moisture starts to condense out of the air. You don’t want your sealer exposed to that.
Lastly, consider your concrete’s condition. If it’s still damp or has a lot of moisture in it, you might need to wait longer before recoating. Always test for moisture if you’re unsure.
What Goes Wrong If You Recoat Too Soon
Recoating too soon can disrupt adhesion between coats, leading to lifting, peeling, or delamination as the underlying layer hasn’t fully cured. You may see a tacky surface or an uneven sheen forming at edges and seams. Foggy or hazy overcoats can appear as solvents are trapped and fail to evaporate properly.
Environmental conditions and surface prep influence the outcome, so temperature, humidity, and airflow can speed up or slow the cure, shifting the safe window. Dust, oils, or moisture on the first coat worsen bonding and create weak pockets for the second coat. A small test patch and careful observation of cure indicators help you spot trouble before committing to a full recoat.
Adhesion and Film Defects
Premature recoating can wreak havoc on your concrete sealer’s finish and performance. Here’s what happens:
First off, the underlying layer hasn’t fully cured yet. This means it’s still soft and tacky. When you apply a new coat too soon, it doesn’t bond properly with the first layer. You might see lifting, peeling, or delamination – that’s the second coat trying to lift off the first.
Wrinkling can also occur if solvents from the new coat get trapped under the surface. This happens when the underlying layer hasn’t had enough time to absorb and evaporate its own solvents. The result? A wavy, uneven finish.
Appearance and Chemical Issues
Too soon a recoat can also lead to visual defects and chemical imbalances:
You might notice cloudiness or hazing in the new coat. This is usually due to trapped volatiles – solvents that haven’t had time to evaporate properly. They get trapped between coats, causing a milky appearance.
Incomplete crosslinking can also be an issue. Some sealers rely on a chemical reaction with air to cure fully. If you recoat too soon, this process gets interrupted, leading to poor performance and a weak final coat.
What Goes Wrong If You Wait Too Long to Recoat
Waiting too long often shows up as chalky residues, contamination layers, or moisture trapped under a cured film, all signaling a weakened intercoat bond. The old coating begins to degrade, forming a boundary that doesn’t provide solid adhesion for the new layer. These symptoms prompt more prep work and potential product incompatibilities.
Contaminants such as dust, oils, cleaners, or efflorescence interfere with film formation and curing, and the coating may micro-crack or lose porosity control as time passes. The progression can include chalking, micro-cracking, and pinholes that compound failure risk with subsequent coats. Thorough cleaning, mechanical profiling, and moisture checks are essential before recoating after a long delay.
Contamination and loss of bond
Waiting too long to recoat your concrete sealer leaves room for contamination. Dirt, oils, and weathering create a barrier that reduces adhesion.
Visible chalking or dust layers signal weakened intercoat bonds. Contaminants interfere with film formation and curing, leading to poor adhesion.
Tip: Inspect your surface before recoating. If it’s dirty or has visible contaminants, clean or abrade the surface to ensure proper bond.
Substrate and sealer degradation
UV rays, moisture, and wear change your concrete’s sealer or substrate over time. This makes recoating less effective without repairs.
Surface chalking, micro-cracking, pinholes, and increased porosity compound failure risk with delayed recoats. The old film may degrade, forming a weak boundary layer that reduces adhesion for the new coat.
Note: Older films often require additional prep work to ensure a sound substrate before recoating.
How to Determine the Correct Time to Recoat
Start with the product tech sheets to locate the stated recoat window, noting any surface prep or conditioning notes that are specific to the sealer. Then assess the current surface condition to decide if the coating is intact or degraded and whether porosity has changed after cleaning. Environmental factors should be documented to ensure they meet the product’s conditions for recoating.
Use simple readiness tests such as moisture checks, a pass/fail surface test, and a quick water drop test to gauge repellency and film integrity. Check substrate moisture pathways with a basic moisture test or a plastic-sheet test to avoid trapping moisture. If tests pass and weather looks suitable, proceed; if there’s any doubt, contact the manufacturer for clarification and keep a written record of the decision process.
Step-by-Step Process
Follow these practical steps to determine the correct time to recoat your concrete surface, ensuring a successful and long-lasting result.
- Preparation: Gather necessary tools (gloves, safety glasses, tape measure, etc.) and ensure you have the product tech sheets. Put on appropriate PPE.
- Surface Inspection: Clean the area thoroughly to remove any dirt or debris. Inspect the existing coating for signs of degradation or chalking.
- Environmental Assessment: Measure and document temperature, humidity, and ambient moisture levels using a hygrometer or similar tool.
- Perform Readiness Tests: Conduct simple tests such as moisture/relative humidity checks, scratch test, water drop test, and substrate moisture pathway check. Consult the tech sheet for specific methods.
- Decision Making: If all tests pass and environmental conditions meet the product’s requirements, proceed with the recoat. If unsure, contact the manufacturer for clarification before proceeding.
Reading Tech Data and Manufacturer Guidelines
Understand key timing terms in product tech sheets to ensure you recoat at the right time. These include:
Dry Time: The time taken for the sealer to dry on the surface.
Cure Time: The period required for the sealer to fully cure and reach its maximum performance.
Recoat Window: The specific time frame recommended by the manufacturer for recoating, usually after the cure time has passed. Always follow product-specific instructions provided by the manufacturer.
Onsite Quick Tests to Check Readiness
Conduct these non-invasive checks to assess your concrete surface’s readiness for recoating:
Tackiness Assessment: Gently touch the surface with a clean, dry finger or a piece of tape. If it feels sticky or leaves residue, the sealer is not yet ready.
Water Beading/Absorption Observation: Place a few drops of water on the surface. If they bead up and don’t absorb, the sealer has likely cured enough to recoat.
Light Solvent Rub Test: Using a clean cloth dampened with a small amount of solvent (consult tech sheet for appropriate solvent), gently rub the surface in a circular motion. If no coating comes off and the surface appears unchanged, it’s ready for recoating.
Adjusting for Weather and Substrate Moisture
Weather conditions and substrate moisture content can impact the effective recoat window:
High temperatures and low humidity can shorten the recoat window, while cold temperatures and high humidity may extend it. Always ensure that temperature and humidity levels fall within the product’s specified range before recoating.
Excessive substrate moisture can ruin adhesion. Use a moisture test or plastic-sheet test to check for trapped moisture beneath the coating. If present, delay recoating until the substrate is dry enough to meet the product’s requirements.

Types of Concrete Sealers and How They Affect Recoating
Penetrating sealers rely on deep saturation to protect the substrate, while film-forming sealers lay a surface layer that can be coated again. Each type has distinct expectations for prep, cleanliness, and porosity handling, which influences how you plan the recoat. Knowing which family you’re using helps you avoid common missteps that lead to failure.
Recoating strategy changes with sealer type: film-forming products may require a clean, dry, and appropriately profiled surface, while penetrating sealers emphasize avoiding surface sealing that blocks further treatment. Anticipate typical failure modes like damp surfaces under film coats or incomplete penetration leaving tackiness, and tailor your checks accordingly. A decision framework based on substrate, traffic, and product compatibility helps ensure a successful recoat and clear warranty coverage.
Penetrating sealers (silane, siloxane, silicate)
Penetrating sealers like silane, siloxane, and silicate work by soaking into the concrete’s pores. They don’t form a surface film.
Recoating: Since they don’t leave a film, you can recoat sooner than with film-forming sealers. But wait until the sealer has fully absorbed – usually 24 to 72 hours.
Before recoating, test for residue by taping off an area and applying a small amount of new sealer. If it beads up or doesn’t absorb, wait longer.
Film-forming sealers (acrylics, epoxies, polyurethanes)
Film-forming sealers like acrylics, epoxies, and polyurethanes create a protective layer on the surface.
Recoating: Wait until the first coat is fully cured. This can take anywhere from 24 hours to several days, depending on the sealer type and conditions.
Epoxies and polyurethanes are sensitive to recoating too soon – it can lead to poor adhesion and peeling. Acrylics are more forgiving but still require proper cure time.
Always check manufacturer guidelines for specific recoat windows.
Signs That a Surface Needs Recoating or Full Replacement
Deciding between a recoat and full restoration hinges on visible condition and underlying integrity. If the surface looks even and the coating adheres well, a recoat may be appropriate; otherwise, deeper restoration could be required. Distinguishing these scenarios early saves time and money.
Visual indicators for recoating include color fade, gloss loss, staining, surface dusting, efflorescence, and small cracks. Performance signs such as peeling, moisture intrusion, or loss of hardness point to failure, while deeper movement cracks, scaling, or spalling signal structural concerns. Use moisture checks and adhesion tests to guide the next steps, and consider professional assessment if you encounter signs of structural damage.
Visual indicators
Look at your concrete surface. It’s talking to you. Here’s what it might be saying:
Color fade – If the sealer’s color is fading, it’s time for a recoat. Same goes for gloss loss. Chalking or dusting on the surface? That’s another sign.
Check for surface staining, even if it’s just minor. And don’t ignore small hairline cracks or roughness. These are all signs that your sealer needs a refresh.
Performance indicators
Your concrete might not look bad, but its performance could be suffering. Here’s what to watch for:
Water no longer beading up? That’s a sign of reduced water repellency. If it’s staining easily or absorbing water quickly, that’s another red flag.
Efflorescence – those white salt deposits – appearing on the surface? That means moisture is getting through. And if traction feels different underfoot, that could indicate a problem too.
These performance issues might not be obvious at first glance, but they’re important. They mean your sealer needs attention, whether it’s a recoat or something more involved.
Preparing Concrete for a Successful Recoat
Begin with a clear sequence: cleaning, degreasing, repairs, profiling or etching, and confirming that the surface is dry enough for recoating. The goal is a uniform, receptive surface that won’t impede film formation. Follow the product’s prep instructions strictly to avoid voids in adhesion.
Detail-oriented steps matter: specify cleaners and degreasers, perform repairs like crack filling and laitance removal, and achieve the desired texture for bonding. Verify dryness with product-recommended criteria and plan around ventilation and safety requirements. Document prep work to support warranty and future maintenance planning.
Cleaning and contamination removal
Start by removing loose dirt, debris, and any other visible contaminants with a broom or shop vacuum.
Oils, salts, and efflorescence can hinder sealer adhesion. Use pressure washing with an alkaline cleaner or detergent to tackle these. For tougher stains, consider using a degreaser compatible with the sealer you’ll be applying.
Rinse thoroughly after cleaning to remove any residue. If residues persist, reapply the cleaner and rinse again.
Repairs and surface profiling
Inspect your concrete for cracks, spalls, or other damaged areas. Fill cracks with a suitable concrete repair material, following the manufacturer’s instructions.
For spalled areas, use a concrete patching compound to restore the surface. Ensure you’ve removed any loose material first and allow the patch to cure according to the product guidelines.
Mechanical abrading or etching can help restore the surface profile and improve adhesion. You might need to scarify or etch the surface, depending on its condition and the sealer you’re using.
Drying and verification before coating
Concrete must be dry before recoating. The atmospheric temperature should ideally be between 50°F to 90°F (10°C to 32°C), with relative humidity below 80%.
Verify the substrate’s moisture content using a non-destructive moisture meter. The reading should be less than 4% for most sealers. If it’s higher, allow more time for drying or consider using a moisture-tolerant sealer.
Recent repairs need time to cure and dry. Follow the manufacturer’s guidelines for curing windows. Typically, you’ll want to wait at least 28 days before recoating repaired areas.
Recoating Process, Tools Checklist, Common Mistakes, and Long-Term Planning
Outline a concise workflow that covers surface prep, coat timing between layers, and the recommended order of layers. A clear sequence helps you avoid missing steps that undermine adhesion. Keep the plan flexible enough to accommodate weather changes.
Assemble a Tools and Materials checklist, including PPE, prep gear, sealer type options, application tools, mixing containers, and cleanup supplies. Identify common mistakes such as applying too soon or too late, moisture mismanagement, thinning errors, or poor ventilation. Safety precautions and the option to call a pro should be part of your plan, along with cost and maintenance planning for longer life cycles and fewer re-coats.
Tools, materials, and PPE checklist
Before you start your recoating project, make sure you have all the necessary tools and materials. Here’s a quick checklist to ensure you’re well-prepared.
- Rollers: For even application of sealant; 9-inch nap roller for penetrating sealers, 3/8-inch nap for film-forming.
- Brushes: For edges and hard-to-reach areas; 2-3 inch brushes work well.
- Squeegees: For removing excess sealer and ensuring a smooth finish.
- Cleaners: To remove dirt, grease, and contaminants; use a degreaser or concrete cleaner.
- Repair compounds: To fill cracks and holes before sealing; use a fast-setting repair compound.
- Personal Protective Equipment (PPE): Safety glasses, gloves, long sleeves, and pants to protect from chemicals.
- Respirator: For protection against harmful fumes; use when applying film-forming sealers in enclosed spaces.
- Mixing containers: To mix sealers according to manufacturer’s instructions; use a large, clean bucket or container.
- Clean-up supplies: Rags, soap, and water for cleaning tools and hands after the job.
Quick rule: Always check your tools and materials before starting. Missing something can lead to delays or poor results.
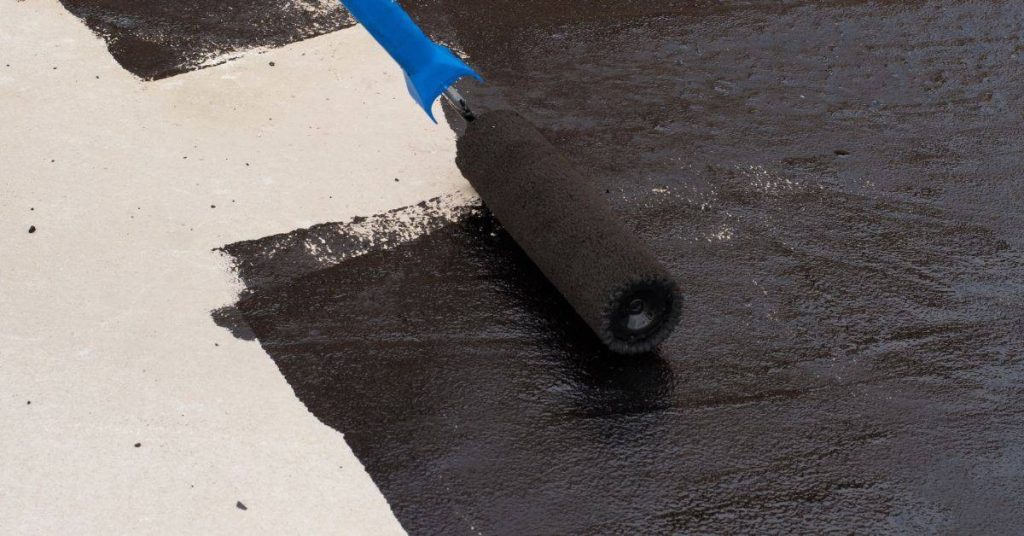
Step-by-step recoating process and common mistakes
Follow this step-by-step guide to ensure a successful recoating job. Keep an eye out for common pitfalls along the way.
- Surface prep: Clean, degrease, and remove any contaminants; sand if needed to profile the surface.
- Moisture test: Ensure the concrete is dry before sealing; use a moisture meter if unsure.
- Prime (if required): Apply a primer to improve sealer adhesion; follow manufacturer’s instructions.
- Sealer application: Apply sealers according to their type; penetrating sealers need multiple thin coats, film-forming sealers one or two thick coats.
- Drying time: Allow each coat to dry as per the manufacturer’s recommendations before applying the next.
- Avoid over-application: Too much sealer can lead to pooling and poor adhesion; apply thin, even coats.
- Temperature control: Apply sealers in temperatures between 50°F – 90°F (10°C – 32°C) for best results.
- Avoid high humidity: High humidity can cause poor adhesion and bubbling; keep relative humidity below 70% during application.
Quick rule: Patience is key in recoating. Rushing through steps or applying sealers too soon can lead to failure.
Cost, safety risks, and maintenance schedule planning
Planning your recoating project involves more than just the initial cost. Consider these factors for long-term success.
- Per-square-foot costs: Budget around $0.50 – $2 per square foot for sealers; labor and materials can double this cost.
- Expected reseal intervals: Most sealers last 3-5 years, but this varies based on traffic, weather, and maintenance.
- Premature recoating risks: Recoating too soon can trap moisture, leading to delamination and reduced lifespan.
- Delayed recoating risks: Waiting too long allows damage to worsen, increasing repair costs and reducing overall lifecycle value.
- Safety risks: Improper ventilation during application can lead to fume inhalation; always use a respirator when required.
- Electrical safety: If using power tools, ensure they’re in good working order and used safely to prevent electrocution or fire hazards.
- Slip hazards: Wet sealers can be slippery; use caution during application and clean-up.
- Regular inspections: Inspect your concrete annually for signs of wear, damage, or delamination to catch issues early.
Quick rule: Regular maintenance and timely recoating extend the life of your concrete and save you money in the long run.
Conclusion
The recoat window matters because the coating job rides on the surface chemistry and readiness of the concrete. Getting it right protects safety, appearance, and long-term durability, so treat timing as a first-step quality control, not an afterthought.
To move forward, verify the surface is clean and fully cured, pick the sealer type you planned, test a small area to confirm adhesion and sheen, follow the method steps in order, and then proceed with the full surface only if the test area behaves properly. Do the prep, respect the timing, apply evenly, and allow the specified cure time before subjecting the floor to traffic or chemicals.
Avoid these missteps: rushing the test, recoating over dust or moisture, or skipping ventilation and protective gear. Always work in a well ventilated space, wipe up spills promptly, and wear eye protection and gloves. If you’re uncertain about surface integrity, or the sealer type is unclear, call a professional rather than guessing—protect the concrete and your safety, and you’ll save time and money in the long run.
FAQ
What is a concrete sealer recoat?
A sealer recoat is applying a second coat after the first has cured to renew protection and maintain appearance. You must follow the product’s instructions for open time, surface prep, and compatibility with the previous coat.
How often should you apply a concrete sealer?
Follow the product label or manufacturer instructions for recoat intervals. Factors like traffic, use, and cleaning frequency affect timing, so check the label for guidance specific to your sealer.
What happens if you seal too soon or too late?
Sealing too soon can trap moisture and solvents, causing dulling or bubbling. Sealing too late can lead to poor adhesion and uneven performance; look for proper surface dryness and smoothness before recoating.
What are the main types of sealers and how do they affect recoating?
Water-based sealers are generally easier to clean up and may dry faster; solvent-based sealers often penetrate differently and can have stronger odor and different recoat windows. Always read the label to confirm compatibility with previous coats and to determine the correct recoat timing and surface prep.