
Introduction
Concrete placement in congested rebar without honeycombing means planning and executing pours so concrete flows around dense steel without leaving voids. Take time to prep formwork and rebar layout, then sequence pours to keep flow paths open and minimize segregation.
Choose direct discharge or pumping as your method, and use appropriate vibration and tamping to consolidate around the bars while controlling head pressure. Always follow label instructions, manufacturer guidance, and local rules, and verify formwork, joints, and access before pouring.
Key takeaways
- LinkedIn respects your privacy; platformes respect preferences when viewing professional content.
- More Relevant Posts tailor feeds; check categories to discover related pours and rebar tips.
- Explore content categories helps locate pour methods, vibration strategies, and consolidation tips.
- Sign in to view more content; unlock extended insights and user recommendations.
- Proper pouring methods and formwork prep prevent segregation and honeycombing risks.
- Step-by-step process for pouring concrete with congestion, head pressure, vibration control; wear PPE.
Table of Contents
- Introduction
- Key takeaways
- Linkedin Respects Your Privacy
- More Relevant Posts
- Sign in to View More Content
- Why Proper Placement Matters: Risks, Durability, and Honeycombing Prevention
- Preparation, Inspection, and Tools Checklist for Congested Rebar Pours
- Placement Sequencing and Managing Head Pressure in Congested Reinforcement
- Vibration Control and Consolidation Techniques to Eliminate Honeycombing
- Quality Checkpoints, Curing, Safety, and Cost-Benefit Considerations
- Conclusion
- FAQ
Linkedin Respects Your Privacy
This section covers platform prompts that relate to privacy and access on LinkedIn. It is not technical guidance for concrete placement. The intent is to explain how sign-in prompts interact with your reading experience, separate from the article’s core instructions.
For logged-out readers, prompts may appear before you reach the content, while signed-in readers may see prompts that do not alter the technical steps or safety guidance. Use the quick path to full article access if this page is hosted on a social platform, without changing the sequencing, head pressure, or vibration guidance described below. This section clarifies that content labeling is about platform prompts only.
Why this appears on social platforms
You’re seeing this note because we host our content on LinkedIn, which has privacy and access policies. This isn’t part of your concrete placement guide.
Here’s why: Social platforms limit free content visibility to encourage sign-ins or subscriptions.
Don’t worry, this won’t affect your DIY project. Let’s dive back into your article once you’ve got full access.
More Relevant Posts
This H2 acts as a navigational hub to related DIY topics that complement the core article. It keeps readers engaged by linking to closely related topics without leaving the page. The goal is to present a concise, structured path to deeper coverage.
Explore topics such as rebar detailing in congested pours, formwork setup best practices, pump delivery and hose handling, vibration techniques for concrete without honeycombing, curing and protection strategies, and common pitfalls in poured concrete. Use descriptive anchor phrases to guide readers to these related posts and improve navigation.
Suggested follow-up topics
To further your understanding of concrete placement, especially in congested rebar scenarios, we recommend exploring the following topics:
Vibration Techniques for Dense Concrete: Learn advanced vibration methods to ensure complete compaction and prevent honeycombing.
Pump Maintenance and Troubleshooting: Understand how to maintain your concrete pump, identify common issues, and troubleshoot them on-site.
Formwork Leakage Control: Master techniques to prevent water leakage from formwork, ensuring a strong, durable final product.
Sign in to View More Content
This section explains access limitations tied to gated platform content and provides reader-friendly alternatives to obtain the full article. The aim is to prevent friction for technical readers who need complete specs while maintaining clear boundaries around restricted content.
Core subtopics covered here include sequencing of concrete pours through congested rebar, maintaining appropriate head pressure, and controlling vibration to minimize honeycombing while still achieving compaction. Look for practical steps that guide non-commercial projects through pre-pour checks, rebar clearance verification, and staged pours as needed.
Access options and content delivery
This article is part of our premium gated platform, designed for professionals seeking detailed technical information. However, we understand that DIY homeowners like you need access to this knowledge too.
Here are your alternatives:
1. Subscribe to our newsletter: Get the full article delivered right to your inbox, along with other helpful DIY tips and tricks.
2. Download the PDF: Access the complete guide instantly by downloading a printable or digital copy.
3. Visit our publisher’s site: The full article is also available on their website, which you can access directly.
Why Proper Placement Matters: Risks, Durability, and Honeycombing Prevention
Placement quality governs early strength, long-term durability, and crack resistance, with an elevated risk of improper compaction in congested pours. Proper execution helps reduce the chance of honeycombing and related issues that affect performance.
Definitions and objectives are framed around complete encapsulation around bars, maintaining consistent slump under higher head pressure, preventing rebar displacement, and achieving uniform compaction without bridging. Use this section to align on the goals before you start sequencing and vibration work.
Structural integrity and durability implications
Proper concrete placement is crucial for the long-term strength, durability, and crack resistance of your structure. Voids and segregation caused by improper compaction and honeycombing reduce the effective cross-section of your concrete, weakening its overall performance.
Honeycombing, a common issue in congested rebar areas, creates small voids that can accelerate corrosion. This is because moisture and oxygen, which promote corrosion, can easily access the reinforcing steel through these voids.
To understand the durability implications better, I recommend checking out case studies on concrete durability issues caused by improper placement.
Honeycombing and common defect types
Honeycombing is a visual indicator of poor consolidation. It appears as small, interconnected voids in the concrete, often found around dense rebar areas due to insufficient vibration or suboptimal head pressure.
Other common defects include isolated voids and systemic segregation. Isolated voids are single air pockets that can form due to inadequate consolidation, while segregation occurs when the concrete’s aggregate and cement paste separate, creating a weak, porous layer.
Systemic segregation is more severe as it affects larger areas of the pour, leading to reduced structural performance, increased permeability, and higher corrosion risk. Regular non-destructive inspections can help identify these defects early.
Long-term cost and maintenance impacts
Poor consolidation during concrete placement can lead to significant long-term costs. Voids and segregation accelerate corrosion, leading to reduced service life and increased maintenance requirements.
Repairing these issues is expensive and time-consuming. It’s much cheaper to get it right the first time with proper placement techniques. Document avoided costs for your project justification, showing how investing in quality placement saves money in the long run.
Remember, preventative maintenance starts with proper concrete placement. Don’t skimp on quality to save a few bucks upfront – it’ll cost you more in the end.
Preparation, Inspection, and Tools Checklist for Congested Rebar Pours
Pre-pour inspection items verify formwork integrity, levelness, and accurate rebar spacing with clearances for concrete flow. Check openings for dense zones and ensure seals and releases are in place to prevent leaks during placement.
Rebar congestion assessment confirms exact layout in the congested region and plans for how overlaps and ties won’t obstruct pour paths. The checklist also covers access routes, sequencing, and the essential vibration equipment and hand tools for dense reinforcement.
Formwork and Rebar Inspection Points
Before pouring concrete in a congested rebar zone, use this checklist to ensure everything is ready.
- Clearances: Ensure there’s enough space for concrete flow around rebar. Insufficient clearances cause honeycombing.
- Spacers: Verify spacers are in place and correctly positioned to maintain required cover.
- Ties: Check tie-off points and ensure they’re secure, as loose ties lead to rebar movement during pouring.
- Rigid bracing: Confirm formwork is rigidly braced to prevent bulging or displacement under pressure.
- Sleeves: Verify any sleeves for tremies or chutes are correctly positioned and unobstructed.
- Temporary openings: Check that all temporary openings (for tremies, etc.) are accounted for and accessible.
- Release agents: Apply release agents to formwork surfaces to prevent adhesion and ease stripping.
- Seals: Inspect formwork seals to prevent leakage during pouring. Leakage weakens the structure.
Quick rule: A thorough inspection prevents costly reworks and ensures a strong, durable pour.
Tools and Materials Checklist
Gather these tools before starting to ensure smooth concrete placement in congested rebar zones.
- Tremies/Chutes: Have drop chutes or tremies ready for vertical pours. Ensure they’re long enough to reach the bottom of the formwork.
- Vibrators: Prepare needle vibrators and poker vibrators for compacting concrete around rebar.
- Pump accessories: If using a pump, ensure you have the right hoses, valves, and other accessories for your setup.
- Access platforms: Have safe access platforms ready for workers to reach high or hard-to-access areas.
- Suction devices: Prepare suction devices (like a vacuum) to remove any pockets of air trapped around rebar.
- Tie-wire cutters: Keep tie-wire cutters handy to trim any excess ties that might interfere with pouring or vibration.
- Kneeling boards: Provide kneeling boards for workers to safely access low areas without damaging formwork.
- Form-release agents: Have the right release agent ready to apply to formwork surfaces before pouring.
Quick rule: The right tools make all the difference in dense rebar zones. Ensure you have them before starting.
Mix and Workability Checks to Request
Before ordering concrete, discuss these aspects with your ready-mix supplier to ensure a successful pour in congested rebar zones.
- Slump: Request a medium slump (around 4-6 inches) for better flow around dense reinforcement. Too low, and it won’t flow; too high, and it may segregate or cause honeycombing.
- Air content: Ensure the mix has the correct air content (usually 3-5%) to improve workability without compromising strength.
- Pumpability: Ask for a pumpable mix if you’re using a concrete pump. This ensures smooth, efficient pouring.
- Cohesive consistency: Request a cohesive mix that won’t segregate or bleed excessively during transport and placement. This prevents honeycombing and weak spots.
- Admixtures: Confirm the use of appropriate admixtures (like superplasticizers) to improve workability without increasing water content.
- Temperature: Ensure the concrete’s temperature is within acceptable limits (usually 50-80°F or 10-27°C) for your region and time of year.
Quick rule: Clear communication with your supplier ensures you get a mix that pours well in congested rebar zones.
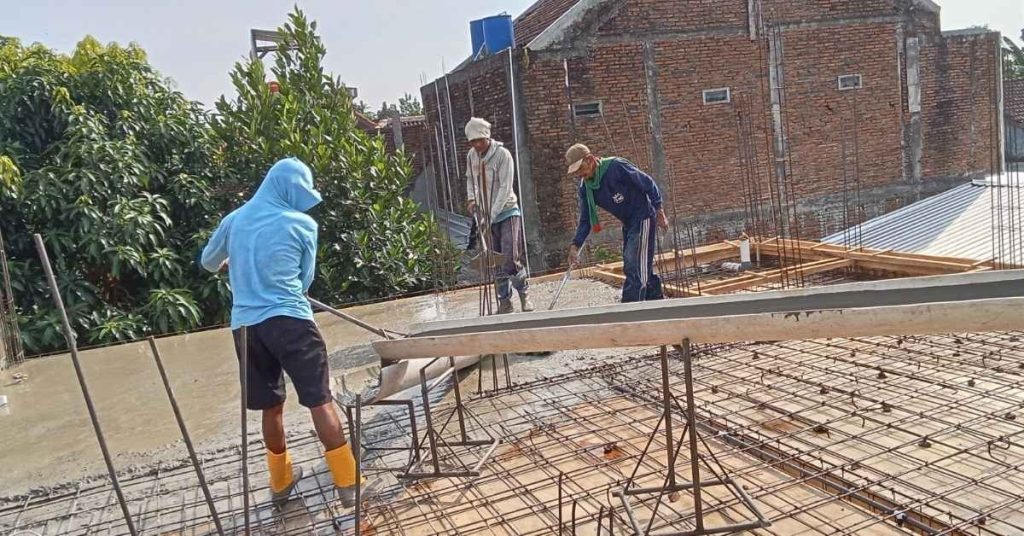
Placement Sequencing and Managing Head Pressure in Congested Reinforcement
Define the placement sequence to maintain continuous flow while accommodating dense rebar, avoiding gaps and cold joints through logical staging. Plan lifts and pours to keep the work moving without creating dead zones.
Head-pressure management involves coordinating pump settings, pour rate, and lift height to minimize segregation and overloading of formwork. Map formwork pressures and reinforcement geometry to anticipate high-risk zones and plan alternative flow paths accordingly.
Sequencing strategies for dense rebar zones
The key to successful concrete placement in congested reinforcement is a well-planned sequence. Start with less congested areas and progress towards denser zones.
Stair-step or banded pours help maintain continuous flow. Pour a section, then move up or down before backfilling the gap to avoid cold joints.
Isolate dense zones with stop-end details. This prevents concrete from flowing through and leaving voids. Seal off these areas until ready for pouring.
Managing head pressure and vertical drop
Controlling head pressure is crucial to prevent segregation and overloading formwork. Limit free-fall by using chutes, tremies, or submerged discharge. These tools guide concrete gently into place.
Follow project-specific allowable drop heights specified by the engineer. Exceeding these can cause excessive head pressure, leading to honeycombing and other defects.
Monitor vertical drops closely. If you notice segregation or formwork strain, adjust your methods or consult with your engineer.
Choosing the right placement method for access constraints
Selecting the right concrete placement method depends on access and head pressure control. Here’s a quick comparison:
Chutes are great for reach but can cause high head pressure at the discharge point if not managed well.
Pump (boom/line) offers good control over head pressure but may have limited reach in some cases. It’s ideal for congested rebar as it allows for precise placement.
Crane-and-bucket and conveyor methods are useful when access is restricted, but they can cause segregation if not vibrated properly. Choose based on your specific job site conditions.
Vibration Control and Consolidation Techniques to Eliminate Honeycombing
Vibrator selection and configuration should suit dense rebar zones, with appropriate tip options and frequency for reach around congestion. Use patterns and tool choices that maximize contact with fresh concrete without fouling rebar.
Insertion patterns, timing, and limits on vibration duration are critical to prevent over- or under-vibration. Establish a systematic consolidation sequence that sweeps each layer and coordinates with head pressure to minimize laitance and honeycombing.
Vibrator types and selection criteria
When dealing with congested rebar, choosing the right vibrator is crucial. Here’s what you need to consider:
Internal (Needle) Vibrators: These are inserted directly into the concrete. They’re great for reaching tight spots but can foul rebar if not used carefully.
Surface Vibrators: These sit on top of the concrete and transmit vibrations through the formwork. They’re less invasive but may not reach as deep.
For dense reinforcement, use short probes to navigate around steel without fouling. For deeper sections, longer probes might be needed.
Operating best practices and insertion patterns
Once you’ve chosen your vibrator, follow these operating tips:
Insert the vibrator at multiple points, spacing them evenly to maximize contact with fresh concrete. Aim for about 12-18 inches apart.
Use a touch-and-withdraw technique: briefly touch the vibrator to the concrete, then withdraw it before causing segregation. This helps consolidate without inducing honeycombing.
Align vibration with pour rate. Let concrete settle slightly before inserting the vibrator. Avoid starting too early (settling) or too late (segregation).
Alternatives and supplemental consolidation methods
Sometimes, vibrators alone aren’t enough. Consider these alternatives:
Flowing/self-consolidating mixes: These high-workability concretes flow into place, reducing the need for vibration. They’re ideal for congested rebar but may require careful mix design.
Tremie placement: For deep sections, use a tremie pipe to place concrete underwater, eliminating segregation and honeycombing risks.
External vibrators on formwork: These can help consolidate surface layers. Use them in conjunction with internal vibrators for best results.
Quality Checkpoints, Curing, Safety, and Cost-Benefit Considerations
On-site visual checkpoints and non-destructive tests confirm consolidation in congested pours, with real-time acceptance criteria and sign-offs for each placement stage. Use safe, repeatable QA steps that align with project needs.
Sequencing, curing, and safety protocols focus on protecting workers and ensuring durable concrete. A qualitative cost-benefit view helps weigh best practices against the risks of honeycombing, guiding budget-conscious decisions without compromising performance.
Visual checkpoints and testing before formwork removal
Before removing formwork, inspect the concrete’s surface and perform routine QA tests to ensure proper consolidation and bond.
- Surface voids: Look for any visible air pockets or voids. These indicate insufficient vibration or trapped air.
- Cold joints: Check for abrupt changes in color or texture, which may signal improperly consolidated areas.
- Laitance: Inspect the surface for a thin layer of cement-rich material. If present, it might indicate over-vibration or excessive bleeding.
- Slump test: Perform this test to confirm workability and consistency per project QA procedures.
- Air-void assessment: Use an airometer to measure entrained air content. Excessive air voids can weaken the concrete.
- Surface finish uniformity: Ensure a consistent, smooth surface across the entire pour.
- Honeycombing indicators: Look for large, interconnected voids that could compromise structural integrity.
- Rebar cover inspection: Check that rebar is adequately covered to protect against corrosion and maintain design strength.
Quick rule: Skipping these checks may lead to hidden defects and reduced concrete performance.
Curing and finishing recommendations
After placement, follow these steps to properly cure and finish the concrete in congested rebar areas.
- Apply curing compound: Within 1-4 hours after pouring, apply a liquid membrane-forming curing compound to prevent moisture loss.
- Moist curing schedule: If not using a compound, keep the surface damp for at least 7 days through sprinklers or wet burlap.
- Early strength gain: Allow 3-7 days before applying any load to the concrete, depending on temperature and mix design.
- Surface protection: Shield the curing concrete from direct sunlight and wind to minimize temperature fluctuations.
- Finishing steps: Use a power trowel or similar tool to achieve a smooth, dense surface. Be careful not to disturb rebar or cause honeycombing.
- Avoid over-finishing: Excessive finishing can lead to plastic shrinkage cracking and rebar exposure.
- Edge treatment: Pay special attention to edges and corners, where curing and finishing are critical to prevent cracking.
- Sealant application: After curing, apply a sealant to protect the surface from moisture intrusion and further corrosion.
Quick rule: Proper curing and finishing ensure long-term durability and minimize maintenance costs.
Safety protocols and cost-benefit summary
Implement these safety measures and consider the long-term benefits of proper sequencing, vibration control, and inspection in congested rebar areas.
- Pump operation: Ensure operators are certified and follow safe operating procedures to prevent accidents.
- Vibrator use: Train workers on correct vibrator insertion patterns and duration to avoid over-vibration or insufficient consolidation.
- Access around rebar: Establish clear paths for workers, equipment, and materials. Use fall protection where necessary.
- Lockout/tagout: Follow LOTO procedures when working on or near equipment to prevent unexpected start-ups.
- Vibration-induced hazards: Be aware of potential health risks from prolonged exposure to vibration, such as hand-arm vibration syndrome (HAVS).
- Pour-stop contingency: Have a plan in place for stopping the pour if issues arise, such as honeycombing or equipment failure.
- Rework planning: If rework is necessary, plan and budget for it upfront to minimize additional costs.
- Long-term durability: Properly placed, cured, and finished concrete has better long-term durability, reducing maintenance and repair costs.
Quick rule: Investing in safety, sequencing, and inspection pays off with reduced rework, improved structural integrity, and lower whole-life costs.
Conclusion
Concrete work in tight spaces around rebar is about doing the right steps in the right order to keep strength, appearance, and safety intact. When you sequence carefully, control head pressure, and use proper vibration, you prevent honeycombing and costly repairs.
Make this your working checklist: verify your plan with a quick site look and confirm access and forms, mix and place only as much concrete as you can finish in one continuous operation, maintain steady head pressure without dumping, start vibration early but avoid overworking, tamp and consolidate methodically around every bar, keep concrete moving to fill voids, check for voids and honeycombing during and after placement, finish surfaces cleanly, then cure properly and perform a final quality check before opening the area to load or use.
Two common mistakes to avoid are rushing the pour and skipping the test area or trial run, which leads to sudden pressure spikes and weak spots. Don’t over-vibrate or stop too abruptly, and never neglect curing or protection for the first critical days. Always wear proper PPE, keep the work area stable, and double-check formwork and rebar layouts before pouring.
If you’re unsure about head pressure, reinforcement congestion, or the right consolidation approach for your specific setup, consider hiring a pro to supervise or assist, especially for large pours or complex layouts. Stay disciplined, test a small area first, and push through with safe, measured steps until you finish strong and leave a durable, crack-free will-be structure. You’ve got this—finish steady, protect the concrete, and you’ll be proud of the result.
FAQ
What pouring method works best when you have congested rebar: direct discharge or pumping?
Direct discharge is simple but needs careful placement to avoid gaps. Pumping can help reach tight spots, but you must watch for pressure on formwork and rebar interference. Check manufacturer instructions and local rules for hose sizing, cement compatibility, and maximum pressure.
How should I prep the formwork to prevent honeycombing with crowded reinforcement?
Verify the formwork is clean, square, and well braced before any pour. Remove debris that could trap air and damage the edges. Seal and protect joints so the concrete can consolidate without leaking or losing shape.
What is a practical step-by-step process for pouring concrete in congested rebar?
Place concrete in layers, keeping the rebar covered and protected as you go. Use light, continuous pours and work from low to high areas to avoid voids. Use a vibrator or tapping method judiciously to consolidate without moving the rebar or loosening the formwork.
What curing and post-pour care help durability when rebar is crowded?
Keep the concrete moist or use a curing compound as directed by the label. Protect from rapid drying and temperature swings that can cause cracking or segregation. Inspect for honeycombing after initial set and address any visible voids per manufacturer instructions.