
Introduction
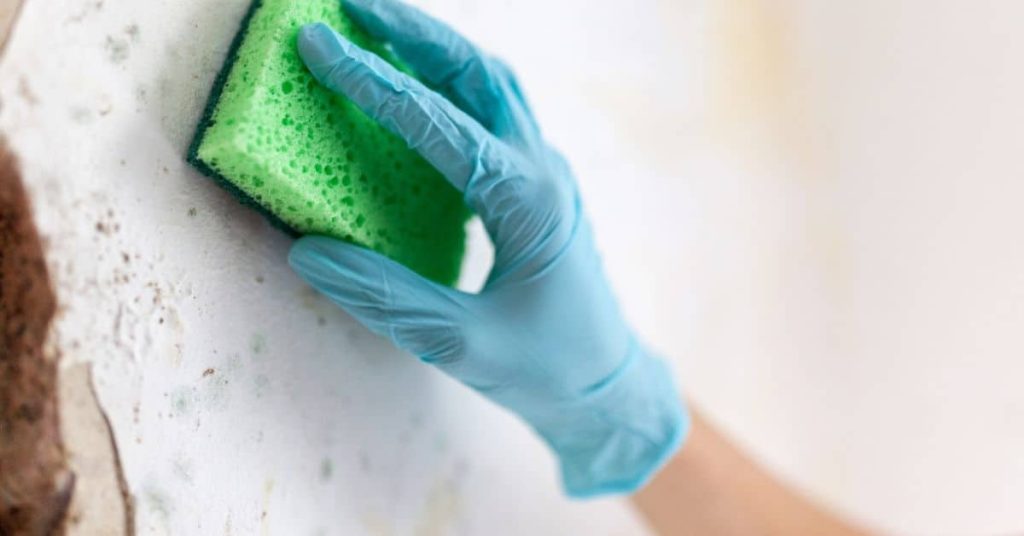
Concrete paint prep is the process of cleaning the surface, creating a slight profile for the paint to grip, and ensuring it dries cleanly before coating. This hands-on approach helps adhesion and long-lasting results, not just a quick splash of color. Check the surface condition, the moisture level, and follow the paint label for prep steps.
Clean thoroughly with a stiff brush and a mild cleaner to remove dirt, oil, and loose dust. If your paint requires a profile, lightly roughen the surface following the product instructions, then remove the dust. Allow the concrete to dry fully and check readiness by following the paint label; if in doubt, give it more time.
Key takeaways
- Ensure concrete surfaces are clean, dry, and free of contaminants before coating.
- Assess porosity and flatness to determine suitable profiling methods and timing.
- Use appropriate cleaners and follow manufacturer instructions for rinsing thoroughly.
- Apply primers or bonding agents only after substrate has passed moisture checks.
- Protect nearby finishes and wear PPE; avoid fumes, splashes, skin contact.
- Inspect final adhesion and curing conditions, addressing defects before proceeding.
Table of Contents
- Introduction
- Key takeaways
- Why Proper Preparation Matters for Adhesion
- Assessing the Concrete Substrate Before Work
- Cleaning Concrete: Methods, Cleaners, and Sequences
- Profiling and Creating the Right Surface Texture
- Drying and Controlling Moisture for Reliable Adhesion
- Primers, Bonding Agents, and Product Selection for Concrete
- Tools, Materials Checklist, and Safety
- Troubleshooting, Common Mistakes, and Final Inspection
- Conclusion
- FAQ
Why Proper Preparation Matters for Adhesion
Clean, profiled, and dry surfaces grip paint far better than neglected concrete. Proper prep reduces the risk of peeling, blistering, or staining later on. Getting these steps right up front can save time and money by avoiding rework.
Think of preparation as the foundation for a durable finish. You’ll understand the cost of skipping steps only after you see the failure patterns. Verify guidance from product labels or manufacturer instructions if you’re unsure about any requirement.
Adhesion Science Basics
Concrete paint adhesion is all about surface energy. The higher the surface energy, the better the bond.
Mechanical keying helps too. Think of it like a puzzle – more pieces (roughness) means more places for the paint to grab onto.
Contaminants, though, are your enemy here. They lower surface energy and block those mechanical keys.
Different substrates behave differently because their surface energies vary. Fresh concrete has high energy, old concrete less so.
Typical Failure Modes From Poor Prep
Poor prep leads to common failures like:
Delamination: Paint peels off in sheets. Cause? Insufficient surface cleaning or profiling.
Blistering: Paint forms bubbles and lifts. This happens when moisture gets trapped under the paint, often due to not letting the concrete dry enough.
Efflorescence-driven lifts: White salts push paint off from underneath. This is usually because of high moisture content in the concrete that wasn’t properly addressed during prep.
Assessing the Concrete Substrate Before Work
Start with a simple substrate check: age, previous coatings, and obvious defects. Look for cracks, spalling, or staining that could affect adhesion. Note the environment around the surface, such as moisture sources or humidity levels.
Use clear decision criteria to choose DIY prep or professional remediation. If the surface shows unknown coatings or severe damage, consult product instructions or a local pro for guidance. Always document findings to reference during the project.
Visual Inspection Checklist
The first step before any prep work is a thorough visual inspection. Use this checklist to ensure your concrete surface is ready for painting.
- Cracks: Even hairline cracks can cause paint to peel. Fill and repair any cracks before painting.
- Spalling: Flaking or crumbling concrete indicates weak spots that need repair.
- Oil stains: These can prevent paint adhesion. Remove with a suitable cleaner.
- Mold or mildew: Growth indicates moisture issues. Clean and treat the area before painting.
- Previous coatings: Check if old paint, sealers, or other coatings are present. These may need removal for best adhesion.
- Delamination: Peeling or bubbling paint indicates previous coating failure. Remove and repair the area.
- Concrete age: Older concrete might have a weaker surface. Consider profiling to improve adhesion.
- Environmental context: Check for signs of freeze-thaw cycles, de-icing salts, or other environmental factors that could affect prep work.
Quick rule: If you find any issues during the inspection, address them before proceeding with painting.
Moisture Assessment and When to Test
Excess moisture can ruin your paint job. Here’s when and why you should test for moisture, especially in high-risk areas.
Perform moisture testing on slab-on-grade foundations and exterior walls, where water intrusion is most likely. Test before painting to avoid trapping moisture under the coating.
Moisture testing is crucial because trapped moisture can cause paint delamination, blistering, and even concrete deterioration over time. Use a moisture meter or calcium chloride test for accurate results.
Quick rule: Always test for moisture before painting on slab-on-grade foundations and exterior walls to prevent costly repairs later.
Chemical and Salt Contamination Checks
Certain contaminants can hinder paint adhesion. Here’s how to check for common culprits before cleaning your concrete surface.
Efflorescence: White, powdery deposits on the surface indicate salt contamination. Remove with a suitable cleaner or acid wash before painting.
Oil stains: Check for any oil, grease, or fuel spills that could prevent paint adhesion. Use a suitable degreaser to clean these areas.
pH testing: Concrete should have a pH between 6 and 10. Test with a pH meter or litmus paper before painting. If the pH is too high or low, adjust it with an appropriate solution.
Cleaning Concrete: Methods, Cleaners, and Sequences
Evaluate dry cleaning, pressure washing, and chemical cleaning as your options. Dry cleaning works for loose debris, while washing removes surface soils and oils. Chemical cleaners help break down contaminants but require rinsing and ventilation.
Plan the sequence from removing grime to neutralizing residues, then drying. Call a professional if you encounter stubborn contamination or coatings that won’t respond to standard methods. Check product labels or data sheets for compatible cleaners and wash times.
Dry cleaning and debris removal
Before you start wet cleaning, remove all loose material from your concrete surface. This includes dirt, dust, leaves, and other debris.
Use a stiff-bristle broom or a leaf blower to clear the area. For tight spaces, a vacuum with a suitable attachment can help.
Ensure you’ve removed as much loose material as possible. This step is crucial for effective cleaning and adhesion of your paint later on.
Pressure washing and detergent selection
Pressure washing is a powerful tool for removing dirt, grease, and other contaminants from concrete. Use a pressure washer with a suitable nozzle (usually 15° or 25° tip) set at around 1200-1700 PSI.
Start at the highest point of your surface and work your way down to avoid streaking. Keep the wand moving to prevent damaging the concrete. Maintain a safe distance – about 6-12 inches from the surface.
Use an alkaline degreaser or neutral cleaner for tough stains. Always rinse thoroughly with clean water after washing to remove any residue. Test a small, hidden area first to ensure compatibility with your specific concrete type.
Stain-specific treatments (oil, rust, mold)
Different stains require different treatment methods:
Oil Stains: Absorb excess oil with cat litter or sawdust. Then use a degreaser specifically designed for oil stains. Apply, let it sit, then scrub and rinse.
Rust Stains (Iron): Use a chelating agent or rust remover. These products contain acids that break down iron oxide. Apply, let it sit, then scrub and rinse. Test in a small area first.
Mold/Mildew: Apply a biocide specifically designed for organic growth. Follow the manufacturer’s instructions. Always wear protective gear when handling chemicals.
Profiling and Creating the Right Surface Texture
Surface profile improves mechanical bonding and paint adhesion. Start with light methods and progress to more aggressive options if needed. Each method has different dust control and recovery considerations.
Think about cost, mess, and how the chosen profile aligns with the coating system. If you’re unsure about standards or required profiles, reference the coating manufacturer instructions or local codes for guidance. When in doubt, consult a pro or the standards referenced by the product data sheet.
Mechanical profiling options
For a solid paint grip, you need to roughen up that smooth concrete surface. Here are your mechanical options:
Grinding: Best for small areas and tight spaces. It’s quiet but generates dust.
Shot-blasting: Aggressive and fast, great for large surfaces. Expect noise and lots of dust.
Diamond finishing: Smooths and profiles in one pass. Ideal for high-end jobs with low dust but needs specialized equipment.
Scarifying: Deep cleaning for damaged or contaminated slabs. It’s tough on the surface and generates some dust.
Acid etching and safe use
Etching with acid is a mild profiling method, perfect for small areas or when you need to remove light contaminants.
Dilution: Mix 1 part muriatic acid (hydrochloric) to 6 parts water. Stronger solutions can damage the concrete.
Application & neutralization: Apply with a brush, let it sit for 10-15 minutes, then rinse and neutralize with baking soda solution.
Safety & disposal: Wear protective gear. Neutralize waste before disposing of it. Never mix acids or pour down drains.
Visual and tactile checkpoints for profile
Before painting, do a quick DIY check to ensure your profiling job is up to snuff:
- Uniform roughness: No smooth spots. If missed, paint won’t stick.
- No shiny spots: Shine means surface contamination. Paint won’t bond.
- Consistent absorbency: Concrete should soak up water evenly. Inconsistencies hint at underlying issues.
- Test adhesion: Apply a small test patch of paint. Let it dry, then scratch with a coin or blade. If it flakes off, re-profile.
Quick rule: If in doubt, consult industry standards like ASTM D4157 for more detailed guidelines.
Drying and Controlling Moisture for Reliable Adhesion
Drying is driven by ambient conditions and substrate porosity. Warm, dry air speeds evaporation, while high humidity slows it down. Porous concrete pulls moisture out of the surface as it dries.
Use practical methods like ventilation and dehumidification to move air and reduce moisture. Always check the coating’s stated moisture limits on the product label or data sheet before applying. If you’re in a damp environment, plan for longer waits or staged applications and consult the manufacturer guidance.
Drying strategies and environmental controls
Concrete needs to be dry before painting. Here’s how to speed up the process:
Air movement: Fans or open windows help dry your slab faster. Set them up around the area.
Heaters: In colder weather, use space heaters to warm the concrete. Keep it below 150°F (66°C) to avoid damage.
Dehumidifiers: If humidity’s high, rent a dehumidifier. It’ll suck moisture out of the air, helping your slab dry faster.
How to measure moisture and interpret results
Before painting, test for moisture:
In-situ relative humidity probes: Stick these into the concrete. If RH is below 75%, you’re good to go.
Surface moisture meters: These give quick readings but aren’t as accurate. Compare results with your coating’s specs.
Calcium chloride test: This one takes time but gives precise results. Wait for the manufacturer’s recommended duration, then compare with their limits.
When to delay painting after rain or washing
After it rains or you wash your slab, wait before painting:
In warm, dry weather (above 70°F/21°C and below 50% RH), wait at least 48 hours. Test for moisture before proceeding.
In colder or humid conditions, wait longer. A week might be needed. Always test before painting.
Rule of thumb: For every 10°F (6°C) below 70°F (21°C), add a day to your waiting time. Test moisture levels regardless.
Primers, Bonding Agents, and Product Selection for Concrete
Primers and bonding agents help compatible chemistries adhere to concrete. Read how paint chemistry interacts with the substrate and select products accordingly. Consider compatibility with the topcoat and whether a sealer or promoter is needed.
Encourage doing trial patches to verify adhesion before committing to a full coat. Verify compatibility and application instructions on the product label or manufacturer tech data sheet. If unsure, consult a local supplier or the coating manufacturer for guidance.
When a Primer or Bonding Agent is Required
A primer or bonding agent isn’t always needed, but they’re crucial for certain surfaces. Here’s when:
New Concrete: Freshly poured concrete needs time to cure and lose moisture. A primer seals the surface, preventing further absorption of paint.
Patched Surfaces: Patches can be porous or have different absorbency than the surrounding concrete. A bonding agent helps create a uniform surface for better adhesion.
Residual Salts: If your concrete has efflorescence – those white salt deposits – use a primer to seal them in and prevent paint from peeling later.
Matching Paint Chemistry to the Substrate
Different paints work best on different surfaces. Here’s what you need to know:
Acrylic: Great for interior floors and walls, acrylic paint is durable, flexible, and easy to clean. It’s not ideal for exterior use due to its susceptibility to UV damage.
Epoxy: Tough and chemical-resistant, epoxy is perfect for garage floors and other high-traffic areas. It can be slippery when wet, so consider adding non-slip additives.
Elastomeric: This paint stretches with the concrete, making it ideal for surfaces that experience movement or cracking. It’s often used on exterior walls to protect against moisture intrusion.
Compatibility Checks and Test Patches
Before painting your entire surface, do a small-area adhesion test. Here’s how:
1. Prepare the area as you would the rest of the surface – clean, profile, and dry.
2. Apply the primer/bonding agent (if using) and let it dry according to the manufacturer’s instructions.
3. Observe the cure: Check for any adverse reactions like bubbling or discoloration. Ensure the paint adheres well by gently scraping with a coin or nail.
Tools, Materials Checklist, and Safety
Create a concise list of essential tools and consumables for cleaning, profiling, drying, and testing. Include PPE like gloves, eye protection, and a dust mask or respirator. Consider rentals for heavy equipment to keep costs reasonable.
Include notes on safe handling and proper disposal of coatings and cleaners. Check local regulations for disposal of contaminated rags, wash water, and empty containers. Refer to labels and safety data sheets for specific requirements.
Essential Tools For Cleaning And Profiling
Before you start, make sure you have all the right gear to get the job done safely and efficiently.
- Pressure washer or grinder: To remove dirt, grease, and loose material. Rent if occasional use.
- Scrub brushes: Stiff-bristled for tough spots, soft for sensitive areas.
- Moisture testers: To check surface moisture before painting. Don’t skip to avoid adhesion issues.
- Safety glasses: Protect your eyes from debris during cleaning and profiling.
- Work gloves: For handling tools and materials, preventing injuries.
- Respirator (for grinding): To protect against silica dust. Don’t skip to avoid health risks.
- Tape measure: To ensure proper coverage with primers and paints.
- Drying fans or heaters (optional): For accelerating drying, if needed for your climate.
Quick rule: Always check your tools before starting. A broken tool can cost you time and money.
Personal Protective Equipment And Site Safety
Protecting yourself and the environment is crucial during concrete prep work.
- Respirator: For chemical cleaning and mechanical profiling. Protects against harmful dust and fumes.
- Safety glasses or goggles: To protect your eyes from chemicals and debris.
- Gloves: To protect your hands from chemicals and sharp edges.
- Coveralls or long sleeves: To protect your skin from chemicals and dust.
- Ear protection (earplugs or earmuffs): For grinding to prevent hearing damage.
- Dust control measures: Wet down surfaces before profiling to minimize dust. Don’t skip to avoid respiratory hazards.
- Contain runoff: Use barriers and absorbents to contain chemical runoff. Don’t let chemicals enter waterways.
Quick rule: Always follow safe work practices. Your health and the environment depend on it.
Troubleshooting, Common Mistakes, and Final Inspection
Develop a practical guide to diagnose adhesion failures, such as poor surface prep or moisture issues. Identify correctable oversights like incomplete cleaning or inadequate profiling. Use a simple checklist to confirm readiness for coating.
Include quick fixes where possible and clear signs to seek professional help. Conduct a thorough final inspection, looking for even texture, absence of moisture, and clean edges. If problems persist, consult a qualified pro and reference the coating instructions.
Common prep mistakes and how to fix them
Before you start painting, use this checklist to ensure your concrete surface is properly prepared. Catch these common mistakes early to avoid costly rework.
- Inadequate cleaning: Dirt, grease, or other contaminants can prevent paint from adhering. Solution: Clean the surface with a degreaser and water, then rinse thoroughly.
- Insufficient profile: A smooth surface may look nice, but it lacks the ‘tooth’ needed for paint to grip. Solution: Use a concrete profiling tool or acid etching to create a rough surface.
- Moisture present: Painting over damp concrete can lead to peeling and mold growth. Solution: Allow the surface to dry completely (at least 72 hours) before painting, and consider using a moisture barrier primer.
- Check for dust: Even a thin layer of dust can prevent paint from sticking. Solution: Wipe the surface with a damp cloth to remove any dust.
- Perform tape test: Apply painter’s tape to the surface, let it sit for 24 hours, then pull it off quickly at a 90-degree angle. If paint comes off, your prep needs improvement. Solution: Re-clean and re-profile the affected area.
Quick rule: Always double-check your work. A few extra minutes can save you from major headaches later on.
Final visual and adhesion checks before painting
Before you grab that paintbrush, walk through this checklist to ensure your concrete surface is ready for its new coat. A few simple tests can save you from a big mess.
Quick rule: If in doubt, test it out. A little extra effort now can prevent a lot of trouble later.
Conclusion
Solid adhesion starts with smart prep. Do the work right, and you prevent peeling, flaking, and costly calls later. Safety stays first, because a little protection goes a long way toward clean, durable results.
Check the basics in order: inspect the concrete for cracks and damage, repair what you find, clean thoroughly with the approved methods, create the right profile, confirm the surface is dry or within the moisture limits, then choose and apply a compatible primer or bonding agent and follow the product instructions—test a small area first and keep the work area well ventilated with appropriate PPE.
Two or three mistakes to avoid are skipping the moisture test or using the wrong cleaner, rushing the profiling step, and skipping a final inspection or testing a small area before full application. Always wear the right safety gear, ventilate the space, and work in daylight or bright lighting to spot dust or residues. If anything looks uncertain or the substrate is heavily damaged, pause and reassess before proceeding.
If the substrate is porous, cracked, or severely contaminated, or if you’re unsure about primer fit or moisture limits, it makes sense to call a pro. Stay disciplined, follow the steps, and you’ll get a solid bond that lasts and looks good—the kind of finish you can trust every day. You’ve got this; finish strong and move on to the next task with confidence.
FAQ
Is it okay to skip cleaning the concrete before painting if I’m in a hurry?
No. Dust, grease, and old coatings ruin adhesion. Clean thoroughly per the product label, then dry the surface before proceeding.
How do I know if the surface is ready for profiling and coating?
Look for a clean, dry surface with no loose material. If you’re unsure, test a small area with the product’s instructions and check for good adhesion before continuing.
What should I do if the surface still looks dusty after cleaning?
Vacuum or wipe down again. A damp wipe can help, but don’t leave moisture behind. Let the surface dry completely before any coating or profiling.
Why are primers or bonding agents sometimes needed on concrete?
They help grip the coating and seal the surface. Follow the manufacturer’s instructions for the right product and application steps, and check for any specific dry times on the label.