
Introduction
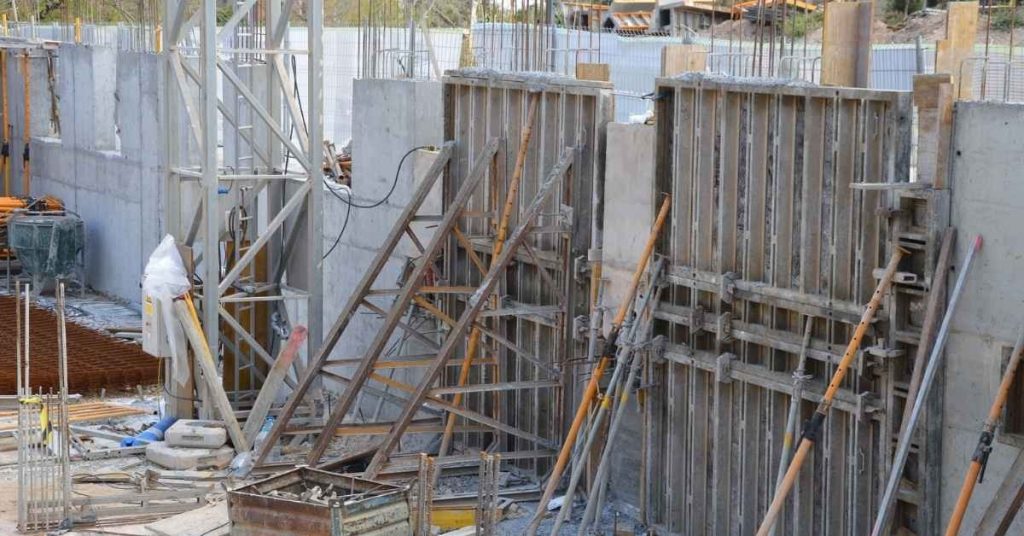
A concrete form bracing checklist is a quick, practical pre-pour verify-before-you-commit guide to ensure form supports and braces are secure. Use it to confirm the setup is stable, true, and ready for concrete placement. It also helps you spot gaps in formwork setup, reinforcement placement, and material readiness before you mix and pour.
Start with the site and materials: clear the area, check boards and braces for damage, and confirm all form panels are aligned. Verify formwork setup visually and by touch, checking for plumb, level, and tight joints before any pour. Finally, review reinforcement placement and embedment, ensuring bars are correctly positioned and supported as required by your project and local rules.
Key takeaways
- Verify form bracing is aligned, plumb, and securely anchored before pour starts.
- Confirm reinforcement placement and embedments clearances meet drawings and manufacturer guidance.
- Check site prep: clean footing area, remove debris, and protect form panels.
- Inspect formwork joints, ties, and bracing members for tight connections.
- Review load path and contingency measures with crew before pour.
- Monitor during-pour sequence for movement, jitter, or exposed bracing; stop and evacuate if noticed.
Table of Contents
- Introduction
- Key takeaways
- Why a Focused Pre-Pour Form Bracing Checklist Matters
- Step-by-Step Pre-Pour Form Bracing Inspection Checklist
- Tools, Materials, and on-Site Preparedness
- Materials and Mix Verification Before Pour
- Reinforcement, Embedments, and Clearance Verification
- During-Pour Monitoring: Placement, Sequencing, and Form Performance
- Post-Pour Finishing, Curing, and Assessing Formwork Performance
- Safety, Environmental Controls, and Emergency Response
- Conclusion
- FAQ
Why a Focused Pre-Pour Form Bracing Checklist Matters
A focused pre-pour bracing checklist helps catch issues before concrete is placed, preventing catastrophic form failure, project delays, and liability exposure. It emphasizes verifying the integrity of braces, shoring, horizontal and vertical alignment, form ties, plywood panels, cam-locks, wedges, and anchorage points. A brief cost-consequence view shows how rework, delays, material waste, and exposure to liability can arise from missed checks.
The checklist establishes who checks what, when to verify everything during form assembly and rebar placement, and how to sign off to ensure accountability. A quick on-site cue involves visually spotting misalignment or loose connections and physically testing brace stability, while an experienced installer confirms all components are intact and secure. If any signs of under-bracing, shifting, or instability appear, halt work, reassess, and adjust bracing before continuing to reduce risk.
Risk and cost of missed bracing issues
Perform this checklist just before pouring concrete to prevent costly failures.
- Brace integrity: Check for cracks, corrosion, or loose connections. Damaged braces can lead to form blowouts during pour.
- Shoring alignment: Ensure shoring is level and plumb. Misaligned shoring can cause settlement issues.
- Form tie integrity: Verify form ties are tight and undamaged. Loose or damaged ties can result in misalignment during pour.
- Plywood panel condition: Inspect for cracks, warping, or delamination. Damaged panels can leak concrete or collapse under pressure.
- Cam-lock function: Test cam-locks to ensure they secure forms properly. Malfunctioning locks can cause form movement during pour.
- Wedge tightness: Check wedges are securely in place and not loose. Loose wedges can allow form movement under pressure.
- Anchorage points stability: Ensure anchorage points are secure and bear no signs of stress. Unstable anchorage points can cause form failure during pour.
- Under-bracing: Look for any signs of under-bracing, such as excessive deflection or movement. Under-bracing can lead to catastrophic failure during pour.
Quick rule: Address any issues promptly to prevent pour delays and additional costs.
Liability, insurance, and contractual sign-offs
Conduct this inspection before pouring concrete to minimize liability risks and support insurance claims.
- Engineer-approved plans: Verify that the assembled formwork adheres to approved plans. Deviations can lead to disputes or claim rejections.
- Component standards compliance: Ensure all components meet specified standards and are from approved manufacturers.
- Proper installation: Check that components are installed correctly according to manufacturer instructions. Incorrect installation can void warranties and cause failures.
- Documentation accuracy: Confirm that records match the actual formwork setup. Inaccurate records can lead to disputes or claim denials.
- Sign-off process: Obtain necessary sign-offs from engineers and project managers before proceeding with pours.
Quick rule: Always obtain necessary approvals before pouring concrete to prevent contractual disputes and support insurance claims.
Step-by-Step Pre-Pour Form Bracing Inspection Checklist
Before concrete arrives, walk the formwork footprint, bracing layout, and supports against the drawings. Verify brace type, spacing, cross-bracing, ties, and anchors for anticipated concrete pressure. Ensure plumb and level faces and that all fasteners and wedges are present and undamaged.
A quick on-site check saves rework and reduces risk of leakage or collapse. Use simple cues: a solid tap should sound tight; wobble means tighten or replace. Document readiness with concise notes and sign-off to keep everyone aligned.
Step-by-Step Pre-Pour Form Bracing Inspection Checklist
Follow this sequence to ensure a smooth concrete pour by thoroughly inspecting and preparing your formwork and bracing.
- Walk the site to identify any obvious issues before starting detailed checks.
- Review drawings, gather tools (tape measure, level, plumb bob, etc.), and ensure safety gear is available.
- Verify form faces are sound, aligned, and dimensionally correct using a visual inspection and measurements with your tools.
- Inspect bracing system for secure attachments, adequate spacing, tightness, and redundancy to withstand hydrostatic loads.
- Check connections, hardware, and locking devices for proper tensioning and functionality.
- Ensure formwork ties are correctly positioned and not cutting into rebar; confirm embedded items won’t be displaced during pour.
- Verify access, fall protection, tag-off with pre-pour sign-off, and document field notes or checklist signatures indicating readiness for concrete arrival.
Formwork Integrity, Plumb, Level, and Dimensions
Use this checklist to verify form faces, alignment, and dimensional compliance with drawings before pouring concrete.
- Check for cracks or damage: Visually inspect form faces; any found should be documented or repaired.
- Compare dimensions: Measure formwork dimensions and compare with drawings to ensure compliance.
- Measure diagonals: Check for square by measuring diagonals; if they don’t match, adjust or document the discrepancy.
- Use a level: Ensure vertical alignment of form faces; any misalignment should be addressed or documented.
- Check support points: Verify supports are secure and undamaged; replace or repair as needed.
Quick rule: If formwork is out of tolerance, adjust or proceed with caution after documenting the issue.
Bracing, Ties, Shores, and Connection Hardware
Inspect bracing system components to ensure they can withstand hydrostatic loads before pouring concrete.
- Check brace type: Verify braces are appropriate for the load; replace if necessary.
- Inspect spacing: Ensure braces are spaced correctly according to drawings or manufacturer recommendations.
- Verify cross-bracing: Check that cross-bracing is present and properly installed.
- Check ties, anchors: Ensure ties and anchors are secure and undamaged; replace if needed.
- Inspect locking devices: Test locking devices to ensure they function correctly.
Quick rule: If bracing issues are found, address immediately or document for later action to prevent concrete pour delays.
Visual Checkpoints and Measurement Tips
Use these practical visual cues and simple measurements to quickly identify potential problems before pouring concrete.
- Measure gaps at brace connections: Compare with acceptable tolerances in drawings or specs; excessive gaps may indicate loose bracing.
- Check for deflection signs: Look for gaps between formwork and supports, excessive movement, or misaligned components.
- Verify plumb and level: Use a plumb bob and level to ensure form faces are vertical and horizontal; any deviation should be addressed or documented.
Quick rule: If deflection or misalignment is found, investigate further or document for later action to prevent concrete pour issues.
Tools, Materials, and on-Site Preparedness
A clear on-site workflow helps prevent delays by assigning responsibilities, defining communication, and detailing rapid repair steps for common bracing failures, since skipping inspection may lead to issues.
Visual cues and templates support consistent checks and traceability, while labeled, organized storage reduces misplacement. If loose or damaged components are found, implement a rapid repair plan before proceeding with concrete.
Essential tools and spare hardware
Before starting any pre-pour inspection, ensure you have the necessary tools and replacement parts on hand to address issues promptly.
- Tape Measure: Accurate measurement is crucial for identifying bracing issues. Use a reliable tape measure with imperial or metric markings as needed.
- Chalk Line: Marking out lines on forms helps identify misalignments and ensures straight, level surfaces. Check the chalk line’s condition before use.
- Level: A 2- or 4-foot level is essential for checking form plumb and level. Ensure it’s calibrated correctly.
- Plumb Line: Verify vertical alignment of forms with a plumb line. Check the weight at the end to ensure it hangs freely.
- Flashlight: Inspect dark areas and check for hidden defects. Ensure batteries are fresh.
- Camera: Document issues and progress. Use a durable, job-site appropriate camera or smartphone.
- Quick-Reference Ruler/Checksheet: A ruler with common measurements marked can speed up checks. Include a simple bracing checklist for quick reference.
- Extra Form Ties/Wedges/Clamps: Have extras on hand to replace damaged or missing components. Check their condition before use.
Template and documentation format recommendations
Use a multi-stage checklist template for efficient record-keeping during pre-pour inspections.
- Date: Record the date of inspection to maintain chronological order.
- Crew Details: List crew members present, their roles, and contact information.
- Weather Conditions: Note temperature, humidity, wind speed, and other relevant weather data.
- Form Dimensions: Record form dimensions to ensure they match plans.
- Bracing Checks: List key bracing components (ties, shores, walers) to check their condition and alignment.
- Deviations from Standard: Note any deviations from standard practice or plan requirements.
- Photo Notes: Include space for noting what each photo shows and its location.
- Inspector Sign-off: Include a field for the inspector to sign off on the completed checklist.
- Foreman Sign-off: Include a field for the foreman to confirm all issues have been addressed.
- Engineer Sign-off: Include a field for the engineer to approve the form’s readiness for pouring.
Quick rule: Ensure all responsible parties are familiar with the documentation process and their respective sign-off roles to maintain traceability.
Materials and Mix Verification Before Pour
Verify the concrete mix ticket details, delivery timing, and arrival appearance to ensure the delivered concrete matches project specifications. Confirm cement type and source, aggregate sizes, admixtures, slump class, air-entraining agent, and target strength align with what the project calls for, and check batch numbers and ETA with the delivery team. If anything seems off, pause and document the discrepancy before proceeding.
This matters because early verification helps prevent cold joints, segregation, and other issues that