
Introduction
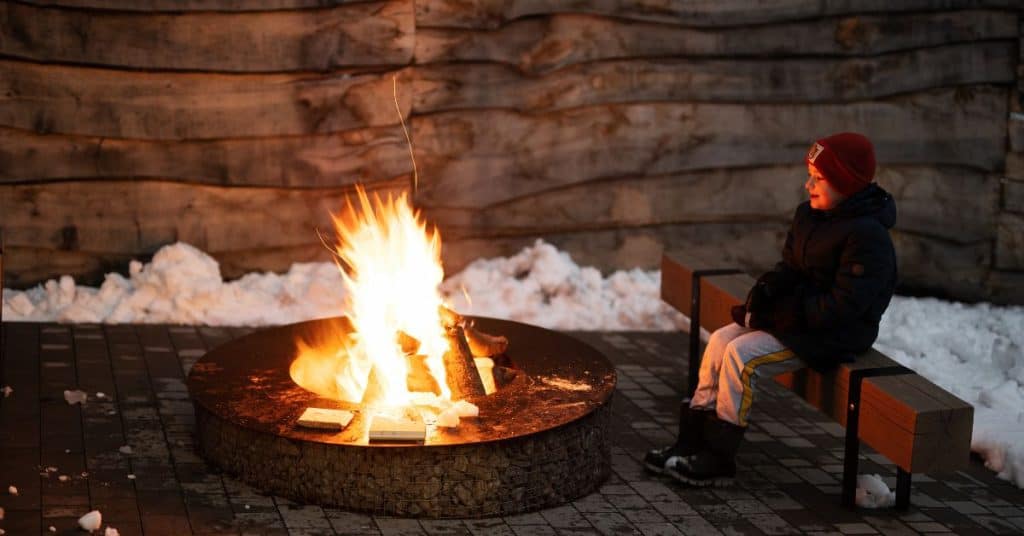
Concrete for outdoor fire pits is the sturdy, heat‑tolerant material you pour to form the pit structure and seating.
This article gives practical tweaks for mix, curing, and sealers so you can do it safely. Always check local codes and manufacturer labels for heat limits and curing temps.
Focus on a durable mix and proper curing by keeping temps and moisture in control. Look for heat resistant additives with clear labeling and follow instructions. When sealing, choose products labeled safe for concrete in outdoor fire areas and follow safety guidelines.
Key takeaways
- Choose a heat-tolerant concrete mix designed for outdoor fire pits.
- Follow manufacturer instructions for curing temperatures and avoid rapid moisture loss.
- Additives should be used only as specified to maintain structural integrity.
- Never apply unapproved sealants near hot surfaces; follow label warnings.
- Inspect for cracks and spalling after heat cycles, repair promptly.
- Plan for even drainage and avoid prolonged standing water near pits.
Table of Contents
- Introduction
- Key takeaways
- Why Use Concrete for Outdoor Fire Pits?
- Concrete Mix Adjustments for Fire Pits
- Heat Resistance and Temperature Limits
- Safer Sealers and Surface Treatments
- Construction and DIY Guidelines
- Durability, Common Mistakes, and Troubleshooting
- Maintenance, Seasonal Care, and Cost Considerations
- Conclusion
- FAQ
Why Use Concrete for Outdoor Fire Pits?
Concrete offers design flexibility, affordable DIY potential, and a cohesive look with surrounding hardscape. It’s easy to shape, finish, and tailor to built‑in seating or flush installations. The material’s cost and customization options often make it a practical first choice for many yards.
However, concrete has limitations when exposed to repeated heating and cooling. Thermal mass, potential cracking, and staining are all considerations, along with moisture management. Mitigation steps include heat‑resistant aggregates, proper curing, and adequate ventilation, plus clear expectations for where concrete shines and where other materials may perform better.
Benefits of concrete
Concrete’s the jack-of-all-trades for outdoor fire pits. It’s affordable, easy to shape, and looks great with your hardscaping.
Design flexibility: Want a round pit? Square? Built-in seating? Concrete does it all. You can even stamp or stain it to match your patio.
Durable outdoors: Once cured, concrete’s tough. It handles rain, snow, and freeze-thaw cycles like a champ. Just remember, it’s not immune to heat-related issues.
Heat-wise, concrete has its limits. It retains heat, so avoid rapid temp changes. But with the right mix and care, it’s perfect for most DIY fire pits.
When concrete is not the best option
Concrete’s great, but it’s not always the top choice. Here are a few scenarios where you might want to consider alternatives.
High heat demands: If your pit’s gonna see super high temps or concentrated heat (like from a wood-burning insert), refractory brick might be better. It’s designed for heavy-duty heat.
Close to combustibles: Concrete doesn’t melt, but it can crack and spall under extreme heat. If your pit’s near flammable stuff like wooden decks or siding, play it safe with a metal fire pit or purpose-built insert.
Local codes: Some areas have strict rules about fire pits. Check yours before you start. You might need to go with a certified insert or metal pit.
Concrete Mix Adjustments for Fire Pits
Thermal expansion, heat exposure, and moisture influence how a fire pit concrete behaves in service. Look for mixes with compatible expansion characteristics and reduced risk of thermal cracking. Material selection should align with the project’s heat exposure expectations.
Practical tweaks include adjusting the water balance, considering low‑heat cement variants, and incorporating supplementary cementitious materials. Air‑entraining agents can improve durability under rapid heating and cooling, while controlled porosity and aggregate choice help manage moisture and freeze‑thaw stress. Always verify every material against the project specs and manufacturer data sheets before pouring.
Aggregate selection and sizing
The aggregate you choose plays a big role in your fire pit’s durability. You want aggregates that can handle heat and won’t crack under thermal stress.
Heat-tolerant aggregates like granite, basalt, or dense limestone are good choices. Avoid lightweight aggregates; they don’t hold up to heat well.
Check the aggregate product information for grading. A well-graded mix with a range of sizes packs tightly together, reducing voids where moisture can hide and cause problems later.
Cement types and thermal additives
Use the right cement for your fire pit. Regular Portland cement is fine, but consider low-heat cement if your fire pit will see very high temperatures.
Pozzolans and silica fume can improve your concrete’s heat resistance by densifying the matrix. They also reduce thermal cracking risk.
Don’t use typical non-structural mortars unless they’re rated for heat exposure. Always check product labels to confirm heat ratings.
Reinforcement and admixtures
Reinforce your fire pit to control shrinkage and improve toughness. Fiber reinforcement is a good choice for concrete fire pits. It helps control cracking from drying and heating.
Metal reinforcement can also work, but it’s more susceptible to corrosion if not properly protected. Use stainless steel or epoxy-coated rebar.
Admixtures like shrinkage-compensating or air-entraining agents improve durability under rapid heating and cooling cycles. Follow manufacturer guidelines for dosages.
Cure your concrete properly to reduce the risk of thermal cracking. Keep it moist and cool for at least three days after pouring, then allow it to dry slowly.
Heat Resistance and Temperature Limits
Ordinary concrete responds to sustained and cycling heat with color changes, microcracking, and potential strength loss if exposed to severe conditions. Understanding how heat moves through the mix helps you plan for durability and safety. The way aggregates and cement paste perform under heat matters for service life.
Common failure modes include spalling, thermal cracking, and moisture‑related degradation. Read product temperature ratings and ensure compatibility with local codes and installation guidelines. Design strategies and appropriate sealers can help, but confirm limits with the manufacturer before proceeding.
Thermal expansion, cycling, and spalling risks
Standard concrete expands when heated. This is normal. But under sustained or cyclical heat, like in an outdoor fire pit, it can cause problems.
Too much heat can lead to microcracking. The surface might change color. And over time, your concrete could lose strength.
Spalling is when pieces of concrete break off due to extreme heat. It’s caused by the expansion and contraction of water in the concrete’s pores. To prevent this:
– Use coarse aggregates that can handle heat better.
– Add thermal additives to your mix, like fly ash or slag cement.
Using liners and refractory materials for higher heat
Incorporating firebrick, refractory liners, or metal inserts can protect your cast concrete from extreme heat. But they change the thermal demands on the surrounding concrete.
- Firebrick: Look for high-alumina content. It’s key for heat resistance. Avoid low-quality bricks that can crack and stain.
- Refractory liners: Check their maximum service temperature. They should match or exceed your fire pit’s expected heat.
- Metal inserts: Use stainless steel or cast iron. They’re durable and can withstand high temperatures. Avoid galvanized metal, as it can rust.
- Insulation: Consider adding insulating materials around your fire pit to protect the surrounding concrete from heat.
- Sealants: Apply a high-temperature sealant between the liner and the concrete. This prevents moisture-related degradation.
Safer Sealers and Surface Treatments
Penetrating sealers, UV‑rated films, and high‑heat ceramic coatings are among the options for outdoor fire pits. Each has a different suitability depending on surface finish and heat exposure. Choose products that align with your concrete finish and expected use.
Prioritize heat stability, low flammability, and long‑term durability. Check that formulas are compatible with existing finishes and that they meet safety disclosures. Verify essential metrics such as continuous and peak temperature ratings, cure time, reapplication intervals, and surface prep requirements.
Penetrating vs Film-forming Sealers
When it comes to sealing your outdoor concrete fire pit, you’ve got two main types of sealers to choose from: penetrating and film-forming. Let’s break down each one.
Penetrating Sealers soak into the concrete, blocking moisture but allowing the surface to breathe. They’re great for heat resistance as they don’t create a layer that can peel or blister under high temperatures. Go for silane- or siloxane-based penetrating sealers.
Film-forming Sealers, like acrylics and urethanes, sit on top of the concrete creating a protective barrier. While they offer good protection against water and chemicals, they’re not ideal near heat sources as they can degrade, discolor, or even peel under high temperatures. Avoid these for fire pit areas.
Heat-resistant Coatings and Safer Application Practices
For added protection against heat, consider heat-resistant coatings. These are typically high-temp ceramic or epoxy-based products designed to withstand continuous exposure to high temperatures. They’re ideal for lining the interior of your fire pit.
When applying sealers, keep these safety tips in mind:
– Apply sealers in well-ventilated areas, away from heat sources and open flames.
– Follow manufacturer guidelines for application temperature (usually 50-90°F or 10-32°C).
– Ensure the concrete is clean, dry, and free of contaminants before applying any sealer.
Construction and DIY Guidelines
Before starting, check permits, local codes, and any HOA restrictions that may apply. Plan a safety review with the proper authorities to avoid rework later. This helps set clear expectations for the build scope.
Then follow a high‑level sequence: site prep, form construction, pour, cure, and finish. Discuss heat management, venting, and pour thickness only in general terms, with attention to wind, weather, and curing conditions that affect outcome. Assemble a practical materials and tools list and keep safety gear ready on site.
Tools and materials checklist
Use this checklist before you start to ensure you’ve got everything needed for a successful, safe outdoor concrete fire pit.
- Concrete: High-heat resistant mix with appropriate cement type (refer to Concrete Mix Adjustments for Fire Pits).
- Liner material: Refractory or heat-resistant liner, compatible with your concrete mix.
- Reinforcement: Rebar or mesh, size and spacing confirmed to support your pit’s dimensions and load.
- Form release: Form oil or release agent to prevent the form from sticking to the concrete.
- Sealer: Heat-resistant sealer with good freeze-thaw resistance (refer to Safer Sealers).
- Curing blanket: Insulating blanket to maintain consistent curing temperature and prevent rapid drying.
- PPE: Safety glasses, gloves, ear protection, and a hard hat for everyone on site.
- Basic tools: Tape measure, level, shovel, rake, wheelbarrow, concrete mixer, trowel, and vibrator (if available).
- Safety gear: Fire extinguisher, first aid kit, and clear safety signage.
Quick rule: Double-check all materials’ heat ratings and compatibility before mixing or pouring.
Step-by-step build outline
Follow this sequence to create a durable, long-lasting outdoor concrete fire pit with optimal heat performance.
- Site prep: Clear the area, ensure it’s level and compacted. Check local codes for setbacks from structures (refer to On-site safety and code considerations).
- Base construction: Lay a bed of gravel, compact it, then add a layer of sand, leveling as you go.
- Formwork: Build forms using plywood or metal, ensuring they’re square and braced properly. Use form release before pouring.
- Insulation/heat shielding: Install heat-resistant liner before pouring concrete to protect the pit from high temperatures (refer to Using liners and refractory materials for higher heat).
- Pour and compact: Pour concrete into forms, using a vibrator to remove air pockets. Keep pour thickness consistent to manage heat buildup.
- Cure: Cover the pit with curing blankets or wet burlap to maintain consistent moisture and temperature during curing. Monitor for proper curing (refer to Construction and DIY Guidelines).
- Liner installation: If using a separate liner, install it after concrete has cured but before final finishing.
- Finishing: Once fully cured, remove forms, clean up any rough edges, and apply the chosen sealer (refer to Safer Sealers).
On-site safety and code considerations
Safety is paramount when building an outdoor concrete fire pit. Follow these practical measures to ensure a safe, code-compliant project.
Clearance from combustibles: Maintain a safe distance from flammable materials like wood siding or decks. Check local codes for specific clearances (refer to On-site safety and code considerations).
Ventilation: Ensure the fire pit has adequate airflow to prevent excessive smoke buildup. Consider installing a chimney or using a fire screen.
Local codes and inspections: Check with local building and fire departments for permit requirements, setback restrictions, and any specific regulations regarding outdoor fire pits (refer to Construction and DIY Guidelines). Schedule pre-pour and post-pour inspections as needed. Always follow approved plans and sign off on completed work.
Durability, Common Mistakes, and Troubleshooting
Durability depends on mix design, curing, thermal cycles, joints, and sealers. Each factor influences long‑term performance and the likelihood of issues. Understanding these drivers helps you plan maintenance and repairs.
Common mistakes include using mismatched aggregates, skipping proper curing, and neglecting drainage. Early signs such as cracks, spalling, or efflorescence signal underlying causes. A stepwise troubleshooting approach helps you map fixes from simple patches to more involved repairs, with safety as a priority.
Common mistakes to avoid
Here are some common pitfalls that can shorten your fire pit’s lifespan. Avoid these to keep your outdoor space safe and looking good.
- Skipping proper curing: This leaves concrete vulnerable to moisture loss and early cracking. Always follow the recommended curing time.
- Neglecting drainage: Standing water weakens concrete over time, leading to cracks and spalling. Ensure your fire pit has adequate drainage.
- Using incompatible aggregates: Some aggregates expand or contract more than others when heated. Stick with aggregates suitable for high-heat applications.
- Skipping liners: Liners protect the concrete from extreme heat. Always use a compatible liner to extend your fire pit’s life.
By avoiding these common mistakes, you’ll keep your fire pit in top shape for years to come.
Repair and patching options
Cracks and spalling can occur over time. Here’s how to address these issues temporarily or permanently.
Cracks: For hairline cracks, use a cement-based crack filler or epoxy injection. For larger cracks, consider using a flexible repair mortar that can withstand movement.
Spalling and liner damage: If the damage is minor, use a refractory mortar to patch the area. If the damage is extensive or affects structural integrity, replacement may be necessary.
Regular inspections help you decide when repairs are sufficient or if replacement is needed. Always prioritize safety in your assessments and repairs.
Performance indicators to monitor
Keep an eye on these signs of wear and tear to maintain your fire pit’s longevity.
Cracking patterns: Notice any new cracks or changes in existing ones. Hairline cracks are normal, but wider or longer cracks may indicate a problem that needs addressing.
Efflorescence: While harmless, efflorescence can indicate moisture issues. If it reappears after cleaning, check your drainage and consider waterproofing.
Spalling: Chipping or flaking concrete indicates structural degradation. Address spalling promptly to prevent further damage.
Regular inspections and timely repairs will help slow down deterioration and extend your fire pit’s service life.
Maintenance, Seasonal Care, and Cost Considerations
A seasonal plan keeps pits performing well: spring checks for stability, summer cleaning, fall prep, and post‑winter moisture inspections. A routine keeps small issues from escalating and supports safer operation. Think of this as ongoing care rather than a one‑time effort.
Compare sealing options and life‑cycle implications to understand long‑term costs. Liners, repairs, and warranties all influence total ownership. Plan for regular maintenance and document service intervals to stay prepared for future improvements and safety checks.
Seasonal and routine maintenance checklist
Use this checklist to keep your outdoor fire pit in tip-top shape throughout the year.
- Spring startup: Check stability, cracks, and sealant integrity. Reapply sealant if necessary.
- Mid-summer cleaning: Remove ash and debris. Inspect liner and burner for wear.
- Heat limit awareness: Monitor pit temperature to prevent overheating.
- Fall pre-winter prep: Clean thoroughly, apply winterizing sealant, and cover the pit.
- Post-winter inspection: Check for moisture-related issues like cracks or spalling.
- Regularly (every 3-6 months): Inspect and clean burner, grate, and liner.
- Annually (before winter): Reapply sealant to protect against freeze-thaw cycles.
Quick rule: Regular maintenance extends your fire pit’s life and prevents costly repairs.
Comparing sealing and liner options: cost vs performance
When choosing a sealer or liner, consider both upfront cost and long-term performance.
Surface sealants are cheaper but need frequent reapplication. Penetrating sealers last longer but cost more. Both impact heat resistance differently, so check manufacturer test data.
Liners protect against thermal damage. Choose one compatible with your fuel type (propane or wood). Regular cleaning and inspection extend their lifespan.
Rule of thumb: Balance initial investment with expected lifespan and maintenance frequency for optimal value.
When to hire a professional
A professional’s expertise is crucial in certain scenarios. Hire one if you notice:
Structural concerns: Cracks, spalling, or significant erosion around the pit.
Extensive thermal damage: Severe discoloration, warping, or cracks in the concrete.
Complex local code requirements: Unclear or strict regulations regarding fire pits in your area.
Safety first: Always prioritize safety when deciding whether to DIY or hire a pro.
Conclusion
Concrete fire pits are durable if you respect heat limits, cure times, and a safe sealer. Stay practical, test new tweaks on a small area, and keep the look and structure solid by following the steps you already know work best.
First check clearance and the sub-base, then verify your concrete mix tweaks, confirm heat exposure ranges, apply a safer sealer after proper curing, run a small test burn, and inspect for any flaws or soft spots. Do these in that rough order and you’ll catch problems early without tearing things apart.
Common mistakes to avoid are using an unadjusted mix or untreated concrete, skipping full cure time, sealing too soon or with the wrong product, and ignoring drainage or improper airflow. Safety rules are simple: test on a small patch first, follow the product labels, and don’t expose the surface to heat beyond its rated limits or to chemicals you wouldn’t use in outdoor furniture. If any cracks grow, or you notice spalling, call a professional rather than chase quick fixes.
When in doubt about structural fit, persistent cracking, or complex sealing, bring in a pro rather than risking more damage or costly repairs. Stay focused on solid joints, proper curing, and sensible seasonal care, and your outdoor fire pit will stay safe, sturdy, and good-looking for years to come.
FAQ
What mix ratio should I use for durability?
Choose a high-quality exterior concrete mix and follow the bag’s guidance. Look for proportions on the label or datasheet and use the recommended water-to-cement guidelines. If in doubt, check manufacturer instructions and local guidelines before committing to a mix.
How long does it cure and what temperatures matter?
Cure times vary with mix and conditions. Keep the concrete within reasonable temperatures during cure and protect it from rapid cooling or heating. Always follow the curing instructions printed on the product and consult local conditions if you’re unsure.
What heat resistance additives or formulas are safe?
Use mixes or additives that are rated for higher heat exposure, and follow the supplier’s directions. Check product labels and manufacturer instructions for limits and application steps. If unsure, ask in-store or refer to the manufacturer for guidance and local safety rules.
What are the safest sealants and surface treatments?
Choose sealers labeled for exterior concrete and heat exposure. Follow the application instructions exactly and test a small area first. Avoid products that don’t state heat tolerance or are not intended for outdoor fire pit surfaces.
What maintenance tips will extend longevity and avoid common mistakes?
Seal surfaces as recommended after curing and re-seal per the product schedule. Clean debris and inspect for cracks, repairing per instructions before issues worsen. If you’re unsure, verify maintenance intervals and product compatibility with the original mix and sealant labels.