
Introduction
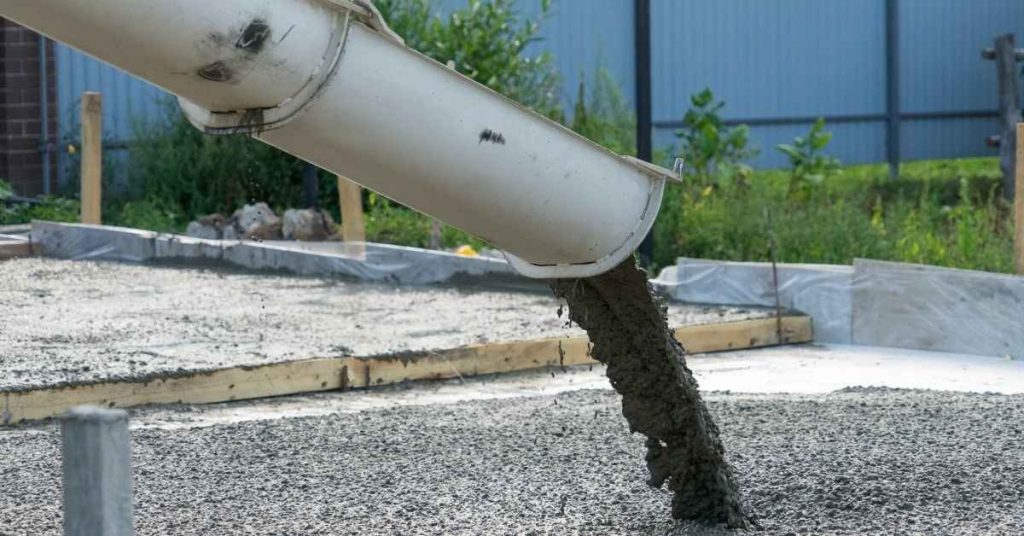
Concrete conduit stubs are short sections of conduit that extend into a slab or wall through sleeves to keep electrical wiring protected and aligned. Sleeves guide the conduit through the concrete and help maintain a clean finish. This introduction covers how to plan for burial, sleeves, and keeping things plumb as you pour.
When you pour, keep the conduit perfectly plumb and centered in the sleeve by using guides and a level. Always verify burial depth and sleeve size with the manufacturer instructions or your local electrical rules, and adjust your plan for any special conditions. If in doubt, consider keeping it a bit more robust and use careful tamping and alignment to avoid movement during the pour.
Key takeaways
- Understand conduit stubs and sleeves prevent damage and misalignment during pours.
- Check local codes and NEC guidelines for burial depth and sleeve placement.
- Plan burial depths with slab design to avoid conduit exposure or corrosion.
- Choose sleeves material based on moisture, load, and chemical exposure.
- Keep stubs plumb and at consistent elevations using stakes and guides.
- Inspect during pour, cover sleeves, and address shifts or movement immediately; wear PPE.
Table of Contents
- Introduction
- Key takeaways
- Overview — Why Conduit Stubs and Sleeves Matter for Concrete Pours
- Codes, Standards, and Material Specifications to Check
- Typical Burial Depths and How Depth Interacts with Slab Design
- Sleeve Options: Materials, Pros/Cons, and Selection Guidance
- How to Keep Conduit Stubs Plumb and at the Correct Elevation During the Pour
- Step-by-Step Installation Workflow and Best Practices
- Common Mistakes, Inspection Tips, and Remediation Strategies
- Cost, Risk Management, and Safety Practices Beyond Code
- Conclusion
- FAQ
Overview — Why Conduit Stubs and Sleeves Matter for Concrete Pours
Conduit stubs and sleeves define protected pathways for wiring in slabs and slabs-on-grade. They also pave the way for future additions or repairs without chasing patches after the pour. Proper depth and alignment protect wiring, simplify inspections, and reduce costly rework.
Understand how stubs differ from sleeves and when each is appropriate for your project. Keep in mind horizontal and vertical offsets, proximity to rebar, and interaction with pour concrete to prevent damage. Use a quick pre-pour workflow to verify plumb, level, and position before the concrete goes in.
What this article covers
This article guides you through planning and installing concrete conduit stubs and sleeves for slabs and slabs-on-grade. We’ll cover:
Code requirements: NEC, local codes, and burial depths.
Materials: Conduit sizes, termination boxes, weatherproofing, and embedment options (stubs vs sleeves).
Installation steps: Depths, alignment, offsets, rebar proximity, and pour sequence coordination.
Common errors and mitigation strategies to keep your wiring safe and inspections smooth.
Cost and safety considerations: Planning for future additions, repairs, and code compliance.
When to plan conduit stubs in the schedule
Planning conduit stubs early is key. Here’s when to coordinate with your trades:
Electrical: Before they start their work, so sleeves and bracing are ready for embedment.
Concrete: Early in the formwork stage to ensure proper placement and protection during the pour.
Rebar: After rebar layout but before tying, to avoid interference and maintain structural integrity.
Timing is crucial. Miss a step, and you might end up with damaged sleeves or misaligned stubs.
Codes, Standards, and Material Specifications to Check
Know NEC burial depth guidance and how it applies to PVC, EMT, and RMC under concrete. Refer to key sections and tables to set baseline depths and verification steps. Local AHJs may interpret or adopt amendments differently, so check with the authority having jurisdiction.
Material specs influence depth, protection, and compatibility with moisture, chemicals, and rebar. Compare PVC Schedule 40/80, rigid PVC, EMT, and rigid metal conduit for durability and installability. Sleeve use and clearance during the pour must align with standards and plan notes, then be validated after completion.
Key NEC references and how to interpret them
The National Electrical Code (NEC) is your go-to for burial depth requirements. Here’s where to find them:
NEC 300.5 covers general rules for underground installations. It refers you to specific tables for each conduit type.
For example, Table 300.5 lists minimum cover requirements for different types of conduits under concrete. Read the exceptions carefully; they might adjust depths based on factors like conduit size or presence of rebar.
Material specs and standards explained
Choosing the right materials ensures your conduits stay protected and aligned during the pour. Here’s what to look for:
- PVC Schedule 40/80: These ratings indicate wall thickness. Thicker walls (Schedule 80) provide better protection against impact but may be more rigid.
- Rigid PVC: It’s lightweight, easy to handle, and resistant to chemicals. Look for markings like ‘PVC’ or ‘CPVC’.
- EMT (Electrical Metallic Tubing): This thin-walled conduit is flexible but less impact-resistant. Markings include ‘EMT’ or ‘THHN/THWN’ (wire types it’s designed for).
- Rigid Metal Conduit (RMC): Heavy-duty protection, but heavier to handle. Look for ‘RMC’, ‘IMC’ (Intermediate Metal Conduit), or ‘AC’ (Armored Cable) markings.
- Sleeves: These protect conduits and keep them plumb. They should be sized to fit your conduit snugly, with extra length to extend above the concrete surface for easy removal post-pour.
Local AHJ and project-specific variations
Your local Authority Having Jurisdiction (AHJ) might have specific requirements or interpretations of the NEC. Check with them early in your planning:
Fire Department Requirements: They may have additional rules, especially for high-rise buildings or other special occupancies.
Owner Preferences: The property owner might have specific expectations or requirements. For instance, they might want conduits buried deeper to avoid future damage during landscaping.
Local Amendments: Some areas adopt standards beyond the NEC. Check for any local amendments that could affect your conduit burial depths and methods.
Typical Burial Depths and How Depth Interacts with Slab Design
Follow NEC/IBC minimum burial depths and translate them to typical residential and commercial work. Actual depths should reflect the slab thickness and the intended use of the space. Always verify with local requirements before finalizing plans.
Slab thickness, whether interior, driveway, or garage, changes spacing and protection needs. Loading and live traffic influence where conduits sit relative to the surface. Consider deeper placements for future needs and to avoid future cuts during service upgrades.
Depth considerations by application
The depth at which you place conduit depends on where it’s going. Here are some guidelines:
Interior slabs, like basement floors or interior rooms, usually need conduits 12″-18″ deep to meet NEC/IBC minimums and typical practice.
Exterior sidewalks/driveways require deeper placement, often 24″-36″. This is due to potential frost heave and heavier vehicle traffic. Check local codes for specific requirements.
Slab-on-grade around foundations needs careful planning. Conduits should be at least 12″ deep but may need to go deeper to avoid interference with footings or other structural elements.
Relationship to slab thickness, rebar, and post-tensioning
The thickness of your slab affects conduit depth. Here’s how:
Conduits need clearance from rebar. Typically, that’s 2″-4″ depending on rebar size. So, if your slab is 6″ thick with #4 rebar, conduits should be placed at least 3″ deep.
For post-tensioned slabs, conduit placement is trickier. You’ll need to work with the engineer or installer to ensure conduits don’t interfere with post-tensioning cables. Generally, place conduits at least 4″-6″ away from the bottom of the slab.
Always check local codes and consult with professionals if you’re unsure about specific requirements for your project.
Sleeve Options: Materials, Pros/Cons, and Selection Guidance
Sleeve types include pipe sleeves, factory-formed sleeve systems, corrugated conduits, and temporary covers. Each has a workflow, rebar interaction, and impact on later inspections. Choose based on project duration, durability, and inspection stringency.
Durability and load performance vary by material and wall thickness. Evaluate moisture resistance, freeze-thaw durability, and abrasion resistance for the service life. Select sleeves with practical installation and stable alignment during pours.
PVC sleeves vs rigid metal sleeves
When it comes to sleeve materials, you’ve got two main options: PVC and rigid metal. Both have their pros and cons.
PVC sleeves are lightweight, easy to handle, and flexible. They’re great for areas with thermal movement or where abrasion might be an issue. But they’re not as strong as metal and can’t be grounded.
Rigid metal sleeves, on the other hand, offer superior strength and durability. They’re ideal for high-traffic areas and can be grounded for safety. However, they’re heavier, stiffer, and more prone to damage from thermal expansion.
Preformed and removable sleeve systems
Some sleeves come pre-formed with features that make installation and removal easier. These include:
– Pull strings: For easy removal after the pour.
– Watertight transitions: To prevent moisture ingress during and after the pour.
These systems are great for jobs where you need to pull wires or cables through later, or where waterproofing is a concern. But they can be more expensive than standard sleeves.
Sealing sleeves and future access
Keeping your sleeves clean and accessible after the pour is crucial for future upgrades or repairs. Here’s how:
– End seals: Use end caps to keep concrete out during the pour, then remove them afterwards.
– Firestopping: For fire-rated walls, use intumescent paint or foam to seal around sleeves.
Also, consider using removable spacers to maintain sleeve plumbness and prevent concrete from filling the sleeve. This keeps it clean and ready for future use.
How to Keep Conduit Stubs Plumb and at the Correct Elevation During the Pour
Document target elevations relative to the slab surface and floor framing, and transfer them to marks on forms or conduit shoes. This creates a clear reference for the entire crew. Start with precise marks before any pour proceeds.
Temporary supports like conduit chairs or small form blocks keep vertical alignment during placement and vibration. Use redundancy in high-vibration pours to prevent movement. Plan the placement sequence to minimize movement and interruptions.
Step-by-Step Pouring Process
The following steps guide you through keeping conduit stubs plumb and at the correct elevation during concrete pouring.
- Preparation: Mark target elevations on forms or shoes. Check all tools are ready.
- Supporting Conduits: Secure conduit chairs, standoffs, or form blocks at marked heights. Double-check they’re level and stable.
- Pour Sequence: Start pouring from one corner, working towards the opposite side to minimize conduit movement.
- Vibration: Pause vibration briefly every 6 inches to check plumbness. Adjust supports if needed.
- Final Checks: Verify all stubs are plumb and at the correct elevation before concrete sets. Clean up tools and site.
Temporary bracing, clamps, and anchors
Secure conduit stubs with the right supports to prevent movement during pouring. Use conduit chairs for light pours, standoffs or form blocks for heavier ones.
Strap conduits to forms using plastic or metal straps for extra support. Anchor them with stakes or form ties to prevent floating.
Adjustable supports allow fine-tuning of conduit height and plumbness. Use them when precise elevation is crucial.
Visual checkpoints and measurement during pour
Regularly inspect conduit stubs during pouring to catch any movement early.
- Plumb lines: Check they’re vertical. Adjust supports if not.
- Level marks: Confirm they’re at the correct elevation. Re-adjust if needed.
- Reference elevations: Compare to known heights. Correct any discrepancies.
- Chalk lines on formwork: Inspect they’re still visible and accurate. Re-mark if smudged.
Quick rule: Inspect every 6 inches of pour height to catch any movement early.
Common failure modes that cause leaning
Insufficient anchorage: Secure supports properly. Use additional braces if needed.
Buoyant forces: Pre-wrap conduits to reduce buoyancy. Ensure surrounding concrete cover meets code.
Rebar contact: Avoid conduit-to-rebar contact during pouring. Adjust supports if necessary.
Heavy vibration: Use redundant supports for high-vibration pours. Pause and check plumbness frequently.
Step-by-Step Installation Workflow and Best Practices
Begin with layout, trenching, and exact coordinate checks. Mark references on formwork and verify verticality with plumb checks. Align sleeves and conduits to the schedule early in the process.
Brace and support sleeves and conduits to stay plumb during pour. Plan depth relative to finished floor and slab thickness, and consider frost depth and edge protection. Keep thorough documentation for inspections and future reference.
Step-by-Step Installation Process
The following steps guide you through the installation workflow, ensuring a proper and efficient process.
- Preparation: Check safety measures, gather tools, and ensure all materials are on-site. Verify conduit schedule and sleeve locations.
- Layout and Marking: Confirm trench dimensions and mark sleeve locations on the formwork. Use a plumb bob to verify verticality and mark reference points.
- Sleeve Selection and Placement: Choose appropriate sleeves based on conduit size and application. Align them with the conduit schedule, center in the slab, and brace temporarily to maintain plumbness.
- Bracing and Supports: Install temporary bracing using rebar chairs, brackets, or stakes. Ensure sleeves and conduits stay plumb during the pour and are protected from vibration.
- Depth Planning: Determine final sleeve depth relative to finished floor level, considering local codes, frost depth, and slab edge protection.
- Pre-pour Inspection: Check alignment, sleeve condition, bolt/connector clearance, and capture photos for quality control notes. Ensure everything is ready for the pour.
- Pour Sequencing: Coordinate with the concrete crew to schedule the pour, minimizing movement risk. Plan placements around sleeves and protect ends from moisture.
Tools and materials checklist
Use this checklist before starting work to ensure you have all necessary tools, fasteners, supports, and consumables on-site.
- Tape measure: To accurately mark and verify dimensions.
- Plumb bob or laser level: For checking verticality and marking reference points.
- Shovel and pickaxe: For trenching, if not using machinery.
- Safety glasses and gloves: Essential for protecting yourself during work.
- Temporary bracing (rebar chairs, brackets, or stakes): To maintain sleeve plumbness during the pour.
- Conduit and sleeves: According to your conduit schedule and application.
- Sealant or adapter: For protecting sleeve ends from concrete ingress.
- Camera: To capture photos for quality control notes during pre-pour inspection.
- Concrete crew contact information: For coordination and scheduling the pour.
Quick rule: Always double-check your measurements to prevent costly mistakes.
Installation sequence and quality-control steps
The installation sequence involves several stages, from staging materials to post-pour verification. Follow these steps for a successful outcome:
Staging: Organize tools, materials, and temporary supports at the work area before starting. This ensures everything is readily available during installation.
Verifying elevations: Use a plumb bob or laser level to check verticality and mark reference points on formwork. Ensure sleeves are centered in the slab and at the correct depth relative to finished floor level.
Securing conduits: Install temporary bracing to maintain sleeve and conduit plumbness during the pour. Protect them from concrete weight and vibration to prevent shifting or tilting.
Pre-pour inspections: Conduct a thorough inspection before pouring concrete. Check alignment, sleeve condition, bolt/connector clearance, and capture photos for quality control notes. Address any issues found during this step.
Pour monitoring: Coordinate with the concrete crew to ensure placements around sleeves are made correctly. Protect sleeve ends from moisture ingress and monitor the pour to prevent movement or tilting.
Post-pour verification: After the initial set, verify plumbness using a level or plumb bob. Address any issues promptly to avoid costly rework.
Common Mistakes, Inspection Tips, and Remediation Strategies
Top mistakes include incorrect depth, misaligned stubs, blocked sleeves, and insufficient support. Inspectors look for proper burial depth, plumbness, sleeve cleanliness, and evidence of movement during pour. Prepare to address issues before concrete sets.
Pre-pour remediation can prevent problems: precise measurements, spacers, and temporary bracing. Post-pour options include re-seating sleeves or extending stubs if feasible. Document violations and corrective actions for future pours.
Inspection checklist for contractors and inspectors
Use this checklist before and during the pour to ensure your conduit stubs pass inspection and avoid rework.
- Verify sleeve depth: Measure from the top of the formwork to the bottom of the sleeve. It should match your plans.
- Check stub alignment: Ensure stubs are plumb using a level or laser level. Misaligned stubs can cause future issues.
- Inspect sleeve cleanliness: Clean sleeves prevent clogging and ensure proper grouting.
- Check clearance around conductors: Ensure no obstructions that could restrict concrete flow or cause voids.
- Confirm temporary bracing: Stubs should be securely braced to prevent movement during the pour.
- Verify anchor placement: Anchors should be properly placed and secure to prevent stub movement.
- Check formwork integrity: Ensure formwork is sound and will hold its shape during the pour.
- Confirm conduit routing: Verify routing matches plans to avoid future issues with access or repairs.
Quick rule: Regular inspections throughout the installation process help catch and correct issues early, saving time and money in the long run.
Repair approaches for misaligned, shallow, or filled sleeves
If you discover issues with your conduit stubs after the pour, use these repair approaches to mitigate problems.
- Misaligned stubs: If feasible, rework or extend stubs using extension fittings. Consult AHJ if structural integrity is compromised.
- Shallow sleeves: Modify local slab design to increase sleeve depth. Consult engineer for major modifications.
- Filled sleeves: If grout is blocking the sleeve, remove and re-grout. If concrete has set, consult AHJ for alternative routing options.
- Debris in sleeves: Clean out debris to prevent clogging and ensure proper grouting.
Quick rule: Early detection and correction of issues can save significant time, money, and effort. Regular inspections are key.
Cost, Risk Management, and Safety Practices Beyond Code
Material choices for sleeves, bracing labor, and potential rework drive costs. Plan for contingencies related to price changes and unknown subsurface conditions. Use a risk register to track probability and impact.
Safety practices beyond code include enhanced PPE, lockout/tagout for live areas, and improved fall protection. Protect sleeves from concrete ingress and maintain long-term reliability with proper sealing and backfill. Document approvals and QA/QC checks to prevent rework.
Budgeting and cost-saving trade-offs
When it comes to concrete conduit stubs, you get what you pay for. But that doesn’t mean you have to break the bank.
Sleeves: PVC is cheaper but less durable than metal. If your budget allows, go for metal sleeves in high-traffic or corrosive environments. For most residential jobs, PVC will do fine.
Bracing and formwork: Skimping on bracing can lead to leaning sleeves and costly rework. Spend a bit more on robust clamps and anchors to keep everything plumb during the pour.
Remember, spending more upfront can save you from expensive repairs down the line. But for low-risk areas, conservative choices are acceptable.
Site safety and electrical protection during and after pour
Safety should never be an afterthought. Here’s how to protect your crew and ensure long-term reliability.
PPE: Hard hats, safety glasses, and steel-toed boots are a must. For concrete work, wear a full-body harness for fall protection.
Temporary covers: Protect exposed stubs with temporary covers or tape to prevent accidents. Mark them clearly as live electrical areas.
Grounding/protection: Before you pour, ensure all live electrical stubs are properly grounded and protected. After the pour, inspect sleeves for any damage caused by the concrete. If necessary, repair and reinsulate before energizing.
Conclusion
Keeping conduit stubs and sleeves properly set now saves you from costly fixes later and keeps the slab safe, cleanly wired, and easy to finish. The right depth, correct sleeves, and a plumb, fixed elevation pay off in appearance and reliability for the whole project.
First, verify the sleeve type and burial depth you settled on, mark the elevations at every stub, check plumb and level with a quick string or laser line, secure all stubs so they won’t move during the pour, and keep the openings protected from concrete contamination. Then pour in a controlled sequence, verify each elevation as you go, maintain continuous contact with the sleeves to avoid offset, and complete a quick inspection before the concrete fully cures. Finally, review the slab for any deviations, perform a post-pour check, and document what you did for future renovations or maintenance.
Common mistakes to avoid include forgetting a proper clearance around the sleeves, misjudging burial depth, and letting stubs shift or go out of plumb during the pour. Always keep a simple safety rule: protect the openings, keep straps tight, and verify before the pour that everything is level and plumb. If you’re unsure about sleeve material, depth, or how to keep elevations during a large pour, pause and re-check the plan or run a small test area before committing to the full slab.
If your project involves tight tolerances, irregular subgrades, or multiple penetrations in a large pour, consider bringing in a pro for final layout and in-pour checks. When in doubt, it’s safer to pause, review the plan, and call a professional rather than risk a crack or misalignment. Stay practical, stay safe, and push ahead with a confident, well-documented plan.
FAQ
What are conduit stubs and sleeves, and why should I care in a concrete pour?
Conduit stubs are the short pieces that extend into or above the concrete where outlets will connect. Sleeves are protective tubes that let you run conduit through concrete without walls cutting and re-framing. They prevent damage during pour and simplify future pulls or changes.
What does NEC burial depth mean for PVC conduit under concrete, and how should I check it?
Burial depth rules tell you how deep the conduit must sit beneath the concrete surface or slab. Since requirements vary by project and locale, always check the latest NEC guidance, the conduit manufacturer instructions, and local rules for your job. If in doubt, confirm with the inspector before pouring.
What are typical burial depths you’ll see in concrete encasement, and how do I plan around them?
Typical depths are based on the slab and embedment needs, not just a single number. Use the sleeve and stub elevations you’ve established, and verify with the framing plan and pour elevations. If the slab design changes, recheck where the sleeves sit relative to the finished surface.
What installation conditions or adjustments should I plan for, and what are common mistakes to avoid?
Plan for temperature, moisture, and concrete settle so stubs stay plumb and sleeves stay protected. Common mistakes include misplacing sleeves, letting conduits get kinked, or pouring around them without protection. Always tape or cap openings and keep the conduits clean and straight before the pour.