
Introduction
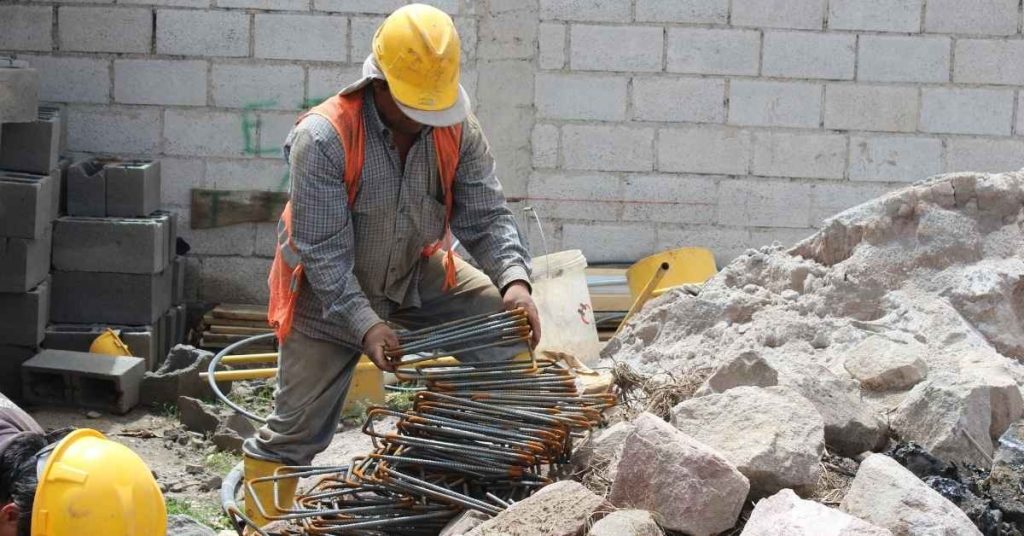
Wire-brushing rebar is a surface cleaning method used to remove loose rust and scale from small repair bars before patching. It can be enough when the rust is light and the bar is still solid, with clean steel showing through. Check that the metal is not deeply pitted or flaky; if it is, further treatment may be needed.
Use a hand or power wire brush to scrub along the grain of the rebar and into any rust pockets. Work with steady, even strokes and keep the brush moving to avoid gouging the metal. Prepare the surface by removing dust, wiping clean, and confirming the rebar is dry before patching.
Key takeaways
- Assess rust severity to decide if wire-brushing suffices for the repair.
- Use a stiff wire brush or drill-powered brush for thorough rust removal.
- Rinse and dry rebar after brushing to prevent flash rust before patching.
- Inspect for pitting and scale; replace severely damaged bars if needed.
- Safety: wear eye protection, gloves, and long sleeves during brushing.
- Document cleaning steps and surface condition to guide patching readiness.
Table of Contents
- Introduction
- Key takeaways
- When Wire-Brushing Is Appropriate for Small Rebar Repairs
- Tools and Materials Checklist
- Preparation and Site Setup
- Step-by-Step Wire-Brushing Technique
- Post-Cleaning Inspection and Readiness for Patching
- When Wire-Brushing Is Not Enough — Alternatives and Upgrade Options
- Common Problems, Mistakes, and Troubleshooting
- Cost, Timing, and Maintenance Planning
- Conclusion
- FAQ
When Wire-Brushing Is Appropriate for Small Rebar Repairs
Wire-brushing works for light surface rust, shallow scale, and minimal exposure where the repair is cosmetic or only facially visible. It’s not a catch-all method for every rebar issue. Use your judgment based on corrosion severity and how much rebar you’ll actually patch.
Assess whether the surface will receive a patch or bonding agent, and check remaining embedment and exposed length. Decide if the repair goal is purely cosmetic or structural, and document the rationale for continuing with wire-brushing or moving to stronger methods.
Surface rust, scale, and pitting — how to read the metal
When assessing rebar for repair, it’s crucial to understand what you’re looking at. Here’s how to distinguish light surface rust from heavy scale and pitting.
Light surface rust is thin, flaky, and red-brown. It can usually be removed with wire-brushing, exposing clean metal ready for patching. If it’s light and shallow, you’re good to go.
Heavy scale is thick, hard, and often black or dark brown. It’s usually a sign of severe corrosion and may require grinding or other stronger methods to remove. Deep pitting, where the steel has been eaten away in small craters, also indicates severe corrosion and needs more than just wire-brushing.
Use your eyes and fingers to assess the metal. If it feels rough, looks pitted, or seems too thick to remove with a wire brush, consider stronger methods.
Repair scope and structural considerations
The size of the repair and its location matter when deciding whether to use wire-brushing. Here’s what to think about:
For small repairs, like minor cracks or chips, wire-brushing is often enough. It’s quick, cheap, and can usually restore a good surface for patching. But if the repair is large, or involves load-bearing elements, you might need to consider replacement or heavier cleaning methods.
Always consult with an engineer for structural repairs. They can advise on whether wire-brushing is sufficient or if stronger methods are needed. Remember, safety first – if in doubt, don’t risk it.
Also, think about the purpose of your repair. If it’s purely cosmetic, a good wire-brush job might be all you need. But if it’s structural, you’ll want to ensure the steel is clean and ready for a strong bond with the new concrete.
Tools and Materials Checklist
Identify the rebar size, surface rust depth, and whether the job is small DIY or broader restoration. Outline PPE, ventilation, and containment needs before starting. Have a clear plan for tool use and cleanup.
For small-scale work, gather hand brushes, cup or coil brushes, a drill attachment, and a small angle grinder with a wire wheel. Also list abrasives, rust inhibitors, solvents, cleaners, and basic consumables, noting when rental or pros are warranted.
Choosing the right brush and power tool
Before you start cleaning or grinding concrete, make sure you’ve got the right tools for the job. This checklist will help you choose the best brushes and power tools to avoid costly mistakes.
- Check wire type: Carbon-steel wires are cheaper but rust; stainless steel lasts longer. Check product label for material.
- Verify bristle stiffness: Softer bristles are gentler on surfaces, harder ones are tougher on dirt. Test by bending a few bristles.
- Hand brush size: Choose based on job size; smaller for detailed work, larger for broad areas. Measure your largest area to ensure the brush fits.
- Rotary brush speed: Slower speeds (600-1200 RPM) are safer and better for delicate surfaces. Faster speeds (1500+ RPM) are tougher on dirt but risk damaging surfaces. Check tool’s RPM rating.
- Power tool type: For heavy-duty cleaning, consider a powered brush or angle grinder attachment. Check local rules for required safety features like guards and switches.
- Angle grinder disc size: Match the disc to your task; smaller discs (4-6″) are better for detailed work, larger ones (7-9″) for broader areas. Measure your area to ensure the disc fits.
- Disc grit size: Coarser grits (16-36) remove more material faster but risk damaging surfaces; finer grits (40-80) are slower but safer. Check manufacturer’s recommendations for your task.
- Safety features: Ensure all power tools have safety guards, switches, and cords in good condition. Test them before starting work.
Quick rule: Always choose the gentlest tool that can still do the job. It’s easier to remove more material later than it is to fix damaged concrete.
Consumables, rust-prevention products, and patching materials
Before you start any concrete repair or maintenance work, use this checklist to ensure you have the right consumables, rust prevention products, and patching materials on hand. This will help you avoid common mistakes and save time and money.
- Rust Converter: Check you have a suitable rust converter for your project. It should be compatible with the metal type (e.g., steel, aluminum) and surface condition. Read the product label to confirm.
- Metal Primer: Ensure you have a high-quality metal primer that’s designed for use with your chosen rust converter. Check it’s suitable for the specific metal type and surface preparation method used.
- Concrete Bonding Agent: Verify you have a concrete bonding agent suitable for your repair project. It should be compatible with the existing concrete and the patching material you’re using. Check manufacturer instructions to ensure it’s appropriate for your application.
- Concrete Repair Compound: Confirm you have the right concrete repair compound for your job. It should match the strength and type of the existing concrete (e.g., regular, high-strength). Check local rules if unsure about specific requirements.
- Epoxy Coating: If required, ensure you have an epoxy coating suitable for your project. It should be compatible with the surface being coated and provide the desired level of protection (e.g., against chemicals, abrasion).
- Concrete Sealer: Check you have a concrete sealer that’s appropriate for your project. It should provide the required level of protection (e.g., waterproofing, stain resistance) and be compatible with the surface being sealed.
- Safety Equipment: Ensure you have safety equipment like gloves, goggles, and a respirator to protect yourself from harmful chemicals during application and cleanup.
- Cleaning Supplies: Verify you have cleaning supplies (e.g., wire brush, degreaser) to properly prepare the surface before applying any products. A clean surface ensures better adhesion and longevity of your repairs.
Quick rule: Always follow manufacturer instructions for application, drying times, and safety precautions when using consumables, rust prevention products, and patching materials. This will help you achieve the best results and avoid costly mistakes.
PPE and jobsite safety equipment
Before you start brushing your concrete, ensure you have the right personal protective equipment (PPE) and site containment items to protect both yourself and the nearby concrete. Use this checklist to verify everything is in order.
- Hard Hat: Check for any cracks or damage. Ensure it fits snugly but comfortably on your head.
- Safety Glasses: Inspect lenses for scratches and ensure they provide adequate protection as per the manufacturer’s instructions.
- Ear Protection: Choose either earplugs or earmuffs, depending on noise levels. Ensure they fit properly and reduce noise to safe levels.
- Gloves: Inspect for tears or weak spots. Choose gloves that provide a good grip and protect against concrete dust.
- Steel-toed Boots: Check soles for wear and ensure they provide adequate protection as per the manufacturer’s instructions.
- Dust Mask or Respirator: Choose one rated for concrete dust. Ensure it fits properly and provides a good seal around your face.
- High-visibility Vest: Check that it is clean, intact, and meets local safety standards.
- Site Containment: Inspect tarps or barriers to ensure they are secure, clean, and can contain any overspray or debris.
Quick rule: Always prioritize your safety first. If you’re unsure about any PPE or site containment item, check the manufacturer’s instructions or consult with a local safety expert before proceeding.
Preparation and Site Setup
Expose only the embedded length needed for the repair and decide when full preparation is required beyond light rust removal. Protect surrounding surfaces and control debris so you don’t spread contaminants.
Set up containment with barriers, cover adjacent concrete, and prepare a staging area for brushes and patch materials. Ensure a dry, clean surface before you begin brushing and patching.
Surface prep and containment
Start by cleaning the surrounding concrete to prevent dust and debris from interfering with your work. Use a stiff-bristled brush, broom, or even a pressure washer to remove loose material.
Mask off adjacent areas using painter’s tape and plastic sheeting to protect them from dust and patch material. This also helps contain the work zone.
Seal any cracks or holes in the masking area with caulk or tape to prevent dust escape.
Set up containment trays or use tarps to catch falling debris and dust, making cleanup easier later.
Access, stabilization, and securing rebar
Ensure you have safe access to the exposed rebar. Use ladders or scaffolding if needed, but make sure they’re stable and secure.
Stabilize the rebar by temporarily bracing it with wooden blocks or metal clamps. This prevents it from moving during brushing, which could cause damage or injury.
If the rebar is loose or damaged, consider using a rebar clamp or wire to secure it in place before proceeding. Be careful not to bend or twist the rebar further.
Check your working position. Ensure you’re stable and comfortable, with enough room to move around and work effectively without causing further damage.
Step-by-Step Wire-Brushing Technique
Start with a quick inspection: check corrosion level, surface contaminants, and any coatings. Decide if light brushing will suffice or if powered cleaning is needed.
Move to a dry brush first, then progressively cleaner passes. Maintain a 15–30 degree angle and use long, even strokes with 50–70% overlap to avoid gaps.
Step-by-Step Process
Follow this clear, numbered sequence to effectively clean rebar using a wire brush. It starts with preparation and safety checks, then moves on to the main work, and finishes with cleanup or final checks.
- Inspect the area: Check for any hazards, assess corrosion level, and determine if light brushing suffices.
- Gather tools: Collect your wire brush, safety gear (gloves, goggles), and any powered tools you might need.
- Secure rebar: Use clamps or weights to keep the bar steady while working. Safety first!
- Dry brush first: Remove loose rust with long, even strokes at a 15-30 degree angle to the bar. Overlap each pass by 50-70%.
- Wet and repeat: Once dry brushing is done, wet the area and repeat the process to remove any remaining contaminants. Check for consistent coverage.
- Inspect your work: Wipe a small test area with a damp cloth. The rebar should feel clean but not pitted or gouged.
- Document progress: Take before/after photos to ensure uniform results across the repair area.
- Clean up: Dispose of waste responsibly and store tools properly for next time.
Brushing motion, pressure, and coverage tips
Use these techniques to maintain consistent cleaning along the exposed length of rebar. Remember, you’re aiming for a sound anchor profile without damaging the bar.
Maintain a 15-30 degree angle to the bar while brushing. This helps remove rust and contaminants effectively. Keep pressure light enough to avoid gouging but firm enough to expose fresh iron.
Use long, even strokes along the length of the rebar. Overlap each pass by 50-70% to ensure no spots are missed. Be careful not to graze corners or apply too much pressure in one area.
Quick tip: Always keep your brush moving. Stationary brushing can cause excessive heat and damage the rebar.
Power brush vs hand brush workflow
A balanced approach using both hand and power brushing tools ensures speed and control for small repairs. Here’s how to combine them efficiently:
Start with a hand brush for initial dry brushing. This helps remove loose rust and contaminants without causing excessive damage or heat.
Once the majority of loose rust is gone, switch to a powered tool like a small grinder attachment or wire cup brush. These can help remove tougher rust and scale more quickly.
After using powered tools, finish with a final pass using your hand brush. This helps ensure consistent coverage and prevents over-cleaning, which could damage the rebar.
Visual checkpoints during brushing
Use this checklist to monitor your progress and ensure you’re cleaning the rebar effectively. Refer to it throughout the process to avoid common mistakes.
- Clean, exposed iron: The goal is to expose fresh, clean metal for proper bonding with patching materials.
- Avoid shiny spots: Shiny areas indicate over-cleaning or gouging, which can weaken the repair.
- No pitting: Pitted rebar indicates excessive cleaning or corrosion, which could compromise the repair’s integrity.
- Consistent color: The entire area should have a consistent, clean metal appearance. Dark spots may indicate missed areas or incomplete cleaning.
- No visible rust: After brushing, no visible rust or contaminants should remain on the surface.
- Avoid heat discoloration: Excessive heat from stationary brushing can cause discoloration, which indicates potential damage to the rebar.
- Smooth surface: The rebar should feel smooth and even. Any rough or jagged edges could indicate over-brushing or damage.
- No burrs: Burrs are small, sharp edges that can form during brushing. Remove any with a light sanding if necessary.
- Uniform results: Before and after photos should show consistent cleaning across the entire repair area.
Quick rule: If you’re unsure about any aspect of the rebar’s condition, consult a professional. It’s better to be safe than sorry when it comes to structural repairs.

Post-Cleaning Inspection and Readiness for Patching
Define acceptance criteria after cleaning: no visible rust, no loose scale, and a dry, uniform surface ready for patching.
Perform tactile checks for roughness and visual checks for pitting or haloing. If moisture remains, delay patching and re-check after drying or additional treatment.
Visual and Tactile Inspection Criteria
Before applying any patch, use this checklist to ensure your rebar is clean and ready for bonding.
- No Visible Rust: Confirm no red or brown rust spots. Any visible rust indicates incomplete cleaning.
- No Loose Scale: Gently tap the rebar with a hammer. If scale falls off, it’s not ready for patching.
- Uniform Surface: Check for consistent texture. Pits or rough spots may affect adhesion.
- Dry Surface: Feel the rebar. It should be dry to the touch. Moisture can weaken patches.
- No Haloing: Look for discoloration around the bar, indicating active corrosion.
- No Pitting: Inspect for small holes or indentations that could compromise the patch.
- No Flaking: Check for loose concrete or rust scale. If present, re-clean and prepare the surface.
- No Jelly-like Rust: Run fingers over the rebar. Any tacky residue signals incomplete cleaning.
Quick rule: If any of these checks fail, re-clean or treat the rebar before patching.
Simple On-Site Adhesion and Cleanliness Checks
Before applying repair materials, use these quick tests to ensure a suitable surface for bonding.
- Light Scuff Test: Gently scuff the rebar with a coin or key. If material comes off easily, it’s not ready.
- Tape Test: Apply and remove tape from the surface. No residue indicates good adhesion readiness.
- Dryness Check: Use a moisture indicator or absorbent cloth. The rebar should stay dry.
- No Capillary Moisture: Look for water droplets on the concrete, which could affect patch adhesion.
- No Active Corrosion: Smell for a metallic odor and look for white deposits (efflorescence).
- No Powdering: Check for loose, powdery material. If present, re-clean the surface.
- Uniform Color: The rebar should have a consistent color, indicating even cleaning.
Quick rule: If these tests fail, address the issue before applying repair materials to prevent patch failure.
When to Escalate to Lab Testing or an Engineer
Certain conditions require professional evaluation. Use this checklist to identify when to seek help.
- Extensive Corrosion: If more than 10% of the rebar surface is affected, consider lab testing.
- Deep Pitting: Pits deeper than 1/8 inch may require professional assessment.
- Moisture Behind Rebar: If the rebar feels damp but the concrete surface is dry, consult an engineer.
- Unusual Discoloration: Unfamiliar colors or patterns on the rebar may indicate unusual corrosion types.
- Structural Cracking: Cracks in the surrounding concrete may require engineering assessment before repair.
- Unknown Concrete Type: If you’re unsure about the concrete’s composition, consider lab testing for compatibility with your patch material.
Quick rule: If any of these conditions are present, consult a structural engineer or send samples to a materials lab for evaluation before proceeding with repairs.
When Wire-Brushing Is Not Enough — Alternatives and Upgrade Options
Know when wire-brushing falls short by looking for deep pitting, rust-through risk, or coating delamination. Use that signal to choose alternatives.
Compare options like mechanical abrasion, abrasive blasting, chemical rust removers, or electrolytic methods, considering containment and potential impact on rebar.
Mechanical options: grinders, needle scalers, and micro-abrasive blasting
When wire-brushing can’t handle the rust, it’s time to bring in some mechanical muscle. Here are your options:
Grinders – Use angle or die grinders with metal brushes for tough spots. They’re quick but generate heat and dust.
Needle scalers – These tools have rotating needles that chip away rust. They’re precise but can over-cut if not handled carefully.
Micro-abrasive blasting – This method uses compressed air and fine abrasives (like glass beads or walnut shells) to clean surfaces gently. It’s great for sensitive areas but requires containment.
Chemical and electrolytic removal choices
For light to moderate rust, chemicals can do the trick. For embedded rust, try electrolysis.
Chemical rust removers – These acids (like muriatic or phosphoric) dissolve rust but can damage concrete if not neutralized. Always wear PPE and follow safety guidelines.
Electrolysis – This method uses an electric current to convert rust into a removable form. It’s gentle on the substrate but requires careful setup and monitoring.
Selecting the right upgrade for the job
Choosing the next-level method depends on your specific situation:
For deep rust, consider grinders or needle scalers. For heavy rust with containment issues, try micro-abrasive blasting. If it’s light to moderate rust and access is tight, chemicals might be your best bet.
Also, consider cost and time. Mechanical methods can be quick but expensive. Chemicals are usually cheaper but take longer to work.
Common Problems, Mistakes, and Troubleshooting
Identify contaminants that hinder bonding, such as oil, paint, or loose scale, and set cleanliness targets for small repairs.
Watch for heat buildup, which can damage rebar temper, and know when to stop and switch methods. Document progress to ensure a uniform anchor profile.
Signs of inadequate cleaning and how to fix them
If your rebar still feels rough, looks dull, or has visible rust after brushing, you’ve not cleaned it enough. This can lead to poor adhesion and repair failure.
Check: Run your gloved hand over the surface. If it’s still gritty or rough, keep brushing. Look for any remaining rust stains – they’re signs of incomplete cleaning.
Fix: Re-brush with firm, even strokes until you achieve a smooth, matte finish. If rust persists, use a wire brush attachment on your drill to target those spots. Always follow up with a visual and tactile inspection before patching.
Avoiding damage from aggressive methods
Over-aggressive cleaning can remove too much metal, cause burns, or introduce stress into the rebar. Here’s how to avoid these mistakes:
- Too much pressure: Applying excessive force with your brush or grinder can gouge and weaken the rebar.
- Overheating: Prolonged grinding or brushing can heat the metal, causing micro-cracks or loss of temper. Watch for discoloration or smoke.
- Excessive material removal: Removing too much cross-section reduces the rebar’s strength and stability. Be mindful of your brushing time and area coverage.
- Ignoring heat-treated rebar: Heat treatment makes rebar harder but more brittle. Avoid aggressive methods on these; use gentle brushing or alternative cleaning methods.
If you notice any of these issues, stop immediately. Inspect the damage, and if necessary, consult with a structural engineer before proceeding. In most cases, it’s better to err on the side of caution and switch to gentler cleaning methods.
Cost, Timing, and Maintenance Planning
Compare tool purchase versus rental costs and account for depreciation or resale value. List consumables and how costs scale with project size.
Estimate labor time, drying and curing windows, and weather constraints. Create a simple inspection plan to catch corrosion early and reduce future cleaning needs.
Cost and Tool-Choice Tradeoffs
When tackling small rebar repairs, consider upfront costs versus rental fees and labor. Here’s a breakdown to help you decide:
- Drill & Wire Brush: Purchase – $20-$50; Rental – $10-$20/day. Ideal for light rust removal.
- Grinder & Wire Cup Brush: Purchase – $30-$70; Rental – $15-$30/day. Tackles heavier rust, but requires more skill.
- Rust Remover Kits: $10-$20 per kit. Useful for light rust and touch-ups, but not a replacement for mechanical removal.
- Needle Scaler: Purchase – $30-$60; Rental – $15-$30/day. For heavy rust and concrete removal, but can damage rebar if not used carefully.
- Micro-Abrasive Blasting: Rental – $200-$400/day (including compressor). Offers thorough cleaning, but requires proper setup and training.
Timing, Curing, and Weather Considerations
Weather plays a crucial role in successful rebar cleaning and patching. Here’s what to consider:
Temperature: Ideally, work between 50°F (10°C) and 90°F (32°C). Below freezing or extreme heat can hinder curing.
Moisture: Avoid cleaning in rain or high humidity. Rebar needs to dry before patching, and wet conditions can lead to poor adhesion.
Curing Time: Plan for 24-72 hours of undisturbed curing time after patching. Keep the area moist during this period to ensure proper curing.
Long-Term Inspection and Preventive Maintenance Tips
Regular checks help extend repair life and prevent escalation. Use this checklist every 6-12 months:
- Visual Inspection: Check for cracks, rust stains, or delamination.
- Tactile Inspection: Feel for any rough spots or loose material.
- Moisture Check: Look for signs of water intrusion or dampness.
- Coating Condition: Inspect the coating for chips, cracks, or peeling.
- Rebar Exposure: Check if rebar is exposed due to concrete deterioration.
- Drainage: Ensure proper drainage to prevent water buildup.
- Plant Growth: Remove any vegetation growing on or near the structure.
- Structural Movement: Check for signs of movement or settling.
- Document Findings: Keep a record of your inspections and any repairs made.
Quick rule: Address minor issues promptly to prevent them from becoming major problems.
Conclusion
Getting the rebar clean enough for a solid patch is about safety, durability, and a clean bond. If you stay within the small-repair scope, wire-brushing can get you there without turning a simple fix into a bigger job.
Check your work as you go: confirm you can see bright metal with no loose rust or oil, secure the work area, keep water and dust from the patch, dry the surface completely, and verify the surface is ready for patching before you mix anything. If the metal isn’t clearly clean, or you see deep pitting or scale that won’t come off, consider the upgrade options or bring in a pro before you waste time and materials.
Common mistakes to avoid include rushing the brushing, neglecting safety gear, and patching over moisture or contaminants. Safety rules are simple: wear eye protection and gloves, keep the area ventilated, and test a small area first to confirm the surface accepts the repair. If the rebar shows significant damage, corrosion undercuts, or you’re dealing with a critical structural element, don’t press on alone—call in a professional. Stay disciplined, follow the clean-test-patch sequence, and you’ll finish confident that the repair will last and look right. You’ve got this, and a solid patch is within reach if you stay methodical.
FAQ
How do I know when wire-brushing is enough for my rebar surface before patching?
Look for light rust and tightly adherent coating. If the rust flakes off easily and the surface feels clean to the touch, wire-brushing may be enough. If you see heavy scale, loose rust, or pitting, plan for a more thorough treatment or replacement per manufacturer instructions.
What’s the right way to use a wire brush tool on rebar?
Attach the brush securely and work with even, steady strokes along the rebar’s length. Keep the tool moving to avoid gouging; don’t press so hard you wear through the metal. Wear eye protection and gloves, and avoid breathing rust dust from the brush.
What steps should I take to prepare rebar surfaces before patching?
Remove all loose rust, paint, and scale until the surface looks clean and dull. Wipe away dust and debris, then inspect for any serious corrosion or damage. If you’re unsure about the surface condition, check the rebar or patch material instructions or local guidelines for prep requirements.
What safety practices should I follow during rebar cleaning?
Wear eye protection, gloves, and a dust mask or respirator when needed. Keep bystanders away from the work area. Use proper tool handling to avoid kickback or sparks, and unplug or power down tools when not in use. If anything looks unsafe, pause and verify from the manufacturer or local rules.