
Introduction
Cleaning concrete and mortar mixers and paddles involves removing cement residue, grime, and surface rust to ensure smooth operation and prevent rust flakes or cement rings from forming. This routine maintenance extends equipment life and maintains consistent mixing results. Use simple steps and ordinary shop tools for this hands-on task.
Select cleaning methods and tools based on your mixer and paddle types, following manufacturer instructions for any cleaners used. Employ basic techniques such as manual scrubbing and rinse cycles, or mechanical cleaning when suitable. Always check product labels for compatibility with metal parts. For rust prevention, perform regular maintenance, dry and store components properly, and use rust inhibitors or protective coatings as recommended by the maker or local guidelines.
Key takeaways
- Rinse promptly after use with clean water to prevent cement set.
- Use a stiff brush and paddle to dislodge hardened deposits safely.
- Inspect for rust flakes; remove loose rust and apply suitable inhibitor.
- Prefer manual cleaning for corners; reserve mechanical options for stubborn scales.
- Wear gloves and eye protection during cleaning to avoid injury.
- Store tools dry; document maintenance needs and schedule routine checks.
- Follow manufacturer guidance; avoid harsh chemicals near metal and concrete.
Table of Contents
- Introduction
- Key takeaways
- Tools and Materials Checklist
- Quick Daily Rinse and Light Maintenance (After Each Use)
- Step-by-Step Deep Cleaning Process
- Removing Stuck Cement Rings and Hardened Deposits
- Preventing and Treating Rust Flakes on Metal Parts
- Maintenance Schedule and Parts Care (How Often and What to Do)
- Common Mistakes, Troubleshooting, and Quick Fixes
- Cost-Effective Methods, Environmental and Disposal Considerations
- Conclusion
- FAQ
Tools and Materials Checklist
Assemble a durable set of tools and cleaning supplies before starting, prioritizing corrosion resistance and long service life. Choose stainless steel or high-quality nylon brushes, plastic scrapers, and non-scratch pads when possible, and verify compatibility with your mixer finish from the manufacturer or product label. Have PPE and cleaners on hand, and note any cleaners to avoid around metal parts.
Keep a clear inventory of rust-prevention products, replacement rings, and paddle tips, with attention to how they work with different cement mixes and moisture levels. Store items in a dry, ventilated area and label cleaners and parts clearly. Check the manufacturer instructions for any special handling requirements, and follow local rules for disposal of spent chemicals.
Essential PPE
Protect yourself from potential hazards by using the following personal protective equipment (PPE) when cleaning concrete mixers, paddles, and mortar rings.
- Chemical-resistant gloves: Protect hands from harsh chemicals and cement. Check: For any holes or tears before use.
- Eye protection: Shield eyes from debris and chemical splashes. Choose: Safety glasses or goggles based on exposure level.
- Respirator or dust mask: Guard against inhaling harmful particles. Select: Appropriate for the cleaning task at hand.
- Hearing protection: Safeguard ears from loud noises, such as pressure washers. Wear: When using power tools or equipment with high noise levels.
- Long sleeves: Protect skin from chemicals and debris. Opt for: Breathable fabric to prevent overheating.
- Non-slip footwear: Prevent slips, trips, and falls on wet surfaces. Ensure: Good grip and water resistance.
- Lockout/tagout devices: Safely isolate equipment from power sources during maintenance. Follow: OSHA guidelines for proper use.
Quick rule: Always inspect PPE before each use to maintain optimal protection.
Cleaning tools and brushes
Use the right tools for effective cleaning of concrete mixers, paddles, and mortar rings at different buildup stages.
- Plastic scrapers: Remove heavy cement rings. Tip: Use a sturdy one for tough jobs.
- Nylon brushes (soft to medium): Clean painted surfaces without damage. Warning: Avoid using on treated finishes.
- Stainless steel or brass brushes (medium to hard): Remove rust and tough cement buildup. Note: These are durable and corrosion-resistant.
- Pressure washers: Blast away loose dirt and debris. Rent/borrow: If occasional use; buy if frequent.
- Brooms (soft to medium): Sweep up loose particles after cleaning. Tip: Use a broom with replaceable heads for longevity.
Cleaning agents and chemicals
Choose the right cleaning agents to effectively remove dirt, rust, and cement from your tools without causing damage.
- Water/pressure: Remove loose dirt and debris. Tip: Use alone or with mild detergents for tougher jobs.
- Alkaline cleaners (pH 8-13): Dissolve grease, oil, and light rust. Caution: Avoid on sensitive finishes; rinse thoroughly.
- Concrete dissolvers (hydrochloric acid): Remove heavy cement buildup. Warning: Highly corrosive; follow safety guidelines.
- Vinegar (acetic acid): Mild rust removal and cleaning. Tip: Dilute with water for safer use.
- Commercial rust removers: Heavy-duty rust removal. Check: Manufacturer instructions for safe handling and storage.
Quick rule: Always test cleaners on a small area before full application to avoid damage.
Quick Daily Rinse and Light Maintenance (After Each Use)
Develop a fast post-use routine to minimize buildup and rust. Unplug the mixer, drain standing water, then rinse the drum, paddles, and chute with a forceful spray or brush to dislodge fresh cement. Keep the steps brief but thorough to prevent setting residues.
After rinsing, dry all metal surfaces and apply a light rust-preventive coating as recommended by the product label or manufacturer instructions. Store the unit in a dry, shaded area and note any early signs of wear in a simple maintenance log for future reference.
Immediate Rinse Steps
After each use, begin by unplugging the mixer to ensure safety. Drain any standing water from the drum and remove it if possible.
Use a forceful spray or stiff brush to rinse the drum, paddles, and chute. Focus on dislodging fresh cement before it sets. Be thorough but avoid scrubbing too harshly to prevent damaging the surfaces.
Note: If the cement has already started to harden, you may need to use a scraper or wire brush for tough spots. Always check your equipment’s manual for specific recommendations.
Drying and Quick Protection
After rinsing, thoroughly dry all metal surfaces using a clean cloth or allow them to air dry. Ensure no moisture remains in the drum, on paddles, or around the chute.
Apply a light coat of rust-preventive spray or food-grade mineral oil to exposed metal surfaces. This creates a temporary barrier against moisture and oxygen, preventing rust formation. Follow the manufacturer’s instructions for application and safety guidelines.
Tip: Store your mixer in a dry, shaded area when not in use to minimize exposure to elements that could cause rusting.
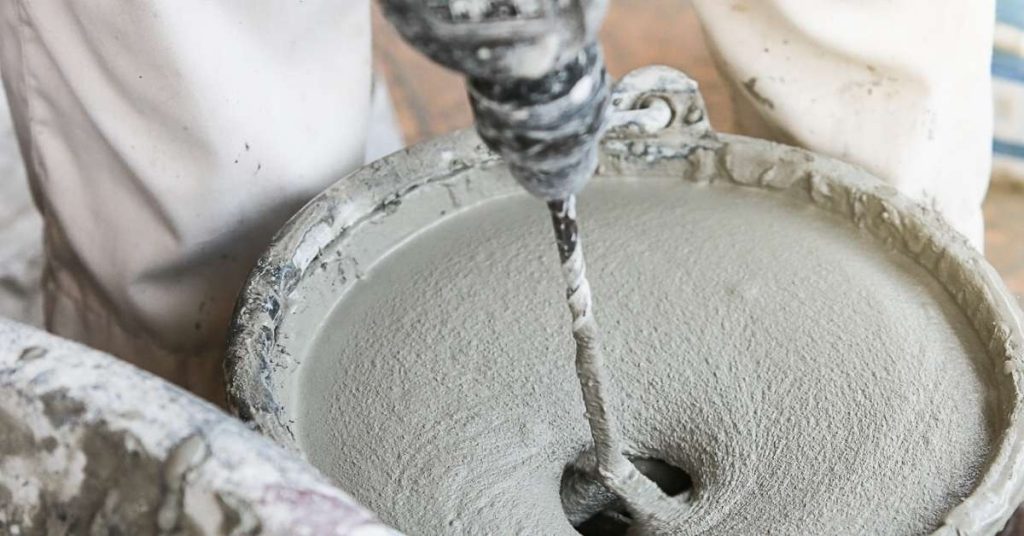
Step-by-Step Deep Cleaning Process
When a rinse isn’t enough, follow a defined sequence from setup to finish that covers safety checks, tool lists, and appropriate cleaners that won’t harm concrete or mixer parts. Unplug the mixer, use any required lockout, wear PPE, cover the area, and drain any residual water or slurry before cleaning. Inspect the shell, paddles, and seals for rust, flaking, or embedded cement, then decide on mechanical versus chemical action and pre-soak stubborn deposits.
This structured approach helps prevent rust, keeps seals intact, and extends mixer life for safer reuse. It also supports a clear record of cleaning times, any parts serviced, and ongoing maintenance like thorough drying and applying light protection to metal surfaces as recommended. If rust or flaking is present, consider rust converters or etchants before mechanical scrubbing, and always use low-pressure rinsing to protect vulnerable areas; ensure parts are cool and completely dry before reassembly.
Step-by-Step Cleaning Process
The following sequence guides you through thoroughly cleaning your mortar mixer and paddles for optimal performance and longevity. Regularly inspect equipment during cleaning to address any issues promptly.
- Pre-rinse the mixer and paddles with water to remove loose debris.
Reason: This helps to reduce the amount of cement dust and dirt that will be agitated during the cleaning process.
Quick check: Ensure no large chunks or clumps remain. - Apply a biodegradable degreaser to targeted areas, following manufacturer instructions for dwell time.
Reason: Degreasers help break down grease, oil, and other contaminants.
Quick check: Check the product label for safe use on concrete mixers and paddles. - Mechanically scrub the mixer shell, paddles, and seals using appropriate brushes or pads.
Reason: Mechanical action helps to dislodge stubborn deposits.
Quick check: Inspect equipment during scrubbing to ensure no damage is occurring. - Rinse thoroughly with clean water, ensuring all cleaner residue is removed.
Reason: Residual cleaner can cause rust or attract dirt and debris.
Quick check: Ensure no visible cleaner remains on surfaces. - Apply a rust-preventive rinse or approved etchant as per manufacturer instructions, if required.
Reason: These treatments help prevent rust formation.
Quick check: Follow safety guidelines provided by the product manufacturer. - Dry thoroughly using compressed air or allow to air-dry.
Reason: Removing all moisture prevents rust and cement ring formation.
Quick check: Ensure no water remains in hard-to-reach areas. - Apply a light oil or corrosion inhibitor to metal surfaces, following manufacturer instructions.
Reason: These protectants help prevent rust and prolong equipment life.
Quick check: Ensure the product is compatible with your mixer and paddles. - Lubricate bearings as per manufacturer specifications.
Reason: Regular lubrication maintains bearing functionality and extends their lifespan.
Quick check: Consult the manufacturer’s instructions for proper lubricant type and application. - Reassemble the mixer only when all components are completely dry.
Reason: Preventing moisture buildup helps maintain equipment performance.
Quick check: Ensure no visible water remains on any surfaces before reassembly.
Pre-clean Inspection and Safety Setup
Before starting heavy cleaning, use this checklist to ensure a safe and efficient process. Regularly inspect equipment during cleaning to address any issues promptly.
- Unplug power cord: Ensure the mixer is unplugged from the power source.
Reason: Prevents accidental operation or electrical shock during cleaning.
If skipped: Risk of injury or damage to equipment. - Lockout-tagout (if needed): Follow local regulations and manufacturer instructions for locking out power sources.
Reason: Ensures the mixer cannot be accidentally turned on during maintenance.
If skipped: Risk of injury or damage to equipment. - Wear PPE: Use gloves, eye protection, and a respirator if dust is present.
Reason: Protects you from chemicals, debris, and harmful particles.
If skipped: Risk of injury or exposure to hazardous substances. - Cover work area: Use drop cloths or plastic sheeting to contain mess.
Reason: Prevents cleaning residue from spreading to other areas.
If skipped: Cleanup may be more difficult and time-consuming. - Drain residual water/concrete slurry: Remove any remaining water or concrete mixture from the mixer.
Reason: Prevents water buildup, which can cause rust or attract dirt.
If skipped: Increased risk of rust formation and dirt accumulation. - Inspect mixer shell: Check for signs of rust, flaking, or embedded cement.
Reason: Identifies areas that may require mechanical or chemical intervention.
If skipped: May miss problematic areas during cleaning. - Check paddles and seals: Inspect for damage, wear, or loose parts.
Reason: Ensures all components are in good working condition.
If skipped: Could lead to equipment failure or improper mixing. - Secure loose parts: Tighten any loose fasteners or remove damaged parts.
Reason: Prevents injury and maintains equipment functionality.
If skipped: Risk of injury or damage to equipment. - Pre-soak stubborn deposits: Apply a suitable cleaner to areas with thick cement buildup before scrubbing.
Reason: Makes removal easier and less time-consuming.
If skipped: May require more effort and time for cleaning.
Quick rule: Always follow the checklist in order to ensure a safe and thorough cleaning process.
Mechanical Removal Techniques
Carefully use appropriate tools to remove rust and cement deposits without damaging your mixer or paddles. Regularly inspect equipment during cleaning to ensure no damage is occurring.
For thick rust or cement deposits, use a chisel, scraper, or powered grinder to carefully chip away the buildup.
Tip: Be cautious not to gouge or scratch the surface of your mixer or paddles. If using a powered grinder, ensure it is equipped with the appropriate attachment and follow safety guidelines.
For lighter deposits, use wire or brass brushes to scrub away the residue.
Caution: When using brass brushes on aluminum paddles, switch to nylon or plastic-bristled brushes to avoid scratches. Regularly inspect your equipment during brushing to ensure no damage is occurring.
If damage occurs during mechanical removal, repair or replace parts as needed, following manufacturer instructions.
Reason: Damaged components can affect the performance and lifespan of your mixer and paddles.
Final Rinse, Neutralize, and Protective Finish
Thoroughly clean and protect your mixer and paddles for optimal performance in the next use. Regularly inspect equipment after cleaning to ensure no residue remains.
After mechanical removal, rinse thoroughly with clean water to remove all cleaner residue.
Reason: Residual cleaner can cause rust or attract dirt and debris.
If acids were used in the cleaning process, neutralize them with a base before the final rinse.
Tip: Consult the product label for proper neutralization methods. Neutralizing ensures no acid remains to potentially damage equipment or cause harm.
Dry thoroughly using compressed air or allow to air-dry.
Caution: Ensure all metal surfaces are completely dry before applying any protective finish. If moisture remains, it can cause rust and compromise the effectiveness of the protective coating.
Apply a light oil or corrosion inhibitor to metal surfaces, following manufacturer instructions.
Reason: These protectants help prevent rust and prolong equipment life. Ensure the product is compatible with your mixer and paddles for best results.
Removing Stuck Cement Rings and Hardened Deposits
Identify which parts have cement rings versus hardened deposits and note the material type (steel, aluminum, plastic) to avoid damage. Plan the approach with safety in mind, and verify PPE and mixer lockout requirements before cleaning. Start with the least invasive methods and progress only as needed.
Progress to mid-level methods with chemical aids as necessary, using pH-neutral or mildly alkaline cleaners and compatible rust inhibitors. For extensive buildup, consider controlled mechanical abrasion or specialty removers after testing a small area, and always rinse and dry thoroughly after treatment.
Mechanical methods for rings
Before attempting mechanical removal of stuck cement rings, ensure the mixer is locked out and the surface is secure to prevent slip or kickback.
For thick, hard rings, use a chisel and hammer. Gently tap along the ring’s edge to break it into smaller pieces that can be easily removed. Be careful not to strike the paddle directly, which could bend or damage it.
For thin but stuck rings, use a pry tool. Insert the tool under the ring and gently lift upwards to break its adhesion. Work around the entire ring until it lifts off completely. Avoid excessive force that could bend the paddle.
Pro tip: Inspect your tools before starting. Sharp, stable chisels and pry bars will make the job easier and safer. If you find yourself damaging the paddle, stop and reassess your technique or consider a less invasive method.
Chemical soak and dissolvers — pros and cautions
Chemical treatments can efficiently remove stuck cement rings without damaging mixer components. However, they must be used with caution to avoid harming other materials present and to ensure proper ventilation.
If a concrete dissolver is available, dilute it according to the label instructions and soak the affected area. These products are designed to break down cement bonds safely and effectively.
For acidic treatments like vinegar, always test on a small, hidden area first to check for compatibility with all materials present (steel, aluminum, galvanized). Follow label guidelines for dilution and application. Ensure adequate ventilation to avoid inhaling fumes.
Caution: If signs of corrosion or damage appear during the process, immediately neutralize the solution, rinse thoroughly, and switch to a compatible method. Always prioritize safety and material compatibility when using chemicals.
Preventing and Treating Rust Flakes on Metal Parts
Pinpoint high-risk areas such as shafts, rivets, and collars, and note where moisture tends to accumulate. Establish cleaning and drying protocols with compatible cleaners and a post-cleaning rust-prevention step, following manufacturer guidance. Distinguish between stabilizing loose flakes and fully removing active rust to protect coatings.
Explore treatment options that preserve coatings, such as rust converters or compatible primers, and follow steps to feather edges and re-coat without trapping moisture. Implement a preventive plan with regular inspections and documentation of rust progression and treatment effectiveness.
Prevention: drying, coatings, and storage
Minimize moisture exposure to prevent rust formation. After each use, thoroughly dry your concrete mixer and paddle parts.
Pro tip: Use compressed air or a clean cloth to ensure all surfaces are dry.
Before storing, apply protective sprays, paint, or sacrificial coatings to create a barrier against moisture. If equipment is stored long-term, use a moisture-proof cover or store in a dry, well-ventilated area.
Treating and repairing flaky areas
Remove loose rust without damaging protective coatings. Choose appropriate treatment based on coating compatibility – use a rust converter for stabilization or a suitable rust remover for active corrosion.
Pro tip: Use soft wire brushes or nylon pads for mechanical removal to avoid gouging the surface.
If rust is loose but not active, stabilize it with a rust converter. If rust is active and deep, remove it using a suitable rust remover, following manufacturer’s instructions. Always repair or recoat damaged areas immediately to protect underlying metal.
Maintenance Schedule and Parts Care (How Often and What to Do)
Develop a usage-based maintenance cadence that fits light, moderate, or heavy use, with clear intervals for quick cleans, deeper cleans, inspections, and part replacement. Base the schedule on practical observations and the manufacturer’s guidance, and adjust as needed for job demands. Keep the plan simple and repeatable.
Include logging of hours run, batch types, cleaning dates, rust spots, and part replacements, plus a quarterly visual inspection checklist. Emphasize safety by unplugging mixers before maintenance and storing in a dry area, with light rust-preventive coating after cleaning as appropriate.
Recommended intervals and what influences them
Maintaining your concrete mixer involves a balance of regular cleaning and inspections tailored to its usage intensity. Here are some guidelines to help you establish an effective maintenance schedule:
Light use (e.g., occasional batches): Rinse the mixer after each use, perform a quick clean and rust prevention every three months, and conduct a thorough inspection annually.
Moderate use (e.g., weekly batches): Rinse the mixer after each use, perform a quick clean and rust prevention quarterly, and conduct a thorough inspection bi-annually.
Heavy use (e.g., daily batches): Rinse the mixer after each use, perform a quick clean and rust prevention monthly or per heavy-use cycle, and conduct a thorough inspection every six months. Always consult your equipment manual and assess job demands to determine appropriate intervals.
Wear items, lubrication, and replacement cues
Regularly inspecting and maintaining critical components of your concrete mixer ensures optimal performance and longevity. Here’s what to look out for:
Lubrication: Verify the type and frequency of lubricant application with your equipment manual or approved product labels/datasheets. Common lubrication points include drive bearings, mixer shaft, and seals.
Part replacement: Inspect paddles, rings, and other parts for signs of excessive wear during each maintenance session. If you notice visible damage or imbalance, replace the parts immediately to prevent further damage. For bearings, seals, and fasteners, look out for rust, leakage, or excessive play. Clean, lubricate, and/or replace these components as necessary, following your manual’s specific procedures.
Common Mistakes, Troubleshooting, and Quick Fixes
Common mistakes include skipping thorough drying, using harsh cleaners, neglecting seals and gaskets, letting water sit, and improper reassembly, which can lead to rust flakes and stuck cement rings. A concise troubleshooting flow helps you spot rust signs, confirm a seized ring or paddle, and perform safe diagnostics without disassembly. Common mistake: Using harsh cleaners can damage mixer components; instead, use mild cleaning agents suitable for the material.
Regular post-use rinsing and thorough drying are essential, along with drying/storage practices and rust inhibitors or coatings where appropriate. A quick visual check of the interior for rust or cement residue and a routine pro check of paddles, shaft, bearings, seals, and fasteners helps catch wear early. If rust or cement is found during inspection, then follow the troubleshooting and quick-fix steps outlined above and decide when professional service is needed.
Mistakes to avoid
To keep your concrete mixer and paddles in optimal condition, it’s crucial to avoid common mistakes that can lead to stuck cement rings and rust flakes.
- Avoid letting concrete fully harden: Remove any hardened concrete immediately using appropriate mechanical or chemical methods.
- Do not use harsh abrasives on coated parts: Use approved cleaning methods to preserve coatings and prevent damage.
- Properly use chemicals: Follow manufacturer instructions for safe and effective use of cleaners, rust inhibitors, and other chemicals.
- Dry and store equipment properly: Thoroughly dry mixers and paddles after each use and store in a dry place to prevent rust.
Regular training on proper use, maintenance, and storage procedures can help avoid these common mistakes.
Troubleshooting guide
Promptly addressing common issues helps maintain your mixer’s operability. Perform quick diagnostic checks during routine maintenance or when symptoms arise.
Stiff paddles: Check for stuck cement rings and attempt removal using approved methods. If the problem persists, consult manufacturer instructions or professional service.
Wobble or unusual vibrations: Inspect bearings, seals, and fasteners. Tighten or replace as needed to eliminate wobble. If the issue continues, further diagnostic steps may be required.
Persistent rust flakes: Inspect affected areas for signs of severe rust or damage. Apply rust inhibitors or coatings as part of your regular maintenance routine. If rust is extensive, professional service may be necessary to prevent further deterioration.
Cost-Effective Methods, Environmental and Disposal Considerations
Introduction
This guide presents practical, low-cost methods for cleaning mixers, paddles, and tools that minimize labor and materials while effectively removing cement and rust. It compares mechanical brushing with mild-chemical options and outlines a lean workflow: pre-rinse, targeted cleaning, drying, and inspection.
Rinse-water handling, slurry containment, and debris disposal require careful planning to maintain project compliance and low environmental impact. If rust is present but not severe, mechanical brushing can be practical; for deeper rust, consider using a mild acid to help break it down, but always check product labels and manufacturer instructions first. Before starting, visually inspect tools for rust or cement residue, and emphasize pre-rinse and drying to reduce rework and future waste.
Low-cost and DIY Techniques
Maintaining clean mixers, paddles, and tools doesn’t have to break the bank. Here are some practical, low-cost methods to minimize labor time and material usage while effectively removing cement and rust.
Pressure-rinse to dislodge loose material before applying any cleaner. Reuse mechanical scraping tools for hardened deposits to avoid buying new ones frequently. Household cleaners like vinegar or baking soda can be effective in dissolving minor rust or cement buildup, reducing the need for commercial products.
However, investing in commercial cleaners is necessary when buildup is extensive or resistant to DIY methods. Always assess tool condition and cleaner suitability before each use to ensure optimal results without causing damage or inefficiency.
Wastewater, Slurry Handling, and Compliance
Proper handling of wastewater and slurry is crucial to protect the environment and ensure legal disposal. Here’s how to manage these materials effectively while staying compliant with local regulations.
Contain and separate solids from wastewater using appropriate filters or screens to prevent clogging and environmental contamination. Avoid discharging alkaline or acidic rinse water into storm drains by treating and neutralizing it first.
Before disposing of any waste, check local regulations. Regularly inspect containment systems and update your knowledge of local disposal rules to ensure compliance. Maintain accurate records of waste disposal for future reference and potential audits.
Conclusion
Keeping concrete and mortar mixers and paddles clean protects you from rust flakes, preserves performance, and keeps your worksite looking professional. Consistent care reduces downtime and helps prevent costly damage over time.
Follow a simple, practical routine: after each use rinse lightly and dry, then inspect for rust spots or stuck rings, proceed with the recommended deep cleaning if deposits are present, check moving parts for wear, and finish by noting any maintenance needs for the next session in a predictable pattern. Use the manufacturer’s guidance for cleaners and dispose of waste properly, and always wear appropriate safety gear during maintenance so you can protect your hands and eyes while you work.
Common mistakes to avoid include rushing through maintenance, using harsh or incompatible cleaners, and forcing loose rings or deposits without confirming proper technique. Remember safety first and protect your equipment by staying within tested methods, testing any new step on a small area first, and stopping if you see signs of damage. When a problem goes beyond routine care—severe rust, structural damage, or unreliable operation—calling a qualified professional is the prudent path, and a clear maintenance plan will help you stay ahead. With consistent, careful work, your mixer staying ready for the next job becomes a reliable habit you can trust.
FAQ
What tools are needed for cleaning concrete mixers and paddles (manual and mechanical options)?
Have a basic set of hand tools for scrubbing and scraping, plus brushes of varying stiffness. Consider mechanical options like a low-speed grinder or rotary cleaning tool if recommended by the manufacturer; always follow their guidance for your mixer and paddle materials.
What cleaning methods work best for concrete mixers and paddles?
Manual cleaning with brushes and putty knives works well for regular maintenance and stubborn deposits. Mechanical cleaning can speed up the job but requires proper guards and compatibility with your mixer style; check the manufacturer’s instructions before using power tools.
What products are suitable for the cleaning process?
Use water and non-corrosive cleaners that are compatible with metal and concrete. For rust prevention, consider approved rust inhibitors or protective coatings per product labels, and always follow the cleaner’s directions and local rules.
How can I prevent rust flakes and remove stuck cement rings safely?
After cleaning, dry all parts thoroughly and apply a preventive coating if recommended. For stuck cement rings, use the gentlest effective method first (soaking or soft scraping), and avoid aggressive force; consult manufacturer instructions if rings persist.