
Introduction
Clay plaster over drywall is a finish where a clay-based plaster is applied on standard wallboard after proper priming. Start with a compatibility-friendly primer; check the label to ensure it works with clay plasters and the drywall surface. Apply multiple thin coats, let each dry, and feather the edges for a flat, even surface.
Screw head telegraphing happens when fasteners show through the finish, so drive screws slightly below the surface and use filler to smooth the area. For dent resistance, use a stiff plaster mix and proper backing, and seal joints to prevent cracking. Check manufacturer guidelines and local building rules for any limits, and test a small area before committing to the whole wall.
Key takeaways
- Assess suitability of clay plaster over drywall and check substrate condition.
- Prepare drywall by removing loose paper, cleaning dust, and repairing damaged areas.
- Use compatible primer labeled for plaster over gypsum board applications.
- Apply plaster in thin coats with proper drying between layers.
- Prevent screw head telegraphing by sinking and embedding fasteners below surface.
- Upgrade dent resistance with compatible skim coat or reinforced backing where needed.
- Maintain safety: wear respirator and protect adjacent finishes during plastering.
Table of Contents
- Introduction
- Key takeaways
- Is Clay Plaster over Drywall the Right Choice?
- Preparing Drywall for Clay Plaster
- Primer Selection and Compatibility with Clay Plaster
- Application Methods and Layer Strategy for Clay over Drywall
- Preventing and Fixing Screw Head Telegraphing
- Upgrades for Dent and Impact Resistance
- Tools, Materials Checklist, and Material Specs Explained
- Common Problems, Troubleshooting, and Maintenance
- Conclusion
- FAQ
Is Clay Plaster over Drywall the Right Choice?
Clay plaster on finished drywall can be suitable for interior finishes and eco friendly projects. It may offer a natural look and improved breathability when done correctly. Understand limitations such as substrate stability and the need for proper surface preparation before committing.
Consider whether you plan to maintain the space and if you want reversibility or easier repairs. Evaluate alternatives like other wall systems if moisture or fastener concerns dominate the project. When in doubt, verify compatibility with plaster products and local rules or recommendations before proceeding.
Pros and cons compared to gypsum or lime plasters
Clay plaster offers unique advantages and drawbacks when compared to traditional gypsum or lime plasters.
Pros
- Durable: Lasts longer than gypsum, less prone to cracking.
- Breathable: Allows walls to ‘breathe’, reducing moisture buildup.
- Aesthetics: Provides a warm, natural look with texture options.
- Maintenance: Easy touch-ups, no painting required.
Cons
- Drying time: Slower drying process compared to gypsum.
- Skill required: Needs experienced applicators for best results.
- Cost: Generally more expensive than gypsum.
- Limited color options: Requires natural pigments or acceptance of earthy tones.
Clay plaster is a great choice when durability, breathability, and aesthetics are priorities, but budget and skill level should also be considered.
When to avoid clay over drywall
Certain conditions may make applying clay plaster directly over drywall a poor choice. Avoid these common mistakes:
- High moisture areas: Clay plaster can absorb excess moisture, leading to damage in bathrooms or kitchens without proper ventilation.
- Structural movement
- Heavy impact zones: Areas prone to impacts (like behind sinks or near doors) may require more durable materials.
- Time constraints: If a quick turnaround is needed, the slower drying time of clay plaster might not be suitable.
: Cracks from settling or shifting foundations can cause clay plaster to crack as well.
In these cases, consider alternative wall systems or address the underlying issues before applying clay plaster.
Cost and labor considerations
Clay plaster is generally more expensive than gypsum due to its natural ingredients and labor-intensive application. Expect to pay around $5-$10 per square foot, including materials and labor.
Labor: Skilled applicators are needed for a smooth finish, adding to the overall cost. DIY applications can save money but may require learning curves and practice runs.
Time-wise, expect each coat (and there are usually 3-4 coats) to take around 2-3 days to apply and dry fully. This means a typical job could take up to two weeks from start to finish.
Preparing Drywall for Clay Plaster
Start with cleaning to remove dust, oils, and loose material from the surface. Inspect for loose tape, delamination, or damaged paper facing before any primer or plaster is applied. Check fasteners for firmness and alignment and address any obvious issues.
Ensure the environment is suitable for adhesion and drying. Note the current joint compound status and repair as needed. This preparation helps prevent future telegraphing and cracking after plastering.
Inspecting and repairing drywall joints and fasteners
Before you start, check every joint and fastener. Weak spots can cause issues later.
Joints: Look for cracks, gaps, or loose tape. If found, re-tape using mesh tape and fresh joint compound. Let it dry, then sand smooth.
Fasteners: Check screws and nails. If any are loose, drive them in further or replace if necessary. Fill any holes with joint compound and let dry before proceeding.
Surface cleaning and dust control
Dust removal is critical for adhesion. Here’s how to clean your surfaces:
Use a damp cloth or sponge with mild soap and water. Wipe down the entire surface, then let it dry.
Vacuum any remaining dust with a soft brush attachment. Be thorough – every speck counts.
Why? Dust can prevent primer and plaster from sticking properly. Keep it clean for best results.
Substrate conditioning (moisture, temperature)
Clay plasters need specific conditions to stick and cure right:
Moisture: Check your drywall’s moisture content. It should be below 12%. If not, wait until it is before priming.
Temperature: Keep the room temperature between 50-80°F (10-27°C) for best results. This helps the plaster cure evenly and prevents cracking.
Always follow manufacturer recommendations for specific products. They know their stuff!
Primer Selection and Compatibility with Clay Plaster
Evaluate primer types such as adhesion or bonding primers, acrylic primers, PVA, isolation coats, and clay specific primers. Choose based on the drywall condition and the clay plaster product you intend to use. Always check product labels for compatibility and application notes.
Test a small area if possible and look for clear guidance on adhesion strength and breathability. Compare manufacturer instructions and any local requirements before committing to a specific primer. If in doubt, consult the product data sheet or technical support for compatibility clues.
What primers do and why they matter for clay
Primers are the unsung heroes of wall preparation. They seal your drywall, boost adhesion, and control suction – all crucial steps before applying clay plaster.
Sealing prevents moisture from the clay plaster being absorbed into the drywall, which could lead to cracking or delamination.
Boosting adhesion ensures a strong bond between the primer and the clay plaster, preventing peeling or flaking. This is especially important with clay plasters due to their heavy nature.
Controlling suction is vital as drywall can suck moisture out of the clay plaster too quickly during application, leading to poor coverage and uneven results.
Choosing between an isolation coat, bonding primer, or clay primer
Each primer serves a unique purpose. Here’s how to pick the right one:
Isolation coats are ideal when your drywall has minor imperfections or is slightly porous. They create a barrier, preventing suction and promoting even plaster application.
Bonding primers are best for drywall in good condition with no major issues. They enhance adhesion between the drywall and clay plaster.
Clay-specific primers are designed by manufacturers to work optimally with their particular clay plaster recipes. Always follow manufacturer guidance when using these.
Small-area compatibility tests
Before priming your entire wall, perform a small test area to ensure compatibility.
Here’s how: Apply the primer to a small, hidden area (around 1ft x 1ft) of your drywall. Let it dry according to the manufacturer’s instructions.
Next, apply a thin layer of clay plaster onto this primed area. Allow it to cure for at least 24 hours.
Check for any signs of peeling or poor adhesion. If the primer and plaster bond well with no issues, you’re good to go. If not, try another primer type.
Application Methods and Layer Strategy for Clay over Drywall
Typical layering includes an isolation or slip coat, a base coat, and a finish coat. Plan the sequence to control build and minimize telegraphing, following product guidance. Use even strokes and appropriate tooling to promote uniform coverage.
Monitor mix consistency and avoid thick pours that slow drying. Allow each coat to dry as directed by the product instructions and maintain good ventilation. Adapt the strategy to the plaster product you choose and the wall condition.
Mixing and consistency basics
The key to a successful clay plaster application is getting the mix right. Consistency affects workability and adhesion, so it’s crucial to get it just right.
Follow manufacturer guidelines for mixing ratios. Typically, you’ll mix clay with water until you reach a smooth, lump-free consistency similar to peanut butter or thick yogurt.
Pro tip: Always check the mix by dropping a small amount onto a flat surface. It should spread out slightly and hold its shape without being too runny or lumpy.
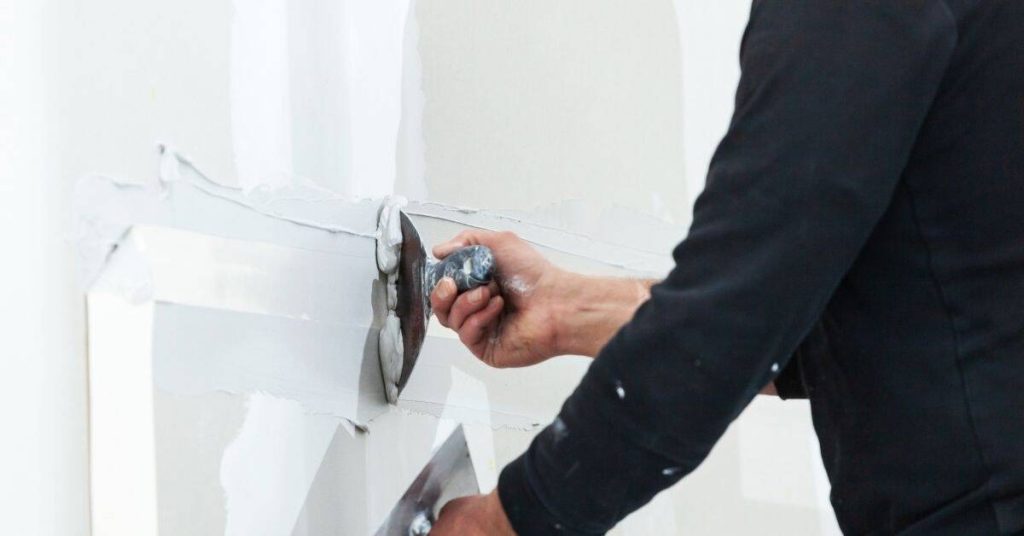
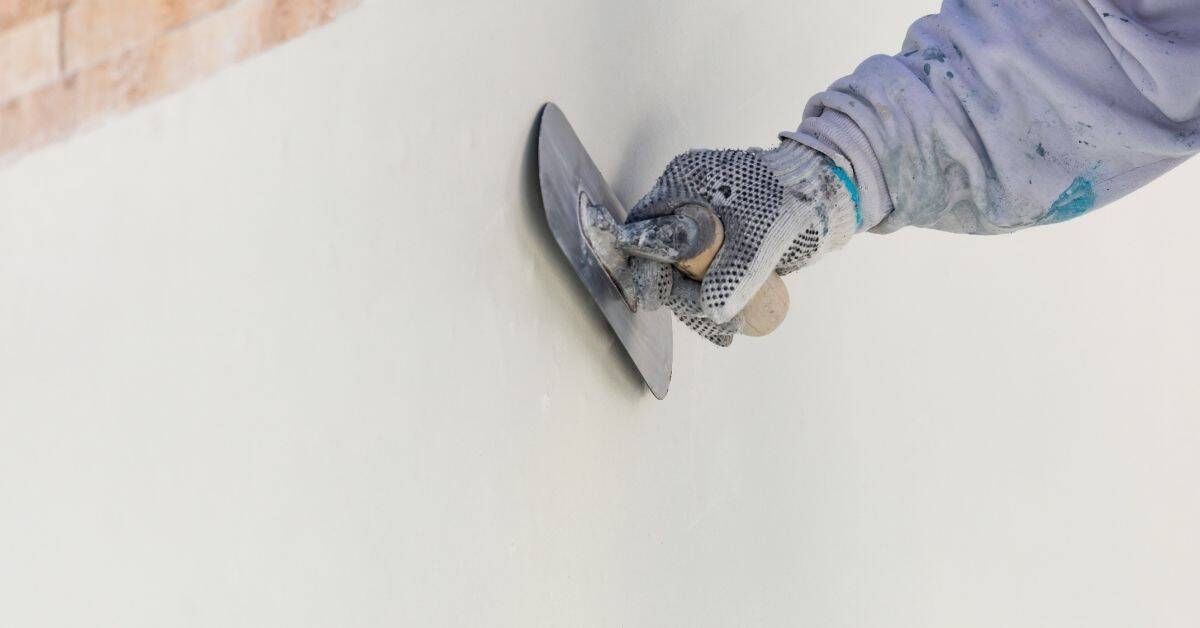
Troweling, floating, and thin-skim techniques
Applying clay plaster is all about even coverage to minimize substrate telegraphing. Use a combination of troweling, floating, and thin-skimming techniques with the right tools.
Start with a hawk and trowel for initial application, spreading the mix evenly across the wall. Then, use a floating tool to smooth out any irregularities, ensuring an even surface.
For thin-skimming, use a straight edge trowel to apply a very thin layer of plaster, pulling it tightly against the wall for a smooth finish. Work in small sections to avoid drying before application.
Drying and recoat timing
Allowing adequate drying time between coats is crucial for the longevity and performance of your clay plaster finish. Rushing this process can lead to cracking, peeling, or other issues.
Check manufacturer recommendations for specific drying times. Generally, you’ll want to allow at least 24 hours of dry time between coats, depending on humidity levels and room temperature.
Pro tip: Don’t assume set times; always check the product label or contact the manufacturer if unsure. Use a moisture meter to test for adequate dryness before recoating.
Preventing and Fixing Screw Head Telegraphing
Telegraphing often stems from fastener movement, differential movement, or very thin finish layers. Use proper fastener length and spacing to reduce movement through the plaster. Address any movement or backing concerns before finishing.
For retrofit, consider reinforced backings or adjusted layer thicknesses to minimize impressions. When re finishing, plan fixes in small areas first and follow the plaster product guidance for drying and sealing steps. If issues persist, verify product compatibility and substrate suitability with the manufacturer.
Why Screw Heads Show Through Clay
Screw heads can show through your clay plaster due to a few reasons. First, thin layers of finish material can’t hide them. Second, substrate flexing or movement can push screws out slightly. Lastly, if screws stick out too much initially, they’ll always be visible.
Thin overlays just can’t hide screw heads. No matter how well you trowel, they’ll still show through.
Substrate flexing or movement can cause screws to pop out a bit over time, making them more visible.
The most obvious reason is if screws were driven too far out initially. Even with thick plaster, they’ll still be noticeable.
Pre-Application Fastener Strategies
Before you start applying your clay plaster, take these steps to prevent screw head telegraphing:
Verify screw seating. Check every screw. If any are loose or sticking out too much, tighten them or drive them in further.
If a screw is stripped or damaged, replace it. A new one will sit flush and secure.
Use appropriate backing or tape around screws. This helps distribute pressure evenly and prevents screws from moving later on.
Repair Options for Existing Telegraphing
If you’re already seeing screw heads through your clay plaster, here are some fixes:
For localized areas, apply a thin skim coat. This can help mask the screw heads. Be sure to feather out the edges so it blends with the surrounding wall.
For more prominent issues, consider using a reinforcing mesh. Apply it over the affected area and then skim coat over it. The mesh helps distribute pressure and keeps screws in place.
Another option is to apply an isolation or bedding coat. This goes on before your final clay plaster layer. It helps stabilize screw areas and provides a better base for your finish coat.
Upgrades for Dent and Impact Resistance
Retrofit options include adding reinforcing meshes or tapes where appropriate. Consider using a slightly tougher finish coat while balancing the breathability and aesthetic goals of clay plaster. Be mindful of how each option affects the wall system as a whole.
Explore protective coatings or panel/backing choices that can improve impact resistance. Always check compatibility with clay plaster and any trade offs with moisture management or appearance. Confirm with manufacturer guidelines before proceeding with any retrofit.
Reinforcement options (mesh, scrim, lath)
When it comes to boosting your clay plaster’s dent and impact resistance, reinforcement is key. You’ve got a few options here – fiberglass mesh, metal lath, or specialty scrims.
Fiberglass mesh is lightweight and easy to install. It distributes forces evenly, reducing the risk of cracking. But it’s not as tough as metal lath.
Metal lath, on the other hand, provides superior strength. It’s great for high-impact areas but can be more challenging to work with and is heavier than mesh.
Then there are specialty scrims. These are designed specifically for clay plaster and offer a balance between strength and ease of use. They’re usually made from materials like polyester or polypropylene.
Choosing a harder finish or protective topcoat
A harder finish coat or clear protective coating can amp up your plaster’s resistance to dings and dents. But remember, these aren’t invisible.
Harder finishes like acrylic or latex can make your clay plaster look more like paint than natural clay. They’ll also reduce breathability, which could lead to moisture issues down the line.
Clear protective coatings, on the other hand, won’t change the look of your plaster much. But they might not be as tough as a harder finish. Always test these in a small area first to make sure they play nice with your clay.
The key here is balance. You want protection without sacrificing too much of that natural clay aesthetic and breathability.
Structural or substrate upgrades for high-impact areas
In spots where impacts are frequent – like near doors, stairs, or in busy hallways – you might need to beef up your substrate.
Consider using more robust drywall panels. These have extra layers of gypsum and can handle more punishment. But they’re heavier and harder to install.
Or, add an extra layer of backing behind your existing drywall. This could be another layer of drywall or even plywood. Just make sure it’s compatible with your clay plaster and won’t trap moisture.
Always check product specs to ensure these upgrades won’t mess with your clay plaster’s breathability or cause other issues down the road.
Tools, Materials Checklist, and Material Specs Explained
Assemble a DIY friendly set of essential tools and material types for plastering over drywall. Include items for surface prep, priming, mixing, and finishing. Keep the list practical and aligned with your project scope.
Learn to read material specs and standards for primers, plaster recipes, and mesh grades. Translate technical details into purchasing decisions and note what to verify with the manufacturer. When uncertain, reference labels, data sheets, or instructions for clarity.
Basic tool and consumables list
Use this checklist before you start mixing or applying your plaster to ensure you have everything needed for a smooth job.
- Trowels (4″, 6″, 12″): Confirm sizes match product recommendations. Too small and you’ll struggle, too large and control is lost.
- Hawk: Check it’s the right size for your largest trowel to avoid spills and waste.
- Plaster Mixer (Electric or Hand): Ensure it’s suitable for the volume you’re mixing. Too small means longer mixing times, too large can lead to overmixing.
- Plaster Mesh: Verify it’s the correct size and type (fiberglass, galvanized, etc.) for your project. Incorrect mesh can cause cracking or rust spots.
- Primers (Bonding, Sealer): Check they’re compatible with your plaster type. Using the wrong primer can result in poor adhesion or discoloration.
- Tape Measure: Ensure it’s long enough for your largest measurement to avoid inaccuracies.
- Level: Confirm it’s suitable for your job (4′, 6′, etc.). Using an incorrect level can lead to uneven surfaces.
- Bucket Grout Float: Check it matches the size of your trowels for easy application and spreading.
Quick rule: Always check tools and consumables against the plaster product’s recommendations to avoid common mistakes that can lead to rework or poor results.
Material specification points to confirm
Before you start mixing and pouring concrete, use this checklist to ensure your materials are suitable for the job. This will help prevent costly mistakes and rework.
- Concrete Mix: Check the mix design on the bag label or ticket. Ensure it matches the required strength (e.g., 3000 psi, 4000 psi) for your project. Incorrect mix can lead to weak concrete that cracks or fails under load.
- Cement: Verify the cement type (e.g., Type I, Type II) and check its expiration date. Old cement can cause weak concrete and poor finish.
- Aggregates (Sand & Gravel): Check the aggregate sizes (e.g., 3/8″, 1/2″) to ensure they match your mix design. Incorrect sizes can affect concrete’s strength, workability, and finish.
- Water: Ensure water is clean and free from contaminants. Dirty or salty water can cause concrete to set slowly or not at all, leading to weak concrete.
- Admixtures (if using): Check the type and dosage of admixtures (e.g., accelerators, retarders) as per manufacturer’s instructions. Incorrect use can lead to rapid setting, delayed setting, or other issues.
- Fiber Reinforcement (if using): Verify the type and amount of fibers (e.g., polypropylene, steel). Inadequate fiber reinforcement can result in weak concrete that cracks easily under stress.
- Substrate Preparation: Check if the surface is clean, dry, and free from contaminants. Poor substrate preparation can cause bonding issues, leading to delamination or cracking.
- Primer (if using): Ensure the primer is compatible with your concrete mix and substrate. Using an incorrect primer can result in poor adhesion and increased porosity.
Quick rule: Always follow manufacturer’s instructions for materials and admixtures to ensure you’re using the right products and dosages for your specific project.
Visual checkpoints during work
Use this checklist as you progress to ensure your concrete work is on track. Check these points regularly for quick, easy-to-spot signs of correct preparation and application.
- Surface Preparation: Before pouring, check the base is clean, dry, and free of debris. A smooth surface ensures good adhesion.
- Concrete Mix: Verify the mix design (check label or manufacturer’s instructions) to ensure it matches your project needs (e.g., strength, finish).
- Water-Cement Ratio: Check the consistency of the mix. It should be workable but not too wet. Too much water weakens concrete.
- Placing Concrete: Watch for uniform placement. Inconsistencies can lead to weak spots or finishing issues.
- Finishing (Striking Off, Floating): Ensure the surface is level and smooth. Pinholes or low spots indicate insufficient consolidation.
- Edge Feathering: Check edges for proper feathering into the forms. Sharp edges can cause cracking during curing.
- Curing: Verify that the concrete is being kept moist (check with a simple water spray). Insufficient curing weakens and discolors concrete.
- Formwork: Inspect forms for stability, alignment, and proper bracing. Sagging or misaligned forms result in poor slab quality.
Quick rule: If it looks wrong, it probably is. Don’t hesitate to recheck your work or consult resources if something doesn’t seem right.
Common Problems, Troubleshooting, and Maintenance
Diagnose cracking, delamination, discoloration, and re appearing telegraphing with a systematic approach. Start with small test fixes on inconspicuous areas before wider application. Use product technical data as a guide for remedies.
Establish routine maintenance practices to prolong the clay finish. Document any recurring issues and adjust care or layering as needed. If stubborn problems arise, consult the product guidance and consider professional input for specifics.
Cracks and delamination — diagnosis and fixes
First, figure out what’s causing those cracks. Most are either from movement or surface shrinkage.
Movement cracks run diagonally or horizontally. They’re usually due to settling or structural issues. If you spot any, get a pro to check your structure.
Shrinkage cracks are vertical and happen when the plaster dries too fast. To fix:
– Re-anchor loose areas with screws driven into studs.
– Reinforce with mesh or scrim before re-plastering.
– Keep the surface consistently moist during drying.
Stains, efflorescence, and moisture-related issues
Moisture problems show up as stains, white deposits (efflorescence), or musty smells. Here’s what to do:
– Investigate the source. Check for leaks, condensation, or high humidity.
– Fix any water entry points.
– Let surfaces dry out completely before re-plastering.
Efflorescence is salt deposits from moisture evaporating. Remove with a wire brush and mild acid (like lemon juice). Rinse well.
For stains, identify the cause. Some can be cleaned off, but others may need professional help.
Long-term care and touch-up strategies
Keep your clay plaster looking good with these simple tips:
– Clean gently. Use a soft brush or cloth with mild soap and water.
– Avoid harsh chemicals.
– Touch up nicks or scratches as soon as you spot them.
To touch up, mix a small batch of plaster matching your wall. Apply thinly, let it dry slowly, then sand smooth. Seal with a clear topcoat if needed.
Regular care keeps your clay plaster looking consistent and beautiful for years to come.
Conclusion
Clay plaster over drywall can give a durable, smooth finish if you plan the layers, prep the surface, and choose compatible primers. The right steps protect your walls, prevent telegraphing from screw heads, and boost dent resistance without wrecking the drywall or your health.
If you want the practical path: start by confirming this setup is the right choice for the room, then prep the drywall, pick a compatible primer, apply the layered plaster in the correct order, and address screw head details and dent upgrades before you move to finish coats. Test in a small area first, mask off any adjacent surfaces, and work with good ventilation and PPE as you go. Check the primers and mixes against the plaster and follow the exact sequence you outlined in your plan.
Common mistakes to avoid are skipping surface prep, using an incompatible primer, or rushing the drying times. Stick to clean, dry, dust-free surfaces; follow the layer order; and respect cure times. Always protect electrical boxes, fixtures, and plumbing, and keep ventilation steady while you work.
If the project grows more complex—large patches, high humidity, or you see ongoing cracks or stubborn telegraphing—consider bringing in a pro for inspection or targeted repairs. You can push ahead with confidence when you follow the plan, keep safety in front, and know when to pause and get expert help. You’ve got this.
FAQ
How can I spot primer issues when plastering over drywall and what should I check?
Look for inconsistent adhesion, peeling, or staining after priming. Check the primer label and the plaster manufacturer instructions for compatibility with clay finishes. When in doubt, test a small area and follow local guidance or product datasheets.
What steps help minimize screw head telegraphing in clay plaster over drywall?
Use a proper substrate prep and a mechanical fastener pattern that seats below the surface. Consider a thin, even base layer to reduce ridges, and verify the screw heads are fully sunk or covered by the first plaster pass. If unsure, refer to product instructions for screw depth and placement guidelines.
Which upgrades improve dent resistance without compromising plaster bind?
Choose approved additives or foams only as recommended by the plaster or clay product. Follow the manufacturer’s guidance on how these additives affect adhesion and workability. Check labels and local rules for any restrictions or recommended mixes.
What should I do after plastering to prevent future cracks or damage?
Keep humidity steady during cure and follow the recommended drying schedule. Inspect for any initial hairline cracking and address it quickly per product instructions. If problems persist, consult the datasheet or manufacturer for repair steps.