
Introduction
Clay plaster basics are simple, old-fashioned wall coverings made from clay, sand, and water that you mix and trowel onto a surface. This article gives a practical, hands-on look at mixing, applying, and why cracks happen. You’ll learn how to handle the mix and what to watch for on site.
Expect a straightforward, honest approach that focuses on feel, not fancy tools. We’ll cover mixing order, testing consistency, and how to spot problems before they show. If a spec matters, check the product label, manufacturer instructions, and local rules.
Key takeaways
- Prepare clay plaster with clean water and sifted aggregates; avoid contaminated mixes.
- Wet plaster surface and prime with bonding slip before application.
- Plan multiple thin coats; allow each coat to set lightly before next.
- Keep tools clean, restrict moisture exposure to prevent cracking during cure.
- Test, seal, and maintain plastered surfaces to reduce future crack appearance.
- Safety: wear eye protection and gloves; dust and sharp edges hazards exist.
Table of Contents
- Introduction
- Key takeaways
- Overview and When to Use Clay Plaster
- Tools and Materials Checklist
- Mixing Clay Plaster — Practical Step-by-Step
- Surface Preparation and Bonding Strategies
- Application Techniques and Layering
- Realistic Crack Control: Causes and Prevention
- Troubleshooting and Repairs
- Drying, Curing, Finishing, and Maintenance
- Conclusion
- FAQ
Overview and When to Use Clay Plaster
Clay plaster is a natural, breathable wall finish made from clay, sand, and various additives chosen for texture and workability. It blends into many traditional or rustic spaces and can be used on several interior surfaces. It has its own set of limitations and acceptance criteria for moisture and substrate compatibility.
Know where it shines: damp-prone environments, historic restorations, or projects where a soft, earth-toned aesthetic is desired. Check how clay interacts with other binders and climate; consult product data and local guidance to confirm suitability before committing. If in doubt, verify with the manufacturer instructions or local building rules to avoid misfits with lime or cement systems.
What clay plaster is and how it differs from lime/cement
Clay plaster is a natural, breathable finish made from a mix of clay, aggregate, and sometimes added fibers or additives. It’s different from lime and cement plasters in several ways:
Breathability: Clay plaster allows moisture to pass through it, helping regulate humidity levels indoors. Lime plasters also breathe, but cement plasters do not.
Flexibility: Due to its organic nature, clay plaster can flex and move with the substrate, making it less prone to cracking than rigid lime or cement plasters.
Adhesion: Clay plaster has excellent adhesion properties. It sticks well to most substrates, unlike cement plasters which often require additional bonding agents.
Best use-cases and limitations
Clay plaster shines in certain applications but has its limits. Here’s where it works best and when to avoid it:
Ideal uses: Interior finishes, passive humidity buffering, repairs. It’s great for creating a warm, inviting atmosphere and can help control indoor moisture levels.
Limitations: High continuous moisture areas (like showers or basements), structural loads, freeze-thaw exposure. Clay plaster isn’t suitable where it will be constantly wet or exposed to freezing temperatures as it can degrade over time.
Tools and Materials Checklist
Gather a basic set of mixing vessels, trowels, floats, and a margin trowel for detail work. Have a small mixer or hand mixer if you will batch multiple small mixes. Include brushes or sponges for surface testing and cleanup.
Stock protective gear like gloves, eye protection, and a respirator or dust mask. Include items for testing and small-sample trials such as a plastic bucket, a little extra clay blend, and a moisture meter or simple dampness tester. Keep a few clean rags and a plug-in timer to manage trial runs without overbuying materials.
Clay types, aggregates, and additives
Use this checklist before mixing your concrete to ensure you’ve got the right materials for the job. This will help you avoid common mistakes that can lead to costly rework.
- Clay type: Check if it’s suitable for your project. Most concretes use ASTM C593 or C686 clays. Confirm with the manufacturer or local supplier.
- Sand-to-clay ratio: Aim for 2-3 parts sand to 1 part clay by volume. Measure and mix accordingly. Wrong ratios can lead to weak, crumbly concrete.
- Fiber options: Check if you need fibers (e.g., steel, synthetic) for added strength or crack reduction. Follow manufacturer guidelines for dosage rates.
- Stabilizers: Verify if you need stabilizers (e.g., fly ash, silica fume) for improved durability. Check local codes and manufacturer recommendations.
- Aggregate size: Ensure the maximum aggregate size is suitable for your project. Common sizes are 3/8″ or 1/2″. Too large can cause voids; too small may lead to weak concrete.
- Water-to-cement ratio: Aim for 0.45-0.60 by weight. Too much water weakens concrete; too little makes it hard to place. Check with a slump test (ASTM C143).
- Cement type: Use Type I or II cement for most projects. Check local availability and any project-specific requirements.
- Admixtures: If using, confirm they’re compatible with your other materials and meet project needs (e.g., accelerators, retarders, air-entraining agents).
Quick rule: Always check local codes and manufacturer recommendations to ensure you’re using the right materials for your specific project.
Tools and safety gear
Before you start mixing or pouring concrete, make sure you have all the necessary tools and safety gear. Use this checklist to ensure nothing is missed.
- Tape measure: To accurately measure materials and check dimensions. Double-check measurements before starting work.
- Shovel: For mixing, moving, and placing concrete. Ensure it’s sturdy and the right size for your job.
- Wheelbarrow: To transport mixed concrete to the pour site. Check tires are inflated and the wheel turns smoothly.
- Concrete mixer (optional): For larger jobs, a mixer can save time and energy. Ensure it’s in good working condition before use.
- Hammer: To break up any clumps or remove air pockets during mixing. Check for cracks or damage.
- Trowel: For finishing and smoothing the concrete surface. Inspect for bends, breaks, or rust.
- Float (optional): To help with initial leveling and consolidation. Ensure it’s in good condition and the right size for your project.
- Safety glasses: To protect eyes from debris during mixing and pouring. Check they fit well and provide adequate coverage.
- Work gloves: For handling materials and protecting hands from injuries. Ensure they’re durable, comfortable, and provide a good grip.
- Steel-toed boots: To protect feet from falling objects and sharp edges. Check soles for good traction and ensure they fit well.
- Ear protection (optional): For use around power tools or when mixing concrete in a mixer. Ensure it’s comfortable and provides adequate noise reduction.
Quick rule: Always prioritize safety gear to protect yourself from potential hazards on the job site.
Mixing Clay Plaster — Practical Step-by-Step
Start with a dry blend of your clay material and aggregate, then add moisture gradually. Mix until you see a consistent, workable texture and no dry pockets. Let the mix hydrate for a short rest before a final remix.
Work in small test batches to judge feel and plasticity. Always verify product guidance before mixing and follow safe testing practices on inconspicuous patches if needed. If unsure, consult the product label or manufacturer instructions for any special needs.
Step-by-Step Process
This section walks you through the practical steps of mixing clay plaster, from preparation to cleanup.
- Gather your materials: clay powder, aggregates, water, and any additives. Always follow the manufacturer’s guidelines for proportions.
- Put on your safety gear – gloves, goggles, and a dust mask.
- Dry blend the clay powder and aggregates in a large container using a shovel or mixing paddle. This helps distribute the materials evenly.
- Gradually add water while mixing, ensuring it’s fully incorporated. Let the mix rest for 10-15 minutes to allow hydration.
- Remix the plaster, checking its consistency. It should be smooth and lump-free, with a workable slump – like soft-serve ice cream. If it’s too stiff, add more water; if too runny, add more clay or aggregates.
- Load your mix into your application tool (hawk, trowel, or sprayer) and apply the plaster to your surface.
- After application, clean up your tools and workspace. Wipe down any equipment with a damp cloth to prevent drying residue.
- Let the applied plaster rest and cure according to the manufacturer’s guidelines before sanding or painting.
Pre-testing and small-batch trials
Before tackling your entire project, make small trial mixes to evaluate adhesion, shrinkage, and color. This helps you fine-tune your mix and avoid costly mistakes.
Mix a small batch of plaster using the proportions you plan to use on your project. Apply it to a test patch on your surface, ensuring it’s representative of the final application.
Observe the test patch over time. Check for signs of delamination (peeling or flaking), cracks, or other defects. Also, note any changes in color as the plaster dries and cures.
If you’re not satisfied with the results, adjust your mix proportions and try again. This iterative process helps ensure a successful final application.
Mixing techniques and consistency targets
Clay plaster can be mixed by hand or using mechanical tools, depending on the scale of your project. Here’s how to achieve the right consistency.
For small projects, hand-mixing is sufficient. Use a shovel or mixing paddle in a large container. For larger jobs, consider using a drill with a mixing attachment or a mortar mixer.
Hydration and rest time are crucial for achieving the right consistency. After adding water, let your mix rest for 10-15 minutes to allow the clay particles to absorb the water fully. Then remix the plaster.
The ideal consistency is workable but not runny. It should have a ‘slump’ – when you hold a trowel full of plaster vertically, it should slowly slide off in a smooth, coherent mass, like soft-serve ice cream. If it’s too stiff or runny, adjust your mix proportions accordingly.
Surface Preparation and Bonding Strategies
Inspect the substrate for cleanliness, flaking paint, or loose material and remove it. Roughen glossy surfaces to create a key, then dampen the area to reduce suction. Check for lingering dust and clean it up thoroughly.
Prime or treat per substrate type and intended plaster mix. Adapt prep steps for different base materials and avoid common mistakes like over-wetting or leaving a slick surface. When in doubt, reference base material guidelines or manufacturer recommendations for bonding strategies.
Preparing common substrates (drywall, earthen, brick, concrete)
Before applying clay plaster, prep your substrate right. Here’s how:
Drywall: Sand any seams and joints smooth. Prime with a breathable primer to seal and improve adhesion.
Earthen or adobe: Clean off any loose material. Lightly dampen the surface, then let it dry. Apply a thin layer of clay slurry for better bonding.
Brick or concrete: Remove any loose mortar or debris. Use a wire brush to roughen the surface. Dampen before plastering.
Lath, mesh, and keys for solid adhesion
For strong bond, use mechanical reinforcement:
Natural fiber mesh: Staple it onto the substrate. Embed it into the first layer of plaster.
Lath or metal mesh: Attach securely to the substrate. Ensure it’s well-embedded in the plaster.
Create mechanical keys: Score the substrate, use expansion joints, or embed fiber strips to help plaster grip better and minimize delamination.

Application Techniques and Layering
Decide on a single-coat or multi-coat approach based on the project and surface. Plan the sequence so you can finish a reasonable area before the plaster stiffens. Manage your workflow to keep edges and details clean while moving from area to area.
Judge readiness to proceed by texture, stiffness, and hand-signal feedback rather than numbers. Test a small area and adjust timing based on how the plaster sets and how the surface accepts the next layer. If uncertain, rely on practical tests and manufacturer guidance rather than fixed schedules.
Scratch, Brown, and Finish Coat Guidance
The first coat, the scratch coat, sets the stage. It’s thin, about 1/4″ to 1/2″, and helps bond with your base. Check your mix design, but it’s usually 3:1 or 4:1 sand-to-cement.
The second, the brown coat, is thicker, around 3/8″ to 5/8″. It fills in any voids and gives a smooth surface. Again, check your mix design, but it’s often 4:1 or 5:1 sand-to-cement.
The final one, the finish coat, is thin, about 1/8″ to 3/16″. It gives that smooth, polished look. Use a 6:1 or 7:1 mix for this one.
Between each coat, let it dry properly, usually 24-72 hours depending on weather. This reduces shrinkage and cracking. Don’t rush it, even if you’re eager to finish. And remember, never apply a new coat over a damp one.
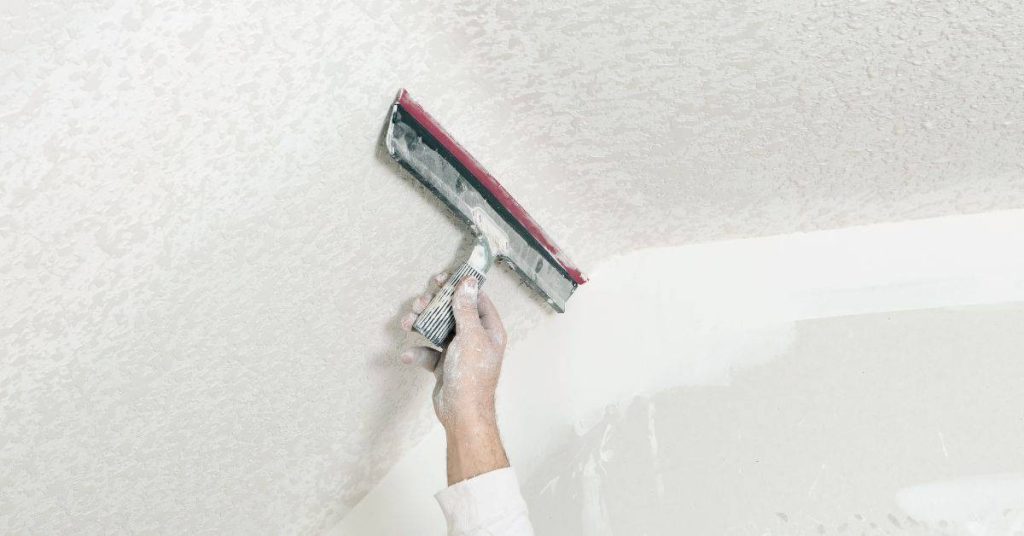
Tool techniques: trowel, float, and finishing textures
Alright, listen up. We’re gonna talk tools here – trowels, floats, and how to use ’em for those finishin’ touches.
First off, check your mix design. It’ll tell ya what kind of texture you’re aimi’ for – smooth or rough. Now, grab your tools:
- Trowel: Use it for applyin’ and levelin’. Start with a broad trowel (1/4″ to 3/8″) for spreadin’, then switch to a straight edge trowel (1/2″ to 5/8″) for screedin’ and levelin’.
- Float: This is your buddy for smoothin’ out those rough spots. Use it after screeding, before final finishin’.
Now, let’s talk textures:
- Smooth finish: After floatin’, use a steel trowel (1/4″ to 3/8″) for the final pass. Work it in a circular motion, pushin’ and pullin’ the concrete. Check those manufacturer instructions for damp-curin’ or burnishin’.
- Exposed aggregate: After floatin’, let it cure a bit (check that label), then use a brush to remove the surface laitance. Rinse, wait a bit, and apply your sealant.
Remember, patience is key. Don’t rush through these steps. And for god’s sake, don’t go tryin’ to finish when it’s too wet or too dry. Check that moisture content before you start!
Realistic Crack Control: Causes and Prevention
Cracks commonly stem from shrinkage, substrate movement, or moisture changes. Plan for a degree of flexibility in the finish and avoid overly rigid bonds. Expect that some hairline cracking may occur and can be managed with proper technique.
Address causes at the source: control moisture, ensure stable substrates, and use compatible binders. Implement preventive steps such as even application and appropriate drying practices. If cracks appear, assess their cause and respond with targeted repairs rather than blaming the entire system.
Predictable vs avoidable cracks and setting expectations
Every clay plaster job will have some cracking, but it’s not all inevitable. Here are common mistakes to avoid.
- Hairline shrinkage: Expect this in most jobs. It’s minor and manageable.
- Drying too fast: Avoid high heat or strong air movement that speeds drying and causes stress cracks.
- Inadequate bonding: Ensure proper surface preparation to prevent delamination and related cracking.
- Substrate movement: Control moisture changes in substrates to minimize expansion/contraction issues.
Set realistic goals: expect hairline shrinkage, but aim to avoid major cracks with good planning and execution.
Reinforcement and control joints
Adding reinforcement helps manage stress and prevent cracking. Here’s when and how:
Fibers: Add to your mix for small, hairline cracks. Use sparingly; too many can weaken the plaster.
Mesh or lath: Install over large areas or where substrate movement is likely. Place at mid-height and stagger joints between layers.
Control joints/movement gaps: Incorporate every 6-8 feet to allow for natural expansion/contraction. Fill with a flexible sealant after plastering.
Troubleshooting and Repairs
Adopt a diagnostic approach to issues like hairline cracks, blisters, delamination, or staining. Note when problems occur and under what conditions they show up. Use inconspicuous patches to test a repair plan before wider application.
Follow step-by-step repairs tailored to crack size and cause, from surface smoothing to patching and re-sealing. Use compatible materials and verify bond before proceeding. When in doubt, consult the repair guidance from the product manufacturer or a local pro for best results.
Repairing hairline cracks and larger splits
First, clean the crack thoroughly. Use a wire brush to remove any loose material.
For hairline cracks: Apply a thin layer of clay plaster using a trowel, feathering it out at both ends so it blends with the surrounding surface. Let it dry, then lightly sand and finish as usual.
For larger splits: Route out the crack using a router or chisel to create a V-shaped groove. Clean it again. Mix some clay plaster with fine sand for added strength. Apply the mixture into the routed area, pressing it in firmly. Feather the edges and let it dry before finishing.
Fixing adhesion failures and bulging areas
If your clay plaster is peeling or bulging, first test the adhesion. Gently tap the surface with a hammer. If it sounds hollow, there’s likely a problem.
For failed areas: Remove the loose plaster using a trowel or chisel. Check for underlying moisture issues or substrate problems. Address these before reapplying clay plaster. Mix a small batch first to ensure consistency with the existing surface.
For bulging areas: Carefully cut away the bulge using a utility knife, creating a clean edge. Apply a thin layer of clay plaster mixed with fine sand for added strength. Press it in firmly and let it dry before finishing.
Drying, Curing, Finishing, and Maintenance
Outline controlled drying and curing strategies to minimize shrinkage and cracking. Favor breathable finishes that suit clay plaster and the environment. Keep the area ventilated and protect from rapid changes in temperature or humidity.
Monitor drying conditions and adjust as needed, then perform light finishing as appropriate. Establish a routine maintenance plan to extend the life of the plaster and address issues promptly. If you need specifics, check product guidance or local recommendations for post-application care.
Drying and humidity management
Clay plaster needs a slow, steady drying process. Too fast, it cracks. Too slow, it stays damp and grows mold.
Ventilation is key. Open windows, use fans to circulate air. But not too much, or you’ll dry it out too quick.
Gentle heat can help if it’s too cold. But keep it low, around 65°F (18°C). Too hot, and you’ll speed up drying.
Staged drying is best. Let the first layer dry a bit before applying the next. This gives each layer time to dry evenly.
Finishes, pigments, and protective coatings
Clay plaster needs breathable finishes. Waxes and natural sealers are good. They let moisture escape while protecting the surface.
Pigments can be mixed in during application. But go easy. Too much, and it’ll darken as it dries.
Stay away from non-breathable coatings like paint or varnish. They trap moisture, causing plaster to fail over time.
Always test finishes on a small area first. Make sure they don’t darken the plaster too much or leave a shiny film.
Conclusion
Clay plaster can be durable and good looking when you get the steps right. Focus on clean surface prep, correct mixing, controlled layering, and careful drying to protect safety, durability, and appearance.
Before you start, check that you have the right tools and materials, test a small patch on a hidden area, clean and dampen the surface, mix in small batches as you learned, apply in thin, controllable coats, let each coat set before adding the next, and watch for any cracks or bond failures as you go.
Avoid common mistakes like skipping proper bonding prep, using the wrong substrate or additives, applying too thick a coat, and rushing drying or curing. Always work with ventilation, wear eye protection and a mask when mixing or sanding, and keep the area protected from drafts and extreme temps. If you’re unsure about moisture, bowing walls, or persistent cracks, pause and reassess rather than forcing a fix.
If cracks keep showing up, or moisture problems and structural concerns appear, it makes sense to call a professional. Stay practical, follow the steps, and you’ll keep the project moving and the finish solid and affordable.
FAQ
Can I put clay plaster over a painted surface or non-porous substrate?
Painted surfaces usually need to be abraded and primed with a bonding primer before plastering. If the substrate is non-porous, you may need a compatible bonding agent. Always check the product label and manufacturer instructions first.
How do I know if clay plaster is right for a damp area like a bathroom?
Clay plaster can tolerate some moisture, but persistent dampness will cause problems. Check as you would with any finish: assess moisture risk and follow the product’s guidance for humidity and exposure. Local rules or the manufacturer’s instructions will have the specifics.
What should I do if I see a hairline crack developing after the plaster dries?
Don’t ignore it. Stop finishing and inspect for movement or insufficient curing. Patch with the recommended repair method and reseal or recoat as directed by the product instructions.
What’s the safest way to patch small cracks without weakening the wall?
Use a compatible repair mix and press it into the crack with a putty knife. Allow it to set per the product label, then recoat with the proper finishing layer. If in doubt, consult the material’s instructions or ask for guidance from a local supplier.