

Introduction
The right repair depends on how the crack moves, how wide it is, and whether water is getting through.
Key takeaways
- Assess movement versus static cracks to guide repair method choices and timing.
- Measure crack width approximately and note tolerance to determine suitable filler and injection.
- Address water infiltration first: seal active leaks before any structural repair work.
- Choose epoxy vs polyurethane injection based on movement, chemical resistance, and cure behavior.
- Surface prep and diagnostics determine success; clean, dry, and chisel corners properly.
- Follow safety rules: PPE, ventilation, containment, and proper disposal of waste.
Table of Contents
- Introduction
- Key takeaways
- Quick Decision Framework — Triage by Movement, Width, and Water
- Identifying Crack Types and Underlying Causes
- Repair Materials Explained — Epoxies, Polyurethanes, Sealants, Patches, Grouts
- Surface Preparation and Diagnostics That Determine Success
- Application Methods — Injection, Routing & Sealing, Patching, and Grouting
- Safety, Environmental, and Disposal Considerations
- Common Mistakes, Troubleshooting, and Red Flags Requiring a Professional
- Planning Your Repair Project — Checklist, Timeline, and Maintenance Plan
- Conclusion
- FAQ
Quick Decision Framework — Triage by Movement, Width, and Water
Begin with a simple flow: classify cracks by whether they are active or stable, how wide or deep they are, and whether they leak or stay dry. This triage guides your repair path from the start. Use a quick checklist to map movement, width, and water to options you can tackle safely.
Movement status tells you what to do next: non-moving cracks often suit surface sealants or cosmetic repairs, while moving cracks call for injections or stabilization. Then match width and depth to materials: hairline cracks usually need surface treatments; medium to wide cracks may require injections; deep or dynamic cracks trigger consideration of structural reinforcement. If water is present, add injections plus waterproofing or drainage planning and review safety around active leaks. Keep a short decision tree handy and follow up with a pro when high loads or foundation signs appear.
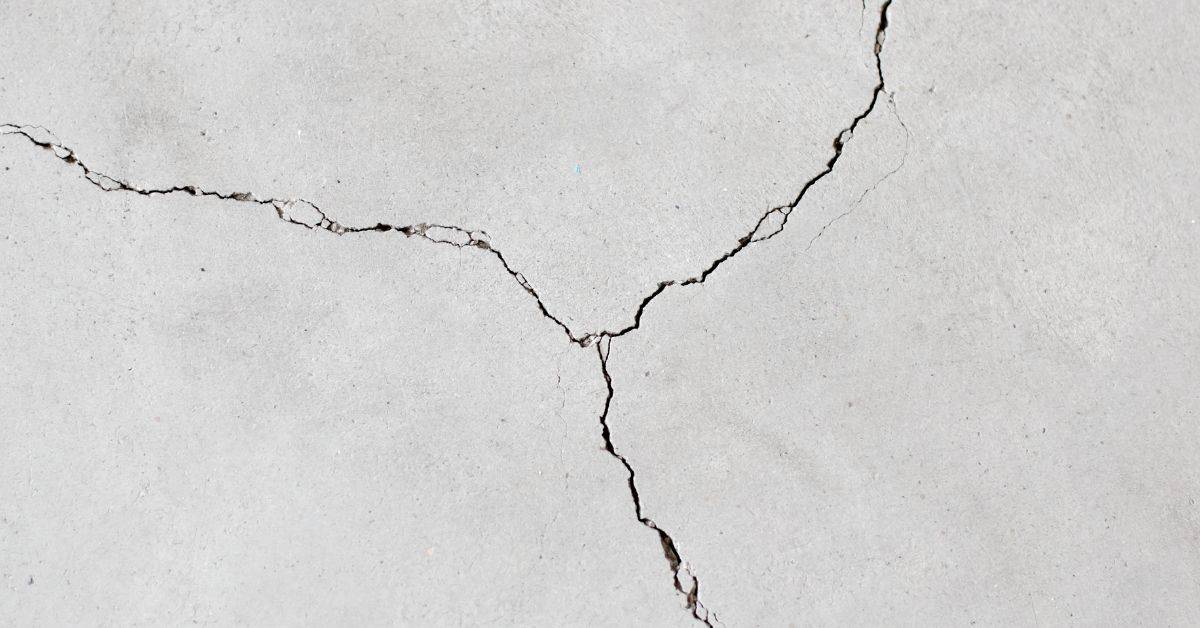
Assessing movement (active vs. dormant)
First off, don’t go patching every crack you see. Some cracks are just sitting there, harmless. Others are moving and need your attention.
Active cracks can cause more damage over time if left untreated. Here’s how to tell them apart:
1. Look for fresh edges: Active cracks will have sharp, fresh-looking edges. Dormant ones are usually weathered and rounded.
2. Check for widening: Mark the crack with a pencil or piece of chalk at both ends. Wait a few days, then check if it’s wider. If so, it’s active.
3. Feel for movement: Gently press on either side of the crack. If you feel any give or see more widening, it’s active.
Measuring Width and Depth (What to Record)
Alright, listen up. You’ve checked for movement, now let’s get the dimensions right. This is crucial for matching repair materials and methods.
Width: Measure across the crack or damaged area at its widest point. Don’t average it out, we want the worst case here. Use a tape measure, not your thumb!
Depth: Now, mark the width on both sides of the crack. Grab a screwdriver and gently probe the crack to find its deepest point. Mark this depth with a pencil at both ends. Then, use a ruler or depth gauge to measure from the surface down to your marks. Record these depths.
Remember, every product has different width and depth thresholds for repair methods. So, check those technical data sheets before you start any work. And don’t forget to record all these measurements somewhere safe – you’ll need them later!
Detecting water: active leaks vs. damp substrates
Before you start your concrete work, you need to know what you’re dealing with when it comes to moisture. Here’s how to tell if you’ve got an active leak, dampness, or episodic moisture.
Active leaks: These are easy to spot – water is dripping, flowing, or pooling somewhere. Check under sinks, around windows, and behind appliances for these obvious signs. If you find any, fix the source before proceeding with your concrete work.
Damp substrates: This is where things get trickier. You might see discoloration, smell mold, or feel dampness when you press on the surface. To be sure, use a moisture meter – they’re cheap and easy to find. Aim for readings below 4% relative humidity (RH) before pouring your concrete.
Episodic moisture: This is moisture that comes and goes with weather changes or other factors. It’s harder to detect but can still cause issues. Check the area during different times of day, after rain, or when dew forms. If you suspect episodic moisture, consider using a waterproofing membrane as part of your concrete prep.
Identifying Crack Types and Underlying Causes
Use clear criteria to separate structural from non-structural cracks. Look at location, pattern, any movement, and evidence of load-bearing displacement. This helps you know when to bring in a structural engineer.
Common causes include concrete shrinkage during curing, ground settlement or movement, corrosion of reinforcing steel, and thermal cycling or freeze-thaw effects. Diagnostic cues like crack orientation, width, moisture staining, and whether multiple cracks share a pattern aid your narrowing. Seek engineering input if cracks widen, are highly irregular, or show displacement that affects doors, windows, or foundations.
Visual indicators of structural distress
Cracks that hint at serious issues often show signs of movement, displacement, or multiple correlated cracks. Here’s what to look for:
Displacement: Cracks that cause visible displacement, like doors or windows sticking, may indicate a structural problem.
Stepped cracks: Wide, stepped cracks can signal settlement issues or movement in the foundation.
Widening cracks: Cracks that are widening over time could be a sign of ongoing damage. If you notice this, measure and monitor them regularly.
Typical non-structural crack patterns and behaviors
Not all cracks are cause for alarm. Some common, harmless patterns include:
Shrinkage cracks: These hairline cracks appear as the concrete cures and shrinks. They’re usually random and isolated.
Plastic settlement cracks: These occur when the concrete first pours and settles into place. They typically form near control joints or expansion cuts.
Hairline thermal cracks: These fine, hairline cracks result from temperature changes. They’re often found in areas with extreme heat or cold.
Repair Materials Explained — Epoxies, Polyurethanes, Sealants, Patches, Grouts
Map material families to their primary function: epoxies for structural bonding, polyurethane or caulks for flexible sealing, sealants for waterproofing, and cementitious patches or grouts for bulk filling. Match to the crack scenario you’re facing, considering movement and exposure.
Pros and cons vary: stiffness and strong adhesion versus flexibility and damp compatibility, plus how each behaves long term in wet conditions. Rely on technical data sheets for cure times, crack width limits, substrate prep, and environmental limits. Prepare surfaces properly, watch curing conditions, and protect fresh repairs as recommended to avoid failure.
Epoxy resins — structural bonding
Epoxies are your go-to for restoring load transfer across cracks. They bond strongly to concrete, creating a rigid, durable repair.
Key points:
- Epoxies excel in dormant or low-movement cracks (less than 0.1mm).
- They require dry surfaces for proper adhesion and curing.
- Not suitable for active movement or wet conditions without additional measures.
Polyurethane and reactive-foam systems — waterproofing and leak-stopping
Moisture-reactive foams and flexible polyurethanes are ideal for active leaks and joints. They expand to fill voids and seal against water intrusion.
Key points:
- These materials are not structural adhesives; they’re best for water management, not load transfer.
- They can accommodate some movement (up to 25% of crack width).
- Great for damp substrates and active leaks, but check compatibility with your specific situation.
Sealants, elastomers, and patching compounds
Flexible joint sealants and polymer-modified patches are perfect for surface restoration and expansion control. They can be used alone or in combination.
Key points:
- Use sealants for narrow cracks (less than 2mm) and joints, providing a flexible, waterproof barrier.
- For wider cracks, use a layered approach: first apply a patching compound, then top with a sealant for added protection.
- These materials are not structural repairs; they’re best for non-load-bearing surfaces and temporary fixes.
Surface Preparation and Diagnostics That Determine Success
Proper prep and diagnostics are often the single most important factor for long-lasting repairs. Skipping steps leads to premature failures and recurring cracks. Treat prep as a concrete investment in success.
Clean thoroughly to remove dust, oil, and coatings; assess bond-breaking contaminants and choose cleaning methods accordingly. Route and profile to expose sound substrate, and document crack width implications. Check for active moisture and plan mitigation before material application, then record findings with photos and notes to guide future maintenance.
Inspection tools and visual checkpoints
Before you start repairing, inspect the crack area thoroughly. Use these tools and checks to ensure your repair lasts.
- Chisel: Tap gently along the crack to confirm it’s not too deep or wide for a simple repair.
- Wire brush: Remove loose material and dust. Skipping this can lead to poor adhesion.
- Moisture meter: Check for excess moisture. Too much can ruin your repair.
- Magnet or magnetized screwdriver: Test for reinforcement. Cracks over rebar need special attention.
- Flashlight: Inspect the crack’s depth and geometry in low light.
- Plastic sheeting: Tape it over the crack, then check later for water seepage.
- Tape measure: Measure crack width. Narrow cracks need different repair methods.
- Level or string line: Check for signs of movement. Active movement needs special consideration.
Quick rule: Always inspect before you repair. Skipping checks can lead to costly failures.
Cleaning, routing, and profile preparation
Remove weak material and create a good bonding surface for your repair.
Step 1: Clean the crack thoroughly. Use a wire brush to remove dust and loose material. A degreaser can help if there’s oil or grease.
Step 2: Route the crack. Use a chisel and hammer to create a ‘V’ shape. This gives your sealant or patch a better grip. Be careful not to damage reinforcement.
Step 3: Remove unsound material. Chip out degraded concrete until you reach solid substrate. This ensures your repair has something strong to bond with.
Managing moisture and temporary leak control
Moisture can ruin your repair if not controlled. Here’s how to manage it temporarily until you’re ready for permanent work.
Step 1: Stop active leaks. Use a flexible, waterproof tape or sealant as a quick fix. This buys time while you prepare the area properly.
Step 2: Dry out the substrate. If it’s damp, use fans and dehumidifiers to speed up drying. You might need to postpone permanent repairs until it’s dry enough.
Step 3: Consider moisture barriers or sealers. These can help control moisture drive from within the concrete. But remember, they’re not a permanent solution on their own.
Application Methods — Injection, Routing & Sealing, Patching, and Grouting
Define each method by the crack you’re treating: injection for movement and leak control, routing and sealing for exposed gaps, patching for surface restoration, and grouting for bulk filling. Link method to crack width, movement, and exposure.
Outline high-level steps: prepare, access and clean, apply or inject, cure, and inspect. Note common pitfalls and misapplications to avoid. Compare epoxy, polyurethane, and cementitious options in terms of movement control, bonding, and water sealing, then use quick checks and safety practices as you work. If in doubt, plan for professional input.
Injection techniques: epoxy vs. polyurethane approaches
Injecting concrete cracks involves strategic port placement and a controlled injection sequence. For static cracks, low-viscosity epoxies are ideal due to their strong bonding properties.
Epoxy: Drill ports every 4-6 inches along the crack. Inject epoxy slowly from the bottom up, allowing it to fill the crack and create a solid bond with the surrounding concrete.
Polyurethane: For wet leaks, use expanding polyurethane foam. Drill ports closer together, about 2-3 inches apart. Inject quickly, allowing the foam to expand and seal the leak.
Routing and surface sealing best practices
Routing creates a controlled profile for better sealant adhesion. Use a router with a suitable bit, following the crack at a consistent depth.
Backer rod: Insert a backer rod into the routed channel to create a reservoir for the sealant and prevent over-application.
Sealant bead: Apply the sealant in a continuous bead, filling the routed channel. Avoid applying too much, as this can lead to excess squeeze-out and poor adhesion.
Three-sided adhesion: Ensure the sealant adheres to all three sides of the crack (top and both walls) for better performance. Use primers if necessary.
Patching and pressure grouting for wide cracks or voids
When dealing with wide cracks or voids, use bulk patching or pressure grouting to rebuild the lost concrete before sealing.
Bulk patching: Mix a cement-based patching compound and apply it into the crack using a trowel or putty knife. Ensure proper bonding by cleaning and profiling the crack first.
Pressure grouting: For larger voids, use pressure grouting to force grout deep into the void, rebuilding the lost concrete. This involves drilling ports at the bottom of the void, connecting them with tubing, and applying pressure as you inject the grout.
Cure time: Allow the patch or grout to cure properly before sealing. Follow the manufacturer’s guidelines for optimal results.
Safety, Environmental, and Disposal Considerations
PPE and ventilation are essential: gloves, eye protection, respirators if needed, and a well-ventilated area. Temperature and humidity can affect safety and cure, so monitor conditions. Plan around safety first on every step.
Handle reactive chemistries with care: follow mixing, application, storage, labeling, and spill response. Manage waste and environmental impact by considering VOCs, container recycling, and proper disposal for contaminated materials. Always reference the SDS and local regulations, and keep spill kits and emergency steps ready. Maintain containment and ventilation throughout the job.
Worker and occupant safety precautions
Protecting workers and building occupants is crucial during concrete crack repair. Here are the primary controls to consider:
Resins and Solvents: Use these only in well-ventilated areas. Keep occupants away until fumes have dissipated.
Dust from prep work: Wet down surfaces before grinding or routing to minimize dust. Wear a respirator designed for particulates.
Environmental impacts and low-VOC options
Concrete crack repair can have environmental implications, especially with volatile organic compounds (VOCs). Here’s what to consider:
VOC Emissions: Some repair materials emit VOCs. Check product labels or SDS for VOC content.
Consider low-VOC options, like water-based sealants or eco-friendly epoxies. Contain waste and spills to prevent groundwater contamination.
Waste handling and disposal basics
Properly handling and disposing of repair waste is vital for safety and environmental protection. Here’s how:
Leftover Resin: Store in original, tightly sealed containers. Dispose according to local hazardous-waste rules.
Contaminated Rags: Treat as hazardous waste. Do not launder or dispose with regular trash. Contact your local hazardous-waste facility for disposal instructions.
Common Mistakes, Troubleshooting, and Red Flags Requiring a Professional
DIY pitfalls include skipping surface prep, selecting the wrong material for the crack, ignoring movement, and neglecting moisture or drainage before sealing. These oversights undermine repairs fast. Identify and fix them early.
Watch for mismatches between material and method, incorrect quantities, or neglected cure times. Monitor movement and widening cracks, even if they start small. Troubleshoot failed repairs by re-cleaning, re-prepping, and re-testing patches. Flag active structural cracks or significant water intrusion as signs to call a professional.
Why repairs fail — quick diagnostics and fixes
Repairs can fail for various reasons. Let’s identify common issues and how to fix them.
Adhesive failure: If the repair material isn’t sticking, it might be due to contaminants on the surface or using the wrong primer. Re-clean and re-prime before re-applying.
Adhesion to laitance: Laitance is a weak, cement-rich layer that can form on concrete surfaces. Remove it by grinding or acid-washing before repairing.
Incorrect flexibility: Concrete moves. If your repair material isn’t flexible enough, it’ll crack under stress. Choose materials with suitable elasticity for the expected movement.
Red flags and when to call an engineer or contractor
Some cracks require immediate professional attention. Here are red flags to watch out for:
Suspected structural cracks: Wide, diagonal, or stair-step cracks could indicate serious structural issues. Don’t DIY; call a pro.
Rapid widening: Cracks that grow quickly need immediate assessment. They might be signs of settlement problems or other underlying issues.
Recurring leaks: If water keeps seeping through after repairs, there’s likely a more complex problem at play. Get expert help to diagnose and fix it.
Reinforcement corrosion: Pitting, spalling, or rust stains around cracks could mean your rebar is corroding. This requires professional intervention.
Planning Your Repair Project — Checklist, Timeline, and Maintenance Plan
Define the repair scope by movement, width, water exposure, and the structure’s role so you know urgency and depth of work. Set clear success criteria for the project. A practical plan starts with those indicators.
Inspect the site thoroughly: map crack patterns, movement history, moisture issues, drainage, utilities, and surrounding concrete. Photograph or video for records and reference. Then choose your method and materials to align with the observed conditions and curing requirements, and outline a realistic schedule and budget.
Tools and materials checklist
Before you start, make sure you have all the necessary tools and materials to ensure a successful repair.
- Tape measure: To accurately measure crack width and length.
- Crack gauge: For precise measurement of crack width.
- Moisture meter: To detect moisture intrusion in the concrete.
- Chipping hammer or grinder: For surface preparation.
- Vacuum or broom: To clean the repair area.
- Injection equipment (if applicable): Pumps, ports, and needles for epoxy/polyurethane injections.
- Cementitious patch material or grout: For filling wide cracks or voids.
- Sealer or coating: To protect the repaired area from water intrusion.
- Substrate test kit: To check for contaminants that could affect adhesion.
- Material Safety Data Sheets (MSDS): For safety information on all products used.
- Technical data sheets: To ensure proper mixing, application, and curing of materials.
Quick rule: Always verify product technical data before purchase to ensure compatibility with your repair method and conditions.
Post-repair inspection and routine maintenance
Regular inspections help catch failures early, extending the service life of your concrete repairs.
- Visual inspection: Check for new cracks or movement around the repair area.
- Moisture check: Use a moisture meter to ensure no water is entering the repaired area.
- Sealant condition: Inspect sealants and coatings for signs of deterioration or delamination.
- Drainage assessment: Ensure proper drainage around the repair area to prevent water buildup.
- Document findings: Keep records of each inspection to track changes over time.
- Re-seal joints as needed: Maintain sealant integrity to prevent water intrusion.
- Address drainage or cracking drivers: If new cracks appear, address the underlying cause to prevent further damage.
Quick rule: Inspect your repairs at least once a year, and more frequently in areas with extreme weather conditions or heavy traffic.
Conclusion
Patching cracks well is about choosing the right approach for movement, width, and water, then sticking to a simple, safe plan that protects the structure andlooks good for years. Do the work with care, test your choices on a small area, and keep the project within its limits.
First, assess movement, width, and moisture, then decide quickly and clearly: use a structural epoxy if movement is minimal and you need stiffness, switch to a polyurethane or sealant if water is actively entering, and reserve patches or grout for nonstructural gaps that won’t shift. Clean, dry, and roughen the surface as needed, follow the material’s directions, and apply in the order that keeps water out and the repair durable. Finish with a proper cure and a simple maintenance check that fits your timeline.
Common mistakes to avoid include trying to seal active leaks with the wrong material, overfilling or underfilling the crack, and skipping surface preparation or small-area testing. Always wear eye protection and gloves, ventilate when working indoors, and keep water away from the repair site during curing. Don’t rush or skip the diagnostics—validate the crack type, movement pattern, and moisture level before you commit to a method.
If you’re dealing with active movement, widening cracks, persistent leaks, or cracks that keep changing after a repair, it’s time to call in a professional. For large areas, complex routes, or failures beyond a DIY fix, get a pro to inspect and decide on a robust plan. Stay methodical, stay safe, and you’ll finish with a repair that lasts and looks right. You’ve got this—take the next step confidently.
FAQ
How can I tell if a crack is moving or just static?
Watch it over a few weeks. If it widens or shifts with traffic, temperature, or loading, it’s moving. Mark the ends and note changes; if there’s no change, it’s likely static for now.
How should I evaluate crack width for repair decisions?
Use a crack gauge or compare to a ruler to estimate width. If it’s a hairline or very narrow, sealants or injectables may work; wider cracks need different treatment. Always check the product label or manufacturer guidance for the max width it’s rated to handle.
What should I do about water infiltration before or during repair?
Address the water source first, if possible. Dry the crack and surrounding area before applying any repair product, and choose materials that are rated for wet conditions if you can’t stop the water. Follow the product instructions and local rules for wet installations.
When is epoxy injection better than polyurethane, and vice versa?
Epoxy is best for static, non-moving cracks and where you need stiffness and potential bonding to structural concrete. Polyurethane is better for moving cracks and leaks because it stays flexible and can handle some movement and water. Use the crack’s behavior and water presence to guide your choice and verify with product instructions.
What surface prep is essential for durable repair?
Clean and remove loose material, dust, oil, and old sealant from the crack. Roughen or key the surface so the repair material can bond, and dry the area as much as possible. Always follow the specific prep steps shown on the product label or datasheet.