
Introduction
Choosing the right concrete crack repair means matching the repair method to how the crack moves, how wide it is, and whether water is involved. Cracks can be structural or non-structural, and the approach should reflect that difference and how it affects stability. Start by noting whether the crack is active, and how you see movement or widening over time.
Evaluate the severity by looking at width, length, and whether the surrounding concrete is loose or flaking. Select repair materials based on the crack type and exposure; check manufacturer guidelines and local rules for guidance. Before any repair, prepare the surface properly by cleaning, drying, and removing loose material so the product can bond effectively.
Key Takeaways
- Assess crack type to distinguish structural versus non-structural before repair decisions.
- Match repair method to movement, width, and water exposure for durability.
- Prepare surfaces thoroughly to ensure adhesive seals and long-lasting repairs.
- Review material compatibility with concrete, moisture, and load conditions.
- Prioritize safety: use PPE, follow manufacturer instructions, and avoid over-application.
- Establish a maintenance plan and monitor for new cracking or movement.
Table of Contents
- Introduction
- Key Takeaways
- Why Concrete Cracks Form and Why It Matters
- Identify and Classify the Crack: Width, Depth, Length, and Activity
- Assess Severity and Set Repair Urgency
- Tools, Materials, and Standards Explained
- Surface Preparation and Pre-Repair Steps That Determine Success
- Repair Methods and Step-by-Step Application Techniques
- Preventing Future Cracking: Joints, Placement, Curing, and Protection
- Costs, Safety, Maintenance Schedules, and Common Pitfalls
- Conclusion
- FAQ
Why Concrete Cracks Form and Why It Matters
Concrete cracks arise from a mix of movement, moisture, and load, and recognizing the cause helps you choose the right repair path. Distinguish between thermal movement, shrinkage, structural stress, corrosion, chemical attack, and freeze-thaw to set repair priorities and select appropriate materials. Linking the crack’s origin to urgency guides whether a fix is cosmetic, waterproofing-focused, or structural in nature.
Cosmetic fixes suit non-active, surface-level cracks, while moisture ingress calls for waterproofing measures or flexible sealants. When cracks widen or show evidence of ongoing movement, consider structural repairs such as injections or reinforcement, and verify that the chosen method aligns with the crack’s behavior and the surrounding conditions. Always check product labels and manufacturer instructions to confirm suitability for your situation and to understand any limitations or preparation requirements.
Thermal, Shrinkage, and Moisture-Driven Cracking
Concrete cracks can form due to natural processes such as thermal movement, shrinkage during curing, or moisture ingress. These types of cracks are typically surface-level and non-structural but can lead to further damage if left untreated.
Thermal cracking occurs when concrete expands and contracts with temperature changes, causing hairline cracks at the surface. These are usually cosmetic and can be repaired using surface sealants or fillers.
Shrinkage happens as concrete dries and loses moisture, leading to minor cracks. These can often be prevented by proper curing and should be addressed promptly to prevent water ingress.
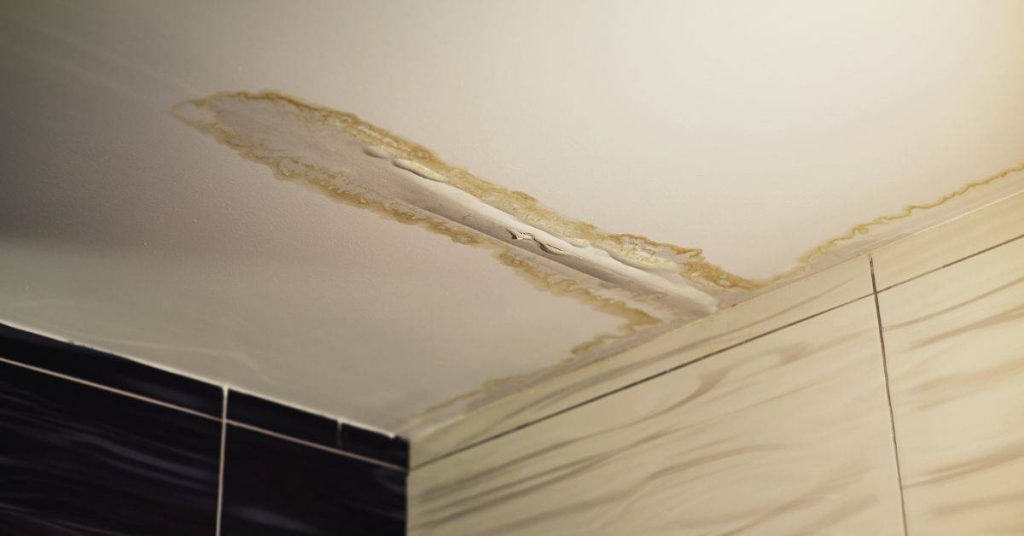
Moisture-driven cracking can occur when water is trapped within the concrete or when it’s exposed to excessive moisture. This can lead to efflorescence (white powder on the surface) and, if left untreated, may cause more serious issues like spalling or delamination.
Structural, Reinforcement Corrosion, and Settlement Issues
Some cracks indicate significant structural problems that require immediate attention. These include wide cracks, diagonal cracks, or those that run through the full depth of the concrete.
Structural cracking can be caused by excessive loading, settlement of the foundation, or other structural defects. These cracks may need to be repaired using epoxy or foam injections and reinforced with additional steel or fiber reinforcement.
Reinforcement corrosion occurs when the steel bars within concrete rust, expanding and causing the surrounding concrete to crack. This is often due to insufficient protective coatings or water ingress. Corroded reinforcement should be removed and replaced, and the cause of water ingress addressed.
Settlement issues can cause cracks as the foundation shifts or settles unevenly. These cracks may need underpinning or other structural repairs to stabilize the foundation and prevent further cracking.
Chemical Attack and Freeze-Thaw Deterioration
Concrete can be damaged by chemical attacks from acids, salts, or other chemicals in the soil or environment. It can also deteriorate due to repeated freezing and thawing cycles.
Chemical attack can cause concrete to soften, flake off (spalling), or crumble. Affected areas should be removed and replaced with concrete that is resistant to the specific chemical agent involved.
Freeze-thaw deterioration occurs when water within the concrete freezes and expands, causing cracks. These cracks allow more water to enter, leading to further damage in subsequent freeze-thaw cycles. This can be prevented by using air-entraining admixtures during concrete mixing or sealing the surface with appropriate sealants.
If you suspect chemical attack or freeze-thaw deterioration, consult a professional for testing and advice tailored to your specific situation.
Identify and Classify the Crack: Width, Depth, Length, and Activity
Create a simple measurement protocol using a crack gauge or ruler, and photograph the crack with a reference scale for accurate records. Establish a baseline by recording initial dimensions and noting any visible features such as texture, dampness, or edge irregularities. Develop a marking system to color-code crack features and sketch a site map that stays with your records.
Set a monitoring plan with regular check-ins and note how weather or temperature affects the crack. Map each feature to repair options, reserving more intensive methods for wide, active cracks that may require injection or routing, and consider a professional assessment when uncertainty remains. Review manufacturer data sheets and product compatibility to ensure your chosen method matches the crack type and movement profile.
Measuring and Documenting Cracks
Accurate measurements and documentation facilitate tracking crack progression and informed repair decisions.
Use a crack gauge or ruler to measure the width at multiple points along the crack’s length. Estimate depth if a probe is not available. Photograph the cracks with a scale for reference.
If the width is greater than 0.2mm (hairline) and less than 15mm (wide), record the width, estimate the depth, and photograph it with a scale. If the width is 15mm or more, or if the depth is unknown, consult a professional for accurate measurement. Re-measure if initial readings seem inaccurate, ensuring photos are clear and dated.
Determining Active Versus Dormant Movement
Distinguishing between active and dormant cracks influences repair urgency and method. Inspect for signs of recent activity such as fresh concrete dust or displaced debris.
Monitor crack width over time using baseline measurements and photographs. If the width changes by more than 5% within the monitoring interval, or if there are signs of recent activity, consider the crack active and prioritize repair. If the width is stable and there are no signs of recent activity, consider the crack dormant and monitor it periodically.
Re-evaluate your classification if initial data seems incorrect based on subsequent monitoring data.
Visual Checkpoints and Crack Patterns to Note
Observing visual cues helps identify the cause, assess severity, and plan repairs. Use this checklist when inspecting cracks.
- Reinforcement corrosion: Look for rust stains or efflorescence around cracks.
- Settlement issues: Check for diagonal cracks at corners or near openings.
- Chemical attack: Inspect for discoloration, especially white or brown cracks.
- Crack pattern: Note the pattern (map, diagonal, step), color, and texture of the crack.
- Structural issues: If the pattern suggests a structural issue or settlement, escalate to a professional assessment.
- Specialized repair methods: If the color or tone indicates chemical attack or freeze-thaw deterioration, consider specialized repair methods such as injection or sealing.
- Review photos and notes: Ensure you haven’t missed any details. Consult with a professional if unsure about your findings.
Quick rule: Always review your findings with a professional if you’re uncertain about the cause, severity, or appropriate repair method for a crack.
Assess Severity and Set Repair Urgency
Look for clear urgency indicators such as water leaks, active seepage, visible movement, or wide cracks that may signal structural concern. Distinguish emergencies requiring immediate action from issues that can be scheduled for inspection and repair, and consider whether safety hazards demand a rapid response. Use these observations to determine whether to engage a licensed professional for evaluation.
Link the severity to underlying drivers such as freeze-thaw cycles, water infiltration, or soil movement, and plan preventive steps to address root causes after repair. Emphasize that addressing the cause is essential to prevent recurrence and extend the repair’s lifespan. Include safety, permits, and professional involvement as part of your readiness checklist, and verify local requirements where applicable.
Structural Warning Signs and When to Call an Engineer
Certain cracks in your concrete may indicate serious structural issues. If you notice any of the following red flags, contact a licensed structural engineer immediately for evaluation before proceeding with repair.
Rapid widening or vertical displacement of cracks could signal significant structural movement. Multiple connected failures also warrant professional attention.
Addressing the underlying cause is essential to prevent recurrence after repair. A licensed engineer can help determine the root cause and recommend appropriate repairs.
Water Intrusion, Active Leaks, and Below-Grade Concerns
Visible water seepage, dampness, or efflorescence may indicate potential structural compromise due to water intrusion. If you notice any of these signs, prioritize waterproofing and drainage improvements.
Below-grade cracks are particularly concerning as they can allow water entry into the structure, leading to further deterioration. Consult a professional for an appropriate repair method that addresses both the crack and the underlying water issue.
Ensure proper drainage around your concrete structures, monitor cracks regularly, and maintain waterproofing systems to prevent recurrence.
Load, Use, and Location-Based Priority
Certain areas in your structure may be more critical than others due to their function or exposure. Cracks in critical areas such as parking decks, warehouse aisles, or foundations should be prioritized for repair based on their impact on safety, functionality, and durability.
High traffic areas, chemical exposure, or other unique conditions may require specialized repair methods. Consult a structural engineer or experienced contractor to determine the best approach and scheduling for repairs in these critical areas.
Regularly inspect and maintain these critical areas to prevent recurrence of cracks. Addressing underlying causes is key to sustaining durability over time.
Tools, Materials, and Standards Explained
Group tools by crack width and movement and choose items that pair with the selected repair material, focusing on gauges, containment, mixing implements, and application gear. Match materials to crack conditions by considering epoxy resins, polyurethane foams, cementitious sealants, and injection materials, noting how each handles depth, width, and movement. Prepare for work with appropriate safety gear and containment to protect workers and the surrounding area.
Consult standards and manufacturer data sheets to confirm compatibility with the crack and to understand curing, testing, and application guidelines. Follow a clear workflow from surface preparation to post-repair inspection, and use a quick-match checklist to confirm the right product family for the crack type and exposure. Keep a concise reference of test methods or criteria required by local codes if applicable.
Tools and Materials Checklist
Select appropriate tools and materials based on crack characteristics.
- Measuring gauges: Essential for determining crack width. Consider renting or borrowing to save cost.
- Containment tools: Prevent material escape during application, crucial for wider cracks (>0.5mm).
- Mixing implements: Ensure proper mixing of repair materials. Choose those accommodating crack flexibility for active movement.
- Application guns/packers: Facilitate material injection or application. Opt for those compatible with chosen repair material.
- Smoothing and finishing tools: Achieve a smooth, durable finish. Choose flexible tools for dynamic cracks.
Repair Material Types and Uses
Choosing the right repair material is crucial for successful crack repairs.
- Epoxy resins: Ideal for narrow cracks (up to 0.5mm) due to strong bond strength and resistance to chemicals.
- Polyurethane foams: Suitable for narrow cracks, providing flexibility and insulation. Avoid in structural repairs.
- Cementitious sealants: Good for wider cracks (0.5-3mm), but may not handle dynamic movement well.
- Injection materials (low/high viscosity): Effective for deep, structural cracks. High-viscosity materials require specialized application equipment.
- Patch mortars: Used for wider, deeper cracks needing structural repair. Ensure compatibility with existing concrete by checking manufacturer guidelines or consulting a professional.
Consult Specifications, Standards, and Technical Data
To achieve optimal results, ensure your repair complies with relevant industry standards and manufacturer guidelines. Review product Technical Data Sheets to confirm compatibility with crack conditions, cure conditions, and expected lifespan.
Examine applicable ASTM, ACI, or ICC-ES standards for performance limits, allowable movement, and substrate preparation requirements. If the repair is structural, consult relevant building codes (e.g., IBC) for additional requirements.
If the crack exhibits active water intrusion, evaluate materials with waterproofing capabilities and appropriate substrate preparation methods. Failure to consult relevant standards and manufacturer guidelines may result in subpar repairs, leading to early deterioration or structural issues.

Surface Preparation and Pre-Repair Steps That Determine Success
Follow a logical sequence: clean the surface, remove deteriorated concrete and coatings, and prepare the substrate to receive the repair material. Manage moisture and ensure the area can dry or cure as required by the product data, keeping in mind that preparation directly affects adhesion and durability. Document the prep steps to maintain consistency across the crew.
Evaluate the substrate for width, moisture, and integrity, planning for any necessary repairs to the concrete before injection or sealing. Establish proper surface conditioning for adhesion, including roughness, priming, or moisture mitigation as needed, and verify compatibility with the chosen material. Conduct a post-prep adhesion check and confirm a clean, dry, stable surface prior to proceeding.
Cleaning, Removing Contaminants, and Substrate Soundness
Proper cleaning ensures adhesion and durability of repair material. Begin by inspecting the surface visually for cleanliness.
Remove any visible contaminants such as dust, oil, grease, curing compounds, or efflorescence using appropriate cleaners and tools like brooms, shop vacs, and scrub brushes.
Verify no residues remain after cleaning to prevent bond failure. If cleaning is inadequate, re-clean the surface before proceeding.
Prepare Crack for Repair
Proper crack preparation ensures efficient material application and effective filling. Measure your crack’s dimensions to ensure they align with your chosen repair material’s requirements.
Maintain consistent crack width along its length for uniform repair. If the width varies significantly or is too narrow, use tools such as routers or chisels to widen and open the crack evenly.
If initial geometry is incorrect, reopen and reshape the crack before proceeding with repairs.
Moisture, Temperature, and Timing Considerations
Appropriate conditions ensure optimal repair material performance. Check the local weather forecast to avoid unexpected rain or temperature changes.
Verify the surface is clean, dry, and at a suitable temperature for the chosen repair material. If the surface is damp or the temperature is outside the recommended range, allow sufficient time for the surface to dry or temperature to stabilize before proceeding.
If conditions are unsuitable, delay repair until appropriate conditions are met.
Repair Methods and Step-by-Step Application Techniques
Identify and compare four primary methods—epoxy or polyurethane injection, routing-and-sealing, patching, and resurfacing or overlays—and align them to crack movement, width, and water exposure. Emphasize thorough surface preparation, including cleaning, drying, and, if needed, widening the crack to ensure proper material flow and bonding. Plan for access needs and follow the chosen method’s sequence to achieve a durable repair.
Note common pitfalls, use the required tools, and implement quality checks such as post-cure inspection and leak tests. Include long-term maintenance planning to monitor the repaired area and verify that the treatment remains effective over time. Always reference the manufacturer instructions and relevant standards to confirm steps and cure conditions before proceeding.
Step-by-Step Repair Process
The following steps outline a clear sequence for repairing concrete cracks using various methods. By understanding and following these practical actions, you can achieve successful repairs with minimal effort and time.
- Preparation: Clean the surface, remove contaminants, widen cracks if needed (except for hairline cracks), and ensure proper access for injections or routing.
- Safety Checks: Review safety guidelines before starting any work. Ensure you have the required tools and materials for your chosen repair method.
- Main Repair Work: Proceed with the main repair work, following the specific instructions for your chosen method (injection, routing-and-sealing, patching, or resurfacing/overlays).
- Curing and Inspection: Allow the repair material to cure according to manufacturer’s instructions. Inspect the repaired area visually and perform leak tests if applicable.
- Maintenance Planning: Develop a long-term maintenance plan to prevent future cracks and ensure the longevity of your repairs.
Injection Techniques: Epoxy Vs Polyurethane Foam
Epoxy and polyurethane foam are common injection materials for concrete crack repair, each suited to different situations.
Epoxy Injection: Epoxy is ideal for narrow cracks (less than 0.25 inches) with minimal movement. It requires specialized equipment and application processes as per the manufacturer’s instructions. Always verify epoxy suitability by checking its datasheet.
Polyurethane Foam Injection: Polyurethane foam is suitable for wider cracks (greater than 0.25 inches) or active leaks. It expands to fill voids and seal cracks, but additional sealing may be required based on crack characteristics. Ensure polyurethane foam compatibility with your substrate and environment by consulting its datasheet.
Routing-and-Sealing and Surface Sealant Application Best Practices
The routing-and-sealing method involves preparing the crack for efficient sealing and ensuring long-term protection. Follow these best practices to achieve successful results.
Crack Preparation: Ensure the crack width is consistent throughout its length before proceeding with routing and sealing. Use a router with a suitable bit to create a uniform groove along the crack’s path. Inspect the routed area visually to ensure complete coverage.
Sealant Application: Verify the sealant’s compatibility with your substrate and environment by consulting its datasheet. Apply the sealant according to manufacturer’s instructions, ensuring proper coverage and adhesion. Allow the sealant to cure as directed before exposing it to traffic or water.
Concrete Surface Repair Methods
Patching, reprofiling, and overlay repairs are techniques used to restore structural integrity and aesthetic appeal of concrete surfaces. These methods are suitable for addressing wide cracks (greater than 0.5 inches) or compromised structural integrity.
Patching: Patching involves removing damaged concrete and replacing it with new material. Ensure compatibility with your substrate and environment by checking the patch material’s datasheet. Follow manufacturer’s instructions for application, allowing proper curing time before exposing it to traffic or water.
Reprofiling and Overlays: Reprofiling involves reshaping the concrete surface to redirect water flow away from cracks. Overlays involve applying a new layer of concrete over the existing surface. Both methods require specialized equipment for application and finishing processes. Verify you have the necessary tools and materials before proceeding with these repairs.
Preventing Future Cracking: Joints, Placement, Curing, and Protection
Design joints and control joints to accommodate anticipated movement and to direct cracking away from critical areas, using proper spacing and placement guidance. Consider how placement and reinforcement during original construction influence future cracking, and plan repairs that complement ongoing performance goals for the structure. Align placement strategies with the anticipated service life and exposure conditions.
Address curing and protection to minimize residual stresses and water intrusion after repair, and implement a maintenance plan that includes regular monitoring and timely resealing. Integrate drainage improvements and crack monitoring to sustain durability, and document the steps and adjustments for future reference. Check product data and local guidelines to ensure ongoing compatibility with the repair system chosen.
Joint Selection, Replacement, and Compatible Sealants
Proper jointing is crucial for preventing concrete cracking by allowing natural expansion and contraction. Inspect existing joints for signs of deterioration or damage before sealing.
Verify that joint spacing, width, and pattern meet design requirements as specified on the project’s label or datasheet. If existing joints are damaged or missing, replace or install new joints as needed.
When sealant fails, remove it and replace with a compatible, high-quality product. Ensure proper surface preparation and application technique for optimal results.
Proper Concrete Placement and Curing Practices
Correct placement and curing minimize cracking due to plastic shrinkage or rapid drying. Inspect freshly placed concrete for signs of excessive bleeding, segregation, or other defects.
Confirm that the concrete mix design meets required strength and durability standards as specified on the product label or datasheet. If concrete shows signs of poor placement or curing, address issues promptly to prevent further deterioration.
If cracking occurs during placement or early curing, address immediately by re-wetting, covering, or other appropriate measures. Consult with a concrete expert if necessary.
Protective Treatments and Long-Term Coatings
Appropriate protective treatments extend the lifespan of concrete repairs by preventing future damage. Inspect the surface for signs of moisture, contamination, or other issues before application.
Verify that the selected treatment or coating is compatible with the repair material and substrate as specified in the manufacturer’s instructions or datasheet. If the surface is not properly prepared or treated, clean and prepare it according to the manufacturer’s instructions.
If a protective treatment fails, remove it and reapply with proper surface preparation and application technique. Consult the manufacturer for specific recommendations.
Costs, Safety, Maintenance Schedules, and Common Pitfalls
Crack repair costs vary based on material selection, crack size, surface preparation, labor duration, indoor/outdoor location, and potential warranties or long-term maintenance. For cracks less than 0.25 inches wide and stable, DIY repair using an appropriate crack-fill product may be suitable; larger cracks or movement typically necessitate professional injection or structural repair. When comparing quotes, consider services included such as surface preparation, moisture barriers, and follow-up inspections.
This guide emphasizes safety through personal protective equipment (PPE), ventilation, safe chemical handling, and proper disposal, along with a maintenance plan involving regular inspections and resealing or re-injection when deterioration is detected. It also highlights common pitfalls to avoid—poor surface preparation, using incorrect products for crack types, ignoring movement, and not addressing water ingress—to help readers decide whether to proceed themselves or hire a professional. Skipping proper surface preparation or moisture checks can lead to repair failure; an experienced installer ensures surfaces are clean, dry, and contaminant-free, enhancing long-term results.
Cost Factors and Budgeting Considerations
The cost of concrete crack repair varies based on several factors. Consider the following when planning your budget:
Material choice significantly impacts cost. Epoxy, polyurethane foam, and crack-fill blends each have different price points. Larger crack width/length and repair area require more material, increasing costs.
Thorough surface prep ensures better adhesion but adds labor time and may require additional equipment. Labor time itself is a cost factor, as are any necessary tools or equipment. Outdoor repairs typically cost less than indoor ones due to accessibility and ventilation needs.
Potential warranties or long-term maintenance costs should also be factored in. DIY repairs for small, static cracks may be cost-effective, but underestimating costs can lead to unexpected expenses. Always compare quotes from professionals, considering the services included such as surface prep, moisture barriers, and follow-up inspections.
Safety, PPE, and Site Containment
Prioritizing safety is crucial during concrete crack repair. Ensure you’re following safe repair procedures and using appropriate personal protective equipment (PPE).
Gloves, goggles, and a respirator may be required, depending on the materials used. Ventilation is necessary for solvent-based products to prevent harmful fumes from accumulating.
Avoid working in occupied spaces if fumes or dust could pose a hazard. Always follow manufacturer guidelines for safe handling, storage, and disposal of chemicals. Contain waste properly to minimize environmental impact and potential health risks.
Never compromise safety for speed. If hazardous materials are involved, use appropriate safety measures as recommended by the manufacturer.
Maintenance Intervals and Common Mistakes in Concrete Crack Repair
Regular inspection and maintenance are crucial for the longevity of your concrete crack repairs. Here are common mistakes to avoid:
- Inadequate Surface Preparation: Poor preparation leads to poor adhesion, causing repairs to fail prematurely. Ensure surfaces are clean, dry, and free of contaminants.
- Using Incorrect Repair Product: Different crack types require different repair products. Using the wrong product can result in failed repairs. Choose a product suited to your specific crack type and conditions.
- Ignoring Crack Movement: Cracks that move or widen after repair may indicate underlying structural issues. Regular monitoring helps detect such movements early.
- Sealing Moisture-Laden Cracks: Sealing wet cracks traps moisture, leading to further deterioration. Address water ingress before repairing cracks.
- Incorrect Application of Repair Materials: Following manufacturer guidelines ensures optimal performance of repair materials. Incorrect application can lead to failed repairs.
Inspect your repaired cracks every 3-6 months post-repair, then annually thereafter. More frequent inspections may be necessary for cracks exposed to harsh conditions. Reseal or reinject when signs of deterioration are detected to prevent further damage.
Conclusion
Careful assessment and a disciplined approach now save time, money, and future repairs. By starting with a clear understanding of crack type, urgency, and proper surface prep, you protect safety and improve durability while avoiding costly mistakes.
Proceed with a simple, practical flow: verify the crack width and movement by testing a small area and comparing against guidelines, choose a repair method that matches the crack’s activity, clean and prepare the surface thoroughly, apply the repair material per manufacturer instructions, cure and protect as recommended, and monitor over future seasons. Always work in a safe area, wear eye and skin protection, and test any repair in a discreet spot before expanding to larger sections.
Common mistakes to avoid include choosing a repair method for the wrong crack type, skipping surface preparation, ignoring moisture or movement, and failing to follow curing and protection steps. Safety rules to follow are to work only within your skill level, read product labels and local rules, test in a small area first, and plan for proper joints and drainage to reduce recurrence. If any crack shows active movement, water intrusion, or structural concerns, consider bringing in a professional before proceeding, and remember that proper repairs now can preserve appearance, strength, and long-term performance.
FAQ
How Can I Tell If a Crack Is Structural or Non-Structural?
Look for features such as widening over time, active movement, or cracks that follow multiple connected joints. If you see doors or windows sticking or misalignment, consider a professional assessment. Check the crack’s location and pattern against common structural indicators and review any available building plans or notes from the initial construction.
How Do I Evaluate Crack Severity and Decide If Repair Is Urgent?
Assess crack width, movement, and whether water or moisture enters through the opening. If the crack keeps expanding after rain or freeze–thaw cycles, or if it affects structural elements, treat it as urgent. When in doubt, seek guidance from a qualified professional before proceeding.
What Factors Should Guide My Choice of Repair Materials?
Consider whether movement is expected, presence of water, and the substrate type. Materials should be compatible with the concrete and intended use, and suitable for bonding to existing surfaces. Always check the product label or manufacturer instructions for suitability and limits in your situation.
What Surface Prep and Application Steps Improve Repair Success?
Clean and prime the area to remove dust, loose material, and dampness. Create a sound bonding surface and follow recommended curing and protection guidelines for the chosen material. For best results, follow the manufacturer instructions and local rules regarding preparation, application, and protection.