
Introduction
Scarify, grind, or acid etch are methods to roughen old concrete to improve bonding for new toppings.
Scarifying uses a rotating drum or blade to chip away the surface and create a rough profile, while grinding removes material with a diamond blade to level the surface. Acid etching chemically bites into the surface but often produces a much smaller roughness than mechanical methods, and results can vary.
If you’re DIYing, plan to rent or borrow the tools you need and gather the right materials, but verify manufacturer instructions and local rules before you start. Steps differ: scarify first to roughen, grind to even, or acid etch with proper dilution and neutralization; for each, follow safety and cleaning steps and check product labels for compatibility with existing coatings. Acid often disappoints because it doesn’t always expose enough texture, and it can be inconsistent on old concrete; if you choose acid, test a small area and document ventilation and cleanup requirements.
Key takeaways
- Scarifying mechanically roughens concrete quickly, leaving anchor points for coatings.
- Grinding provides finer profile; use for smoother, level prep before coating.
- Acid etching often underperforms on sealed or dusty surfaces; test adhesion first.
- For best results, verify surface profile with a consistent pass pattern and clean debris.
- Wear PPE, ventilate, and follow local rules; never mix acids with incompatible materials.
- Reliable resources include manufacturer instructions and independent testing guides for tools.
Table of Contents
- Introduction
- Key takeaways
- Why Surface Preparation Determines Coating Success
- Scarifying: How It Works, Pros, and Best-Use Cases
- Grinding: Method, Outcomes, and When to Pick It
- Acid Etching: Chemistry, Technique, and Why It Often Disappoints
- Direct Comparison: Bond Strength, Durability, and Longevity
- Safety, Environmental, and Regulatory Considerations
- Practical Next Steps and Trusted Sources
- Common Mistakes, Inspection Checkpoints, and Troubleshooting
- Conclusion
- FAQ
Why Surface Preparation Determines Coating Success
Surface prep is the foundation of any coating project. The substrate’s profile, cleanliness, and condition determine how well the coating can grab and how long it will last. Preparation choices directly influence mechanical keying, contaminant removal, and the expected lifespan of the finish.
Scarifying, grinding, and acid etching each alter the surface in different ways, affecting profile depth, potential for damage, and compatibility with coatings. Readers should check for residual contaminants, moisture levels, and how these factors drive adhesion and cure. Practical checks and tests help verify readiness before coating, and the right method should align with the coating system and project goals to avoid over- or under-preparation. When acid is used on the wrong substrate, disappointment is common.
What ‘old work’ means for concrete and substrates
Aged concrete, previously coated or sealed surfaces – that’s what we mean by ‘old work’. These surfaces can be challenging to bond with new coatings. Why?
Over time, concrete develops a layer called laitance. It’s weak, powdery stuff that needs to go. Oils from formwork release agents and curing compounds can also leave behind contaminants.
These old surfaces might look solid, but they’re not ready for new coatings until we deal with these issues.
How coatings bond to concrete (mechanical vs chemical)
Coatings stick to concrete in two ways: mechanical interlock and chemical adhesion.
Mechanical interlock happens when the coating’s texture grabs onto the concrete’s rough surface. Think of it like Velcro – lots of tiny hooks grabbing onto loops.
Chemical adhesion is when the coating’s molecules bond with the concrete’s. But for either to work, you need a clean, profiled surface. That’s where our prep methods come in.
Scarifying: How It Works, Pros, and Best-Use Cases
Scarifying uses flail or rotary-cutting heads to roughen the surface and remove contaminants. The action creates a mechanical key by exposing fresh concrete and tearing away laitance. This method is fast and aggressively prepares the surface for bonding.
Scarifying handles old concrete, thin overlays, and curing compounds well, and it often suits coatings that need a strong bite, such as epoxies or urethanes. It also supports texture creation or removal of existing coatings in one pass, typically followed by cleanup. Consider the dust and noise, and verify that the achieved profile suits the coating being applied.
Surface profile and bond performance from scarifying
Scarifying creates a deep, aggressive profile on concrete surfaces. The flail or rotary-cutting heads impact the surface, abrading it and removing contaminants.
The resulting texture is ideal for mechanical bonding of thick toppings or overlays. It provides a strong key for new coatings to adhere to, preventing delamination and improving overall bond performance.
Scarifying typically produces a profile with an International Organization for Standardization (ISO) roughness level of 7-10 or a Surface Profile (SP) number between 2-4. This is perfect for most coating applications.
Advantages, limitations, and typical cost drivers
Scarifying offers several advantages. It’s fast at removing old coatings and preparing surfaces for new ones. It can handle a wide range of substrates and produces an aggressive profile that promotes strong bonding.
However, it also has its limitations. Scarifying can leave a rough finish, which may not be suitable for all applications. It generates noise, which could disturb neighbors or require additional safety measures on-site.
The cost of scarifying is typically driven by labor and machine rental fees. The size and complexity of the job will affect these costs. For instance, larger areas or more complex surfaces will take longer to complete, increasing labor time.
Grinding: Method, Outcomes, and When to Pick It
Diamond grinding with a cup wheel smooths or levels a surface by controlled removal of material. It can produce a flatter, more uniform profile and is less likely to over-roughen the substrate compared with scarifying. This method is gentler on the substrate when needed.
Grind work is ideal for flatness, leveling minor high spots, and preserving thin cementitious toppings. It requires careful dust control and masking to keep dust under control. Before coating, expect to assess the texture, porosity exposure, and potential micro-cracking as part of the final adhesion check.
Profile quality, flatness, and coating fit
Grinding produces a flatter, more consistent profile than other prep methods. This is ideal for thin-film coatings and finishes with low tolerance.
With grinding, you can achieve a smooth surface that’s ready to accept your finish. It’s perfect for epoxy, urethanes, or other high-build coatings.
Grinding exposes fresh concrete pores, giving your coating something solid to grip onto. But it also exposes micro-cracks, so be aware of that.
Pros, cons, and operational considerations
Advantages: Grinding is precise and repeatable. It’s great for leveling minor high spots and preserving thin toppings.
Drawbacks: It’s less aggressive than scarifying, so it might not remove all the contamination. And equipment can be pricey.
Considerations: You’ll need to control dust. Use a HEPA vac, contain the area, and wear a respirator. Dust mitigation is crucial during grinding.
Acid Etching: Chemistry, Technique, and Why It Often Disappoints
Acid etching chemically reacts with cement paste to create micro-roughness and remove weak laitance. It’s important to understand what an etch can and cannot achieve for surface profile and cleanliness. This is not a universal solution for all substrates or coatings.
Bonding reliability with acid etching is often weaker or more variable than mechanical prep, due to profile depth, cleanliness, residue, and moisture issues. Common myths include that more acid guarantees a better bond or that etching alone handles moisture. Follow a careful DIY workflow with proper safety, assessment, and a post-etch cleaning sequence to verify readiness.
Proper application, neutralization, and rinsing
Follow your etchant product’s dilution instructions to the letter. Too much acid won’t give you a better bond; it’ll just waste product and damage the surface.
Dwell time is crucial. Leave the etchant on for the recommended duration, no more, no less. Then, neutralize with the provided solution or baking soda to stop the etching process. Rinse thoroughly until no residue remains and pH strips show a neutral reading.
Remember, acid etching is a precise job. Stick to the manufacturer’s guidelines to get it right.
Typical failure modes and residue problems
Incomplete contaminant removal leads to weak adhesion. Residual salts or chemicals can prevent the etchant from working properly, leaving a smooth surface that won’t bond well.
Uneven etching is another common problem. This happens when the acid doesn’t contact the entire surface long enough, leading to inconsistent roughness and poor bonding in those areas.
Moisture trapped under the etchant can also cause issues. It dilutes the acid, reducing its effectiveness. Ensure your surface is dry before etching.
These problems often lead to adhesion loss, peeling coatings, or delaminating adhesives. To avoid them, prep your surface carefully and follow application guidelines closely.
Direct Comparison: Bond Strength, Durability, and Longevity
Practical adhesion outcomes focus on how well a coating will bite into the prepared surface under real-world conditions. The amount of roughness, contaminant removal, and overall cleanliness influence long-term performance. Realistic expectations should guide method choice.
Delamination resistance and lifecycle depend on the substrate, moisture, and coating system. Consider how each method affects recoating intervals, maintenance needs, and potential sealing requirements. A concise workflow helps maintain uniform profiles and predictable results for DIY projects.
How contaminants and laitance change results
Contaminants like oils, sealers, or laitance can ruin your prep work. They sit on the surface, preventing proper bonding.
Laitance is that weak, powdery layer on new concrete. It’s easy to remove with light prep, but it needs to go. Otherwise, your coating will peel.
Always test a small area first. Use water or a simple adhesion test. If it beads up or peels off easily, you’ve got contaminants or laitance.
When mechanical prep outperforms chemical prep
Mechanical methods – scarifying and grinding – are your best bet when dealing with heavily contaminated surfaces. They physically remove contaminants.
Dense surfaces or prior coatings also respond better to mechanical prep. Acids struggle to penetrate these.
Think mechanical prep for: old, oily slabs; dense, hard concrete; or existing coatings you can’t remove with chemicals alone.
Safety, Environmental, and Regulatory Considerations
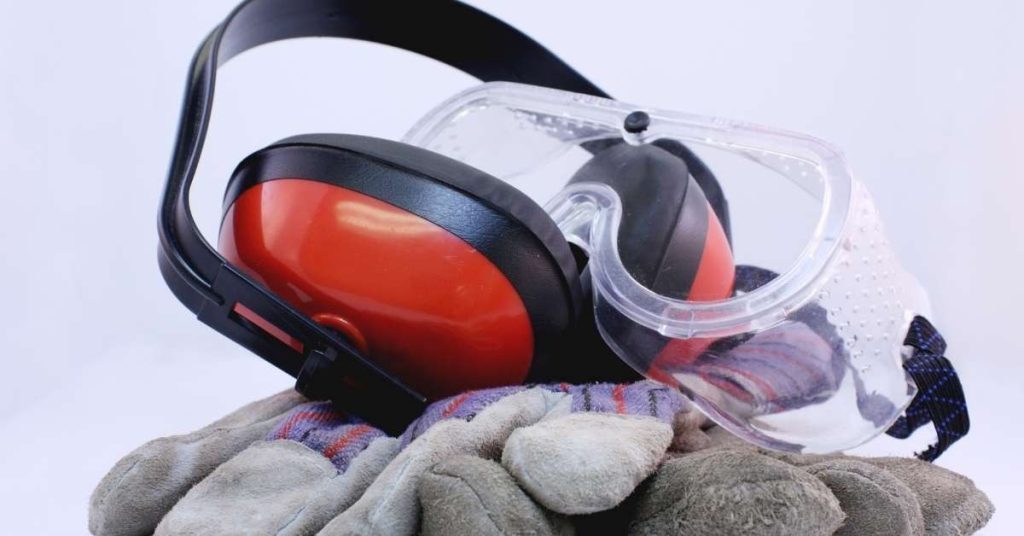
PPE and site protection are essential. Use appropriate respiratory protection, eye and skin protection, and a garment suited for the task. Have splash shields or disposable covers as needed and follow a simple donning/doffing routine.
Ventilation and dust control are important, especially indoors. Manage wastewater, runoff, and environmental safeguards by containing wash water and following local disposal rules. Check regulatory and SDS guidance and prepare a site safety plan with documentation for compliance.
PPE, dust control, and airborne hazards
Protecting yourself and others from dust and fumes is crucial. Here’s what you need:
Personal Protective Equipment (PPE): Wear a dust mask or respirator, safety glasses, gloves, and a hard hat if there’s overhead work. For splash hazards, use shields or disposable coveralls.
Dust control: Indoors, use HEPA vacuums or wet methods to suppress dust. Outdoors, keep equipment well-maintained and consider water sprays. Minimize silica dust exposure and solvent fumes with proper ventilation.
Waste handling, neutralization, and disposal for acids
Acids need special handling. Here’s how to manage rinse water:
Neutralization: After etching, neutralize the acid with a base like sodium bicarbonate or ammonia. Test until pH is 7.
Containment and disposal: Contain wash water in sealed containers or pits. Use filters or pails for graywater. Dispose of waste per local regulations – often this means hazardous waste facilities. Always consult local authorities or disposal guidance.
Practical Next Steps and Trusted Sources
Outline a practical workflow that matches the coating system and substrate. Choose between scarify, grind, or acid and avoid over-prepping or under-prepping. A clear plan helps prevent surprises on the job.
Assemble tools, materials, and testing supplies before starting. Include a mix of scarifiers, grinders, vacuums, sprayers, neutralizers, cleaners, primers, and adhesion or surface-profile tests. Rely on manufacturer documentation, university publications, and reputable industry references for guidance.
Recommended tools and consumables by method
Before you start any prep work, gather these essentials:
- Scarifying: Rent or buy a walk-behind scarifier with rotating cutters. Check the machine’s capacity to handle your slab thickness.
- Grinding: Use a concrete grinder with diamond blades. Ensure the blade size matches your machine and task.
- Acid etching: Purchase muriatic acid (hydrochloric acid) or another suitable etcher. Always follow safety guidelines on the product label.
Don’t forget these consumables:
- Safety gear: Wear a hard hat, safety glasses, gloves, and protective clothing. For acid etching, use a respirator too.
- Cleaning supplies: Have a stiff-bristle broom, shovel, and high-pressure washer on hand for cleanup.
Reliable references, manufacturers, and standards to check
When it comes to concrete work, you can’t just wing it. You need solid info from reliable sources. Here’s what you should check:
Product SDS (Safety Data Sheet): Every bag of cement or bucket of admixture has one. It tells you how to handle, store, and dispose of the product safely. Don’t skip this.
Next, look at your coating manufacturer’s surface prep specs. They know their stuff, so follow their guidelines for best results. And don’t forget to check local building codes or standards for final acceptance criteria. You don’t want any surprises when the inspectors show up.
Common Mistakes, Inspection Checkpoints, and Troubleshooting
Highlight frequent errors per method, such as overly aggressive scarification, glazed surfaces after grinding, or under-etching with acid. Link issues to adhesion, profile, and coating compatibility to help readers spot risk early.
Use practical pre-coating checks: cleanliness, moisture, surface profile feel, and a basic adhesion test. When problems arise, outline rework steps, re-cleaning, and re-testing, and suggest switching methods if substrate or coating needs demand it.
Visual and Test Checkpoints Before Coating
Before applying any coating, run through this quick checklist to ensure your surface is ready.
- Surface Cleanliness: Inspect for dirt, grease, or residues. A clean surface feels smooth and looks uniform.
- Profile Uniformity: Check that scarification or grinding lines are consistent and evenly spaced. Inadequate profiling can lead to poor adhesion and coating failure.
- Dryness: Test for moisture using a simple moisture meter or by touching the surface. Excessive moisture can cause coatings to peel or blister.
- Surface Profile (R-value): Measure the microtexture with a profilometer. An R-value of 3-7 is ideal for most coatings, providing enough ‘tooth’ for adhesion without trapping contaminants.
- Neutral pH: Test the surface with pH paper to ensure it’s neutral (pH 6-8). Acidic or alkaline surfaces can react with coatings and cause discoloration or peeling.
- Adhesion Test – Tape Pull: Apply painter’s tape, press firmly, then pull off quickly at a 45° angle. If the surface comes away, re-prep is needed.
- Adhesion Test – Scratch: Gently scratch the surface with a coin or key. The coating should not flake or peel.
- Uniformity of Scarification/Grinding: Inspect for any missed spots or overdone areas that could affect adhesion and coating appearance.
Quick rule: If anything fails these tests, rework the surface before coating to avoid costly mistakes.
Remedies for Failed Prep and Rework Guidance
If your surface fails inspection or adhesion tests, follow this checklist to troubleshoot and rework the prep.
- Re-clean: If residues are present, clean the surface again using an appropriate cleaner. Residues can prevent proper adhesion.
- Re-profile: If profiling is inadequate, use a scarifier or grinder to create a better profile. Insufficient profiling leads to poor adhesion and coating failure.
- Mechanical Scar or Grind: If acid etching was used but the surface failed tests, switch to mechanical prep. Some surfaces don’t etch well and need mechanical prep instead.
- Re-test pH: After re-cleaning, retest the surface pH to ensure it’s neutral. Acidic or alkaline surfaces can react with coatings.
- Re-dry: If moisture is present, allow the surface to dry completely before re-testing and recoating.
- Re-test Adhesion: After reworking, retest adhesion using tape pull and scratch tests to confirm the surface is now ready for coating.
- Switch Methods (if needed): If one method fails repeatedly, switch to another. Some surfaces require mechanical prep or specific etching techniques.
Quick rule: Be patient and thorough in reworking failed preps. It’s cheaper than fixing coating failures later on.
Conclusion
Protecting safety and durability starts with the right surface prep. The path you choose—scarify, grind, or avoid acid—determines how long the coating will last and how it looks, so pick based on the substrate, the old coating, and the job size, then follow it start to finish.
Assess the surface and decide your method, then set up a practical plan: clear the area and protect people and nearby surfaces, wear proper PPE, remove loose material, create a clean, keyed surface with scarifying or controlled grinding, clean and dry the area, test bond in a small spot, and only then apply the coating per the manufacturer’s instructions. Keep the work area ventilated, dust under control, and check for any damp or oily patches that could ruin adhesion before you proceed.
Common mistakes to avoid are chasing fast results with acid when it isn’t needed, skipping dust removal and surface cleaning, and under- or over-roughening the surface. Don’t heat or gouge the substrate, don’t mix methods without a plan, and don’t skip a small-area test to confirm the bond. Safety rules are simple: protect eyes and lungs, wear gloves, and verify the area is dry and clean before coating.
If you’re dealing with structural concerns, uncertain substrate conditions, large or complex surfaces, or coatings that have failed repeatedly, it makes sense to bring in a professional. When in doubt, stop and verify with a trusted source or supplier, then move forward with a clear, tested plan. Stay deliberate, stay safe, and you’ll finish with a durable, good-looking result.
FAQ
How do scarifying and grinding differ for preparing a concrete surface?
Scarifying removes the surface layer with rapid impact blades; it roughens the top and can expose aggregate. Grinding uses a rotating disk or cup wheel to level and smooth the surface. For adhesion, scarifying is rougher and better for old coatings, while grinding is gentler and can create a flatter base.
How effective is acid etching on concrete, and why does it often disappoint?
Acid etching chemically roughens the surface but only to a shallow depth. It depends on the concrete mix, moisture, and existing coatings. If the surface is dense or has sealers, acid etching may not provide enough bite for new coatings.
What are the basic steps for scarifying, grinding, and acid etching?
Scarifying: protect nearby areas, set the machine to the right depth, and pass over the entire surface with even passes. Grinding: choose the right grit, start with coarser to level, then finish with a finer pass for a consistent texture. Acid etching: apply the product per label, spread evenly, and neutralize/clean after the reaction as required by the instructions.
What tools and materials do I need for each technique, and what safety precautions matter?
Scarifying: scarifier or rotary machine, appropriate blades, dust control gear, and a respirator. Grinding: floor grinder, grinding discs, dust collection, hearing protection, and eye protection. Acid etching: etchant product, plastic spreader, neutralizer, gloves, and eye protection. Always read the label, follow local rules, and ventilate; wear PPE and remove loose coatings before starting.