
Introduction
Angle grinder dust control on concrete and masonry means using a shroud and vacuum system to capture dust at the source during cutting and grinding.
Controlling dust protects lungs, keeps the work area safer, and helps the job go smoother by reducing cleanup and exposure. Airflow matters because proper capture depends on a good seal, adequate vacuum capacity, and correct hose routing.
Shrouds come in different styles, including full cup, convertible, and tuck-point designs, and each type has its own fit with a grinder and dust extractor.
Before you buy or assemble, check compatibility: the shroud fits your grinder model, the vacuum head matches the shroud port, and the hose size allows for effective airflow.
Always follow the manufacturer instructions and local rules for filtering, maintenance, and replacement parts, and verify any specs or claims with the label before purchasing.
Key takeaways
- Dust control on concrete reduces health risks and boosts productivity on jobsites.
- Shrouds capture dust by sealing against grinder guard and exposing blade area.
- Convertible and full-cup shrouds suit both rough grinding and tuck-pointing needs.
- Vacuum sizing must match shroud port and provide continuous airflow without leaks.
- Compatibility checklist: ensure shroud, grinder, and vacuum fit within manufacturer specs.
- Verify installation, test airflow, and maintain seals to avoid fugitive dust exposure.
Table of Contents
- Introduction
- Key takeaways
- Why Dust Control Should Be Non-Negotiable on Concrete and Masonry Jobs
- How Angle Grinder Dust Shrouds Work — the Mechanics Behind Capture
- Vacuum Selection and Proper Sizing for Shrouded Grinders
- Shroud Types and When to Use Each for Concrete and Masonry
- Compatibility Checklist — Fitment, Adapters, and Material Considerations
- Installation, Setup, and Operating Techniques for Maximum Capture
- Maintenance, Troubleshooting, and Common User Mistakes
- Buying Guide, Cost-Benefit, and Must-Have Features
- Conclusion
- FAQ
Why Dust Control Should Be Non-Negotiable on Concrete and Masonry Jobs
Dust control on concrete and masonry projects directly affects worker health and safety. It helps reduce exposure to respirable silica and other fine particles that can persist in the air long after grinding stops. Implementing a consistent plan protects people and communities around the job site.
Regulatory expectations and industry standards shape how dust control is implemented, including permissible exposure references and local mandates. Inadequate control can raise liabilities, insurance costs, and contract penalties, even when the work proceeds on schedule. When dust control is integrated with finish quality and cleanup planning, it also supports predictable project costs and outcomes.
Health risks and regulatory landscape
Exposure to respirable crystalline silica (RCS) during concrete and masonry work poses significant health risks. RCS is a known carcinogen, linked to lung cancer, silicosis, and other respiratory diseases.
OSHA has set a permissible exposure limit of 50 µg/m³ (micrograms per cubic meter) for RCS as an 8-hour time-weighted average. Check local regulations, such as provincial or international standards, as they may vary.
Regularly review and understand these exposure limits to ensure compliance and protect worker health. If exposure limits are exceeded, implement dust control measures immediately.
Business impacts: productivity, rework, and client perception
Excessive dust can negatively impact your project’s economics. It shortens tool life, increases cleanup time, and can lead to rework due to poor finish quality.
Dust control measures, such as shrouds and vacuums, can help maintain tool performance, reduce rework, and improve overall productivity. Satisfied clients are more likely to provide positive referrals, contributing to future business growth.
To calculate the return on investment (ROI) for dust control equipment, assess potential rework costs, extended project duration due to cleanup, and the impact on tool life. Optimize your dust control strategies to minimize these factors and maximize client satisfaction.
How Angle Grinder Dust Shrouds Work — the Mechanics Behind Capture
Think of a shroud as a system with five core parts: skirt, nose, dust port, seal, and mounting. Each piece influences how well dust is drawn toward the vacuum port and kept from escaping into the work area. The goal is to create a controlled airstream around the cut or grind line.
Capture relies on negative pressure at the port and sufficient capture velocity at the cut. Different designs balance flexibility, depth, and edge contact to maintain suction while the grinder moves. Proper alignment and a tight seal minimize leaks and maximize effectiveness.
Core components and sealing principles
The efficiency of an angle grinder dust shroud relies on its well-designed components and proper assembly. Here’s a breakdown:
- Skirts/Brushes: These contact the workpiece, guiding dust towards the port. Flexible skirts hug curves but may wear out faster; rigid ones offer stability on flat surfaces.
- Nose: The constricted area near the blade focuses airflow and captures dust. Deep-nosed shrouds accommodate longer blades but ensure compatibility with your grinder’s guard size.
- Dust Port: This intake connects to your vacuum hose, drawing dust away. A larger port increases suction and reduces losses through the system.
- Mounting Interface: Secure shroud attachment to the grinder is crucial for maintaining alignment under vibration. Check hardware regularly for tightness and wear.
A good seal between the shroud and workpiece minimizes leaks, maximizing capture efficiency. Inspect all components before use, replacing worn or damaged parts promptly.
Airflow fundamentals: capture path, velocity, and why airflow trumps suction alone
Effective dust control relies on understanding airflow dynamics. Here’s what you need to know:
- Airflow (CFM): This measures the volume of air moved by your vacuum per minute. Ensure your vacuum’s CFM matches or exceeds shroud requirements for optimal performance.
- Capture Velocity: Airflow speed at the cut determines dust capture efficiency. A higher velocity reduces escape into the work area. Monitor hose connections for leaks and tighten as needed.
- Port and Hose Losses: Inconsistent or small ports, and varying hose diameters can cause airflow losses, reducing suction power. Use consistent hose diameter throughout the system and consider increasing port size to maximize suction.
Regularly clean or replace filters to maintain vacuum performance and airflow. Understanding these fundamentals ensures optimal dust control with your angle grinder shroud.
Vacuum Selection and Proper Sizing for Shrouded Grinders
A practical framework matches extractor performance (CFM and static pressure) to shroud type, grinder task, and room size, with a clear method to estimate required airflow. It covers hose sizing and configuration, noting impedance from hose length and bends, plus filter choices and how they affect respirable dust control. Readers should verify maximum CFM, static pressure, compatible hose sizes, shroud compatibility, grinder interface, and any recommended vacuum models or classes from manufacturers.
This matters because proper matching prevents underperforming dust control and protects health during concrete and masonry work. A quick light-flow test, checking for air leaks around the shroud, and confirming the measured airflow aligns with task requirements help prevent common mistakes like undersized hoses. In small rooms or heavy dust tasks, prioritize static pressure and verify a documented compatibility checklist with the shroud, vacuum inlet, and required adapters.
What to check on vacuum specs (CFM, static lift, and filtration)
Before purchasing a vacuum for your shrouded angle grinder, ensure it meets the following specifications to effectively control dust.
- Airflow (CFM): Check the vacuum’s maximum airflow rate in cubic feet per minute. This should match or exceed your grinder’s shroud requirements.
- Static Pressure: Verify the vacuum can maintain sufficient static pressure to draw dust through the hose and into the filter without losing suction.
- Filtration Type: Ensure the vacuum uses HEPA or HEPA-equivalent filtration for effective silica control. This is crucial for protecting your health.
- Filter Replacement: Check how often filters need to be replaced and factor this into your maintenance schedule.
- Hose Compatibility: Confirm the vacuum’s hose size matches or can accommodate your grinder’s shroud.
- Shroud Compatibility: Verify the vacuum is compatible with your grinder’s shroud design and interface.
- Grinder Interface: Check if the vacuum can connect directly to your grinder or if adapters are required.
- Gasket Integrity: Ensure gaskets between the vacuum, hose, and shroud are intact and create a proper seal to prevent dust leakage.
- Anti-static/ Grounding: Confirm the vacuum has anti-static or grounding features to prevent static buildup and potential sparks.
Quick rule: Always verify manufacturer minimums for silica control, as these can vary based on specific tasks and regulations.
Safe sizing guidance and common match-ups
Matching your vacuum’s capacity to your grinder’s shroud and task is crucial for efficient dust control. Here are some safe ranges and troubleshooting steps:
Airflow (CFM): Start with the manufacturer-recommended CFM for your grinder’s shroud. If capture is marginal, upsize the vacuum or hose to increase airflow.
Hose Size: Begin with the recommended hose diameter from the manufacturer. If dust escape occurs, consider increasing the hose size to improve suction and reduce impedance.
Hose Length: Keep hose lengths as short as possible to minimize impedance and maintain optimal suction. Excessive hose length can lead to reduced capture efficiency.
Bends and Transitions: Minimize abrupt transitions and bends in the hose, as these can cause turbulence and reduce airflow, leading to poor dust control.
Shroud Types and When to Use Each for Concrete and Masonry
Full-cup surface-grinding shrouds work well for broad, flat surfaces where a wide capture area is needed. Convertible or hinged noses adapt to different edge profiles and depths. Tuck-point or cut shrouds suit masonry joints and tighter spaces, while walk-behind housings fit larger, stationary tasks.
Choosing the right design depends on the task, desired finish, and dust capture goals. Airflow, vacuum sizing, and hose fittings interact with each shroud type to influence capture efficiency. Proper setup and maintenance help prevent leaks and performance loss.
Full-cup vs. Convertible vs. Dedicated Slot Shrouds
The choice between full-cup, convertible, and dedicated slot shrouds depends on the task at hand.
Full-cup shrouds are ideal for surface grinding as they provide complete dust coverage. However, they may not be suitable for edge work or tight spaces due to their size.
Convertible/hinged noses offer versatility with adjustable designs that can accommodate both flat and edge surfaces. They are a good compromise between full-cup shrouds and dedicated slot shrouds but may have a higher clogging risk due to their complex design.
Dedicated slot shrouds, designed for specific tasks like tuck-point removal or cutting, offer excellent dust capture efficiency in their intended use. However, they lack versatility and may not be suitable for other tasks.
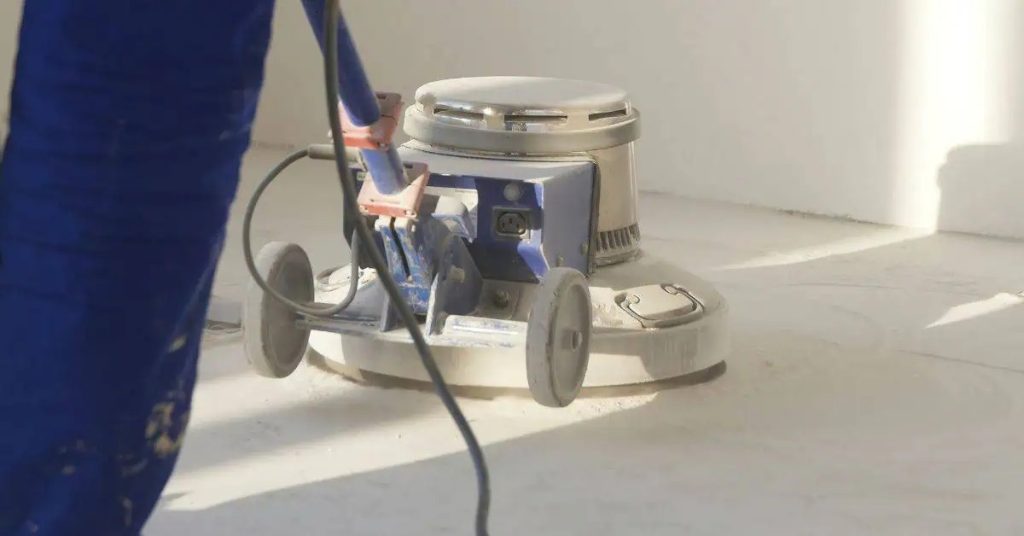
Handheld vs. Walk-Behind Systems
The choice between handheld and walk-behind systems depends on the size of the area you’re working in and the task at hand.
Handheld shrouds are versatile and suitable for small repairs, tight spaces, and edge work. They allow for better maneuverability but may not be as efficient for large areas due to user fatigue.
Walk-behind housings, on the other hand, are ideal for large, flat surfaces like concrete slabs or floors. They offer reduced user fatigue and improved dust capture efficiency but lack the versatility of handheld shrouds in tight spaces or for edge work.
Consider your workspace constraints, task requirements, and personal comfort when choosing between handheld and walk-behind systems.

Compatibility Checklist — Fitment, Adapters, and Material Considerations
Check wheel diameter and shroud mounting compatibility to prevent gaps that invite leakage. Match the grinder guard interface with the shroud mounting pattern or use reliable adapters if provided.
Inspect collar fit and seals to minimize dust leakage. Consider task-specific needs (concrete, masonry, or reinforced concrete) to select appropriate shroud and filter options. Ensure the vacuum’s airflow and hose size align with the shroud inlet for effective capture.
Wheel, guard and collar fit verification
Before purchasing a dust shroud for your angle grinder, ensure it’s compatible with your grinder and wheel to prevent leakage.
- Check wheel diameter: Measure the diameter of your grinder’s wheel (e.g., 4.5″, 5″, 7″) and confirm the shroud’s mounting ring matches this size.
- Inspect guard interface: Ensure the shroud’s guard mount type (slot, bolt-on, quick-release) is compatible with your grinder or that reliable adapters are available.
- Verify collar diameter and thread size: Measure the diameter of your grinder’s collar and check if the shroud’s collar fits snugly. Also, confirm the thread sizes (metric/standard) match to ensure a proper seal.
- Check adapter fit: If there are any mismatches in collar diameters or thread sizes, investigate available adapters to bridge the gap and prevent dust leakage.
- Inspect gasket or o-ring: Ensure the shroud comes with a gasket or o-ring to create a tight seal between the grinder, shroud, and vacuum, minimizing dust leakage.
- Avoid common mistake: If leakage occurs during use, recheck your measurements and ensure adapters are correctly installed.
Quick rule: Always measure and compare sizes before purchasing to avoid compatibility issues.
Hose, port, and material-spec considerations
The choice of hose and shroud materials significantly impacts the dust control system’s performance and lifespan.
- Hose inner diameter: Measure your vacuum’s hose inner diameter and ensure it matches the shroud’s inlet size to maintain effective airflow. Using a smaller or larger hose can restrict airflow or cause leakage.
- Hose length: Consider the task at hand when choosing a hose length. A longer hose provides more flexibility but may introduce resistance, reducing airflow efficiency.
- Plastic shrouds: Suitable for light-duty tasks with minimal spark exposure. They are affordable and lightweight but less durable than other materials.
- Glass-filled nylon shrouds: Ideal for medium-duty tasks involving some spark exposure. They offer better durability and resistance to abrasion compared to plastic.
- Aluminum shrouds: Designed for heavy-duty tasks with high spark exposure. They are durable, resistant to heat and abrasion, but more expensive than other materials.
Quick tip: Always match the hose diameter with the shroud inlet size to maintain effective airflow. Choose shroud materials based on the task’s requirements to prevent damage and ensure optimal performance.
Installation, Setup, and Operating Techniques for Maximum Capture
Pre-installation checks should confirm grinder compatibility, vacuum requirements, and any ducting or shop-vac capacity considerations. Note material differences that affect seal and airflow. A clear plan helps avoid last-minute adjustments on site.
During setup, power off the grinder and secure the tool before attaching the shroud. Ensure the vacuum hose has a smooth path with minimal bends to preserve suction. Maintain full contact between shroud and work surface to maximize coverage.
Quick install and pre-use checklist
Before every shift, ensure optimal dust capture and operator safety by following this quick setup checklist.
- Check shroud seal: Inspect for wear or damage. Replace or repair as needed to prevent leaks.
- Secure grinder: Ensure the grinder is properly secured in its mount.
- Position shroud: Maximize coverage around the periphery of the grinding wheel.
- Lock guard: Confirm the guard is locked and functioning correctly.
- Check vacuum hose: Ensure it’s free of kinks, has an unobstructed path to the dust port, and is securely attached.
- Route hoses: Keep them away from heat sources and sparks. Minimize length and bends to maintain suction.
- Check filter: Ensure the vacuum’s filter is clean and functional. Replace if necessary.
- Inspect brush skirt: Check for wear or damage that could compromise dust capture.
Quick rule: Always perform this checklist before starting work to ensure all components are securely attached and functional.
Grinding technique and edge work best practices
Maintaining consistent contact between the shroud and surface is crucial for maximizing dust capture efficiency while preserving airflow. Use light, steady passes to avoid clogging or seal loss.
For edge work, consider using a convertible nose or suction-assisted hand technique to maintain effective dust capture in tight spaces. Adapt speed and pressure to material density to preserve airflow.
Pro tip: Always maintain consistent contact between the shroud and surface to maximize dust capture efficiency.
Temporary or emergency workarounds and safety cautions
In cases where a shroud or proper extractor isn’t available, use safe short-term fixes to minimize dust exposure. However, always document these workarounds and address compliance gaps promptly.
If no shroud or extractor is available, use a wet grinding method or dampen the surface to suppress dust. Always inform your supervisor about temporary setups and ensure they are secure and functional.
Safety caution: Temporary workarounds should not replace proper dust control measures. Always strive to comply with safety regulations and best practices.
Maintenance, Troubleshooting, and Common User Mistakes
Establish a routine that covers daily inspections, weekly performance checks, and monthly filter or shroud replacements. Simple checklists and safe-disassembly steps keep maintenance practical. Document findings to track performance over time.
Common mistakes include improper shroud sizing, gaps at the surface, and incompatible vacuum setups. Address leaks, clogged ports, and worn seals promptly to restore capture efficiency and extend equipment life.
Daily cleaning, wear checks, and part replacement
At the end of each shift, perform a quick visual check on your shroud to ensure dust collection integrity and prolong its lifespan. Look for signs of wear or damage on the skirt, seals, and gaskets.
Wear indicators: Cracks, tears, or excessive wear on these components can compromise their effectiveness in containing dust.
Replace worn parts promptly to maintain capture efficiency. Neglecting regular cleaning and wear checks can lead to reduced performance and increased maintenance costs.
Troubleshooting checklist and visual checkpoints
When you notice reduced dust collection performance or strange grinder vibrations, use this checklist to quickly identify and resolve common capture failures.
- Air leaks: Check for gaps between the shroud and surface. Ensure proper nozzle positioning and that the shroud is securely attached.
- Blocked or collapsed shrouds: Inspect the shroud’s interior for clogging, especially around the dust port. Verify that the vacuum hose is not kinked or crushed.
- Insufficient vacuum flow: Check your vacuum’s performance and ensure it meets the required flow rate (CFM).
- Clogged filters: Inspect your filter for clogs or blockages. Clean or replace as needed.
- Strange grinder vibration: Inspect for unbalanced or improperly installed shrouds, and verify proper wheel fitment.
- Improper shroud sizing: Ensure the shroud is appropriately sized for your grinding task and tool.
- Incorrect nozzle positioning: Check that the nozzle is positioned correctly to capture dust efficiently.
- Incompatible vacuum hose sizing: Verify that the vacuum hose diameter matches the shroud’s outlet size.
- Over-tightening causing deformation: Inspect the shroud and vacuum connections for any signs of excessive force or damage.
Quick rule: Regularly inspect your setup to prevent capture failures, ensuring optimal dust collection efficiency and safety.
Storage, transport, and longevity tips
Proper storage and handling of shrouds protect them from damage and maintain their optimal performance. Regularly inspect shrouds for signs of wear or damage before each use.
Storage: Keep shrouds in a cool, dry place away from direct sunlight to prevent UV damage and deformation. Avoid storing shrouds in extreme temperatures or humid conditions.
Transportation: When moving shrouds between job sites, ensure they are securely fastened to prevent damage during transit. Do not stack heavy objects on top of shrouds.
If signs of wear or damage are present, replace the shroud promptly to maintain capture efficiency. Improper storage and transport can lead to reduced shroud lifespan, increased maintenance costs, and potential safety hazards.
Buying Guide, Cost-Benefit, and Must-Have Features
Identify must-have features that consistently support dust capture: grinder compatibility, filtration efficiency, and ease of maintenance. Look for shrouds that maintain effective capture at the blade gap and a vacuum path that minimizes resistance.
Use a workload-based approach to weigh upfront costs against long-term value, including health benefits, time savings, and replacement cycle costs. A practical compatibility and installation checklist helps compare options and make a robust choice.
Must-have features and smart upgrades
When selecting a dust shroud and vacuum for your angle grinder, prioritize features that enhance dust capture and minimize downtime. These include:
Replaceable brush rings: Ensure longevity by allowing easy replacement of worn-out parts.
Quick-release latches: Facilitate swift tool changes when working with multiple grinders, saving time and effort.
Durable noses: A robust shroud nose can withstand impacts and reduce the need for frequent replacements. Additionally, consider an anti-static design to minimize dust accumulation and potential fire hazards.
Cost vs. durability and ROI considerations
To maximize long-term value, evaluate the initial price of a dust control system against its expected lifespan and operational costs. Consider the following:
High upfront budgets may warrant premium models with longer warranties and better durability to withstand heavy use and reduce replacement costs.
For low dust loads and infrequent use, affordable, entry-level options with an acceptable life expectancy can be sufficient. Regular inspection and maintenance will further extend the lifespan of your equipment, minimizing replacement costs.
Additionally, consider the time saved through reduced cleanup and fewer wheel changes, as well as the mitigation of compliance risks associated with inadequate dust control.
Conclusion
Dust control on concrete and masonry remains non-negotiable for safety, durability, and a clean, professional finish. By confirming proper shroud fitment, selecting the right vacuum size, and maintaining steady, unobstructed airflow, you protect workers, reduce cleanup costs, and prevent damage to surfaces and tools.
Begin with a simple, practical check: confirm shroud compatibility and correct sizing for the grinder, verify the vacuum meets the system’s airflow needs, install and seal the shroud tightly, and run a brief test on a small area to verify maximum capture before full work. Ensure there are no gaps around the shroud, hoses are free of kinks, the filter is clean or replaced as needed, and you perform periodic checks during the job to sustain proper airflow and filtration throughout.
Common mistakes to avoid include under-sizing or overloading the vacuum, installing an adapter or shroud that doesn’t fit properly, and bypassing safety steps in search of speed. Always test in a controlled area, wear appropriate PPE, and stop to recheck fitment and seals if you notice dust escaping. When in doubt about compatibility, installation, or drastic airflow changes, consult manufacturer instructions or a qualified professional, then proceed only after confirming safe, tested setup. With careful setup and ongoing vigilance, you can work confidently and protect both the project and the people involved.
FAQ
Why is dust control crucial for health, safety, and productivity?
Dust control protects lungs and reduces exposure to harmful particles. It also improves visibility and cleanup, helping workers maintain tempo and accuracy on the job. Proper setup can prevent tool clogging and minimize downtime due to dust-related issues.
How do angle grinder shrouds function to capture dust?
A shroud creates a sealed or near-sealed area around the cutting path and channels dust toward a connected vacuum. The airflow helps pull grime away from the work surface and into the dust collector, reducing airborne particles.
What are the main types of dust shrouds and when should I use them?
Full cup shrouds surround the wheel and offer broad coverage for flat surfaces. Convertible shrouds switch between disc and cup configurations for different angles. Tuck-point shrouds are designed for mortar joints and tight areas. Choose based on surface access, joint shape, and clearance around the work.
What should I check for compatibility among shroud, grinder, and vacuum?
Verify mounting thread or clamp fit between the shroud and grinder, and confirm hose or port sizes match the vacuum. Check that the vacuum’s airflow capacity and filter type suit the dust generated. Follow manufacturer instructions for compatibility and any required adapters.
What installation and setup steps improve performance?
Ensure a tight seal between the shroud and work surface, secure all connections, and attach the vacuum with appropriate hose fittings. Check for leaks, test the setup, and adjust as needed to maintain steady airflow without hindering tool operation.