
Introduction
Venetian plaster sealing means choosing a surface finish to protect and alter the look of plaster while controlling sheen. In practice, DIYers typically choose wax, soap, or modern sealers, each with its own feel and maintenance. Wax can add warmth and depth, soap offers a lighter look and easier rework, and modern sealers vary in sheen and durability.
Each method has a different application path and requires prep and curing considerations you can manage with basic tools and careful work. Waxing usually involves a warm application and buffing to a patina, soap is straightforward but may need more upkeep, and modern sealers come in spray or brush forms with varying durability. Always check product labels for surface compatibility, application steps, and any local requirements to guide your choice and foreshadow results.
Key takeaways
- Wax sealers provide a durable film but reduce breathability and sheen.
- Soap treatments refresh texture without hard film; need frequent reapplication.
- Modern sealers vary by chemistry; choose based on moisture, use, and look.
- Test areas first; document substrate, plaster, and finish responses before full coat.
- Apply thin, even coats; avoid puddling or slow curing that traps moisture.
- Safety: work in ventilated areas; read manufacturer instructions and PPE needs.
Table of Contents
- Introduction
- Key takeaways
- Why Sealing Venetian Plaster Matters and What “Changes” Refers to
- Wax Sealers for Venetian Plaster: Properties, Benefits, and Limitations
- Soap-Treated Venetian Plaster: How It Works, Pros and Cons
- Modern Sealers: Types, Characteristics, and When to Choose Them
- Direct Comparison: Protection, Breathability, Look, and Durability
- Longevity, Maintenance Schedule, and Cost Considerations
- Environmental, Health, and Safety Considerations
- Planning Your Sealing Project: Tools, Test Areas, and Common Mistakes to Avoid
- Conclusion
- FAQ
Why Sealing Venetian Plaster Matters and What “Changes” Refers to
Sealing Venetian plaster helps protect the surface from moisture, stains, and UV exposure while aiming to preserve its depth and color. It also gives you control over gloss level and breathability, which affects cleaning and long-term maintenance.
This piece contrasts traditional wax-only finishes with modern, breathable sealers. We’ll use clear criteria like moisture resistance, color stability, durability, and environmental impact to compare options throughout the article.
Sealing objectives and performance criteria
When sealing Venetian plaster, we’re after a few key things. First off, protection. We want to keep moisture, stains, and UV rays out while letting the wall breathe.
The finish should enhance or at least preserve the appearance, control gloss level, and maintain color stability over time. Ease of care, cleaning, and long-term maintenance are also crucial.
To compare sealers fairly, we’ll look at moisture resistance and vapor permeability, sheen and depth of color, durability and repairability, substrate compatibility, VOCs and environmental impact, cost, availability, and ease of application.
Historical context and recent developments
Traditionally, Venetian plaster was sealed with wax or soap. These natural products offered some protection but had their limitations – slow drying times, labor-intensive application, and limited durability.
Enter modern sealers. We’ve moved on from wax-only finishes to breathable, low-VOC options. Water-based polymers, siloxanes, and hybrid products have hit the scene, bringing faster curing, easier reapplication, and more predictable outcomes without compromising substrate integrity.
These changes mean we can now choose sealers that better balance protection, appearance, and breathability – all while being mindful of our environmental impact.
Wax Sealers for Venetian Plaster: Properties, Benefits, and Limitations
Wax sealers are typically made from beeswax, carnauba, resins, or blends, and they interact with lime-based plaster to form a protective film. They contribute a warm, rich appearance and subtle depth to the sheen.
Application involves surface prep and choosing between soft or hard wax options, with or without solvents. They can protect against dirt and moisture but may require reapplication and can buildup in crevices over time.
Advantages of wax (appearance and tactile qualities)
Wax sealers enhance the beauty of Venetian plaster, adding depth and warmth. They create a subtle sheen that catches the light, giving your walls a dynamic, inviting look.
Depth: Wax penetrates the plaster surface, filling micro-pores and creating a smooth, continuous layer. This imparts a sense of solidity and richness to the finish.
Sheen Control: Unlike other sealers, wax allows you to control the sheen level. A light application gives a soft matte look, while multiple coats build up a warm glow.
The tactile feel of wax-sealed plaster is often preferred by artisans. It’s smooth yet slightly yielding, like fine leather. This pleasant hand-feel adds to the overall luxury of the finish.
Drawbacks and limitations of wax
While wax offers aesthetic benefits, it’s not without its vulnerabilities. Understanding these can help you make informed decisions about when to use it.
Water Sensitivity: Wax is not waterproof. While it provides some resistance, prolonged exposure or heavy splashing can cause damage. Avoid using wax in areas prone to moisture or direct water contact.
Scuffing and Wear: Wax can scuff or wear over time, especially in high-traffic areas. This is why it’s often not recommended for floors or heavily used surfaces like kitchen countertops.
Regular buffing or reapplication may be needed to maintain the finish. Efflorescence – the appearance of white salt deposits on the surface – can also occur if the wax traps moisture beneath it. Proper preparation and application can help mitigate these issues.
Application process and maintenance for wax
Proper application and care ensure your wax-sealed Venetian plaster looks its best for years to come. Here’s a simple guide:
Surface Prep: Ensure the plaster is fully cured (at least 28 days), clean, dry, and free of any contaminants. Lightly sand with fine-grit paper if necessary.
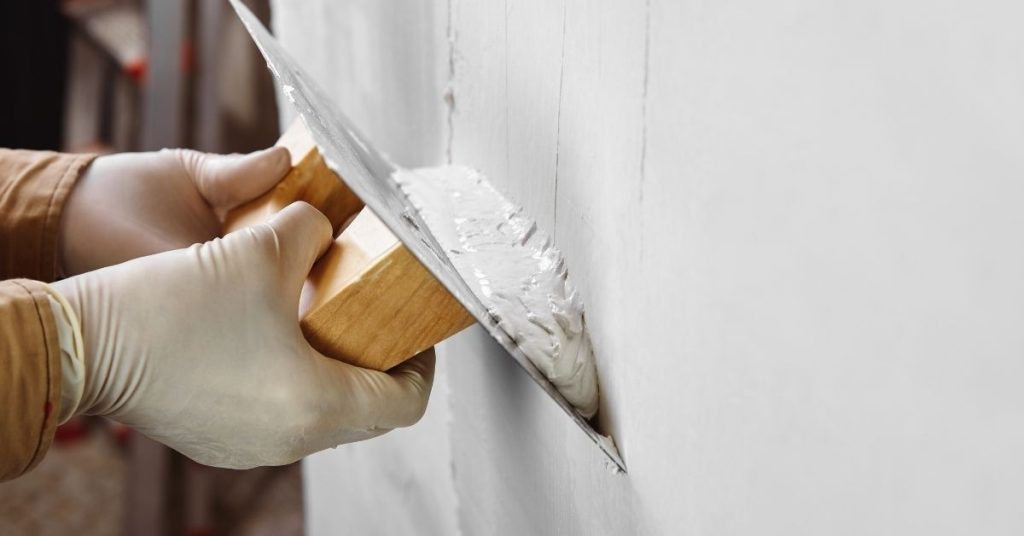
Application: Choose between soft or hard wax, depending on your desired sheen level. Apply using a natural bristle brush in thin, even coats, following the direction of the trowel marks. Allow each coat to cure according to manufacturer’s instructions before buffing lightly with a clean cloth.
Maintenance: Clean spills promptly with a damp cloth. For heavier dirt or grime, use a mild soap solution and avoid abrasive materials. Re-wax every 2-5 years, depending on traffic and wear. If scratches appear, gently buff them out during reapplication. Avoid exposing the surface to heat, UV light, or significant temperature changes.
Soap-Treated Venetian Plaster: How It Works, Pros and Cons
Soap treatment creates a lime-soap surface as the chemical reaction unfolds with the plaster matrix, yielding a natural sheen. The finish tends to emphasize patina and texture rather than a high gloss.
Ideal where breathability and aging gracefully are desired, this approach suits interiors with lighter traffic. It can be more vulnerable to water and humidity, so plan maintenance accordingly.
Benefits of soap sealing (breathability and natural finish)
Soap sealing maintains the breathability of Venetian plaster. This means it allows moisture to escape, preventing trapped water from causing damage.
Appearance-wise, soap sealing gives a matte or satin finish – a natural look that’s often preferred for traditional or historic-style spaces.
It also provides modest water repellence. While it won’t protect against heavy water exposure, it can help resist minor spills and splashes.
Disadvantages and limitations of soap
Soap sealing isn’t stain-resistant long-term. Spills or dirt left untreated can lead to permanent discoloration.
Periodic retreatment is necessary, typically every 2-5 years depending on traffic and conditions. Heavy soiling or alkaline cleaners can also degrade the seal.
Soap sealing isn’t ideal for high-traffic areas or spaces prone to heavy soiling. It’s best suited for low-traffic interiors with a historic or traditional aesthetic.
How to apply soap sealer and maintain it
First, clean the surface thoroughly. Remove any dust, dirt, or debris. Then, dilute your soap flakes according to the manufacturer’s instructions – usually 1 part soap to 5-10 parts water.
Apply the solution using a soft brush or cloth, working in small sections. Let it cure for at least 24 hours before testing with a damp cloth to ensure no marks are left behind.
Maintain your soap seal by cleaning spills promptly and retreating every 2-5 years. Always confirm the exact maintenance schedule with the product’s guidance.
Modern Sealers: Types, Characteristics, and When to Choose Them
This section groups penetrating silanes/siloxanes, acrylics, polyurethanes, and hybrids, noting how each interacts with lime plaster and whether they form a film or stay largely penetrating. Breathability and moisture management hinge on this distinction.
Consider where each type shines—from interiors with low maintenance needs to damp or high-traffic areas—and how substrate porosity and prep influence results. We’ll also cover curing times and potential risks like color changes or efflorescence.
Penetrating vs Film-forming Modern Sealers
Modern sealers fall into two main categories: penetrating and film-forming. Understanding the difference is crucial for maintaining Venetian plaster’s natural beauty.
Penetrating sealers, like silanes and siloxanes, soak into the plaster, lining the pores to repel water and other liquids without forming a surface film. This keeps the plaster breathable, allowing moisture to evaporate naturally.
Film-forming sealers, such as acrylics and polyurethanes, create a protective layer on top of the plaster. While they offer excellent protection against water and stains, they can reduce breathability and may alter the plaster’s texture and appearance.
Performance Benefits and Potential Downsides
Modern sealers bring significant improvements to Venetian plaster’s performance. However, it’s essential to weigh their benefits against potential drawbacks.
Benefits: Modern sealers enhance water resistance (measured as contact angle or hydrostatic resistance), improve stain resistance, and extend longevity compared to traditional waxes and soaps. They also offer better UV stability and abrasion/chemical resistance.
Downsides: Some modern sealers may darken the plaster’s color slightly or cause efflorescence if not compatible with lime-based plasters. Film-forming sealers can alter the plaster’s texture, potentially affecting its vintage look and feel.
Application Best Practices for Modern Sealers
Proper preparation and application are key to achieving optimal results with modern sealers. Here’s a step-by-step guide:
Preparation: Assess surface porosity, clean the plaster thoroughly (using a suitable cleaner), and allow it to dry completely. Check moisture content and apply a compatible primer if needed.
Application: Follow the technical data sheet’s instructions for application methods (e.g., brush, roller, or spray). Apply sealers in thin, even coats, allowing adequate drying time between applications. Perform test patches first to ensure compatibility and desired results.

Direct Comparison: Protection, Breathability, Look, and Durability
We compare protection levels, moisture management, visual impact, and wear resistance across wax, soap, and modern sealers. This helps you picture performance in real-use scenarios.
Expect guidance on preparation, re-sealing timelines, and how each option may affect breathability and appearance. The goal is to surface practical trade-offs for planning maintenance.
How each sealer handles moisture and stains
Wax sealers offer moderate protection against water but excel at repelling oil-based stains. They’re great for kitchen countertops or high-traffic surfaces where oil spills are common.
Soap sealers provide good water resistance, thanks to the lime in the plaster reacting with the soap. However, they’re not as effective against oil stains. Use them indoors where oil spills aren’t frequent.
Modern sealers, especially film-forming ones, offer excellent protection against both water and oil-based stains. They’re ideal for exterior surfaces or areas prone to both types of stains, like bathrooms with marble countertops.
Impact on texture and color (visual checkpoints)
Before sealing, test a small area to ensure you’re happy with the final look. Here’s what to check:
- Sheen level: Wax provides a soft, warm sheen. Soap leaves a natural matte finish. Modern sealers can be glossy or matte, depending on the type.
- Color enhancement: Wax can slightly darken the plaster. Soap may lighten it slightly. Modern sealers usually maintain the original color.
- Texture feel: Wax adds a slight softness. Soap maintains the original texture. Modern sealers might add a subtle smoothness.
- Water beading: Check if water beads up on the surface after sealing. This indicates good protection.
Quick rule: Always test in an inconspicuous area first to avoid surprises.
Longevity, Maintenance Schedule, and Cost Considerations
General expectations for how long each sealing option lasts under typical conditions are discussed, along with factors that shorten or extend life. You’ll find guidance on cleaning methods and reapplication needs.
A simple maintenance schedule helps you plan budgets, renewals, and potential downtime. We’ll point to cost drivers like product price, labor, and prep so you can forecast over the project’s horizon.
Maintenance routines and frequency
Each sealer type has its own maintenance routine. Here’s what to expect:
Wax: Clean every 6-12 months with mild soap and water. Re-wax every 2-5 years, depending on traffic and cleaning frequency.
Soap: Clean gently every 3-6 months using a soft cloth and warm water. No reapplication needed; just clean as required.
Modern Sealers: Clean every 12-24 months with manufacturer-approved cleaner. Reapply every 5-10 years, depending on sealer type and conditions.
Cost factors and rough budgeting guidance
The cost of sealing Venetian plaster varies. Here’s what to consider:
Product: Wax is usually the cheapest, followed by soap, then modern sealers.
Labor: Application time and complexity affect labor costs. Expect 1-3 days per room.
Maintenance: More frequent cleaning or reapplication increases long-term costs. Plan for these intervals in your budget.
Environmental, Health, and Safety Considerations
We outline VOC content and toxicity profiles for wax, soap, and modern sealers to help you assess health and cleanup concerns. Disposal and local regulatory notes are included for responsible handling.
Indoor air quality during application and curing is addressed, with practical PPE and ventilation tips. A quick framework helps you choose options aligned with your project scope and environmental priorities.
VOCs, biodegradability, and eco-labels to look for
When choosing a sealer, consider the environmental impact. Look at the Volatile Organic Compounds (VOCs) content. Lower VOCs mean less pollution and better indoor air quality.
Check if the product is biodegradable. This means it breaks down naturally in the environment. Soap sealers are often biodegradable, but not all waxes or modern sealers are.
Look for eco-labels like EcoLogo, Green Seal, or EPEAT. These certifications ensure products meet certain environmental standards. Prioritize these when possible.
Personal protective equipment and ventilation practices
Safety first! Here’s what you need to protect yourself and maintain good indoor air quality during application:
- Respirator: Use a NIOSH-certified N95 or P100 respirator for dust and chemical protection. It’s cheap, but essential.
- Goggles: Protect your eyes from splashes with chemical-resistant safety goggles. They’re around $10-$20.
- Gloves: Use latex or nitrile gloves to protect your hands. A box of 100 is about $5-$10.
- Ventilation: Open windows and use fans for cross-ventilation. If you’re sensitive, consider renting an $80-$120 air purifier with a HEPA filter.
- Clothing: Wear old clothes or coveralls to protect your skin. Consider a $20-$40 Tyvek suit for extra protection.
- Professional help: If you’re sensitive, elderly, or have health issues, consider hiring a professional. They have specialized equipment and training.
Planning Your Sealing Project: Tools, Test Areas, and Common Mistakes to Avoid
A practical pre-project checklist covers substrate condition, humidity, temperature, cure times, and plaster compatibility. This sets the stage for a smooth sealant choice.
We outline testing plans, sample areas, and acceptance criteria to prevent costly mistakes. Finally, we flag common errors in prep, sequencing, and maintenance to keep your project on track.
Tools, materials checklist, and visual checkpoints
Before you start your Venetian plaster sealing project, make sure you have all the necessary tools and consumables. Here’s a quick checklist to ensure you’re ready:
- Sealers: Wax, soap, or modern sealers – choose based on your finish preference.
- Applicators: Brushes, rollers, or spray equipment for each sealer type.
- PPE: Gloves, goggles, and a respirator for safety during application.
- Masking tape: To protect adjacent surfaces from sealant.
- Ventilation plan: Fans or open windows to ensure proper air circulation.
- Cleanup supplies: Rags, solvents, and soap for cleaning tools and hands.
- Test patches: Representative areas on your substrate to test sealers.
- Adhesion test: Scratch or pull off a small amount of the sealer after curing. It should not peel off easily.
- Porosity test: Drip water onto the sealed surface. It should bead up and not absorb.
- Hide/color test: Check if the sealer provides even coverage and desired color enhancement.
Quick rule: Always perform these tests before full-scale application to avoid costly mistakes.
Common mistakes and troubleshooting
Even with the best intentions, mistakes can happen. Here are some frequent errors and how to avoid or correct them:
- Insufficient curing time: Why: Hurried application leads to improper curing. How to avoid/correct: Always follow the manufacturer’s recommended cure times.
- Wrong sealer choice: Why: Using incompatible sealers can ruin your finish. How to avoid/correct: Test different sealers on a small area before full application.
- Inadequate testing: Why: Skipping tests may result in poor performance or appearance. How to avoid/correct: Always perform adhesion, porosity, and hide/color tests as mentioned earlier.
- Overheating or freezing substrates: Why: Extreme temperatures can damage the plaster or affect sealer performance. How to avoid/correct: Maintain substrate temperature within the manufacturer’s recommended range.
By being aware of these common mistakes, you can prevent them and ensure a successful Venetian plaster sealing project.
Conclusion
Sealing Venetian plaster changes how it looks, how it breathes, and how long it lasts, so do not rush. The right choice reduces risk of damage, keeps a natural finish, and makes maintenance predictable.
Test a small area with your chosen sealer, note drying time and odor, inspect color and sheen under different light, prep the surface properly, repair any cracks, choose the approach that matches the existing plaster, apply thin, even coats with good ventilation, and then wait for full cure before judging the result; evaluate durability and ease of cleaning to decide on future maintenance and timing. Test a small area first, protect ventilation and airflow, follow manufacturer directions.
Common mistakes to avoid are skipping the test patch, using incompatible products, applying too thick coats, neglecting surface prep, and sealing in dry or damp conditions. Keep the area well ventilated, wear a mask if dust or fumes are present, and work in dry, stable temperatures with clean hands and tools to prevent dust and dirt from getting under the finish.
If you’re dealing with large spaces, uncertain substrate conditions, ongoing moisture, or spots that have previously failed, call a professional rather than pushing through alone. With careful testing, proper prep, and controlled application, you’ll get a durable, attractive result that lasts and stays easier to maintain. Stay steady, follow the plan, and you’ll finish strong.
FAQ
What exactly are the sealing methods for Venetian plaster (wax, soap, and modern sealers) and how do they differ in principle?
Wax is a surface coating that sits on top of the plaster. Soap cleans and partially protects the surface while letting it breathe. Modern sealers are clear coatings that shield without altering the look too much. Each method changes protection, breathability, and sheen in different ways, so pick the one that matches your goals.
What are the main characteristics I should expect from each sealer type?
Wax gives a warm, satin finish and enhances depth but can darken the plaster and may require future maintenance. Soap-treated plaster keeps a more natural look with some slipperiness and needs reapplication to maintain depth and sheen. Modern sealers vary, but many preserve color, reduce staining, and improve water resistance without a heavy film—check whether they are satin, matte, or high-gloss based on your preference.
How do I apply each type, and what practical steps should I follow on site?
Wax: apply thin coats with a soft cloth or brush, let set, and buff. Soap: apply with a sponge or cloth, work evenly, and allow to dry; reapply as needed for the desired finish. Modern sealers: follow the manufacturer’s instructions for surface prep, application tool, and number of coats; keep dust off between passes and avoid applying in high heat or direct sun. Always test a small area first.
Which sealer lasts the longest and what maintenance should I expect?
Durability depends on the product and environment. Wax may need frequent touch-ups in high-use areas. Soap finishes require periodic reapplication to maintain look and protection. Modern sealers generally last longer with less frequent maintenance, but you’ll still need occasional cleaning and re-coating as the surface shows wear. Check the label for maintenance intervals and compatible cleaners.