
Introduction
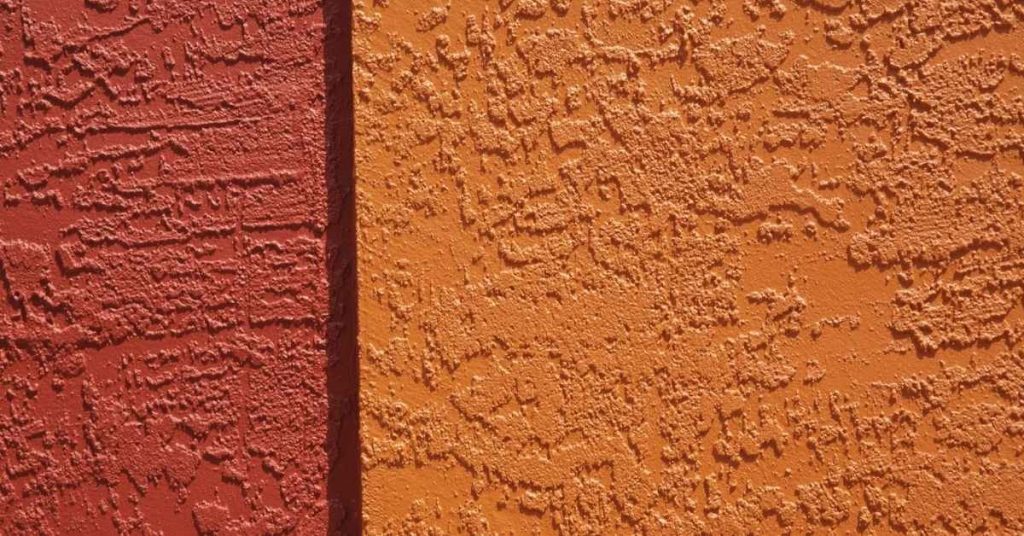
Two-tone stucco bands without cracks are achieved by using deliberate movement joints and proper sequencing to control where cracks form.
This approach keeps the color bands crisp and the surface durable during temperature changes and settling. Avoid guessing—check labels and manufacturer guidance for allowable joint spacing and material compatibility.
Identify crack types as they appear and match your repair plan to the crack you see.
Cracks can occur from movement, moisture, or improper adhesion, and joints help absorb that movement.
Plan your layering and timing so the two colors meet at a joint, and always follow local rules and product instructions for sequencing.
Key takeaways
- Identify crack types early: hairline, structural, and staggered bands require different fixes.
- Movement joints prevent cracking by accommodating building movement and temperature changes.
- Plan sequencing: install sublayers, bonds, and two-tone bands in correct order to minimize cracks.
- Inspect surfaces for proper substrate, clean dryness, and moisture before coatings.
- Use movement joints at transitions and around openings where bands meet.
- Safety: wear eye protection and follow product instructions to avoid skin irritation.
Table of Contents
- Introduction
- Key takeaways
- Why Stucco Cracks Happen and How Two-Tone Bands Help
- Movement Joints — Types, Placement, and Performance
- Planning, Inspection, and Code Compliance Before You Start
- Materials, Accessories, and Tools Checklist
- Sequencing: Step-by-Step Installation to Minimize Cracking
- Two-Tone Band Techniques, Profiles, and Texture Matching
- Quality Checks, Common Mistakes, and Troubleshooting
- Maintenance, Safety, and Cost Considerations
- Conclusion
- FAQ
Why Stucco Cracks Happen and How Two-Tone Bands Help
Stucco cracks come from several movement and detailing issues. Thermal expansion and contraction test the system with daily temperature swings, while substrate movement adds stress at the base. Poor detailing around edges, windows, and openings creates weak points where cracks can start. Moisture intrusion and UV exposure further degrade the finish over time. Two-tone bands, when designed with intent, provide controlled stress relief without sacrificing aesthetics.
Think of two-tone bands as movement joints that also read as a design feature. They interrupt stress paths and guide where cracks would appear, reducing their visibility along the band edges. Proper detailing supports movement management by placing joints, backing, and substrate prep in a way that compounds the band’s effectiveness. Corner transitions, window openings, and terminations should be smooth and continuous to prevent telegraphing through the finish. Sequencing matters: plan band installation within the lath, base coat, and finish coat, and align it with weather windows and cure cycles to avoid trapping stresses. Material and color choices must stay compatible, with joint materials that accommodate movement without transferring cracks. Regular maintenance and inspection help keep movement joints performing as intended for years to come.
Common causes of stucco cracks
Stucco cracking is a common issue, but understanding its causes can help prevent it. Here are the primary culprits:
Thermal movement: Stucco expands and contracts with temperature changes. Cracks often appear when these movements aren’t accommodated properly.
Substrate movement: The underlying structure may shift due to settling, moisture, or other factors, causing cracks in the stucco finish.
Improper detailing: Poorly executed edges, corners, and openings can lead to cracking. Inadequate expansion joints and control joints also contribute to this problem.
How two-tone bands reduce visual and structural impact
Two-tone stucco bands serve a dual purpose: they enhance aesthetics and manage movement. Here’s how:
Bands hide minor hairline cracks. By breaking up the monotony of a single color, they help camouflage fine cracks that may appear over time.
They provide controlled break lines. Bands guide where stucco can expand and contract, reducing the likelihood of uncontrolled cracking elsewhere on the wall.
Bands also guide where movement joints should occur. By placing bands strategically, you can direct where cracks will form, ensuring they’re less visible and more manageable.
Movement Joints — Types, Placement, and Performance
Control joints, expansion joints, isolation joints, and head-of-wall joints each serve a distinct purpose. A control joint provides a deliberate break at predictable stress lines, while expansion joints accommodate larger movement ranges. Isolation joints separate elements to prevent transfer of movement. Head-of-wall joints sit at transition points where wall and structure meet, helping to isolate movement stresses. Visual cues tied to two-tone bands help you spot these joints quickly on site.
Proper placement aligns with structure and anticipated movement zones to minimize random cracking where color bands cross joints. Spacing and alignment with framing should be considered so the edge transitions stay clean and crack-free. Sequencing should coordinate substrate prep, bond coats, and finish layers, ensuring edge details of the two-tone band are captured without compromising bond or water resistance. Dial in gasket or backer materials and compatible sealants to prevent telegraphing through the color band. On-site checks for joint performance include looking for signs of movement transfer and ensuring joints stay intact under varying climate conditions.
Movement Joint Types and When to Use Each
Stucco walls need different kinds of movement joints to handle various stresses. Here’s what you need:
Control Joints: These are your everyday joints, spaced evenly (6-12 feet apart) to control cracking. They’re perfect for long wall runs.
Expansion Joints: Use these where walls meet, like at corners or openings. They let walls expand and contract independently. Space them 3-5 feet apart.
Isolation Joints: These separate different materials or structures, preventing movement from one affecting the other. Place them where walls meet non-stucco surfaces, like brick or stone.
Head-of-Wall Joints: Found at the top of walls, these handle movement between walls and roofs. They’re crucial in two-tone bands to prevent cracking at color transitions.
Placement Rules and Spacing Guidance
Proper placement prevents cracks. Here’s how:
Space joints evenly along walls, not exceeding 12 feet apart. Check local codes for exact rules.
Align joints with studs or framing members to let them move together. This stops cracking at seams.
At corners and openings, place joints within 3-5 feet of the edge. This lets walls expand and contract freely.
Integrating Movement Joints with Two-Tone Band Layout
Make sure your color bands work with your joints, not against them:
Align joint lines with the edge of your color bands. This hides joints and keeps them from showing through your two-tone effect.
If you can’t align them, offset joints slightly to avoid having both a joint line and a color seam in the same spot. This prevents cracking at the intersection.
When planning, consider how your bands will interact with expansion joints at corners or openings. Make sure they don’t conflict.
Planning, Inspection, and Code Compliance Before You Start
Start with a clear scope: crack mapping, moisture checks, substrate readiness, and coordinating with a licensed pro if needed. Document structural concerns that could influence movement and joint placement. Verify what codes and product standards apply in your area, and check permit requirements before work begins.
Lay out a strategy for where joints live within the two-tone bands and how they respond to expansion and contraction. Mockups of band patterns and color tests help you visualize performance before you commit to full application. Create a step-by-step sequence that minimizes cold joints and curing issues. Keep a pre-job checklist for weather windows, protective measures, and required approvals so you stay aligned with local rules and manufacturer guidance.
Assessing existing cracks and structural indicators
Before you start any concrete repair work, use this checklist to assess the current state of your concrete. This will help you decide whether a DIY fix is suitable or if professional intervention is needed.
- Crack width: Measure the widest part of each crack using a ruler or a crack gauge. Cracks wider than 1/8″ (3mm) may indicate structural issues and should be inspected by a pro.
- Crack pattern: Identify the shape and direction of cracks. Straight, vertical cracks often indicate settlement, while diagonal cracks can signal structural problems. Check for any patterns that repeat across the surface.
- Crack growth history: Look for signs of recent crack growth, such as fresh concrete dust or widening at the ends of cracks. If cracks are growing, they may need professional attention.
- Concrete delamination: Check for any flaking or peeling of the concrete surface. This can indicate moisture issues or inadequate curing and should be addressed before proceeding with repairs.
- Structural movement: Gently push and pull on visible cracks to check for movement. If there’s significant give, it could indicate structural instability that requires professional evaluation.
- Concrete spalling: Look for areas where the concrete has chipped or crumbled away, exposing the aggregate beneath. This can be a sign of severe damage and may require professional repair.
- Uneven settlement: Check for dips, bumps, or other signs of uneven settling in the concrete surface. These could indicate underlying soil issues that need to be addressed before making repairs.
- Water intrusion: Inspect cracks and joints for signs of water seepage, such as dampness, efflorescence (white powdery deposits), or mold growth. Water intrusion can weaken concrete over time and should be addressed promptly.
Quick rule: If you find any cracks wider than 1/8″ (3mm), signs of recent crack growth, structural movement, or other severe damage, it’s best to consult a professional before proceeding with DIY repairs. These issues could indicate underlying problems that require expert attention.
What to verify with local codes and manufacturer specs
Before you start any concrete work, use this checklist to ensure your plans comply with local building codes and follow manufacturer instructions. This will help prevent costly mistakes and rework.
- Expansion Joints: Check local codes for required spacing (typically every 20-30 feet). Measure existing joints, if any, to ensure they match.
- Fire Rating: Verify required fire-resistance rating with local codes. Check manufacturer’s data sheets for their product’s rating.
- Concrete Mix Design: Follow manufacturer’s recommendations or consult a structural engineer for the right mix design based on your project’s needs.
- Slump Test: Conduct a slump test (as per ASTM C143) to ensure concrete consistency. Aim for 3-5 inches of slump for most projects.
- Air Entrainment: Check manufacturer’s recommendations or local codes for required air content (usually 5-8%). Use an air meter to verify.
- Curing Time: Follow manufacturer’s instructions for proper curing duration (typically 7 days).
- Concrete Coverage: Verify that your concrete volume will cover the required area. Check local codes for minimum thickness requirements.
- Formwork Strength: Ensure formwork can withstand the pressure of wet concrete (typically 5 psi per inch of depth).
Quick rule: Always double-check your plans and calculations with a second pair of eyes, whether it’s a colleague or a professional. This simple step can catch many potential issues before they become costly problems.
Layout, mockup, and sequencing plan
Before you start mixing concrete, use this checklist to ensure your layout, mockup, and sequencing plan are solid. This will help you avoid costly rework and keep your project on track.
- Check existing structure: Inspect the area where you’ll be pouring. Ensure it’s structurally sound and free from major cracks or damage (refer to ‘Assessing existing cracks’ section).
- Mark joint locations: Using a chalk line, mark out where your control joints will go. These should be spaced at 24″ to 36″ intervals for typical slabs.
- Determine band profiles: Decide on the profile of your bands (e.g., square edge, beveled). Mark these on your layout plan and check with local codes if unsure.
- Select color samples: Choose concrete color samples that match your desired finish. Check manufacturer instructions to ensure compatibility with your mix design.
- Plan formwork sequence: Determine the order in which you’ll pour sections of your slab. Start at one corner and work towards the opposite side to avoid cold joints.
- Check formwork alignment: Ensure forms are level, plumb, and square before pouring. Use a laser level or water gauge for accuracy.
- Verify reinforcement placement: Check that rebar is properly placed within your forms (refer to ‘Local codes and manufacturer specs’ section).
- Prepare pour sequence plan: Write out the exact order of operations for each pour, including mix design, pouring time, finishing, and curing.
Quick rule: Always start at one corner and work towards the opposite side to avoid cold joints. This helps ensure your slab has consistent strength throughout.
Materials, Accessories, and Tools Checklist
Core materials include sealants, backer rods, joint covers, bond breakers, base coats, finish coats, primers, and compatible paints. Verify movement and crack-bridging specifications and UV resistance on the labels. Make sure all items are suitable for exterior stucco and the two-tone band approach you plan to use.
Check substrate compatibility, whether you’re using elastomeric or rigid sealants, and the correct backer rod diameter and foam type. Ensure the primer and finish are compatible to prevent staining or delamination. Plan for edge trims, color-matching paints, and weather-resistant joint covers and ensure proper storage and handling to maintain performance until installation.
Sealants, backs, and joint systems to consider
Use this checklist when selecting sealants, backer rods, and prefabricated joint systems for your concrete project. These items ensure proper expansion and contraction of the slab, preventing cracks and water intrusion.
- Elastomeric Sealant: Check label for ‘elastomeric’ in product name; confirm it stretches at least 25% without breaking (manufacturer’s data).
- UV/Weather Resistance: Ensure sealant has good UV and weather resistance rating (check manufacturer’s specs).
- Movement Capability: Verify sealant can accommodate the expected joint movement (check with manufacturer or local engineer).
- Backer Rod Size: Measure joint width; select backer rod size accordingly (typically 1/2″ to 3/4″ for concrete joints).
- Prefab Joint System: Check if it’s designed for your specific joint type and movement range (consult manufacturer’s guide).
- Joint Filler Material: Ensure it matches the joint system’s requirements (e.g., sand, polymer-modified concrete, etc.).
- Sealant Application Temperature: Check if current temperature is within sealant’s application range (check manufacturer’s specs).
- Joint Cleanliness: Before applying sealant, ensure joint is clean and dry; any dirt or moisture can compromise adhesion.
Quick rule: Always choose sealants and joint systems designed for your specific concrete application. Skipping this step may lead to premature failure, costly repairs, or even entire slab replacement.
Two-tone finish and texture materials
Use this checklist when preparing to apply a two-tone finish with textured surfaces on your concrete project. It ensures you have the right materials for crisp results and long-term adhesion.
- Base coat mix: Check it’s a standard concrete mix (e.g., C30, C40) suitable for your project’s requirements. Confirm with manufacturer instructions or local building codes.
- Finish textures: Choose from broom finish, exposed aggregate, or stamps. Ensure they’re compatible with your base coat and two-tone design.
- Masonry primer: Select a high-quality, breathable primer suitable for concrete. Check it’s compatible with your chosen paint system.
- UV-stable paints (two tones): Choose 100% acrylic latex paints designed for exterior masonry use. Ensure they’re UV-stable and have good adhesion properties.
- Paint colors: Select contrasting or complementary colors for your two-tone effect. Test them on a small, hidden area first to ensure you like the result.
- Paint sheen: Choose a low-sheen or flat finish for better adhesion and less glare. Satin or semi-gloss may not adhere as well over textured surfaces.
- Paint coverage: Estimate your paint needs based on surface area and texture depth. Add 10-20% extra to account for wastage and touch-ups.
- Sealer (optional): Consider a clear, UV-stable sealer to protect the painted finish from weathering and enhance durability. Check it’s compatible with your paint system.
Quick rule: Always test your materials on a small, hidden area first to ensure compatibility and desired results.
Essential tools and PPE
Before you start your concrete project, use this checklist to ensure you have all the necessary tools and safety equipment. This will help you work efficiently and safely.
- Tape measure: Verify it’s in good working condition and calibrated correctly for accurate measurements.
- Level: Check that your level is straight by placing it on a flat surface. Ensure the bubble is centered in both directions.
- Shovel: Inspect for any damage or rust. A sturdy shovel is crucial for mixing and moving concrete.
- Wheelbarrow: Check tires are inflated, and the wheel turns smoothly. Ensure it’s in good condition to prevent concrete spills.
- Concrete trowel (square-nose & margin trowel): Inspect for any bends or damage. These tools are essential for finishing your concrete surface.
- Sealant gun: Ensure it’s clean and in good working order to prevent sealant blockages.
- Safety glasses: Check they provide adequate protection and fit securely on your face. Safety glasses are crucial for protecting your eyes from debris.
- Work gloves: Ensure they’re durable, comfortable, and provide a good grip to handle tools safely.
- Steel-toed boots: Inspect for any damage or wear. Steel-toed boots protect your feet from heavy objects and sharp edges.
- Hard hat: Check it’s in good condition and fits securely on your head to protect against falling objects.
Quick rule: Always prioritize safety over speed. Ensure you have the right tools and PPE before starting any concrete project to prevent injuries and rework.

Sequencing: Step-by-Step Installation to Minimize Cracking
Start with a thorough assessment of surface condition, moisture, and substrate compatibility. Establish a plan that minimizes trapped stresses during coating and texture application. Establish the critical decision points that influence crack resistance throughout the project.
Detail the joint placement strategy for the two-tone bands, including how expansion joints align with movement zones and timing to avoid stress during curing. Outline band formation steps, including layout, masking, edge treatment, and texture matching for a seamless transition. Plan priming and adhesion considerations specific to two-tone stucco to prevent bond failures and ensure color band integrity.
Step-by-Step Installation Process
The following sequence ensures a smooth, crack-resistant two-tone stucco installation.
- Preparation: Inspect the site for safety. Gather tools and materials listed in your plan.
- Surface Prep: Follow the Surface Preparation steps below to ensure a clean, stable surface.
- Main Work: Install movement joints, then create two-tone bands as outlined in the following sections.
- Curing & Quality Check: Allow proper curing time. Inspect for signs of cracking or adhesion issues before applying final topcoat.
- Cleanup & Final Checks: Remove tools and materials. Perform a final walkthrough to ensure everything is correct.
Surface preparation and crack stabilization
Start by cleaning the surface with a wire brush or pressure washer to remove any loose material, dirt, or debris. Repair active leaks using appropriate sealants or patching compounds.
Stabilize hairline cracks using an elastomeric crack filler. Apply according to manufacturer’s instructions, ensuring the filler is compatible with your chosen stucco system.
Allow fillers and repairs to cure fully before proceeding with joint installation. This ensures a stable surface for your two-tone bands.
Installing movement joints and backing
Begin by installing backer rod in expansion/movement joints, following the guidelines from Movement Joints — Types, Placement, and Performance. Ensure joint depth-to-width ratios are maintained for optimal performance.
Apply a bond-breaker or joint cover over the backer rod. This prevents adhesion between the sealant and stucco, allowing movement without cracking.
Seal the joints using a compatible sealant. Follow manufacturer’s instructions for application and tooling to achieve a smooth, even bead.
Building the two-tone band: base, texture, and topcoat order
Apply the base coat according to manufacturer’s instructions. Ensure it’s compatible with your chosen textures and topcoats.
Embed any reinforcing materials, such as fiberglass mesh or wire lath, into the base coat while it’s still wet. This helps prevent cracking due to differential movement.
Profile the band reveal using a straight edge or reveal tool. Allow the base coat to cure according to manufacturer’s recommendations before proceeding with texturing and topcoating.
Match texture by applying the second tone carefully, following your mockup plan. Prime the band using a compatible primer to ensure good adhesion of the final topcoat. Apply topcoats in the recommended sequence to avoid rewetting or adhesion problems.
Two-Tone Band Techniques, Profiles, and Texture Matching
Edge control is key for sharp two-tone lines. Options include painted caulk joints, skim coat reveals, metal trims, and shadow lines, each affecting edge crispness and durability. Choose a method that suits your texture and substrate while avoiding tear-out or chipping.
Explore profile options such as reveals, trims, and shadow-line designs, and note installation steps, fastener choices, and sealant compatibility. Develop a texture-matching workflow to blend repairs with the field finish, using test panels and color considerations to keep the two-tone band inconspicuous. Plan the sequencing so bands are integrated with the surrounding texture, including expansion joints to prevent crack propagation at band junctions.
Masking, reveals, and trim options for clean color breaks
For sharp two-tone lines, consider these masking and reveal techniques:
Masking Tape/Film: Use painter’s tape or film to mask off the edge. Apply it before applying the first coat of your base color. For a crisp line, press down firmly and use a straightedge to seal it.
Recessed Reveals: Create a reveal by setting back the second color behind a thin strip of wood or metal. This gives a clean, shadowed edge. Ensure the reveal is deep enough to accommodate your trowel width for texturing.
Metal or PVC Trims: Install trims along the edge before applying the second color. These provide a crisp line and protect the edge from chipping. Use appropriate fasteners, like stainless steel screws or nails, to prevent rusting.
Texture matching methods
Matching adjacent textures is crucial for repairs to blend in:
Test Panels: Before starting, create test panels using your existing texture tools (trowel, float, brush) and materials. This helps you match the old finish exactly.
Feathering: At the band’s edge, feather the new texture into the old one. Use a smaller trowel or sponge to lightly apply texture onto the existing surface, gradually increasing pressure as you move into the new area.
Color Matching: Ensure your new materials match the color of the existing finish. If needed, use a masonry stain or integral color to achieve an exact match.
Detailing corners, intersections, and penetrations
Special attention is required at corners, window/door heads, and where penetrations meet bands:
Corners: At outside corners, use a corner trowel or guide to maintain the same texture on both sides. Inside corners can be detailed with a smaller trowel or sponge for a smooth transition.
Window/Door Heads: At window and door heads, ensure your band meets the head trim cleanly. Use a straightedge and level to keep the line true. Consider using a reveal or trim here for added protection.
Penetrations: Where pipes or other penetrations meet the band, use a flexible caulk or sealant to bridge the gap. Ensure it’s compatible with your stucco finish and can accommodate movement.
Quality Checks, Common Mistakes, and Troubleshooting
Perform on-site checkpoints at each phase, with pass/fail criteria and photo prompts to document progress. Look for hairline cracks, misaligned joints, rough substrates, and improper sealant installation. Use a simple flow to escalate issues when performance flags appear.
Common mistakes include insufficient movement joints, over-tight backer rods, improper joint spacing, and curing too quickly. Have quick fixes ready and know when to pause work and call a specialist. Keep documentation and visual records to support any adjustments or escalations to supervisors or manufacturers.
Visual and performance checkpoints
Use this checklist at each stage of your two-tone band installation to ensure quality and prevent cracking.
- Surface prep: Check for full adhesion of the primer. Incomplete adhesion can lead to delamination later on.
- Joint placement: Verify correct joint compression. Under-compression leads to weak joints, while over-compression causes cracking.
- Concrete pours: Ensure uniform texture and color. Inconsistencies here can result in visible defects.
- Color/texture transition: Check for smooth transitions between colors and textures. Sharp lines or abrupt changes indicate incorrect application.
- Final curing: Confirm even curing across the entire surface. Uneven curing causes differential shrinkage, leading to cracks.
- Moisture content: Measure moisture levels before applying any materials. Excessive moisture can cause blistering or delamination.
- Joint sealant/backer rod: Inspect proper installation of joint sealants and backer rods. Incorrect installation leads to water intrusion and cracking.
Quick rule: If any checkpoint fails, address the issue immediately before moving on to the next step.
Common mistakes that cause recurring cracks
Avoid these common installation errors to prevent cracking in your two-tone bands.
- Inadequate movement joints: Insufficient joint spacing leads to excessive stress on the stucco, causing cracking.
- Over-tight backer rods: Over-compressing backer rods restricts expansion and contraction, leading to cracking.
- Improper joint spacing: Incorrectly spaced joints cause uneven stress distribution, resulting in cracks.
- Premature curing: Shrinkage from rapid drying can cause hairline cracks to form.
- Weather window violations: Applying materials outside recommended temperature and humidity ranges leads to poor adhesion and cracking.
Prevent these mistakes by following the manufacturer’s guidelines, using proper tools, and maintaining a consistent application process.
When troubleshooting fails: call a specialist
While you can handle many issues on your own, some problems require professional intervention. Here’s when to bring in an expert:
Widening cracks: If cracks are growing wider over time, it may indicate a structural issue that needs assessment by a structural engineer.
Ongoing leaks: Persistent water intrusion could signal a problem with the substrate or moisture management system. Consult an EIFS/surfacing specialist to diagnose and address the issue.
Alignment with foundation movement: If cracks align with known foundation movements, it’s wise to consult a structural engineer to ensure your structure can safely handle these movements.
Remember: The sooner you address potential problems, the less expensive and time-consuming repairs will be. Don’t hesitate to seek professional help when needed.
Maintenance, Safety, and Cost Considerations
Establish a routine inspection cadence focused on two-tone bands and movement joints. Check paint bond, hairline cracks, joint separation, and moisture intrusion, and document changes with photos. Use a straightforward scoring system to track condition over time.
Define safe weather-window practices for curing sealants and coatings, and implement site safety protocols for working at heights. Outline maintenance steps for cleaning, resealing, and repainting bands, including compatible sealants and coatings. Develop a simple budgeting framework and guidance on obtaining reliable estimates and warranties.
Routine Maintenance and Inspection Checklist
Use this checklist every six months to keep your two-tone bands and movement joints in top shape. Catching small issues early prevents costly repairs.
- Paint Bond: Check for peeling or flaking. If found, touch up immediately to prevent further damage.
- Hairline Cracks: Inspect for fine cracks. Seal promptly to stop moisture intrusion and crack growth.
- Joint Separation: Ensure joints remain tight. Reapply sealant if gaps appear.
- Foam Backing: Check foam backing behind joints. Replace any damaged or missing pieces.
- Staining/Moisture Intrusion: Look for discoloration or dampness. Address promptly to prevent further water damage.
- Cleanliness: Remove dirt and debris from bands and joints. A clean surface ensures better paint adhesion and sealant performance.
- Joint Movement: Check if joints are moving as designed. If not, re-tension if applicable or consult a specialist.
- Document Findings: Photograph and note any issues for future reference and to track changes over time.
Quick rule: Regular inspections and prompt touch-ups keep your bands and joints looking great and performing well.
Safety Practices and Ideal Weather Windows
Safety is paramount when working on your two-tone bands. Follow these guidelines to protect yourself and your work:
PPE: Wear appropriate personal protective equipment, including safety glasses and gloves.
Fall Protection: Use ladders or scaffolding with fall protection systems in place. Secure containment to prevent tools or debris from falling.
Weather Windows: Avoid extreme temperatures and wet conditions when installing sealants and finishes. Ideal curing temperatures are between 50-90°F (10-32°C) with low humidity.
Cost Factors and How to Get Accurate Estimates
The cost of maintaining your two-tone bands depends on several factors. Here’s what to consider when budgeting:
Scope: The size, complexity, and number of bands affect the labor and material costs.
Access: Difficult access may increase labor costs due to additional time and safety measures required.
Materials: High-quality materials and specialized finishes can significantly impact the cost.
To get accurate estimates, follow these tips:
Get Multiple Bids: Obtain at least three local bids from reputable contractors. Compare them line by line to understand what’s included.
Written Scopes: Ensure each bid includes a detailed written scope of work.
Warranties: Ask for manufacturer-backed warranties on materials and labor. This protects your investment and ensures quality workmanship.
Conclusion
Keeping joints and two-tone bands properly sequenced is what seals long-term durability and a clean, professional look. If you respect movement, plan your sequence, and test each step on a small patch, you’ll prevent cracks and costly rework.
Begin with a clear plan and then check surfaces, substrates, and joint layouts before you start. Verify code requirements, prep materials, and set out your bands in the correct order. Install with the right expansion gaps, follow the sequence for texture matching, cure each layer, and finish with a thorough inspection and routine maintenance. Do the work in safe conditions, and document any deviations from plan so you can backtrack safely if needed.
Avoid rushing joints, skipping movement spaces, or forcing texture to hide cracks. Don’t overwork edges, mix to the right slump, or work in conditions that compromise cure. Wear eye protection and gloves, keep solvents and moisture away from existing work, and test a small area first to confirm adhesion and texture before committing to the full job.
When in doubt or when you encounter stubborn cracking, big patches, or a substrate that won’t cleanly take bands, call a professional. A careful pro can save time, prevent costly mistakes, and keep the finish looking sharp for years to come. Stay steady, work methodically, and you’ll finish with strength, safety, and pride in the result.
FAQ
How can I identify different types of stucco cracks?
Hairline cracks run across the surface and are usually cosmetic. Wider cracks with gaps or no alignment may indicate movement issues. Diagonal cracks near corners or around openings often point to frame movement or improper jointing.
What causes cracking specifically in two-tone stucco bands?
Movement of the substrate, improper joint placement, or changing temperatures can stress the band area. Improper sequencing or bonding between the base coat and finish can also create cracks in the band if movements aren’t allowed.
Why are movement joints essential to prevent cracks in bands?
Movement joints give the wall a controlled place to move. Without them, expansion and contraction can force cracks across both the band and base stucco. Install joints where you see stresses from sun, wind, and framing movement.
What is the proper sequencing for applying two-tone stucco banding?
Apply base coats first, then install joints where required, and cure according to instructions. Finish the two-tone band after the adjacent surfaces have cured enough to avoid bond interference. Follow manufacturer guidance for each layer’s order and timing.
What should I include in an annual maintenance checklist to prevent cracking?
Inspect for new cracks, especially near joints and openings. Check movement joints for sealant separation and re-caulk as needed. Clean surfaces and keep drainage clear to prevent water intrusion that can push against the bands and cause cracks.