
Introduction
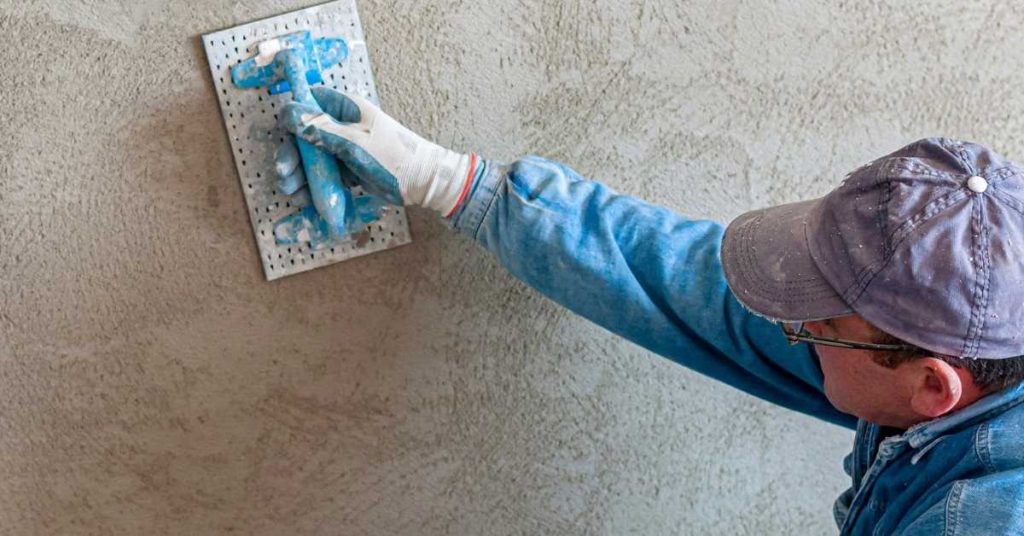
Traditional plaster corners without metal beads are built by floating plaster to a clean, sharp edge.
Key takeaways
- Prepare raw corner by removing paint, dust, and protrusions for plaster bonding.
- Establish guides and screeds to create a true 90-degree plaster edge.
- Apply backing coat evenly before corner float to avoid laitance.
- Use a controlled strike to blend corner and wall joint without metal beads.
- Protect curing plaster from direct sun and drafts to prevent cracking.
- Inspect frequently for pinholes or feathered edges and touch up promptly.
Table of Contents
Quick Method Overview
The corner-float method offers a clean alternative to metal beads by letting plaster float to a sharp edge with careful control. This approach works best when the substrate is sound and the corner is square. It locks in a crisp line without relying on metal components.
Compared with a metal bead, you can achieve a smooth transition and fewer tool marks with mindful troweling. The key is maintaining consistent pressure and keeping the edge visible as you work. Use this method when you want a seamless plaster corner with minimal setup.
What the corner-float is
The corner-float method is a traditional plastering technique that creates a smooth, beaded-less corner using a float. It results in a clean, seamless finish.
The process involves applying a layer of plaster to the corner, then using a float to smooth it out and create a sharp edge.
It’s important to note that this method requires skill and practice to achieve a perfect result.
When to choose this method
The corner-float method is typically used in new construction or when repairing existing corners. It’s best suited for walls and ceilings with a flat, even surface.
It’s also a good choice when you want to avoid the visible metal bead that comes with traditional beading methods.
However, it might not be suitable for corners with significant imperfections or where a quick, easy fix is needed.
Tools and Materials Checklist
Gather the basics: plaster or joint compound suited to your system, a clean trowel, a straight edge or screed, and a finishing float. Have a mixing tool and a bucket for working material, plus a damp sponge for cleanup. Include a corner guide or makeshift guide if you plan to run consistent edges.
Check product labels and manufacturer instructions for substrate compatibility and cure times. If you’re using a different plaster system, select an alternative that matches its bonding agents and curl resistance. For any uncertain item, verify with the label, data sheet, or local building rules before you proceed.
Essential tools
Before you start mixing and pouring concrete, ensure you have all the necessary tools at hand. This checklist will help you verify that you have everything needed for a successful pour.
- Trowels ( various sizes ): Check your trowels’ edges; they should be sharp and undamaged to ensure smooth finishing.
- Corner tools: Ensure you have both inside and outside corner tools to shape corners accurately.
- Straightedges (long enough for your pour): Verify their straightness by laying them on a flat surface. Any warping could lead to uneven surfaces.
- Hawk: Inspect your hawk for any cracks or damage that could cause concrete loss during transport.
- Floats ( various sizes ): Check floats’ edges; they should be smooth and undamaged to prevent surface imperfections.
- Mixing equipment (shovel, wheelbarrow, mixer): Ensure all are in good working condition. A faulty mixer can lead to improperly mixed concrete.
- Concrete vibrator: Test the vibrator before use; a malfunctioning one can result in air pockets and weak spots.
- Tape measure: Verify its accuracy to ensure proper depth and leveling of your pour.
Quick rule: Always check your tools before starting work. Damaged or faulty tools can lead to expensive rework and an uneven finish.
Materials and mix guidance
Before you start mixing your plaster, use this checklist to ensure you have the right materials and understand how to prepare them. This will save you time and prevent costly mistakes.
- Plaster Type: Check if it’s a bonding coat (for first application) or finish coat (for final layer).
- Setting Time: Verify the setting time on the packaging. Gypsum plasters typically take 30-60 minutes.
- Plaster-to-Water Ratio: Follow manufacturer’s instructions for mixing ratio (usually 4:1 or 5:1).
- Water Temperature: Ensure water is between 50°F – 70°F (10°C – 21°C) for optimal setting.
- Plaster Age: Check the ‘best before’ date on the packaging. Old plaster may not set properly.
- Contaminants: Ensure no contaminants like oil, grease, or dust are present that could hinder adhesion.
- Mixing Equipment: Use a clean mixing paddle and drill to ensure thorough mixing.
- Applying Temperature: Check if the surface temperature is between 50°F – 70°F (10°C – 21°C) for proper setting.
Quick rule: Always follow manufacturer’s instructions for mixing ratios and dry times. Skipping this can lead to improperly set plaster that cracks, crumbles, or doesn’t adhere properly.
Safety and project planning
Before you start any concrete work, use this checklist to ensure safety, efficiency, and a successful outcome.
- Personal Protective Equipment (PPE): Check your hard hat, safety glasses, gloves, and steel-toed boots. Ensure they’re in good condition and fit properly.
- Dust control: Inspect your dust mask or respirator to ensure it’s clean and functional. If using a respirator, check the cartridge type and replace if necessary (check manufacturer instructions).
- Ventilation: For enclosed spaces, ensure you have adequate ventilation before starting work.
- Concrete mix design: Verify that your concrete mix meets the required strength and durability for your project. Check the bag labels or contact your supplier if unsure.
- Formwork: Inspect formwork for any cracks, gaps, or weak points. Ensure it’s properly braced and supported.
- Rebar placement: Check that rebar is correctly placed according to the plans. Verify spacing, size, and proper anchorage at ends.
- Water source: Ensure you have a reliable water supply for mixing and curing concrete. Check hose length and pressure.
- Labor planning: Estimate labor needs based on the project’s scope and complexity. Consider staging work to keep everyone productive and safe.
Quick rule: Always prioritize safety first. Ensure all team members are trained, equipped, and aware of their roles before starting any concrete work.
Preparing the Wall and Raw Corner
Inspect the substrate for moisture, flaking paint, or loose material in the corner. Remove loose material and dust to reveal a solid base. Ensure the corner is square and ready for an even start.
Rough up glossy surfaces if needed to improve key for the backing coat. Clean the area again before applying any bonding agents or plaster. A clean, true corner helps the float bed stay true as you work.
Assessing substrate and fixing defects
Before you start, inspect your walls thoroughly. Look for any signs of delamination – where the old plaster has started to peel away from the wall. Also, check for gaps or voids between the wall and any adjacent surfaces.
If you find any issues, address them immediately. For delamination, use a scraper to remove the loose material. For gaps, fill them with a suitable joint compound or plaster mix before proceeding.
Remember: A stable base is crucial for a successful finish. Don’t rush this step.
Marking and squaring the corner
Start by establishing your intended plane. Use a level to draw a horizontal line along both walls where they meet, marking the top of your plaster finish.
Next, find your true corner alignment. Using a combination square or a similar tool, mark a vertical line at the exact point where the two walls meet. This will be your corner reference point.
Now, use these marks to ensure your first coat is applied accurately and squarely. Precision here ensures clean corners throughout the process.
Establishing Guides and Screeds
Set up temporary guides to help you keep thickness consistent and the corner aligned. Use a straight edge or level as a reference while you tack in place your initial guides. Check that guides don’t hinder your hand movement during the float.
Place screeds or thin planks to pace the plaster depth and to define the corner angle. Recheck alignment frequently as you work to avoid drift. If you’re using a different plaster system, confirm compatibility with guides and edge control tools with the manufacturer.
Using temporary straightedges and strings
To guide your trowel work, place long, straight pieces of wood (straightedges) along the wall edges. Secure them with screws or nails. For added accuracy, stretch a string taut between the top and bottom of each straightedge.
Hold your trowel flat against these guides as you apply plaster. The strings help keep your trowel level, ensuring consistent corner alignment.
Pro tip: Use straightedges slightly wider than your trowel to allow for easy maneuvering around the corner.
Depth control and reference points
To maintain uniform plaster thickness, set reference marks along the wall edges. Use a level or ruler to mark lines every 6-8 inches. These marks serve as your depth guide.
When applying plaster, use these marks to ensure your trowel is consistently ‘biting’ into the wall at the same depth. This helps create an even corner thickness.
Pro tip: For extra precision, mark both sides of the corner and check your work frequently to adjust as needed.

Applying the Backing Coat
Apply the first coat so it keys well to the substrate and creates a stable base that is slightly proud at the corner. Work from the wall toward the corner to establish a solid bed. Keep the coat even and avoid creating sag or gaps.
Key the surface properly to minimize shrinkage and to help the corner float seat firmly. Let the backing coat establish a uniform plane that supports the final float. If you’re unsure about bonding agents, check the product instructions or label.
Trowel technique for even backing
The first coat, or backing, needs to be smooth and consistent. Here’s how:
Start by striking the plaster onto the wall with your trowel, pushing it into any hollows or recesses. Then, fill in any gaps or low spots.
Use a smooth, steady motion to spread the plaster evenly across the surface. Keep your trowel at a consistent angle for even coverage.
Keying and adhesion best practices
A good bond between coats is crucial. Here’s how to ensure it:
First, score the surface with a straight edge or comb to create grooves for better adhesion.
Next, apply a bonding agent to both the wall and the plaster. This helps the new coat stick better.
Finally, make sure the wall is properly wet. A damp surface helps the plaster adhere and reduces shrinkage.
The Corner Float and Strike Process
Form the initial fillet at the corner with a light hand and steady pressure. Strike the corner with a clean edge to create a crisp line. Refine the shape gradually with the float to approach the final angle.
Work methodically to avoid creating ridges or flattened edges. Maintain control as you sweep along the face and into the corner for a consistent finish. If needed, revisit with light touches to clean up any wobble in the edge.
Forming the initial corner fillet
The first step is to create a slightly proud fillet at your corner. This will serve as the working shape you’ll refine later.
Using your straight float, apply a small amount of plaster onto one wall, then bring it over to the corner and press firmly while pulling the float towards yourself. This creates a slight bulge that’s wider than the final desired fillet.
Repeat this process on the other wall, meeting at the corner. Don’t worry about perfection at this stage; we’ll refine later.
Floating to achieve the crisp edge
Now it’s time to refine that initial fillet into a smooth, straight corner. You’ll use your float with varying pressure and angles.
Start by holding the float at a 45-degree angle to the wall. Apply gentle pressure as you pull it along the corner, smoothing out the fillet. This is called ‘floating off’ excess plaster.
Next, turn the float so its edge is against the wall. Use firm, steady pressure and short strokes to strike a clean line at the corner’s edge. This step defines your final corner angle.
Repeat these steps, alternating between floating off and striking, until you achieve a crisp, smooth edge.
When to use corner-specific tools vs straight float
While a straight float is versatile, there are times when corner-specific tools can give you better control and results.
- Corner Trowel – Deep Corners: For very deep corners, a corner trowel can help you reach into the recess and create a tight fillet. These trowels have a long handle and a narrow blade designed for just this purpose. Rental: $15-$25 per day.
- Wooden Float – Sharp Corners: For very sharp corners (less than 90 degrees), a wooden float can help you maintain that acute angle. The flexibility of the wood allows it to conform to the corner better than a rigid metal float. Purchase: $10-$20 each.
- Straight Float – General Use: For most corners, a straight float is your go-to tool. It’s versatile and easy to control for creating fillets and striking lines. Purchase: $5-$15 each.
- Straight Float – Large Corners: For very large or wide corners, a straight float can help you create a consistent fillet across the entire surface. The wide blade allows for even pressure distribution. Purchase: $8-$20 each (depending on size).
- Straight Float – Fine Tuning: Once your corner is nearly perfect, switch to a smaller straight float for fine-tuning and refining the final edge. Purchase: $3-$10 each.
Finishing, Curing, and Sanding
Coordinate follow-up coats with the recommended cure time and keep the area protected from rapid drying. Manage moisture during cure to prevent edge lift. Plan minimal handling until the plaster firmed up.
When ready, rub or lightly sand the corner to blend with the surrounding surface without rounding the edge. Wipe away dust and inspect for uniformity. If edges show imperfections, address them with cautious touch-ups per product guidance.
Timing between coats and moisture checks
Check your plaster manufacturer’s guidelines for recommended cure times. Typically, you’ll wait around 24 hours before applying the next coat.
Before each new coat, ensure the surface is completely dry to the touch. A simple test: lightly press a clean, damp sponge onto the surface. If it leaves no moisture behind, you’re good to go.
Some plasters have built-in cure indicators that change color when ready for the next coat. Always follow these guides.
Final sanding, rubbing, and feathering
Once your corner is fully cured, lightly sand it using a fine-grit (220 or higher) drywall sanding screen. Work in the direction of the grain.
Gently rub the corner with a damp sponge to remove any dust or residue. Let it dry completely.
To feather the corner into adjacent plaster or drywall, use a flexible putty knife to lightly blend the edge. Work from the corner outwards, applying gentle pressure.
Common Problems and Troubleshooting
Cracking can appear if the mix is too thin or if the substrate was unstable; fix by stabilizing the substrate and reapplying with proper bonding. Rounded edges indicate over-troweling or excessive pressure; reset by re-establishing a sharp guide and lightening the touch. Ridges may form from uneven pressing and leaving tool marks; smooth by backing off pressure and refining with the float.
Prevent recurrence by checking for moisture changes, ensuring the corner is square, and using consistent technique. If you see edge pull or warping, verify curing conditions and material compatibility. Always refer to the product label or manufacturer instructions for specific recommendations related to your plaster system.
Cracking or Shrinkage at the Corner
Hairline cracks at corners can occur due to improper curing, inadequate keying, or settling of the substrate. To repair:
Moisten the area, fill with joint compound, let it dry, then sand and prime before repainting.
Prevent cracking by ensuring proper moisture control during application and curing.
Uneven or Wavy Edges
Uneven edges can result from applying inconsistent plaster thickness, incorrect trowel technique, or using worn-out tools. To diagnose:
Run your fingers along the edge to feel for inconsistencies. To correct before finishing:
Re-wet and re-float problem areas with a straight float, ensuring even thickness.
Impact Damage Prevention and Repair
Knocks and dents can occur during or after application. To prevent:
Protect corners with cardboard or foam during construction. For minor repairs:
Moisten, fill with joint compound, let it dry, then sand and prime.
For severe damage, consider reinforcing with fiberglass mesh before filling.
Conclusion
A clean corner without metal beads comes down to solid setup, careful application, and patient curing. Do the prep right, keep the edge true, and you’ll avoid cracks, chipping, and wavy edges that scream amateur work.
Start by securing the work area and inspecting the wall and raw corner, then establish guides and screeds, mix the backing coat to a workable consistency, apply it evenly, use the corner float and strike method to shape the corner, finish, and let it cure before light sanding and final touch-ups. Check for straight edges and uniform setback, and keep tools clean and your hands steady throughout the process.
Common mistakes to avoid are overworking the surface, skipping or rushing the backing coat, and ignoring proper curing time. Follow safety rules: wear eye protection and a dust mask when sanding, ventilate the room, and don’t mix or apply materials beyond their recommended temps or in wet or highly humid conditions. If something looks off, pause, test a small area, and adjust rather than forcing a flawed corner.
If the corner isn’t lining up after the first pass, or you see frequent crumbling, cracking, or persistent moisture issues, it’s a good time to call a pro rather than push on. A skilled finisher can save time and prevent costly callbacks. Stay focused, work steadily, and you’ll end with a durable, clean corner that lasts. You’ve got this.
FAQ
1. Can I skip mesh or backing and still get a clean corner with plaster?
Skip nothing that backs the plaster. A clean corner needs proper backing and a true corner. If you’re unsure, follow the manufacturer’s backing guidance or consult local rules for recommended practice.
2. How tight should my corner float be against the wall and straight edge?
Keep the float tight to the guides but not so tight you pull the plaster out of position. Work steady strokes to maintain a crisp, square edge. If the corner starts to wobble, pause and recheck the guides.
3. What should I do if the plaster cracks after the back coat dries?
Don’t blame the corner float yet. Cracks often come from movement or improper curing. Talk through with the product label instructions or the backing manufacturer to confirm the right touch-up method and timing.
4. How long should I wait before sanding the corner after finishing?
Sanding time depends on product and weather. Check the label for recommended curing and dry times. If in doubt, err on the side of longer cure and test a small area first.