

Introduction
A stucco weep screed is the bottom edge of a stucco wall that lets moisture drain and keeps the weep holes open.
In plain terms, it sits just above grade and acts like a drip edge for drainage and a stop for the finish. When you install it, make sure the area behind it is clean and that the screed is positioned so water can move freely away from the home. Keep the weep holes clear and accessible during the job so you don’t trap debris behind the finish.
Grade clearance and corner work come down to keeping air and water moving while the finish stays supported. Use proper installation methods to set the screed, watch for tight corners, and seal joints so debris can’t build up. Regularly inspect and clear the weep holes to keep drainage paths open and check product labels or manufacturer instructions for any specific setup notes.
Key takeaways
- Ensure starter weep screed sits above grade clearance, with proper drainage path.
- Install corners with sealed, continuous weep channels and backer rod for gaps.
- Keep weep holes free of debris using regular checks and protective screens.
- Maintain grade clearance by choosing appropriate stucco base and flashing integration.
- Verify flashing transitions integrate with wall system to prevent water intrusion.
- Follow manufacturer and local code guidance; never block or seal weep openings.
Table of Contents
- Introduction
- Key takeaways
- What Is a Stucco Weep Screed and Why It Matters
- Code, Standards, and Determining Grade Clearance
- Installing Weep Screeds Correctly (Step-by-Step Topics)
- Corners, Terminations, and Transitions
- Keeping Weep Channels Open: Design and Maintenance Tactics
- Waterproofing, Flashing, and Integration with Wall Systems
- Common Mistakes, Troubleshooting, and How to Avoid Them
- Tools, Materials Checklist, and Material Specs Explained
- Conclusion
- FAQ
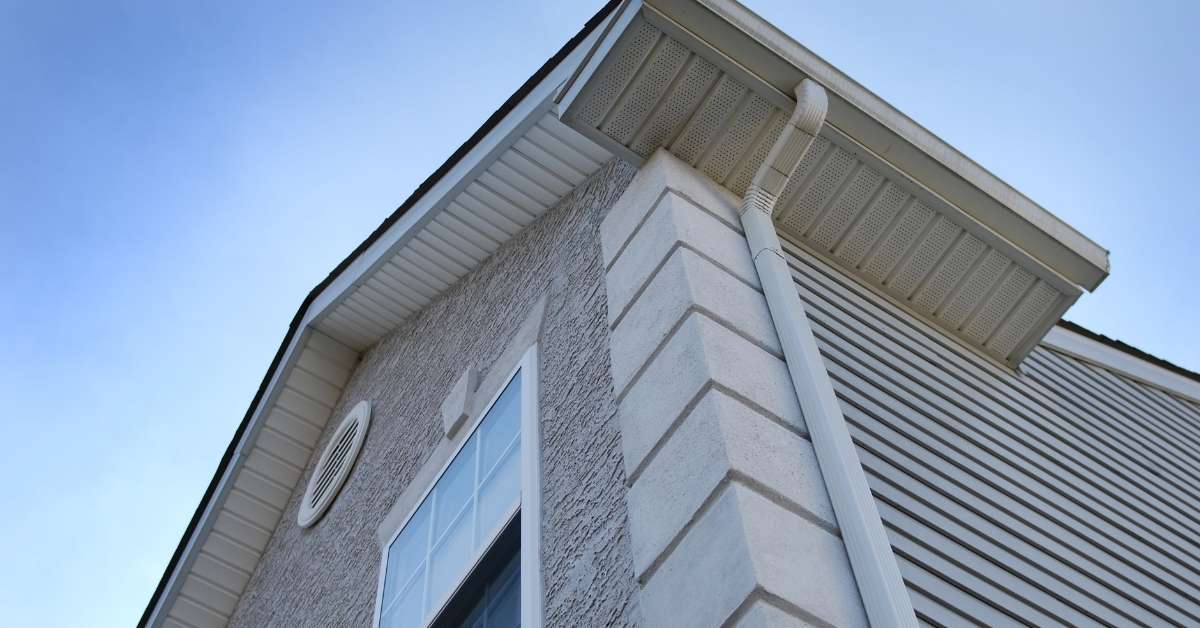
What Is a Stucco Weep Screed and Why It Matters
A stucco weep screed sits at the exterior wall terminus of the stucco and marks the drainage plane. It is distinct from other flashing components and serves as the termination point for moisture management. Understanding its role helps protect the wall assembly from moisture damage.
Its drainage function creates a path for moisture to exit and promotes drying behind the stucco. It must terminate at the proper plane above the foundation to allow for effective drainage. Proper installation criteria include clearance above grade, alignment with the drainage plane, and continuity with the weather-resistant barrier to prevent moisture intrusion.
Purpose and basic components
A weep screed’s job is simple but crucial: let water out. It’s the drainage/termination point for your exterior stucco. Here’s what makes it tick:
Metal or PVC screed: This is the backbone, creating a channel for water to flow through.
Perforations/weep openings: These tiny holes let water drip out. They’re usually on the bottom and sides of the screed.
Drip edge/hem: This keeps water from running behind the screed, ensuring it all goes down and out.
How a weep screed works in a wall system
Water gets into stucco, no matter how well you apply it. Here’s how the weep screed handles that:
Incidental water seeps through the stucco and hits the water-resistive barrier (WRB). The WRB redirects it down to the flashing at the base of your wall.
The flashing then guides this water into the weep screed. It flows through the perforations, out the bottom, and drips onto the ground.
This keeps your walls dry, preventing moisture damage. It’s a simple system, but it needs to be installed right to work.
Code, Standards, and Determining Grade Clearance
Grade clearance defines how high the weep screed sits above the finished grade and why that matters for drainage and moisture management. High or low placements can affect how water is vented away from the wall.
Local code and manufacturer instructions guide the required clearance, with references to IBC/IRC when applicable. Always check site-specific requirements with the local building department and review product data sheets for each job. Practical checks include verifying grading, ensuring continuous drainage paths, and documenting compliance for inspections.
Interpreting building code vs. manufacturer guidance
The International Building Code (IBC) and International Residential Code (IRC) set the minimum standards for stucco weep screed clearance. But, local codes might have amendments, and manufacturers may recommend specific clearances in their installation instructions.
Always follow the most stringent requirement. If there’s a conflict, consult your local building inspector. They can clarify which rule takes precedence on your site.
Manufacturers’ guidelines are based on extensive testing and experience. They might suggest higher clearances for optimal performance. While not legally binding, ignoring these recommendations could void warranties or lead to moisture issues down the line.
Site factors that affect required clearance
Before determining grade clearance for your stucco weep screed, consider these site-specific factors:
Grading: The slope of the ground around your foundation influences water flow. A steeper slope may require a higher clearance to ensure proper drainage.
Finish surfaces and potential splash zones: If there are hard surfaces nearby, like driveways or patios, that could direct water onto your walls, you might need extra clearance to prevent water from being forced up behind the stucco.
Adjacent walkways: If people will be walking near your walls, consider a higher clearance to accommodate for any accidental kicks or impacts that could dislodge debris and block weep holes.
Installing Weep Screeds Correctly (Step-by-Step Topics)
Substrate prep and WRB interaction involve confirming the wall assembly, the grade clearance from the footing, and current moisture conditions. Make sure the weather-resistive barrier is properly installed and continuous to prevent water tracking to the framing.
Flashing and integration at openings require careful planning around windows, doors, and terminations. Seal joints to keep drainage paths open without blocking weep slots. Setting the correct plane means aligning the weep screed height with the lath and ensuring compatibility with insulation or siding edges.
Step-by-Step Installation Process
The following steps guide you through installing weep screeds correctly, ensuring clear drainage paths for your stucco walls.
- Prepare the substrate: Inspect the wall assembly, ensure grade clearance from the footing, and check moisture conditions. Verify the weather-resistive barrier (WRB) is properly installed and continuous.
- Plan flashing details: Around windows, doors, and terminations, plan your flashing to keep drainage paths open without blocking weep slots.
- Set the correct plane: Determine the finished stucco plane and align the weep screed height with the lath/grid for unobstructed drainage. Confirm compatibility with insulation or siding edge.
- Fastening pattern and materials: Use corrosion-resistant fasteners, space them per code, and ensure they don’t penetrate through to obstruct weep paths.
- Install lath and apply scratch coat: Install lath and apply the scratch coat, preserving weep slots. Avoid packing mortar into screed channels during setup.
- Final inspection: After each step, verify that weep holes remain clear. Plan a final on-site inspection to confirm no blockages from mortar, debris, or misalignment.
Fastening, alignment, and plane control
Properly securing the weep screed ensures clear drainage paths and maintains a consistent stucco thickness.
Use corrosion-resistant fasteners spaced according to code. Ensure they don’t penetrate through the screed, blocking weep paths.
Align the screed plumb with the wall plane. Maintain this alignment throughout installation to ensure consistent stucco thickness to the screed.
Tip: Use a level or laser level to maintain plumb and check consistency as you go.
Temporary protection and sequencing during construction
Protecting weep screeds during construction prevents mortar and debris from clogging drainage paths. Here’s how:
Cover the screed with a protective material, like plastic sheeting or cardboard, to keep out debris. Remove it once stucco application begins.
Coordinate with other trades to minimize disruption around weep screeds. Keep the area clear of excess mortar and debris during construction.
Note: If you notice any blockages or damage during construction, address them immediately to prevent long-term issues.
Corners, Terminations, and Transitions
Best practices for outside corners include proper corner bead use, formed returns, and backing support to prevent cracking and water ingress. Inside corners should maintain a clean transition that preserves drainage while allowing movement.
End terminations at parapet edges and transitions to openings require watertight seals and continuous drainage paths. The screed should integrate with flashing and weather barriers without creating gaps.
Outside and Inside Corner Details
Corners are critical areas where water can easily penetrate. Here’s how to handle them:
Outside Corners (Gable, Sill): Use formed returns or corner beads for a clean finish. Support with sheathing/backing to prevent cracking.
Inside Corners (Wall-to-Ceiling): Apply mesh and scratch coat before installing the weep screed. Ensure drainage continuity by maintaining a consistent slope.
Transitioning to Flashings, Window Sills, and Penetrations
Proper transitions ensure water flows freely without leaks. Here’s how:
Flashings: Tie the weep screed into below-window flashings using compatible materials. Ensure a watertight seal.
Window Sills: Integrate the weep screed with window sills, maintaining drainage continuity and preventing cold joints.
Penetrations: Seal around penetrations (e.g., pipes) using appropriate materials to prevent bypass leaks. Ensure they don’t bridge the drainage plane.
Keeping Weep Channels Open: Design and Maintenance Tactics
Design strategies focus on profiles that keep openings clear and accessible screens that can be serviced. Choose shapes and features that promote unobstructed air channels and debris shedding.
Maintenance routines should be practical and include inspection points for debris removal without damaging the stucco. Plan serviceable access and testing methods to verify open channels and consider retrofitting cleanouts where feasible.
Visual checkpoints and inspection points
Regularly inspect your weep screeds to ensure they’re working properly. Use this checklist to spot signs of blockage or poor performance.
- Wet spots at base: Check for water stains or dampness around the bottom of walls. This could indicate clogged weeps.
- Mud dauber nests: These can block weep holes. Look for them under cap flashings and in corners.
- Debris buildup: Inspect for leaves, twigs, or dirt accumulating at the base of walls.
- Missing or damaged screens: Check if insect screens are present and intact. Damaged screens can let debris in.
- Water pooling: Look for standing water near weep screeds. This could mean they’re not draining properly.
- Cracked or damaged screeds: Inspect for cracks, chips, or other damage that might affect performance.
- Clogged weep tubes: Check if tubes are full of debris. You may need to clean them out.
- Mold or mildew growth: Look for signs of mold or mildew, which can indicate trapped moisture.
Quick rule: Inspect weep screeds quarterly and after heavy storms to catch issues early.
Routine cleaning and minor repairs
To keep your weep screeds clear, perform routine cleanings. Here’s how to safely remove debris without damaging the system.
Gently brush: Use a soft-bristle brush or compressed air to remove dirt and debris from weep holes. Be careful not to damage screens or the screed itself.
For tougher clogs, use a thin wire or pipe cleaner to gently poke into the weep hole and dislodge any obstructions. Be gentle to avoid damaging the system.
If screens are damaged, replace them with new ones that match your existing system’s size and material. Ensure they’re securely fastened but not too tight, which could restrict airflow.
Waterproofing, Flashing, and Integration with Wall Systems
Flashing details around heads, sills, and terminations must work with the grade clearance and corner treatments to prevent water intrusion. Proper sequencing helps maintain a continuous drainage path.
WRB continuity across penetrations and joints is essential, with no gaps that allow moisture to bypass the drainage plane. Drainage plane compatibility and material sequencing influence overall performance and durability.
Flashing best practices
The key to effective flashing is ensuring a continuous slope towards the weep screed. This allows water to drain efficiently.
Terminate flashings correctly at the weep screed. They should extend just below the screed’s bottom edge, allowing water to exit without obstruction.
Overlap and seal flashings properly to preserve the drainage path. Overlapping creates a stepped effect that directs water downwards, while sealing prevents water from seeping behind the flashing.
WRB, rainscreens, and material compatibility
Material choices significantly impact the performance of your stucco weep screed. Incompatible materials can lead to cracking, staining, or weak bonds.
- Weather-Resistant Barrier (WRB): Tie the weep screed into the WRB plane for a continuous moisture barrier. Use compatible tapes and sealants at joints and penetrations.
- Rainscreens: Consider vented or rigid backing for rainscreen cavities to promote drainage and drying. Place weeps within these cavities, ensuring they’re not blocked by insulation or other materials.
- Flashing Metals: Choose compatible metals that won’t corrode when in contact with each other. Galvanized steel and aluminum are common choices.
- Coatings: Ensure stucco coatings are compatible with flashings and other materials. Check for proper adhesion, flexibility, and resistance to cracking.
- Fasteners: Use fasteners rated for the specific materials they’re connecting. Incompatible fasteners can cause corrosion or weak connections.
Common Mistakes, Troubleshooting, and How to Avoid Them
Frequent mistakes include blocked openings, inconsistent grade clearance, and missing or poorly installed flashings. These issues can compromise drainage and cause moisture intrusion.
Inspection checks should cover clearance measurements, debris signs, fastener corrosion indicators, and flashing integrity around openings. Use corrective steps to reestablish drainage and consider preventive measures for future jobs.
Diagnosing blocked or underperforming weeps
First things first, you need to inspect visually. Look for any signs of blockage or debris in your weep screeds. Check for:
– Paint overspray or drips covering the openings.
– Stucco droppings or other construction debris clogging the weeps.
If you find any, use a wire brush or needle-nose pliers to clean them out. For paint, use a scraper and some solvent if needed.
Material failures and corrosion issues
The materials you choose for your weep screeds matter. Incompatible metals or finishes can lead to corrosion, cracking, and staining. Here’s what to look out for:
- Galvanized steel: Look for rust. Replace if you see it. Use with compatible materials.
- Stainless steel: Check for discoloration. It’s rare, but it can happen. Specify 304 or 316 grades.
- Aluminum: Look for pitting. Avoid if you’re near saltwater. Use with compatible fasteners.
- Plastic: Inspect for cracking. UV exposure can cause it. Use UV-stabilized types.
- Zinc: Check for white corrosion products. It’s normal, but excessive means replace. Use with compatible coatings.
Tools, Materials Checklist, and Material Specs Explained
A DIY-friendly tools list should cover hand tools, measuring devices, safety gear, and specialty items. Include quick-use notes for when each tool is needed during installation or inspection.
The materials list should explain the purpose of each item, from weep screed types to fasteners and flashing. Include guidance on how to read specs, verify tolerances, and check compatibility with stucco and weather barriers.
Tools and consumables checklist
Before you start, make sure you have the right tools for the job. This list covers both installation and inspection of weep screeds.
- Tape measure: Essential for accurate measurements. Skipping this can lead to improper clearance and incorrect cuts.
- Level: Crucial for ensuring the screed is level. Without it, water may not drain properly.
- Chalk line: Helps mark out where to cut and install the screed.
- Circular saw or utility knife: Depends on your screed material. Skip this step at your peril – wrong tools can damage materials.
- Safety glasses: Protects your eyes from debris during cutting and installation.
- Work gloves: Essential for handling sharp edges and heavy materials.
- Caulking gun: Needed for applying sealants around the screed.
- Screwdriver or drill: For driving screws into the weep screed. Without this, your screed won’t stay put.
Quick rule: Always check tool suitability for your chosen screed material before starting work.
What to check on product data sheets and standards
Before purchasing, make sure the weep screed meets your needs. Here’s what to look for in product datasheets and standards.
- Material type: Ensure it’s compatible with your stucco mix and weather barriers. Incompatibility can lead to poor performance or failure.
- Finish: Check if the finish is suitable for your project’s aesthetic requirements.
- Perforation pattern: Verify it allows sufficient water drainage. An improper pattern can cause water buildup and damage.
- Recommended clearance: Make sure it matches your wall assembly design to prevent water intrusion.
- Corrosion resistance: Important for longevity, especially in areas with high moisture exposure or salt air.
- ASTM/ICC references: Check if the product meets relevant standards. Non-compliance can result in poor performance and voided warranties.
- Warranty terms: Understand what’s covered, for how long, and under what conditions.
- Compatibility with stucco mixes and weather barriers: Ensure it works well with your chosen materials to prevent installation issues or failures.
Quick rule: Always consult local building codes and manufacturer literature for exact material specs before purchasing.
Conclusion
Keeping the weep screed open and properly tied into the wall system protects the structure from water damage, preserves durability, and makes the finish look right. If you nail the grade clearance, flashing details, corners, and terminations, you reduce costly repairs and stay safe while working.
Check like this: confirm grade clearance matches code, lay out screed runs with correct spacing, install flashed joints and terminations, keep the channels open at corners and transitions, test for water shedding and drainage, and finish with clean joints and proper sealant where needed. Do a small, controlled test area first, and only proceed when you’re confident the setup drains and vents as intended.
Common traps to avoid: blocking or crushing the weep channels, skimping on flashing or waterproofing, mixing incompatible materials, or rushing around ladders and edges. Safety rules: work from solid footing, protect exposed edges, wear eye and hand protection, and never skip a drainage test after installation. If any part feels uncertain or if the wall is large, uneven, or has complex corners, call a professional rather than push ahead. With careful steps and attention to the details, you can finish strong and keep the system open and reliable.
FAQ
How do I properly install a stucco weep screed to keep drainage open?
Install the screed level at the base of the stucco wall as you build. Seal or drill any necessary weep holes so water can exit, and keep the surface clean during installation. Follow the manufacturer’s instructions for fasteners and spacing specific to your product.
What are reliable grade clearance methods I can use on a DIY job?
Check the product label for the required clearance under the stucco. Use framing or shims to maintain a consistent gap while you install weather barriers. If in doubt, align with the wall system’s guidance and local practice.
How should I treat corners to avoid leaks and keep weep channels open?
Plan tight but open corner details that don’t block the weep holes. Use corner beads or compatible trim that won’t pinch the channels. Make sure flashing and sealants don’t seal off the weep paths.
What should I do to keep weep holes from clogging during or after installation?
Keep debris out during build and regularly inspect the openings. Leave a clear path for drainage and avoid over-dense finishes near the outlets. If debris blocks a hole, follow the manufacturer’s guidance to clear it safely.