
Introduction
Stucco texturing tools and patterns refer to the tools and methods used to create dash, lace, and sand finishes on stucco surfaces. This introduction explains how different textures are achieved and what to expect during a DIY application. Start by checking local rules and manufacturer instructions for surface prep and safety.
The article covers the basic tools you’ll need and the general steps to apply textured finishes. You’ll learn practical tips for handling the material, controlling pattern, and cleaning up after the job. If a detail matters for your project, verify with the product label or local codes and choose methods that fit your skill level.
Key takeaways
- Identify the finish type early to choose compatible tools and textures.
- Prepare surfaces, mix, and apply in proper sequence for consistent texture.
- Use appropriate trowels and floats for each texture: sand, dash, lace.
- Safety first: wear eye protection, masks, and ladders secured during application.
- Expect variable curing times; plan weather windows and protect fresh textures.
- Document costs and progress, then decide if pro help reduces risk.
Table of Contents
- Introduction
- Key takeaways
- What Is Stucco and the Most Common Finish Types
- Tools and Materials Checklist (What You Need for Each Texture)
- How to Replicate the Sand (Float) Finish Step-by-Step
- How to Replicate the Dash Finish (Roughcast / Knockdown / Pebble)
- How to Replicate the Lace (Spanish Lace / Skip Trowel) Finish
- Other Finishes to Consider: English, Santa Barbara, and Smooth
- Project Planning: Time, Cost Drivers, and When to Hire a Pro
- Safety, Common Mistakes, and Maintenance Best Practices
- Conclusion
- FAQ
What Is Stucco and the Most Common Finish Types
Stucco combines traditional lime-based finishes with modern Portland cement formulations, and relies on base coats, lightweight additives, and exterior plaster systems. The article focuses on three finishes: sand/float, dash, and lace, and explains why they remain popular for different styles. Context is provided by noting alternative finishes to help readers choose wisely.
Sand/float offers an even granular texture, dash presents a roughcast or knockdown pattern, and lace yields intricate decorative effects. Regional names vary, but the look and feel of each finish remain recognizable across markets. The discussion also touches on how climate, aesthetics, and architecture influence finish choices.
Traditional vs. Modern Stucco Mixes
Stucco mixtures consist of basic components: cement, sand, water, and sometimes polymers or additives. The composition affects the texture and workability of the final product.
Traditional lime-based mixes use lime as a binder instead of Portland cement. They offer better breathability but cure slower. Expect longer drying times and potential cracking if not properly cared for during curing.
Modern Portland cement mixes, on the other hand, set faster and provide increased durability. However, they may lack the breathability of lime-based mixes, which could lead to moisture-related issues if not addressed with proper design considerations.
To ensure optimal workability, adjust the water-to-cement ratio or consult with a professional about adding polymers to your mix as needed.
Quick Visual Guide to Finish Characteristics
Stucco finishes vary in appearance and texture, each suited to different applications. Familiarize yourself with these common types to choose the right one for your project.
Sand/Float finish offers an even, granular texture. It’s popular for its simple elegance and ease of application. It’s often used in modern and contemporary architectural styles.
Dash (Roughcast/Knockdown/Pebble) finish features a roughcast or knockdown pattern. It provides excellent coverage and hides imperfections well. This versatile finish works well with various architectural styles, from traditional to Mediterranean.
Lace (Spanish Lace/Skip) finish is an intricate, decorative pattern. It’s typically used for accents rather than entire surfaces due to its labor-intensive application process. Review images or samples of each finish type to ensure you’re selecting the right one for your needs.
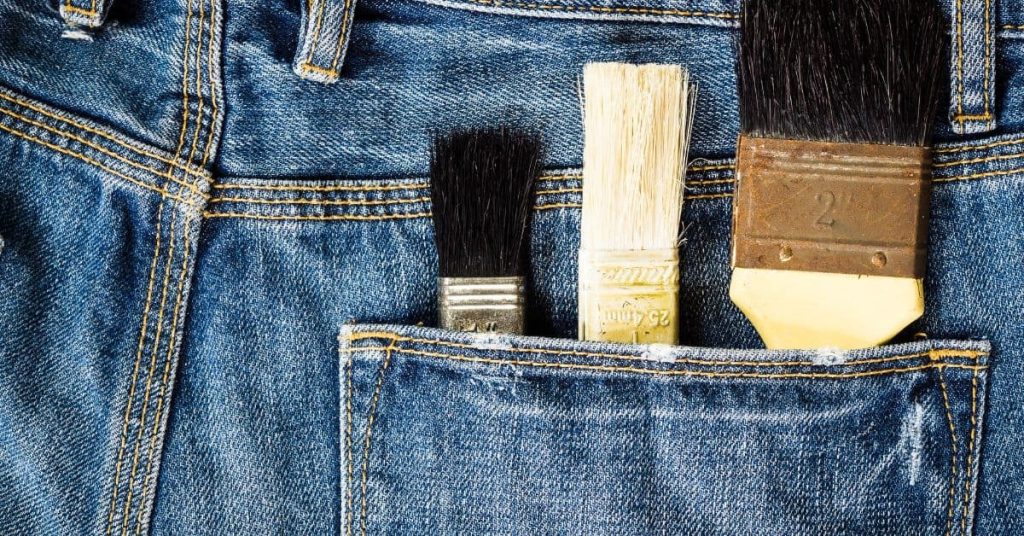
Tools and Materials Checklist (What You Need for Each Texture)
The texture-specific toolkit includes hand trowels, darby or float options, brushes or sponges for lace, and spray equipment such as an airless sprayer or hopper gun for dash and sand. Compatibility with the substrate and cementitious mixes is essential. Expect to reference manufacturer instructions for correct setup.
Materials cover basecoat stucco or modified plaster, finish coat with the appropriate aggregates, and any bonding agents or acrylic admixtures if required. PPE and site prep items are included, along with guidance to verify product data sheets for suitability with local conditions. Always review the specs before starting.
Hand tools and finishing tools
The right tools ensure consistent textures and professional results. Before starting, perform a quick visual inspection of your tools to confirm they’re present and functional.
- Trowels ( various sizes): Essential for applying and spreading texture compounds. Different sizes (6″ – 14″) are used based on the desired finish and coverage area. Larger trowels are ideal for wider areas, while smaller ones offer better control for detailed work.
- Floats: Optional, but useful for creating specific textures like skip trowel or knockdown finishes. Floats have a notched edge that creates unique patterns when dragged through the texture compound.
- Hawks: Essential for holding and transporting texture compounds from the bucket to your trowel or float. A sturdy hawk ensures clean, mess-free application.
- Knockdown knives ( various sizes): Optional, used for creating knockdown textures. These knives have a notched edge that ‘knocks down’ peaks created by trowels or floats, resulting in a smooth, uniform finish.
- Brushes and sponges: Recommended for lace or sand finishes. Brushes create fine lines, while sponges produce random patterns. For machine-applied textures, use spray equipment.
Pro tip: Combining tools like trowels, floats, and knockdown knives allows you to create a variety of textures. Always ensure your tools are clean, undamaged, and compatible with the chosen texture and substrate for best results.
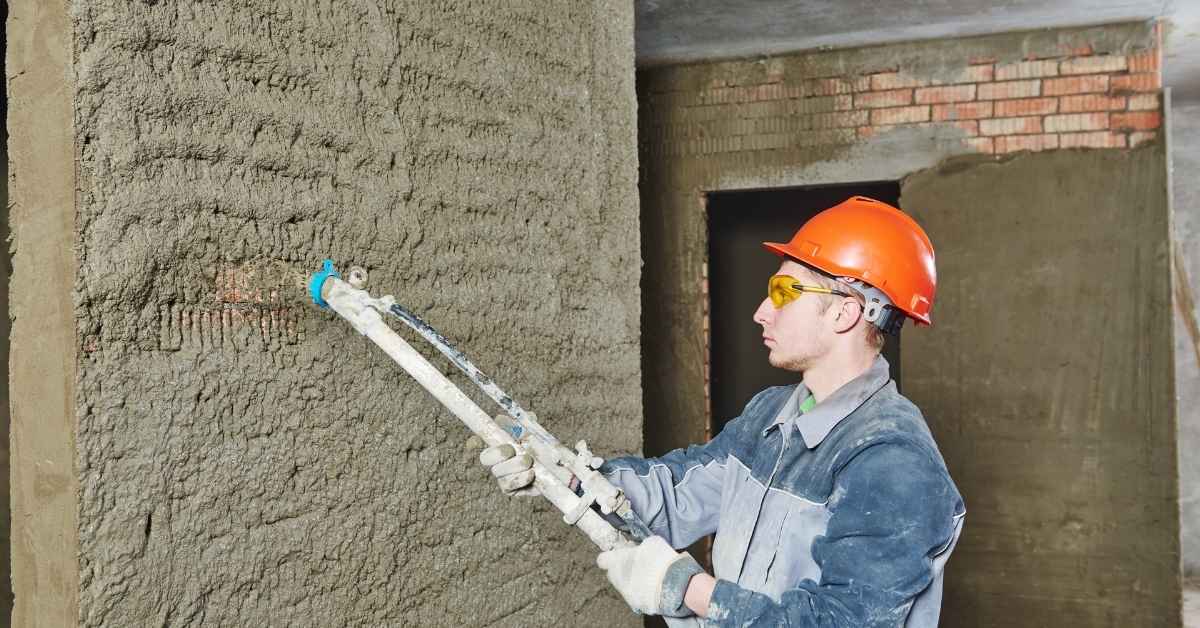
Spray equipment and mechanical tools
To achieve consistent textures, you’ll need to choose the right spray equipment and mechanical tools. This section outlines essentials for both spray and hand application methods.
- Hopper Gun: A gravity-fed airless sprayer that’s great for large areas with thick materials like texture coatings. It’s essential when applying heavy textures or covering vast surfaces quickly. Key spec: Choose a gun with an adjustable tip to control material flow. Tip: Regularly clean the gun to prevent clogging.
- Airless Sprayer: A pump-driven sprayer suitable for various textures and aggregates. It’s optional but highly recommended for efficiency. Key specs: Consider the sprayer’s pressure (PSI) and tip size to match your chosen texture. Tip: Always follow the manufacturer’s guidelines for tip size and pressure.
- Compressor: Necessary when using hopper guns or air-assisted airless sprayers. It provides the air needed to atomize and propel materials. Key spec: Ensure the compressor’s CFM (cubic feet per minute) rating matches your tool’s requirements. Tip: Regularly maintain your compressor to prevent breakdowns.
- Pump: Optional for small projects or touch-ups, a pump helps apply texture by hand. It’s less efficient than spray methods but can be useful for tight spaces or minor repairs. Key spec: Choose a pump with an adjustable flow rate. Tip: Use a steady, even motion to avoid applying too much material.
- Spray Tips: Essential accessories that control the size and shape of your texture aggregates. They’re optional but crucial for achieving desired results. Key specs: Match tip size and type (e.g., fan, round) to your chosen texture. Tip: Regularly clean and replace tips as needed.
Pro tip: Always test your spray equipment on sample boards before starting a project. This helps ensure consistent application and allows you to fine-tune settings for optimal results.
Materials, Aggregates, and Additives
Selecting the right materials ensures your texture’s durability and appearance. Key components include:
- Sand (Aggregates): Used for texture and bulk. Opt for clean, sharp-edged sand:
- Silica or mason sand: Suitable for most textures; avoid play sand as it’s too fine.
- Polymeric sand: Specialty product for jointing, with added binders to resist weed growth and erosion.
- Pebbles or Shells: Optional decorative aggregates:
- Choose natural or man-made pebbles/shells in desired size (e.g., 3/8″ to 1/2″) and color.
- Avoid small sizes for walkways to prevent tripping hazards; avoid large sizes for walls to prevent falling risks.
- Cement or Concrete Mix: Binds aggregates together:
- Type N mortar: General-purpose, suitable for most textures. Ensure ASTM C270 compliance.
- Concrete mix: For thicker textures; check strength class (e.g., 3000 psi) and compatibility with other materials.
- Polymer Additives: Enhance durability and appearance:
- Epoxy or acrylic fortifiers: Improve bond strength, flexibility, and UV resistance. Check compatibility with other materials.
- Color hardeners: Add color to the mix; choose a reputable brand for consistent results.
- Sealers: Protect textures from water and stains:
- Look for breathable, UV-resistant sealers suitable for your texture type (e.g., acrylic, silicone).
- Avoid oil-based sealers on concrete as they can trap moisture, leading to cracking.
Pro tip: Always consult product data sheets for recommended mix ratios and curing requirements. Store materials properly to maintain quality and safety.
How to Replicate the Sand (Float) Finish Step-by-Step
The sand (float) finish presents a natural, sandy appearance with a range of textures from fine to coarse. The goal is a durable, seamless look with minimal seams or flaws. Understanding texture progression helps set expectations for results.
Prepare the surface with cleaning, patching, and moisture control, then prime as needed. A workable mix and proper aggregate selection support adhesion and workability. The sequence typically involves scratch coat prep, skim coat, then floating to develop the texture.
Step-by-Step Process
The following steps outline how to replicate the sand (float) finish on your stucco surface. Correct sequence ensures successful results.
- Preparation: Ensure safety with proper gear, check weather conditions, and gather tools and materials.
- Surface Preparation: Clean and prime the substrate to ensure even texture acceptance. If working on new construction or existing surface, adjust steps accordingly.
- Mix Stucco: Prepare a cementitious mix with appropriate sand grading and optional acrylic admixtures for improved workability and adhesion.
- Apply Scratch Coat: Spread the mixed stucco onto the substrate using a trowel, creating grooves for better texture adhesion. Keep the mud workable by misting it with water.
- Apply Skim Coat: Apply a thin layer ofstucco over the scratch coat to create a smooth base for floating.
- Float Application: Using a float, spread and press the stucco into the desired texture. Maintain consistent pressure and stroke pattern for uniform results. If desired finish is fine or coarse sand, adjust float pressure and stroke pattern accordingly.
- Feather Edges: Ensure edges are feathered properly to avoid visible seams. Regularly check for proper edge blending during application.
- Final Checks: Inspect the surface for any imperfections, cracks, or missed spots before allowing it to cure. Address issues promptly to prevent further problems.
- Cleanup and Curing: Clean tools thoroughly, remove any protective coverings, and allow the stucco to cure properly according to manufacturer instructions to prevent cracking.
Surface Preparation and Mix Tips
Proper surface preparation is crucial for achieving an even sand (float) finish. Begin by cleaning the substrate thoroughly to remove any dirt, debris, or loose material.
For existing stucco: Inspect for cracks or damage, and apply a bonding primer before mixing your stucco. If using new stucco, apply a scratch coat instead of priming.
Mix consistency: Aim for a smooth, lump-free mix with appropriate sand grading to achieve the desired grain size. Consult product labels or manufacturer instructions for specific ratios and guidelines. Regularly check mix consistency during application to ensure it meets job requirements.
Floating Technique and Tool Motions
The floating technique ensures a uniform sand texture without trowel marks. Use these tools and motions to achieve your desired finish:
- Float: Select a float suitable for your project’s size and shape. Consider renting or borrowing, as floats can be expensive.
- Trowel: Apply the stucco mix using a trowel before floating. A 6-inch to 12-inch trowel is usually appropriate.
- Hawk: Transfer mixed stucco from your mixing container to the trowel using a hawk for consistent material distribution and drip prevention.
- Float Motions: Apply even pressure with the float, moving it in smooth, continuous strokes across the surface. For fine textures, use lighter pressure and shorter strokes; for coarse textures, apply more pressure and longer strokes.
- Timing: Float the stucco within 15 to 30 minutes after application for optimal workability and texture development. Inspect your float regularly for any damage or wear that may affect results.
Visual Checkpoints and Common Mistakes
Regularly inspecting your work during application helps prevent costly rework. Keep an eye out for the following issues and their remedies.
- Grit Uniformity: Ensure consistent grit distribution throughout the surface. Inconsistencies may indicate improper mix consistency, float pressure, or stroke pattern. Revisit these factors if texture appears uneven or inconsistent.
- Feathered Edges: Check corners and intersections for proper edge blending. Inadequate feathering can result in visible seams. Re-apply and blend edges as needed.
- Shrinkage Cracks: Inspect the surface for cracks caused by shrinkage during curing. Address these promptly with a crack filler or re-floating, if necessary.
- Trowel Marks: Regularly check for trowel marks left behind by improper float technique. If present, re-float the affected area to remove marks and achieve the desired texture.
Addressing issues promptly prevents further problems and ensures a successful sand (float) finish.
How to Replicate the Dash Finish (Roughcast / Knockdown / Pebble)
Fine dash, heavy pebble dash, and knockdown variations each offer a distinct visual and texture depth. The guide explains how depth, pattern size, and edge definition influence curb appeal and durability. Readers learn to recognize which variant suits their project.
Prepping the substrate includes cleaning, crack repair, moisture checks, and primer needs. Environmental conditions that affect spray and set times are noted, with an emphasis on achieving consistent texture across a wall. The workflow covers spraying base, applying dash, and final knockdown or leaving as-is.
Dash Finish Application Process
Follow these steps to apply a dash finish on your stucco substrate, ensuring correct sequence for desired results.
- Surface Preparation: Ensure the surface is clean, dry, and free of cracks. Check local temperature and humidity conditions for optimal spray-application and texture setting.
- Priming: Apply a primer or sealer to enhance adhesion and seal the substrate.
- Spray Base Coat: Using your hopper gun, apply a base coat of stucco mix. Maintain consistent spray distance and pass frequency for even coverage.
- Apply Dash: With an appropriate nozzle or trowel technique, apply the dash mixture. Use smaller aggregates for fine dash; increase aggregate size for heavy pebble dash.
- Knockdown (optional): If desired, perform knockdown within 15-30 minutes after dashing to achieve a smooth, uniform finish. Timing is crucial for optimal results.
- Cleanup: Rinse and clean equipment promptly to prevent clogging or damage.
- Final Inspection: Inspect the finished texture for any imperfections or missed spots. Address issues promptly to minimize rework.
Mixing Aggregates
Selecting appropriate aggregates is vital for achieving your desired dash finish. A correct mix ensures the desired texture and adhesion.
Fine Dash: Use small aggregates, such as sand or fine gravel, for a smooth, subtle texture. Aim for aggregates around 1-2mm in size.
Heavy Pebble Dash: Incorporate larger aggregates like pebbles or river stones for a rough, textured look. Aggregates should be approximately 4-8mm in size.
Before applying the mix to your wall, test a small batch on a sample board to confirm appearance and adhesion. Adjust the mix as needed until satisfied with the results.
Spraying, Dashing, and Knockdown Technique
Mastering the technique ensures consistent wall finishes. Practice on sample boards to refine your approach.
Hopper Gun Setup: Adjust tip size and pressure based on desired finish. Larger tips and higher pressure create heavier textures.
Manual Dash Method: Apply dash mixture using a trowel or hawk, working in small sections. For light finishes, use smooth, even motion; for heavy finishes, apply mix thickly and roughly.
Knockdown Timing: Perform knockdown within 15-30 minutes after dashing for a smooth, uniform finish. If targeting heavier pebble dash, increase aggregate size and reduce water content for better control over peak size and density.
Troubleshooting and repairs
Prompt repair minimizes rework. Consult visual guides or expert advice if unsure about any issues.
Poor Adhesion: If the mix is not adhering properly, check your substrate for contaminants or moisture. Re-apply primer or sealer and try again.
Uneven Peaks: Inconsistent peaks can be caused by varying spray distance or pass frequency. Practice on sample boards to improve technique.
Washouts: If washouts are present, re-apply mix to the affected areas, feathering edges to blend with surrounding texture. Inspect work regularly for potential issues and address them promptly and thoroughly.
How to Replicate the Lace (Spanish Lace / Skip Trowel) Finish
The Lace finish, including Spanish lace and skip trowel approaches, creates layered, decorative patterns that differ from dash and sand textures. Expectations are set for a refined or more pronounced lace depending on technique. The article outlines how these looks translate to various architectural styles.
Base layer preparation covers substrate cleanliness and skim coat ratios to establish a stable foundation. Techniques for light versus heavy lace, skip trowel and sweep methods, and tool choices guide consistent texture. A troubleshooting checklist addresses common issues and pattern control.
Step-by-Step Process
This guide walks you through replicating the lace (Spanish lace / skip trowel) finish on your surface, focusing on practical DIY actions and jobsite habits.
- Prepare the surface: Ensure it’s clean, dry, and free of defects. If working on an existing surface, follow manufacturer guidelines for surface preparation. Apply a reinforcing mesh or skim coat if necessary to establish a level, workable foundation.
- Mix your stucco material: Follow manufacturer instructions to ensure proper ratios for a lace finish.
- Apply the base layer: Using a trowel, spread the mixed stucco evenly across the surface. Aim for consistent thickness that allows texturing without overwhelming the finish.
- Allow the base layer to set: Let it dry until it reaches a leather-hard state, typically around 20-30 minutes depending on conditions and material type. Be patient; rushing this step can lead to an uneven texture.
- Light skim or heavy lace technique: Apply a thin skim coat if desired for a light, cloud-like finish, or build up the texture with additional layers for a heavier look. Use a straight edge trowel to create a smooth surface before texturing.
- Skip trowel or sweep technique: Using a skip trowel or trowel with a similar pattern, apply even pressure and follow a consistent motion to create the lace texture. Sweep in one direction for a uniform effect.
- Allow the finish to set: Let it dry completely before applying any sealants or painting. This can take several hours to a full day depending on conditions.
- Inspect your work: Check for any missed spots, uneven texture, or other issues. Make adjustments as needed before moving on to final steps.
Layering and skim coat strategy
The key to achieving an optimal lace texture lies in understanding how build-up and drying times affect groove depth. Here’s how to prep your base for the final lace sweep.
Base layer: Start with a level, workable foundation. Ensure it’s clean, dry, and free of any defects. Apply a reinforcing mesh or skim coat if necessary.
Skim coat: For a light, cloud-like finish, apply a thin skim coat. Allow it to set for the recommended time before skip troweling. If desiring a heavy lace look, apply a thicker skim coat and let it set longer to create deeper grooves.
Drying times: Drying times vary based on weather conditions, material type, and application thickness. Be patient; rushing this step can lead to an uneven texture or premature drying, which may cause cracks or other defects.
Tool motion, pressure, and sweep patterns
The technique for creating cloud-like or heavy lace effects involves understanding sweep angles, trowel pressure, and rhythm. Here are key aspects to consider:
- Trowel size: Choose a trowel with teeth that match your desired texture. Larger teeth create deeper grooves, while smaller teeth produce lighter textures.
- Pressure: Apply even pressure across the surface. Too much pressure can overwork the material and lead to an uneven finish. Less pressure creates a lighter, more subtle texture.
- Sweep angle: Sweeping at a wider angle with the trowel creates a light, cloud-like finish. A narrower sweep angle results in deeper grooves and a heavier look.
- Rhythm: Maintain a consistent rhythm while sweeping to ensure even texture across the entire surface.
- Tool condition: Ensure your trowel is in good condition before use. A damaged tool can lead to inconsistent results or damage to the surface.
Variations and aesthetic choices
The visual impact of your lace finish depends on understanding how materials and techniques affect the final result. Here’s how to create desired textures and match different architectural styles:
Aggregates: Choose aggregates that complement your desired aesthetic. Larger aggregates create a heavier, more pronounced texture, while smaller aggregates produce a lighter, subtler look.
Coat thickness: Vary the thickness of your skim coat to achieve different levels of texture. A thicker coat results in deeper grooves and a heavier finish, while a thinner coat creates a lighter, more subtle effect.
Trowel size: As mentioned earlier, trowel size affects groove depth. Matching the original finish when working on an existing surface is crucial for maintaining aesthetic consistency.
Other Finishes to Consider: English, Santa Barbara, and Smooth
English, Santa Barbara, and Smooth finishes provide alternatives to dash, lace, and sand, each with distinct visual cues—trowel marks, sheen, and depth. Readers gain a quick sense of how these textures read on different facades. The comparison helps align style with climate and maintenance expectations.
Performance factors such as weather resistance and crack tendency are weighed against practical considerations like base coat, mix, and application method. The section offers decision guidance for choosing finishes based on architectural goals and environmental context, with a note on transition or complement to dash, lace, or sand.
English Finish: Look and Technique
The English finish offers a heavily brushed, antiqued appearance with upward curls and layered strokes. It’s achieved by using a trowel or brush to create these distinctive marks.
To replicate this look, start with a base coat and apply the stucco mix. While the stucco is still wet, use a stiff-bristled brush or trowel to create upward strokes. Vary the pressure and angle to achieve the desired texture.
For a more refined English finish, consider using a smaller trowel or brush with denser bristles. This will help you create finer curls and strokes.
Santa Barbara / Spanish Mission Style
The Santa Barbara, also known as the Spanish Mission style, offers a semi-smooth, irregular finish resembling adobe. It’s characterized by its soft look and subtle texture.
To achieve this finish, start with a base coat and apply a stucco mix with fine sand. Use a trowel to spread the mixture evenly, then use your hands or a float to smooth it out. The key is to avoid creating distinct trowel marks.
The secret to the Santa Barbara finish lies in the application nuances. Instead of using heavy pressure and distinct strokes like other finishes, apply the stucco with light, even strokes. This helps to create the soft, adobe-like texture.
Smooth Finishes and When to Hire a Pro
A true smooth finish requires a suitable substrate and careful application. It’s achieved by applying a base coat, then using a trowel or float to spread the stucco mix evenly without creating any marks.
To ensure a smooth finish, it’s crucial to prepare your surface properly. This may involve sanding, priming, or using a specific type of base coat. Check your product labels and manufacturer instructions for guidance.
Given the skill and precision required, hiring experienced applicators is often recommended for smooth finishes. They have the tools and expertise needed to achieve a consistent, high-quality result.
Project Planning: Time, Cost Drivers, and When to Hire a Pro
Key cost drivers include prep work, multi-layer applications, equipment, and access challenges. Planning involves mapping the sequence from site prep to curing and recognizing how weather windows influence timing. The goal is to identify realistic milestones without overcommitting resources.
DIY feasibility is weighed against finish type, skill requirements, and risk factors such as cracking or improper curing. Readers are guided to prepare questions for contractors, covering material specs, warranties, cleanup, and scheduling to ensure alignment on expected texture results.
Cost drivers and budgeting tips
The cost of stucco texturing projects varies based on several factors. Material grade and aggregate choices significantly impact the price, with higher-quality options increasing the cost.
Labor intensity is another key driver. Complex patterns like lace or sand finishes require more skilled labor, driving up costs. Additionally, scaffolding or other access equipment may be necessary, adding to the expense.
To budget accurately, get multiple itemized quotes from different contractors. Check local rates for materials and labor to ensure you’re comparing apples to apples. This will help you make informed decisions about where to cut costs without compromising quality.
Time sequencing and labor planning
Stucco texturing projects follow a specific sequence of coats. First, apply the base coat, then allow it to cure according to manufacturer guidelines. Next, apply the texture layer, again following recommended drying times.
The weather plays a crucial role in scheduling. Stucco application and curing are sensitive to temperature and humidity fluctuations. Check product data sheets for optimal application temperatures and adjust your schedule accordingly to avoid delays due to inclement weather.
Plan for additional time if you’re applying multiple textures or patterns, as each layer requires drying time before the next can be applied. Always follow manufacturer recommendations for cure times between coats to ensure a durable, long-lasting finish.
DIY vs. professional considerations
Before deciding whether to tackle your stucco texturing project yourself or hire a pro, consider several factors. Project size is a significant determinant. Larger projects may require more manpower and specialized equipment, making it advisable to hire professionals.
The required finish quality also plays a role. Complex patterns like dash, lace, or sand finishes demand a high level of skill and experience. If you’re unsure about your ability to achieve the desired result, consider hiring a professional to ensure a consistent, high-quality finish.
Equipment needs and warranty expectations are other considerations. Professionals typically have access to specialized equipment and may offer warranties on their work. If you don’t have the necessary tools or want peace of mind regarding the project’s outcome, hiring a pro might be your best option.
Safety, Common Mistakes, and Maintenance Best Practices
Essential PPE includes eye protection, gloves, respirators, and skin protection, along with ventilation considerations for cement-based products. Safe handling and dust control are emphasized to reduce health risks. Routine safety checks support a smooth workflow.
Common mistakes include batching errors, slump inconsistencies, and improper trowel angles, with practical fixes provided. A maintenance plan covers cracking repair, patching, sealing or reapplication timing, cleaning, and color retention guidance.
Safety and Environmental Precautions
When working with cement-based finishes, prioritize your personal safety and maintain a clean jobsite. Essential personal protective equipment (PPE) includes:
- Respirator: Protect against lime/cement dust. Use a respirator rated for this purpose.
- Eye Protection: Wear safety glasses or goggles to shield your eyes from dust and debris.
- Gloves: Use gloves designed for cement work to protect your hands from irritation and cuts.
Jobsite Controls: Implement dust control measures, such as wetting surfaces before application. Follow product safety data sheets (MSDS/SDS) for specific guidelines on handling materials and waste cleanup.
Common Mistakes and How to Avoid Them
To achieve a high-quality, long-lasting finish, be aware of these common application errors:
- Incorrect Mixing: Follow manufacturer’s guidelines for batching. Discard affected batches if mis-mixing occurs.
- Improper Timing: Respect working times to avoid overworking or underworking the finish.
- Overworking Textures: Maintain consistent slump and avoid overworking dash or lace textures.
- Poor Feathering: Ensure proper feathering at edges when creating sand finishes to prevent visible lines.
Familiarize yourself with the specific texture’s application technique and verify trowel angles and working times as per product instructions.
Maintenance, Inspection, and Simple Repairs
Regularly inspect your finish to preserve its appearance and longevity. Use this checklist seasonally:
- Detachment/Cracks: Check around windows, doors, and corners for detachment or cracks.
- Water Damage: Inspect for signs of water damage, such as efflorescence or staining.
- Texture Loss: Look for texture loss or areas where the finish is wearing thin.
- Sealant Condition: Check the condition of any sealants used in conjunction with the finish.
Quick Rule: If you find detached, cracked, or damaged areas, repair using compatible mortar or stucco and matching texture. Clean affected areas as needed to maintain appearance and prevent staining.
Conclusion
The key idea is that selecting the right texture and applying it safely in a controlled way protects the appearance and the longevity of your stucco finish. With careful planning and steady execution, you can achieve durable results that look professional without overspending or causing damage to surrounding surfaces.
Move forward with a simple, practical check: choose the finish you want (sand, dash, lace, or an alternative), gather the appropriate tools and materials, test your technique on a small area, and follow the manufacturer guidance for the mix and application times. Plan for cure times between coats, protect adjacent surfaces, and perform each step in a steady, consistent manner to avoid patchy results or cracking.
Common mistakes to avoid include rushing the texture while the coat is too wet or too dry, overworking the surface, and ignoring safety gear or ventilation. Practice safe work habits: wear eye protection, a dust mask, and appropriate gloves; keep ladders and scaffolding stable; and set up clean, sheltered work zones to control dust and overspray. If you notice cracking, peeling, or adhesion issues, stop and recheck the substrate, mixing ratios, and weather conditions before proceeding.
If the project scope or site conditions exceed your comfort level—or you’re targeting a specific, complex finish—consider bringing in a pro. When in doubt, weigh the cost of your time against the potential for costly mistakes. With careful planning, testing, and adherence to safety, you can finish with confidence and enjoy a durable, attractive result.
FAQ
What are the main stucco finish types and how do they differ?
Common finishes include sand, dash, and lace. Sand has a gritty, evenly textured surface; dash provides a rough, granular look; lace offers a delicate, intricate pattern. Each finish has different maintenance needs and visual impact, so choose based on the look you want and local climate conditions.
What tools are typically needed to apply different textures?
Basic tools include a hawk, trowels, and a float for applying and shaping the mix. Texture-specific tools can be a float with a texture pattern, a lace brush or comb, and a knockdown knife for certain finishes. Always follow the manufacturer instructions and check local rules for tool use on exterior surfaces.
What are the key steps to achieve lace, dash, or sand textures?
Prepare the surface, mix the stucco per product instructions, and apply in workable passes. Texture while the coat is still workable, using the chosen tool or technique for the finish, then smooth or pattern as required. Work in small sections to maintain consistent thickness and joint alignment; test on a hidden area if possible.
How should I maintain and care for each finish after curing?
Inspect for cracks and damage regularly and address promptly to prevent water intrusion. Clean with a soft brush or low-pressure method recommended by the coating or stucco manufacturer, and reseal or coat as advised. Avoid high-pressure washing or harsh chemicals unless approved by the product label and local guidelines.