
Introduction
Cracks that reappear after patching are usually caused by movement or shrinkage in the stucco system. You can tell them apart by looking at how the crack ran and what the surrounding area did over time; movement cracks often change with structure or temperature, while shrinkage cracks stay smaller and more uniform.
To start, identify whether you’re dealing with a movement crack or a shrinkage crack, then plan your repair around that. Gather materials like stucco patch compound, mesh or fiberglass tape if needed, bonding agents, and clean tools, and always check product labels and local rules for mix ratios and curing times. For a DIY repair, knock out loose material, clean the crack, apply appropriate patch or mesh, and seal with a finish coat; monitor over a few seasons and address underlying movement or drainage as needed.
Key takeaways
- Distinguish movement cracks from shrinkage by tracking crack length, pattern, and timing.
- Inspect substrate, flashing, and control joints for sources before repairs to avoid recurrence.
- Use compatible patch materials and sealants rated for exterior stucco to prevent separation.
- For shrinkage cracks, apply hairline repair techniques with backing and feathered edges.
- For movement cracks, consolidate substrate, re-anchor, and use flex sealant with minimal joints.
- Safety: turn off power, wear eye protection, and use scaffold guardrails when working high.
Table of Contents
- Introduction
- Key takeaways
- Why Stucco Patch Cracks Reappear: Movement Vs Shrinkage
- Diagnostic Checklist: Inspecting Cracks to Determine the Root Cause
- Tools and Materials Checklist for Accurate Diagnosis and Durable Repair
- Repair Techniques for Shrinkage (Hairline) Cracks
- Repair Techniques for Movement-Related Cracks
- Sealant and Material Selection Guide
- Preventative Measures and Maintenance to Minimize Recurrence
- Costs, Common Mistakes, Safety, and When to Hire a Pro
- Conclusion
- FAQ
Why Stucco Patch Cracks Reappear: Movement Vs Shrinkage
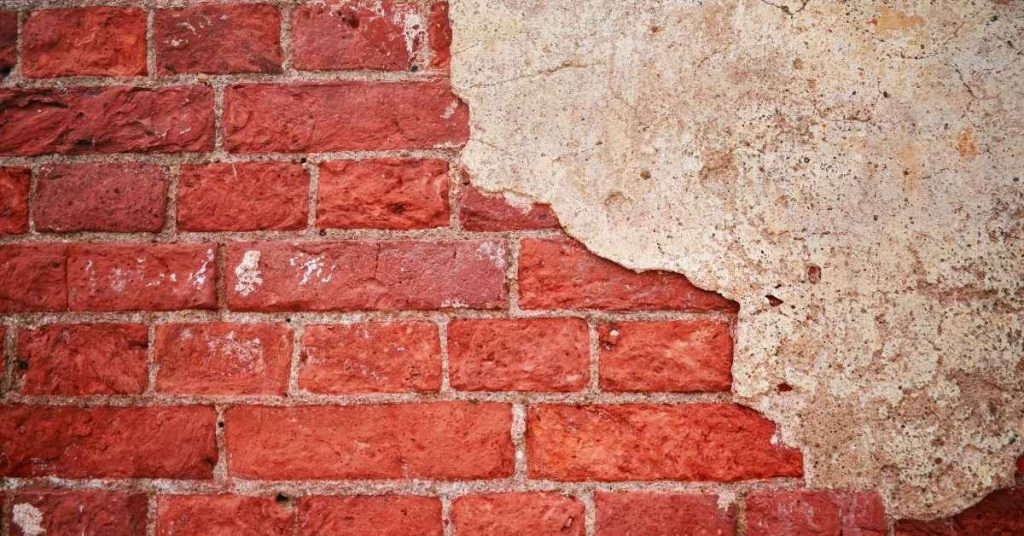
Movement cracks occur when the substrate or framing shifts, and they tend to follow lines of structural contact like studs or windows. Shrinkage cracks form as concrete or stucco dries and contracts, often appearing as fine, hairline patterns. On sight, movement cracks may zigzag and widen with seasons, while shrinkage cracks usually stay thin and random near openings or corners.
The causes differ: movement cracks come from structural or substrate movement, such as earth shifts or improper anchoring, while shrinkage cracks stem from concrete drying, curing, and thermal contraction. These roots influence how the crack behaves over time and whether it will repeat after patching. A practical diagnostic approach is to note pattern, location, and width, then compare with seasonal changes and moisture conditions.
Movement-related cracks — causes and signs
Movement cracks in stucco are caused by shifts in the underlying structure, substrate, or earth. These can be due to:
Structural movement: settling of framing, improper anchoring, or changes in the building’s foundation.
Thermal expansion and contraction: temperature fluctuations cause materials to expand and contract, putting stress on the stucco.
Moisture-related movement: swelling and shrinking of substrates due to absorbed moisture can lead to cracks.
Shrinkage-related cracks — causes and signs
Shrinkage cracks are a result of the drying and curing process of cementitious stucco. As the material loses moisture, it naturally shrinks.
The typical appearance of shrinkage cracks is:
Fine, hairline cracks: These are usually narrow and may not be immediately visible but can widen over time.
Random patterns: Unlike movement cracks, shrinkage cracks do not follow any specific pattern or line. They often appear as spiderweb or crazing patterns near corners or openings.
Key visual clues to distinguish them
To tell movement and shrinkage cracks apart, look for these key signs:
Location: Movement cracks often follow studs or frames, while shrinkage cracks are typically found near corners or openings.
Pattern: Movement cracks may zigzag or have a stair-step pattern. Shrinkage cracks usually appear as random, fine lines.
Width and continuity: Movement cracks can be wide and may widen seasonally. Shrinkage cracks start narrow but can widen over time if not properly sealed.
Timing: Movement cracks may appear soon after construction or gradually over time as the building settles. Shrinkage cracks often show up within a few weeks to a few months after application.
Diagnostic Checklist: Inspecting Cracks to Determine the Root Cause
Start by defining crack types and patterns you see, such as hairline versus broad, vertical versus horizontal, or stepped cracks. Each pattern can hint at movement, shrinkage, or substrate failure. Use quick observations to categorize the issue as you view the exterior surfaces.
Document the findings with timestamped photos and a simple log. Include a ruler or scale in photos and map crack locations on a site diagram. Monitor width changes over time to guide repair urgency and method.
Measurement and monitoring techniques
Before you start repairs, use this checklist to measure and monitor cracks. It helps track changes over time.
- Mark dates: Use a pencil or paint to mark dates directly on the crack. This helps track when it first appeared and any growth.
- Use crack gauges: Apply these tools at regular intervals along the crack. They measure width changes precisely.
- Create reference marks: Use a pencil or masking tape to create reference points on either side of the crack. Photograph these for comparison later.
- Photograph patterns: Take photos from various angles, focusing on the crack’s pattern and edges. Compare these over time to spot changes.
- Document width: Measure and record the crack’s width at regular intervals. Even small changes can indicate active movement or shrinkage.
- Check length: Measure and note any changes in the crack’s length. Lengthening cracks may signal ongoing issues.
- Monitor displacement: If possible, measure any displacement or deflection at the crack’s edges. This can indicate structural movement.
- Record vibrations: Note any vibrations or additional cracking near the original crack. This could suggest spreading damage.
- Check for progression: Regularly inspect the area around the crack for new cracks or signs of spreading damage.
Quick rule: Consistency is key. Measure and monitor at regular intervals to catch changes early.
Patterns, location, and timing analysis
Analyze crack patterns, locations, and timelines to pinpoint causes before repairs.
- Crack type: Identify if cracks are hairline (thin), broad (wide), vertical, horizontal, or stepped. Each type can indicate different causes.
- Pattern analysis: Look for patterns like fishmouths (at corners) or map cracking (random). These can point to specific issues.
- Location check: Inspect cracks at corners, openings, or large fields. Different locations may have unique causes.
- New construction: If cracks appear during new construction, they might be due to drying shrinkage.
- Seasonal changes: Cracks that widen in winter and narrow in summer could be due to thermal movement.
- Moisture sources: Look for signs of moisture intrusion like efflorescence or staining. These can indicate water damage.
- Roof, gutters, drainage: Check these areas for potential water entry points that could cause cracks.
- High humidity: In humid climates, high moisture levels can contribute to cracking.
- Timing of appearance: Note when cracks first appeared. This can help determine if they’re due to movement or shrinkage.
Quick rule: Consider all factors – location, pattern, timing – to get a complete picture before starting repairs.
Tools and Materials Checklist for Accurate Diagnosis and Durable Repair
Set up a diagnostic toolbox for movement versus shrinkage with a moisture meter, infrared thermometer, moisture probe, crack gauges, straightedge, level, and a bright light. Use this kit to reveal subtle movement along edges and to assess moisture influences that affect adhesion and curing.
For surface mapping and prep, carry a tape measure, chalk line, ruler, calipers, a notebook, and a camera. This keeps crack location, width, and direction tracked over time for durable repairs and accurate patching decisions.
Tools for prep and repair
Before you start patching, gather these tools to ensure a smooth process.
- Scrapers: Remove loose stucco and prepare the surface. Skip this and your patch won’t stick.
- Wire brushes: Clean out cracks and remove dust. Without proper cleaning, your patch will fail.
- Utility knives: Cut backer rod and trim excess material. Inaccurate cuts can lead to improper sealing.
- Trowels ( various sizes): Apply and smooth the patch. Using the wrong size can result in an uneven surface.
- Caulking gun: Apply sealant around edges. Skipping this can cause water intrusion, leading to further damage.
- Backer rod: Fill wide cracks before applying sealant. Without backer rod, sealant won’t bond properly.
- Sanding tools (sandpaper, orbital sander): Smooth the patched area after application. Skipping this can leave a rough surface that attracts dirt and moisture.
- Safety gear (gloves, safety glasses, dust mask): Protect yourself from debris and harmful substances. Without proper protection, you risk injury or illness.
Quick rule: Always use the right tool for the job to ensure a lasting repair.
Materials: stucco mixes, primers, sealants, and reinforcement
Choose the right materials for your patch job to ensure compatibility and durability.
- Stucco patch mix: Select a type that matches your existing stucco. Using an incompatible mix can cause cracking and peeling.
- Bonding agent/primer: Apply before the patch to improve adhesion. Skipping this can result in delamination.
- Reinforcing mesh/fabric: Add strength to your patch. Without reinforcement, cracks can reappear due to movement or shrinkage.
- Backer rod: Use with sealant for wide cracks. Incompatible backer rod can cause improper sealing and water intrusion.
- Sealant: Choose one compatible with your stucco. Using an incompatible sealant can lead to discoloration or cracking.
- Curing/sealing products: Apply after patching to protect the area from moisture loss and premature curing. Without proper cure, your patch may crack or peel.
Quick rule: Always ensure compatibility between new materials and existing stucco for a durable repair.
Repair Techniques for Shrinkage (Hairline) Cracks
First confirm that the crack is hairline and not showing active movement or moisture intrusion. Look for signs of ongoing movement, moisture intrusion, or efflorescence that would indicate a deeper issue. This helps you choose the right fix path before patching.
Prep thoroughly by removing loose material and dust, then dampen the crack to aid adhesion without leaving standing water. Choose a filler suited for hairline cracks, such as latex or elastomeric patching compounds, and use multiple thin passes if needed to avoid seeping or shrinking after cure.
Cleaning, bonding, and filling
First things first: clean that crack. Use a stiff brush to remove loose material and dust.
Efflorescence, that white powdery stuff, needs to go too. Scrub it off with a mixture of water and muriatic acid (1 part acid to 5 parts water). Safety first: wear gloves and goggles.
Now, dampen the crack. Just a light mist, no puddles. This improves adhesion. Use a spray bottle or a damp cloth.
Next, apply a bonding primer or slurry. This helps the filler stick better. Use a paintbrush to spread it evenly along the crack edges and about an inch onto the surrounding surface.
Choosing the right filler is crucial. For hairline shrinkage cracks, latex/acrylic patching compounds or elastomeric stucco crack fillers are your best bets. They’re flexible, which helps prevent future cracking due to minor movement.
Finishing and texture matching
Once the filler’s dry, it’s time to finish the job. Start by feathering the edges with a damp sponge or sandpaper. This blends the repair into the surrounding surface.
Matching the texture is key. If your stucco has a smooth finish, use a trowel or float to smooth out the filler. For textured finishes, use a stiff brush to mimic the existing texture. Work in small sections and check often to ensure you’re matching.
Now, let it cure properly. Follow the manufacturer’s instructions for drying times. Patience is key here. Don’t rush it.
Once cured, recoat with a matching stucco paint or primer. This seals the repair and protects it from moisture and UV damage. If you’re in an exterior area, consider applying a thin elastomeric topcoat for extra protection.
Repair Techniques for Movement-Related Cracks
Clarify the root cause by checking crack pattern, width, progression over seasons, and proximity to expansion joints. This helps distinguish movement from shrinkage so you plan the patch correctly. Look for signs of foundation or substrate issues that need addressing before patching.
Reinforcement and flexible joints are key. Consider embedded metal lath, welded wire mesh, or flexible fabrics where movement is anticipated. Use flexible patch systems and compatible primers and topcoats to allow movement without re-cracking.
Reinforcement and Structural Fixes
Before you patch, reinforce. Movement cracks need sturdy support to prevent reoccurrence.
Lath or Mesh: Add metal lath or welded wire mesh when cracks are wide (1/8″+) or near corners. Coincide with substrate repairs for best results.
Structural Issues: If framing or fastening issues cause movement, fix them first. Cracks won’t heal if the cause persists.
Flexible Joints, Backer Rod, and Sealants
Control movement with flexible joints. They allow substrate to move without stressing the stucco.
Backer Rod: Use it in wider joints (1/4″+) to maintain joint depth and prevent overfilling.
Joint Profiles & Sealants: Choose appropriate joint profiles based on expected movement. Use approved elastomeric or silicone sealants for flexibility and durability.
Sealant and Material Selection Guide
Compare sealant chemistries such as silicone, polyurethane, and hybrids for adhesion to cement-based stucco and their ability to accommodate movement. Consider how each option behaves with sun exposure and temperature changes over time. Choose the best fit for the crack type and location.
List compatible stucco products and note interior versus exterior use, including whether primers are needed. Plan for substrate prep, backer rod use, groove width, and joint geometry to optimize sealant performance and durability.
Acrylic, Silicone, and Polyurethane Pros/Cons
When it comes to sealing stucco cracks, you’ve got options. Let’s break down the pros and cons of acrylic, silicone, and polyurethane sealants.
Acrylic: Great for interior use, cheap, and paintable. But it lacks flexibility and UV resistance, making it unsuitable for exterior joints.
Silicone: Super flexible, excellent for movement accommodation, and UV-resistant. It’s ideal for exterior joints but can’t be painted and has poor adhesion to Portland cement-based stucco without a primer.
Polyurethane: Tough, durable, and paintable. It sticks well to stucco but lacks the flexibility of silicone for wide movement joints. It’s best for interior use or narrow exterior cracks.
Mortar/Stucco Blend Compatibility and Application Tips
To ensure your sealant bonds well with your stucco, you need to match the chemistry. Here’s how:
For interior repairs, use an acrylic latex primer before applying an acrylic or polyurethane sealant. This primes the surface and minimizes differential shrinkage.
For exterior repairs, use a silicone-based primer before applying a silicone sealant. This ensures strong adhesion and prevents peeling. If you’re using a stucco mix, ensure it’s compatible with your chosen sealant by checking manufacturer guidelines.
Always clean the surface, let it dry, and score the crack to create a mechanical bond. For wide cracks, use a backer rod to support the sealant and prevent overfilling.
Preventative Measures and Maintenance to Minimize Recurrence
Start with substrate preparation by assessing crack patterns, removing loose material, cleaning, and applying a bonding agent suitable for concrete surfaces. This creates a solid base for any patch or coating and reduces future failures.
Improve flashing and drainage to limit moisture-driven movement, and plan control joints where needed. Establish a routine inspection schedule and use a moisture management plan to protect the stucco from weather cycles and interior humidity that drive new cracks.
Proper substrate prep and moisture management
Before you start patching, ensure your substrate is ready. Flashing around windows, doors, and parapets should be in good condition to prevent water intrusion.
Weep screeds at the base of walls help drain excess moisture. Make sure they’re clear and functioning properly.
Proper curing of your existing stucco is crucial. It helps achieve full strength and prevents premature cracking due to rapid drying. Follow manufacturer guidelines for curing new patches as well.
Moisture control inside your home is also important. Address any interior moisture sources, like leaks or condensation, to prevent them from affecting your exterior stucco.
Routine maintenance and monitoring schedule
A regular inspection routine helps catch problems early. Inspect your stucco at least seasonally, and after heavy rains or freezes.
Check for new cracks, and document changes in existing ones. If a crack grows significantly or shows signs of movement, consider professional evaluation.
Recaulking is an important maintenance task. Inspect all caulk lines around openings and at control joints. Reseal any that show signs of cracking or peeling.
Minor touch-ups can prevent small problems from becoming big ones. Keep your stucco clean, reapply sealant as needed, and perform minor repatching when necessary to maintain a durable finish.
Costs, Common Mistakes, Safety, and When to Hire a Pro
Understand the factors that drive costs, including labor, materials, access, patch extent, and any required moisture mitigation or structural work. These elements influence total project pricing and scheduling. Plan for contingencies if hidden issues are found.
Be aware of common DIY mistakes that trigger recurrence: incomplete surface prep, not addressing movement causes, over-sealing, selecting the wrong patch material, or skipping moisture barriers. Consider safety gear and ladder protocols, and know when to call a pro for structural movement or repeated failures.
Common mistakes that make cracks come back
Even with careful planning, some DIYers end up battling recurring cracks. Here are common pitfalls to avoid.
- Inadequate surface prep: Skipping proper cleaning and priming lets moisture and contaminants cause cracks from within.
- Wrong sealant choice: Using the wrong type of sealant for your joint size or substrate can lead to cracking under movement or stress.
- Overpainting flexible joints: Painting over flexible joints before they’ve fully cured can restrict their movement, causing cracks when the joint flexes.
- Neglecting underlying movement sources: Failing to address issues like settling, thermal expansion, or substrate movement ensures cracks will return.
Double-check these points before you start. A little extra time upfront can save you from endless crack repairs down the line.
Safety precautions, prep steps, and criteria for professional help
Before you start, gear up right. That means wearing a hard hat, safety glasses, gloves, and sturdy boots. If you’re working from heights, use ladders or scaffolding, but check they’re in good condition and secure before climbing.
When handling materials like concrete or mortar, remember they can be heavy and awkward. Lift with your legs, not your back, and ask for help if you need it. Keep work areas clear of debris to prevent trips and falls.
Now, let’s talk about when to call in the pros. If you’re seeing signs like structural movement, large gaps, or repeated failure, don’t mess around. These could be signs of serious issues that need a contractor or structural engineer. It’s better to be safe and get it checked out.
Conclusion
Make safety and durability your baseline. With the right checks and careful repairs, you control appearance and prevent costly rework.
First, verify the root cause in a small, controlled area: inspect cracks for movement signs, assess shrinkage indicators, gather the right tools and materials, and follow the repair sequence from diagnosis to finish. Start with a small patch, test the sealant in a hidden spot, let each step cure, and recheck before moving on to larger sections.
Common mistakes to avoid are ignoring movement signs, using the wrong sealant or substrate, and skipping proper surface cleaning or curing times. Always test a patch in a hidden area, wear eye protection and gloves, and keep moisture away from fresh repairs until they set. Don’t force sealants into gaps or overcoat too soon; let the training and the material directions govern timing.
If crack patterns are ongoing after a thorough diagnosis, or you’re unsure about movement versus shrinkage, it makes sense to call a professional. A pro can confirm the root cause, select the right materials, and ensure the repair won’t fail under climate or load conditions. Stay steady, follow the steps, and you’ll keep a solid, good-looking stucco shell for years to come.
FAQ
How do I tell if a stucco crack is from movement or shrinkage?
Look at the crack pattern: hairline, vertical, or diagonal cracks can signal different causes. Measure the crack width over a few days if you can; rapid change often points to movement. If the crack follows joints or runs through patches with new, rough edges, check for recent framing or moisture changes.
What materials do I need to repair stucco cracks effectively?
You’ll need a crack sealer or stucco patch compound, a trowel, a wire brush, masking tape, and a compatible finish coat or paint. Have a stucco patch or caulk designed for exterior use and matching color ready before you start. Always check product labels for compatibility with your existing stucco and any required prep steps.
What is the step-by-step repair process for cracks, depending on their type?
First, clean the crack and remove loose material. Then apply a sealant or patch compound and press firmly to fill the gap. Finally, smooth, let cure per the product instructions, and apply a finish coat or paint to blend with surrounding stucco.
What prevention steps help stop cracks from coming back?
Seal small cracks early before moisture gets in. Keep drainage clear and ensure proper flashing around openings. Regularly inspect for new cracks after heavy rains or settling, and address movement or moisture sources promptly.