
Introduction
Stucco over painted concrete block requires proper surface prep and adhesion testing to prevent delamination.
We’ll walk through simple checks you can do with basic tools to judge if the old paint will hold and what to rough up or clean. This is a hands-on, DIY-friendly overview, not a full contractor guide.
You’ll start with quick adhesion checks and a simple prep plan, then carry out a test patch to confirm the surface is ready. Always follow the paint and stucco product labels and local rules, and check up on any prep steps like cleaning, roughening, or priming. If adhesion isn’t clear or if the surface is flaky, choose a more cautious approach and seek guidance or alternatives.
Key takeaways
- Test adhesion on representative painted CMU areas before full stucco application.
- Clean and remove loose paint; lightly abrade surfaces for better key.
- Use primers or bonding agents compatible with both CMU and stucco system.
- Verify lath installation, scratch coat adhesion, and cure conditions per manufacturer.
- Address moisture, drainage, and vapor paths to prevent delamination risks.
- Maintain clean tools and follow safety gear; avoid dust and fumes exposure.
Table of Contents
- Introduction
- Key takeaways
- Why Stucco Delaminates from Painted Concrete Block
- How to Assess Painted CMU Before Committing to Stucco
- Adhesion Testing Methods and Interpreting Results
- Cleaning and Surface Preparation Techniques
- Selecting Primers, Bonding Agents, and System Compatibility
- Lath, Scratch Coat, and Stucco Application Best Practices
- Moisture Management, Drainage, and Vapor Considerations
- Tools, Materials Checklist, and Safety Considerations
- Conclusion
- FAQ
Why Stucco Delaminates from Painted Concrete Block
Painted CMU creates a barrier between the substrate and the stucco that can weaken over time. Delamination often starts where the bond is compromised by poor adhesion or moisture intrusion. Look for areas where paint films are softened, blistered, or peeling as warning signs.
Surface contamination, improper paint type, and ongoing movement of the blockwork all affect the bond. Understanding how moisture moves through the wall helps explain why stucco fails at the interface. This section helps you spot the main culprits before you start work.
Incompatible coatings and surface films
Some paints and sealers block mechanical and chemical bonding of stucco to concrete blocks. This happens because these coatings create a barrier that prevents the stucco from adhering properly.
Before applying any coating, check product labels. Look for terms like ‘concrete sealer’, ‘primer’, or ‘paint’. Some products claim to be ‘stucco-ready’ or ‘stucco-friendly’, but always double-check.
Identifying coating chemistry matters. Avoid paints and sealers with high levels of silicone, acrylic, or other film-forming agents. These can prevent the stucco from bonding effectively. Instead, opt for products that allow for good mechanical keying, like certain types of masonry paint or primer.
Moisture, Salts, and Substrate Movement
Trapped moisture and soluble salts in your concrete blocks can cause big problems when you paint ’em and stucco over. Here’s what to watch out for:
Moisture: If water gets trapped between the block and the paint, it’ll find a way out – usually by pushing the stucco off. Check base compaction before you start. If it’s too soft, water can get in and cause trouble.
Salts: Some blocks have salts that dissolve in water. When they come to the surface, they can push your paint and stucco off. Look for signs of efflorescence – white, powdery stuff on the block face. If you see it, check the label or contact the manufacturer before painting.
Movement: Concrete blocks move with temperature changes and structural settling. This can crack your paint and make the stucco pop off. To minimize this, use a flexible primer and consider adding expansion joints in your stucco design.
Poor detailing and installation errors
Here are some common mistakes that can lead to stucco delamination from painted concrete block. Avoid these pitfalls for a successful job.
- Missing flashing: Flashing is crucial to direct water away from the wall. Without it, moisture can get trapped and cause delamination. Always install flashing at the base of the wall and around windows and doors.
- Improper lath attachment: Lath should be securely attached to the block with nails or screws driven into the mortar joints. If not properly attached, stucco can crack and peel off. Check that lath is tight against the wall and fasteners are secure.
- Incorrect mix/application practices: Using too much sand in your stucco mix or applying it too thick can cause cracking and delamination. Follow manufacturer instructions for mixing and application, and keep layers thin to avoid issues.
Double-check these points before you start. A little extra time upfront can save a lot of trouble later on.
How to Assess Painted CMU Before Committing to Stucco
Begin with a visual survey of the painted areas for cracks, peeling paint, and signs of moisture. Document conditions and take photos to keep a baseline for comparison. Safety and careful note-taking are essential before any prep work.
Next, perform basic tests to gauge bond quality and substrate condition. Decide whether stripping or a full surface preparation is required based on your findings. Always verify applicable guidelines from manufacturers or local codes when in doubt.
Step-by-Step Process
Follow these practical steps to assess painted CMU before applying stucco. This sequence ensures safety, thorough inspection, and informed decision-making.
- Preparation: Gather tools (gloves, goggles, tape measure, flashlight), wear appropriate PPE, and ensure the area is safe for work.
- Initial Visual Inspection: Scan the surface for any visible issues like cracks, efflorescence, or flaking paint. Use a flashlight to check corners and hard-to-see areas.
- Tactile Inspection: Gently tap and press on the surface with your knuckles or a soft mallet to listen for hollow sounds or feel for soft spots that could indicate poor adhesion.
- Main Work: Perform non-destructive field checks (tap/rake tests, moisture scanning) as outlined in the following sections. Document findings accurately.
- Cleanup and Final Checks: After completing all tests, clean up the area, and review your findings. If necessary, consult with a professional before proceeding with stucco application.
Visual and Tactile Inspection Checklist
Use this checklist during your initial inspection to assess the condition of painted CMU before applying stucco.
- Flaking Paint: Check for any paint that’s peeling, chipping, or coming off easily. This indicates poor adhesion and may require stripping.
- Efflorescence: Look for white, powdery deposits on the surface, which could indicate moisture issues or salt contamination.
- Hairline Cracks: Inspect for fine cracks, as they might grow larger over time and compromise stucco adhesion.
- Soft or Powdery Areas: Press gently on the surface; if it feels soft or crumbles, this could signal poor adhesion or substrate issues.
- Discoloration: Check for stains or discoloration that might indicate moisture problems or incompatible coatings.
- Inconsistent Surface Texture: Feel for any areas with a different texture than the rest of the surface, which could suggest underlying issues.
- Missing or Damaged Areas: Inspect for any gaps, holes, or damaged sections that need repair before stucco application.
- Improperly Painted Edges: Check corners and edges to ensure they’re properly painted and prepared for stucco installation.
Quick rule: If you find more than a few issues, consider stripping the paint or consulting a professional before proceeding with stucco.
Non-destructive Field Checks
Perform these simple on-site checks to identify potential issues without damaging the substrate. This helps inform your decision about applying stucco.
Tap/Rake Tests: Gently tap or rake the surface with a soft mallet or stiff-bristled brush. Listen for hollow sounds, which could indicate voids or poor adhesion. If you hear any, perform additional tests to confirm the issue.
Moisture Scanning: Use an infrared camera or moisture meter to scan the surface for wet zones. Excessive moisture can compromise stucco adhesion and should be addressed before proceeding.
Infrared Thermal Imaging: If available, use an infrared camera to detect temperature differences that might indicate moisture trapped within the walls. This non-invasive method helps identify potential issues without causing damage.
When to Perform Destructive or Invasive Tests
In some cases, small removals, core samples, or borescope inspections are necessary to fully assess the condition of painted CMU. These tests can change your remediation approach and should be performed when:
Visible Issues Persist: If initial visual and tactile inspections reveal persistent problems, perform destructive tests to better understand the root cause.
Non-destructive Tests Indicate Issues: When tap/rake tests or moisture scans suggest underlying problems, invasive testing may be required to confirm the findings and develop an appropriate remediation plan.
Preparing for Stucco Application: Before applying stucco, it’s crucial to ensure the substrate is sound and free of issues that could compromise adhesion. Destructive tests help verify the condition of the painted CMU and inform your preparation process.
Adhesion Testing Methods and Interpreting Results
Different tests measure different aspects of adhesion. Quick field checks give you a fast read on surface tack and cohesive failure tendencies. Standardized tests provide more consistent data for comparison.
Use the results to plan your prep strategy, such as whether additional mechanical abrasion or a bonding agent is needed. Always confirm acceptance criteria with the manufacturer instructions or local building codes. Keep results documented for future reference.
Pull-off adhesion testing (lab/field)
The pull-off test is a quantitative method to measure the bond strength between your painted concrete block and the stucco. It’s like giving them a tug-of-war.
In a lab, they use special equipment to pull a dollop of material off the surface. In the field, you can do a simplified version using a suction cup and a scale. The force needed to pull it off tells you how well they’re stuck together.
Compare your results with what manufacturers or project specs say is acceptable. If it’s too low, you might need better prep work or different materials.
Tape, scrape, and rake tests for quick assessment
These are fast field checks to get a rough idea of how well your prep work is going. No fancy equipment needed.
First, stick some tape on the surface, press it down, then rip it off. If paint comes with it, you know there’s no bond. Next, try scraping or raking the surface. If it flakes off easily, that’s not good either.
Keep in mind, these tests are quick but not as accurate as pull-off tests. They’re more like a first pass to see if you’re on the right track.
Mock-up panels and accelerated exposure
Before you stucco the whole wall, make a small test panel. Do your prep work on it just like you would on the real thing.
Then, expose it to conditions that mimic what it’ll face long-term – sun, rain, freeze-thaw cycles. Check on it regularly to see how it’s holding up.
If delamination happens during this test, you know there’s a problem with your prep or materials. It’s better to find out now than after you’ve stuccoed the whole wall.
Cleaning and Surface Preparation Techniques
Start with gentle cleaning to remove surface grime and contaminants that can hinder bonding. If paint or sealers resist, consider more aggressive methods that are still safe for CMU. The goal is a clean, sound surface free of loose material.
Choose preparation steps based on what you find during inspection: cleaning, light etching, or full paint removal may be necessary. Emphasize contaminant removal and creating a bondable surface that can accept the stucco system you plan to use. Always follow product labels and manufacturer directions for cleaners and removal methods.
Low-impact cleaning: detergents and pressure washing
For lightly soiled painted CMU, start with a gentle touch. A mild detergent wash can do the trick.
Mix a solution of warm water and a mild detergent like dish soap. Apply it to the surface using a soft-bristle brush or a pump sprayer. Let it sit for 10-15 minutes to break down dirt and grime.
Rinse thoroughly with clean water. Be careful not to over-wet the blocks, as excess water can damage them. Verify that all detergent residue is removed to ensure proper stucco adhesion.
Mechanical removal and abrasion options
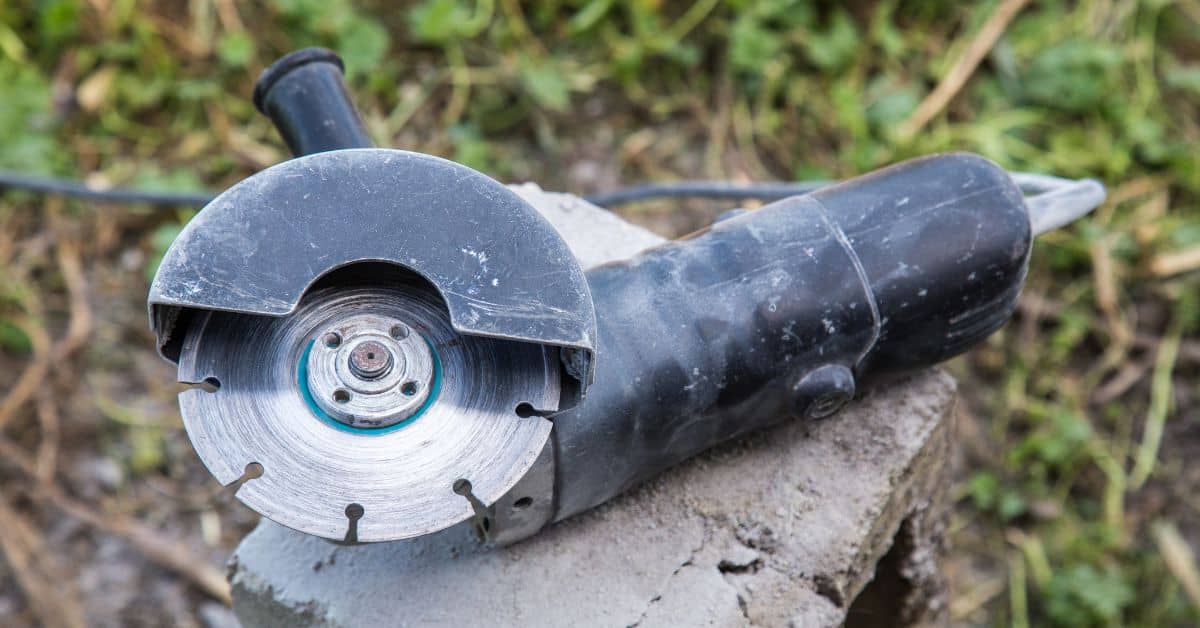
When paint is loose or peeling, it’s time for some mechanical action. Here are a few methods to consider:
Grinding: Use a handheld grinder with a suitable attachment (like a wire cup brush) to remove paint and profile the surface. It’s great for large areas but can create dust, so wear appropriate PPE.
Sanding: For smaller areas or touch-ups, use sandpaper by hand or with a palm sander. Start with coarse grit (e.g., 60) to remove paint, then follow up with finer grit (e.g., 120) for a smooth finish.
Abrasive blasting: This method is suitable for large-scale projects and can be done with sand, soda, or other abrasives. It’s aggressive but effective. Always wear protective gear and follow safety guidelines.
Chemical stripping and etching considerations
Sometimes, mechanical methods aren’t enough or practical. That’s where chemical strippers and etchants come in.
Choose a stripper suitable for your paint type. Apply it according to the manufacturer’s instructions, usually with a brush or roller. Let it sit to break down the paint, then scrape it off. Rinse thoroughly with water.
For mild etching, use a solution of muriatic acid (hydrochloric acid) diluted with water. This creates a micro-porous surface for better stucco adhesion. Always wear protective gear and follow safety guidelines when handling chemicals.
After using any chemical, neutralize it with a base (like baking soda or ammonia), rinse thoroughly, and dispose of waste responsibly according to local regulations.
Selecting Primers, Bonding Agents, and System Compatibility
Pick primers and bonding agents that are compatible with both the painted CMU and the chosen stucco system. Compatibility testing helps prevent delamination down the line. Refer to product data sheets for guidance on substrate suitability.
Follow the manufacturer instructions for surface prep, cure times, and application methods. When in doubt, verify requirements with the primer or bonding agent supplier and check local code expectations. Document approvals before proceeding.
Criteria for primer selection on previously painted CMU
A good primer is your first line of defense against delamination. Here’s what to look for:
Adhesion promotion: The primer should enhance the bond between the painted concrete block and the stucco system.
Vapor permeability: It should allow moisture to escape, preventing trapped water from causing problems later on. Look for primers with high vapor permeability ratings.
Compatibility: Ensure the primer is compatible with both your painted surface and the chosen stucco system. Check manufacturer guidelines to be sure.
Bonding agents, polymer modifiers, and cementitious adhesives
These products help improve adhesion between the substrate and stucco. Here’s a quick rundown:
Bonding agents: These are typically liquid or powdered additives that enhance adhesion by chemically bonding with both surfaces.
Polymer modifiers: These are polymers added to cement-based mixes to improve flexibility, durability, and adhesion. They’re often used in polymer-modified stucco systems.
Cementitious adhesives: These are cement-based products designed to enhance bond strength. They can be applied as a thin layer before applying the stucco system.
Verifying compatibility and following manufacturer directions
Before you start, make sure your chosen primer or bonding agent plays nice with both your painted surface and the stucco system.
Perform small adhesion tests on a hidden area. Document the results to ensure you’re getting good bond strength.
Always follow manufacturer’s cure and application requirements. This includes drying times, mixing ratios, and application temperatures.
Lath, Scratch Coat, and Stucco Application Best Practices
Choose lath and fasteners appropriate for the wall type and project conditions. Proper attachment and spacing are key to a durable base for the scratch coat. Follow a sequence that maintains substrate integrity throughout the build.
Prepare the scratch coat with attention to consistency and cure environment. Techniques that minimize cracking and bond loss help prevent delamination. Adhere to the system’s guidelines and manufacturer instructions for best results.
Lath types, fastening patterns, and attachment to painted block
The first step in applying stucco over painted concrete block is installing the lath. Here’s what you need to know:
Lath Types: For painted surfaces, use expanded metal or woven wire lath. These allow for better adhesion and penetration of the scratch coat.
Fastening Patterns: Secure lath every 4-6 inches along the edges and every 8-12 inches in the field. Stagger the fasteners on adjacent rows to create a strong, continuous bond.
Attachment: Use corrosion-resistant fasteners like stainless steel or hot-dipped galvanized nails or screws. Drive them flush with the lath surface for proper scratch coat adhesion.
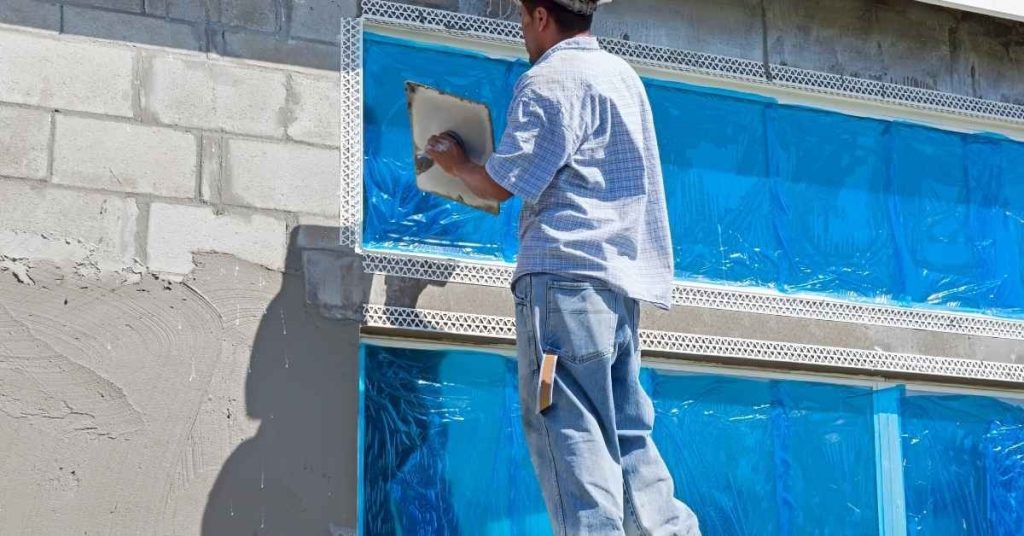
Scratch coat mix, thickness, and curing approach
The scratch coat is your first layer of stucco. It’s crucial for creating a strong bond between the lath and finish coats. Here’s how to apply it:
Mix: Prepare a thick, stiff mixture using 1 part cement, 2-3 parts sand, and enough water to create a workable consistency.
Thickness: Apply the scratch coat at a thickness of about 3/8 inch. This provides sufficient key for the finish coats while avoiding excessive shrinkage cracks.
Curing: Keep the scratch coat damp for at least three days to allow proper curing. This helps develop strong adhesion and prevents premature drying, which can lead to cracking.
Finishing coats and timing between layers
Applying the finish coats correctly is vital for preventing delamination. Follow these guidelines:
Timing: Apply the brown coat (second layer) when the scratch coat has cured but is still slightly damp. This ensures a strong bond between coats.
Avoid Overworking: Don’t overwork or trowel the wet layers excessively, as this can cause delamination. Gently apply and smooth each layer.
Bond Between Coats: Allow each coat to cure according to manufacturer recommendations before applying the next one. This ensures a strong bond between all layers.
Moisture Management, Drainage, and Vapor Considerations
Control bulk water and ensure proper drainage to keep the substrate dry. Allow for substrate drying time as needed before applying subsequent layers. Consider exterior details that direct water away from the wall.
Manage vapor drive by detailing flashing, weeps, and proper capillary breaks. These measures help keep moisture from undermining the bond. Always align with design details in the project drawings and local requirements.
Flashing, drainage plane, and termination details
Proper flashing is key to directing water away from your stucco. Here’s where it’s crucial:
- Base Flashing: At the bottom, keep water out. Seal between block and foundation.
- Counter Flashing: Protects top of wall from rain. Nails into wall, under roof or parapet.
- Termination Bar: At top, stops water running down wall. Extends above finish level.
Use wide flashing (at least 4″ for CMU) and overlap joints. Seal with caulk or mastic.
Assessing and mitigating vapor drive and trapped moisture
Moisture inside can cause problems too. Here’s how to manage it:
Inspect Interior: Check for leaks, condensation, or high humidity. Fix any issues.
Ventilation: Ensure proper airflow. Exhaust fans, open windows help dry out walls.
Exterior Exposure: Consider sun, wind. South-facing walls need more protection from heat and moisture drive.
When to delay work for substrate drying or remediation
Sometimes you gotta wait. Here’s when:
Recent Wetting: If walls are wet from rain, snow, or irrigation, wait until dry.
Moisture Readings: Use a moisture meter. If readings are high (above 15-20% for CMU), wait and re-test.
Efflorescence: White powder on surface means moisture is moving through. Wait, clean off, and test again.
Tools, Materials Checklist, and Safety Considerations
Assemble a practical set of tools for testing and prep, plus PPE for the job. Include items for cleaning, surface prep, and adhesion checks. Plan for safe handling of materials and adequate ventilation where needed.
Review permit requirements and hazardous-material concerns that may apply to your project. Keep a checklist handy to verify you have all essentials before you start. When in doubt, consult local regulations and the material manufacturers for safety guidance.
Essential tools for inspection and testing
Before you start, gather these tools to inspect your painted concrete block (CMU) and test adhesion.
- Moisture meter: Check for excess moisture that can cause delamination. Aim for readings below 15%.
- Scraping tool: Gently remove paint to expose the CMU surface, ensuring it’s sound and clean.
- Pull-off tester: Perform adhesion tests (ASTM D4541) to ensure paint-to-CMU bond strength is adequate for stucco application. Aim for 200-300 psi.
- Mock-up area: Create a small test patch to trial primers, bonding agents, and stucco mixes before full-scale application.
- Specialist hire: If tests are inconclusive or you’re unsure, consult a professional for expert advice.
Quick rule: Don’t skip testing. It’s the key to preventing delamination and costly rework.
Materials and consumables for prep and stucco application
Use this checklist to ensure you have all necessary materials for preparing your painted CMU and applying stucco.
- Primer: Select a suitable primer (see earlier section) and follow manufacturer’s guidelines for application. Aim for 2 coats, allowing adequate drying time between applications.
- Bonding agent: Apply a compatible bonding agent to enhance adhesion between the primer and stucco. Follow manufacturer’s mixing and application instructions.
- Lath: Choose appropriate lath (e.g., expanded metal, fiberglass) and fasteners for your wall type and size. Ensure they’re compatible with your chosen stucco system.
- Stucco mix components: Gather materials for your scratch coat (e.g., cement, sand, aggregate, additives) and finish coats (e.g., cement, lime, sand, water). Follow manufacturer’s mixing ratios.
Quick rule: Always confirm product compatibility and follow storage/handling instructions to avoid waste and poor performance.
Health, safety, and environmental precautions
Safety should be your top priority. Follow these guidelines to protect yourself and the environment during prep and application.
- Respirator: Wear a respirator rated for lead and other hazardous particles when removing old paint or coatings that may contain lead.
- Dust control: Use water sprays, containment sheets, or other methods to minimize dust generation during prep and application.
- Lead/old-coating removal containment: Isolate work areas to prevent contamination of other parts of your home. Follow local regulations for lead-safe practices.
- Waste disposal: Dispose of waste materials, including old paint and stucco mix remnants, according to local regulations. Never pour liquids down drains without proper treatment.
- Permit check: Ensure you have the necessary permits for any work that may affect structural integrity or require inspections (e.g., lath attachment, flashing).
Quick rule: Always consult local regulations and follow safety guidelines to protect yourself and the environment.
Conclusion
You’ve got a practical path to durable stucco over painted CMU, with safety and long-term look in mind. Start with a small, visible test area, confirm moisture and drainage conditions, and pick primers and bonding systems that match the surface you actually have. Don’t skip the prep or the adhesion checks, because failure usually shows up as delamination after the first season big rain or freeze cycles.
First, assess the painted block and run the adhesion tests you described, then clean the surface and scrub away any loose paint or contaminants. Next, verify system compatibility, choose the right primer or bonding agent, and lay out the lath and scratch coat plan before you mix anything. Apply in the proper weather window, keep moisture in check, manage drainage, and follow the recommended sequence from scratch coat to final stucco. Do a small trial section and check results before scaling up.
Avoid these common missteps: painting over suspect or deteriorated paint without proper prep, skipping a test patch, or forcing a bond coat when moisture or surface conditions aren’t right. Always wear eye and skin protection, use ladders and scaffolding safely, and keep surfaces dry during bonding and curing. Don’t rush cure times or skimp on flashing, drainage, or moisture barriers.
If the block or finish shows signs of uncontrolled moisture, persistent delamination risk, or you’re unsure about primer compatibility or system components, call a professional. When in doubt, pause and verify the plan with a pro before you commit to the full job. Stay deliberate, stay safe, and you’ll land with a solid, durable finish that lasts.
FAQ
How can I spot early signs that painted CMU may fail after stucco is applied?
Look for bubbling, cracking, or paint flaking under the surface. If the paint shows signs of poor adhesion or soft edges, it’s a red flag before you start work.
Check for damp spots or musty smells near the wall. Moisture problems multiply delamination risk, so address those first.
What should I do if I notice moisture or efflorescence on the painted block before stucco?
Address moisture sources and clean off any soluble salts you find. Document the surface, then follow the manufacturer’s guidance for moisture mitigation and surface prep.
Don’t skip moisture steps or rely on a quick fix. Delamination often follows hidden moisture paths, not visible surface grime alone.
How do I choose between primers and bonding agents for a painted CMU surface?
Read the product label for compatibility with painted concrete and stucco systems. Look for guidance on adhesion to painted substrates and any surface prep notes.
If you’re unsure, contact the manufacturer or check local rules for approved pairings. Do not mix products unless the labels explicitly allow it.
When is it safe to proceed with stucco application after cleaning and prep?
Only proceed once the surface is clean, dry, and free of active paint failure. Confirm the wall shows no remaining adhesion problems and that moisture concerns are addressed.
If in doubt, pause and re-check the prep steps or run through a small test area to verify the system bonds well. Safety first, then finish.