
Introduction
Stringline setup for straight block walls is the method of using posts and batter boards to mark a straight line and guide brick or block alignment. It helps you keep the wall edges true as you work from one end to the other. You’ll plan the layout, set up a taut line, and verify the line stays straight during the build.
Set the posts and boards in solid, well-placed anchors and run a string tight between them to define the line. As you build, check the line frequently and make small adjustments to correct any drift or wobble. If you notice a discrepancy, pause to reassess the posts, batter boards, and string tension before continuing.
Key takeaways
- Align posts and batter boards precisely to maintain a true stringline.
- Tension the stringline steadily and check for sag before laying blocks.
- Verify level and plumb references at each course to avoid drift.
- Use batter boards and stakes outside control joints; wear eye protection.
- Document and correct misalignments promptly to prevent compounding errors later.
- Follow manufacturer guidance for tools, avoid over-tensioning to protect components.
Table of Contents
- Introduction
- Key takeaways
- Why a Stringline Matters for Straight Block Walls
- Tools and Materials Checklist
- Setting Posts for Stringline
- Batter Boards: Setup and Use
- Installing and Tensioning the Stringline
- Laying Block Courses to the Stringline
- Fast Corrections and Troubleshooting
- Visual Checkpoints and Quality Control
- Conclusion
- FAQ
Why a Stringline Matters for Straight Block Walls
The stringline serves as a visual and physical reference for alignment across the wall length. It helps achieve consistent line, plumb, and beat-for-beat straightness during block placement. Using a stringline can speed up setup and reduce rework by clearly defining the layout. When a wall runs long or around corners, a stringline is often the preferred method for maintaining a continuous reference.
Think of the stringline as both a guide and a lockable reference. It makes it easier to transfer offsets and heights from the plan to the actual wall. If you need confirmation on a specific technique or tolerance, check the product label, manufacturer instructions, or local building rules for guidance.
Accuracy goals and tolerances
When building straight block walls, it’s crucial to set realistic accuracy expectations. While perfection is unattainable, aiming for a consistent level of precision ensures your walls are both functional and aesthetically pleasing.
Consult your project plans or local building codes to determine the required tolerance for your specific project. If not specified, aim for a conservative tolerance of 1/8 inch per 10 feet. This allows for minor variations without compromising the wall’s integrity or appearance.
During setup, use a level or laser to verify both the stringline’s alignment and the wall’s plumbness. Regularly recheck these measurements throughout construction to ensure your walls remain within tolerance.
Common mistakes include relying on visual estimates alone or neglecting to recheck alignments after adjustments. Always double-check your stringline’s position and adjust as needed to maintain accuracy.
When not to rely on a stringline
A stringline is an invaluable tool for most straight block wall layouts, but it may not be sufficient in certain situations. Understanding these limitations helps you choose the right tools for the job and avoid potential inaccuracies or hazards.
For walls spanning more than 20 feet, consider using a laser level or templates to maintain accuracy over long distances. Similarly, for walls with significant curves, these alternative methods may provide better results.
In extreme wind conditions (over 15 mph), postpone layout work until the wind subsides. Wind can cause stringlines to move, compromising your layout’s accuracy and potentially creating safety hazards.
Before starting any layout work, assess job site conditions, wall length, and design complexities. If initial setup is compromised due to these factors, re-evaluate your approach and choose appropriate tools for the task at hand.
Tools and Materials Checklist
Assemble a core set of tools for stringline setup: stringline material, posts, and batter boards, plus a level, tape measure, and stakes. Have a plumb bob or laser level to verify lines perpendicular to edges. Keep a mallet, tie wire, and chalk for marking anchor points, along with a utility knife for string repair.
Choose durable posts and line material suited to your project, and inspect components for wear before use. Maintain strings and hardware to prevent fraying or loosening during tensioning. When selecting items, reference supplier labels, manufacturer instructions, or local building guidelines for compatibility and limits.
Choosing string and line tensioners
Before setting up your stringline, ensure you have the right tools to keep it taut and accurate.
- Braided nylon string: Durable, weather-resistant, and suitable for most jobs. Check for UV protection for long-term use.
- Galvanized steel wire: Ideal for heavy-duty applications where extra strength is needed. Ensure it’s properly coated to prevent rusting.
- Plastic-coated string: Provides a grip-friendly surface, reducing the risk of injuries. Check for abrasion resistance if using with sharp edges.
- Cordless tensioners: Easy-to-use and convenient for quick adjustments on-site. Ensure they’re fully charged before starting work.
- Handheld tensioners: Simple, cost-effective, and suitable for smaller projects. Check for a comfortable grip to minimize hand fatigue.
- Spring-loaded tensioners: Ideal for maintaining consistent tension over long distances. Ensure they’re properly calibrated to prevent string breakage.
- Quick-release tensioners: Useful when frequent string changes are required. Check for a secure locking mechanism to prevent accidental release.
- Tension gauges: Optional tools that help maintain consistent tension across the line. Consider renting or borrowing if needed.
Quick rule: Regularly inspect and replace worn or damaged strings to maintain accuracy.
Posts, stakes, and batter-board materials
The right materials ensure your stringline is stable, accurate, and long-lasting.
- Pressure-treated lumber: Rot-resistant and suitable for outdoor use. Check for the preservative retention level to ensure longevity.
- Composite materials: Durable, low-maintenance, and resistant to rot and decay. Consider their strength-to-weight ratio for stability.
- Concrete or metal posts: Highly durable and suitable for heavy-duty applications. Ensure they’re properly anchored to prevent movement.
- Reusable batter boards: Adjustable, allowing for easy relocation of the stringline. Check for sturdy construction to prevent warping or bending.
- Temporary wooden stakes: Inexpensive and suitable for small projects. Ensure they’re securely anchored in the ground to prevent movement.
Common mistake: Using weak materials can lead to cracking, staining, or a weak bond, causing your stringline to be inaccurate or unstable.
Measuring and marking tools
Accurate measurement and marking are crucial for a straight block wall. Here are the essential tools you’ll need.
- Tape measure: Essential for taking precise measurements. Consider one with an extended reach for hard-to-reach areas.
- Chalk line: Ideal for marking long, straight lines on walls or floors. Ensure the chalk is visible against the surface color.
- Line level: Helps create a perfectly horizontal line. Check for accuracy before use and adjust as needed.
- Laser level: Provides accurate, long-distance measurements. Consider renting or borrowing if you don’t need it frequently.
- Carpenter’s square: Useful for marking 90-degree angles. Ensure it’s properly calibrated to maintain accuracy.
Pro tip: Regularly calibrate and clean your tools to maintain their accuracy and longevity.
Setting Posts for Stringline
Position posts outside the wall footprint so the stringline remains clear of the blockwork as it goes up. Place posts at strategic intervals to support straight runs and ensure the line will clear the future wall thickness. Drive or anchor posts securely so they resist movement during tensioning.
Anchor the setup with secondary lines or guy wires if needed to maintain stability. Use batter boards to reference exact spacing and to help keep the line square to the wall. For any anchor method, verify with the manufacturer instructions or local rules if you are unsure about soil, wind, or frost considerations.
Post locations and spacing strategy
To minimize stringline sag and ensure easy access, position posts outside the wall footprint. Keep them close to the wall but not too close to avoid interference with construction activities.
For long runs, place posts every 6-8 feet along straight sections. At corners, place a post on each side, no more than 3 feet apart. If the wall length exceeds 20 feet, add intermediate posts to maintain stringline tension and accuracy.
Pro tip: Ensure posts are close enough for accurate reference but far enough from the wall to avoid construction interference.
Securing posts in different soils
Use appropriate anchoring methods based on soil conditions. In soft soil, use driven stakes or concrete footings. In firm soil, drive stakes deep enough. In rocky soil, brace posts with additional supports or use concrete footings.
Verify post stability by gently pushing and pulling; it should not move more than a few millimeters. If soil is unstable or loose, use concrete footings for secure anchoring.
Common mistake: If the post wobbles or moves, re-anchor using an appropriate method for soil conditions.
Removing or relocating posts safely
Remove or relocate temporary posts carefully to avoid disturbing established reference lines. Gently pull or dig around the post, and if it’s driven, use a sledgehammer and a crowbar to remove it without displacing nearby soil.
Before removal, ensure no other construction activities rely on the post’s location. If the post is driven deep into the ground, use a post puller or carefully dig around the post before removal.
Common mistake: If the reference line shifts, re-establish it using nearby stable points and adjust stringline tension accordingly.
Batter Boards: Setup and Use
Batter boards transfer the layout lines from the posts to a stable reference platform. They also help maintain offsets from the wall footprint. Place batter boards outside the active work zone so they don’t get obstructed by blocks or mortar.
Install the boards level and square, then run strings to the posts to establish the reference height and alignment. Tie into the boards with care to avoid slippage, and recheck dimensions after any adjustment. If you’re unsure about their placement, consult the manufacturer instructions or local guidelines for proper offsets.
Building Simple Batter Boards
To create a stable DIY batter board assembly, start by selecting straight, flat boards. Common sizes are 2x4s or 1x6s, but check your specific needs.
Secure the boards together using braces at right angles. Ensure they’re tight and square using a framing square or laser level. Check for square before proceeding.
For added stability, especially in windy conditions, reinforce with additional bracing if boards warp over time. Regularly check and adjust your batter boards to maintain their integrity.
Transferring Reference Lines with Batter Boards
Batter boards help carry corner lines and offsets across the site accurately. Position them so they straddle your layout line, maintaining the desired offset.
Use a stringline tensioner to keep the string taut. Confirm line alignment with existing marks or structures. If the line doesn’t reach, adjust batter boards or use extensions.
Maintain consistent batter board height for accurate transfers. Regularly check and recheck lines to ensure they remain aligned as work progresses.
Maintaining Batter Board Geometry During a Build
Routine checks help keep batter boards square and plumb. Inspect them after heavy equipment use, wind, or rain. Check for squareness using a framing square or laser level.
Ensure braces remain tight. If batter boards shift out of position, re-secure braces and recheck for squareness. Temporarily remove them if site conditions become too unstable.
Regular checks ensure your layout lines remain accurate throughout the build process. Recheck and correct any shifts to maintain precision.
Installing and Tensioning the Stringline
Attach the string to the posts at the planned height and pull it tight to eliminate slack. Check that the string is parallel to the intended wall face and clear of any obstructions. Protect the string from cement and debris as you work.
Secure the string with knots or fasteners and recheck tension as you proceed. Re-tension if the line loosens, then verify that the line remains level with the reference points. For any height or tension questions, refer to the manufacturer instructions or product data sheets for guidance.
Techniques for tight, level lines
To achieve consistent stringline tension and level, use the following techniques:
Knot technique: Tie strings off using a secure knot like the figure-eight or taut-line hitch to prevent slippage. Ensure knots are tied at the same height on each stake.
Turnbuckles or ratchets: Use these tools to tension your stringline. Turn slowly and evenly in both directions to distribute tension uniformly. Regularly check and adjust tension as needed.
Mid-support tricks: For long runs, add mid-string supports like temporary nails or screws into studs (if available) to reduce sag and maintain tension. Ensure these are removed once the stringline is no longer needed.
Setting string height and offsets
Positioning your string correctly relative to the block face and mortar joints ensures accurate block placement:
Measure from the floor to where you want the bottom of your first course (row) of blocks. This is your offset. Mark this measurement on your stakes.
Attach strings at the marked height, ensuring they are level using a line level. Verify stringline height with sample blocks or manufacturer data to ensure proper fit.
Adjust string height and re-tension: If blocks aren’t fitting properly, adjust your string height and offsets accordingly, then re-tension your strings.
Using line levels and lasers together
Cross-checking with both a line level and laser helps minimize cumulative error in long stringline runs:
First, use your line level to ensure strings are level. Then, use your laser to quickly check for any high or low points along the stringline.
Regularly cross-check stringline level with both tools at intervals throughout the build process. If discrepancies are found between line level and laser, recheck both tools and adjust the stringline if necessary.
Long runs off-level: If long runs are consistently off-level, recheck and readjust using both tools to maintain a consistent reference line.
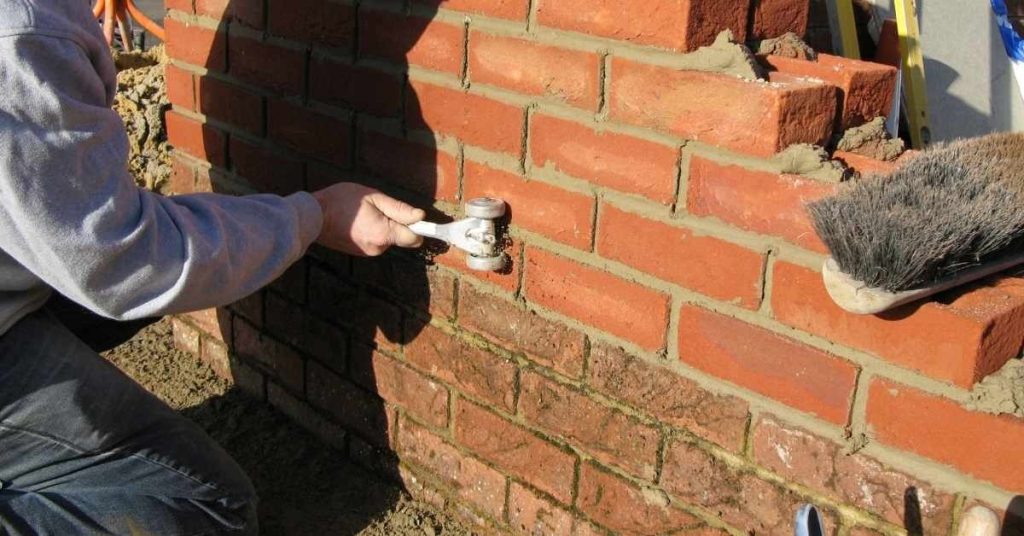
Laying Block Courses to the Stringline
Bedding blocks to the stringline keeps the first course consistently aligned with the reference. Start with the first row carefully, ensuring each block sits squarely against its neighbors and the line. Maintain even mortar joints as you move along the wall.
Work steadily toward the stringline, adjusting as necessary to stay on the line. If a block drifts out of plumb or the line shifts, pause to re-check and re-seat blocks. For any tolerance questions, verify against plan dimensions or local building instructions before proceeding.
First Course and Starter Blocks
The first course sets the tone for your entire wall. Ensure accuracy by securing it directly to the stringline as your primary reference.
At corners, use a 45-degree angle to set starter blocks precisely. Align them with the stringline to maintain straightness throughout construction.
Pro Tip: Double-check batter board geometry before installing the first block and verify the stringline is level and plumb before starting.
Keeping Courses Straight and Plumb
Maintain wall alignment by performing routine checks as you lay each course. Tap blocks into place, ensuring they’re fully seated and aligned with the stringline.
Regularly check for level and plumb using line levels and lasers to maintain accuracy. If the stringline becomes slack, re-tension or reposition it.
Common Mistake: If blocks are out of alignment, remove and reset them using the stringline as a guide.
Dealing with Interruptions and Junctions
Preserve wall alignment at complex sections by using the stringline to align blocks at junctions. Ensure they’re plumb and measure and mark for openings, returns, and corners before cutting.
When meeting another wall or structure, use a right angle tool to maintain 90-degree alignment. If alignment is off, remove and reset blocks using the stringline as a guide, and recheck measurements.
Stake: Maintaining wall alignment at complex sections is crucial for a successful build.
Fast Corrections and Troubleshooting
Address sagging lines, out-of-plumb blocks, or misaligned corners quickly to avoid cascading errors. Re-tension or reposition the line as needed to restore accuracy. Keep a calm pace to avoid forcing blocks into misalignment.
If lines or corners drift, re-anchor supports and re-check with the reference points. Corrective steps should be safe and within the project’s tolerances; consult product labels or manufacturer instructions if you are unsure about an adjustment.
Correcting a Sagging or Loose Stringline
A loose or sagging stringline can lead to inaccurate walls. To correct this:
Re-tension the line by adjusting the turnbuckles at both ends until it’s taut but not overly tight.
If re-tensioning doesn’t solve the problem, add temporary mid-supports, such as stakes or clamps, to keep the line level and straight. Inspect the line, supports, and posts for wear or damage.
If the line remains loose after these steps, reset the posts or replace the line entirely to ensure accurate wall construction.
Fixing an Out-of-Line Course
A mislaid course can compromise wall integrity. To fix this:
For minor misalignments, lift and relay the blocks to re-establish the correct line. Ensure the new course is level and plumb.
For major issues, consider either shimming or partially dismantling the course. Shimming involves inserting thin wedges under misaligned blocks to realign them. Partial dismantle requires carefully removing and replacing blocks to correct the line.
If misalignment is extensive, it might be best to dismantle the entire course and relay it from scratch to ensure accuracy.
Emergency Measures for Wind, Traffic, or Damaged Batter Boards
Uncontrolled layout can lead to inaccurate walls. In case of damage or movement:
Temporarily brace the batter boards using additional stakes or supports to prevent further movement. If possible, lock-off reference points by transferring lines from the batter boards to permanent marks on the ground.
If damage is extensive or layout is severely compromised, stop work immediately. Inspect all layout components for damage or movement. Re-establish accurate layout controls by resetting batter boards, transferring lines, and tensioning the stringline properly.
Visual Checkpoints and Quality Control
Establish a daily checklist for visual inspections of line, level, and plumb along the wall length. Mark any deviations and plan corrections before laying more course blocks. Use milestone checks at corners and transition points to confirm consistency.
Document observed tolerances and corrective actions to catch trends early. When in doubt, verify expectations with manufacturer instructions or local rules to ensure compliance and durability.
Quick site checks at start and end of day
Conduct these checks daily to ensure your stringline setup remains accurate and stable.
- String tension: Check that the stringline is taut and maintains its tension throughout the workday. If it’s loose or sagging, tension and secure it immediately.
- Batter-board stability: Ensure batter boards are level, plumb, and firmly planted in the ground to prevent movement.
- Reference marks: Verify that reference marks on the wall or floor are still visible and accurate.
- Sample course alignment: Check the first few courses against the stringline to ensure they’re straight, level, and plumb.
- Stringline integrity: Inspect the stringline for any kinks, frays, or other damage that could affect its accuracy.
- Batter boards: Check batter boards for signs of warping, rotting, or other defects that might compromise their stability.
- Wind and traffic: Assess the impact of wind and traffic on your setup. If conditions have changed significantly since initial setup, recheck and adjust as needed.
- Stringline height and offset: Confirm that the stringline is at the correct height and offset for each course.
Quick rule: Always address any identified problems before proceeding with work to maintain accuracy and prevent costly rework.
Measuring and documenting deviations
Regularly measure and document any deviations from the stringline to ensure timely corrective actions.
- Stringline alignment: Compare the stringline’s position with initial setup marks using a straightedge or laser tool.
- Course deviation: Measure the distance between courses and the stringline. Any variation should be noted and addressed.
- Plumb lines: Check plumb lines at each end of the wall to ensure they’re still accurate and haven’t shifted.
- Level lines: Verify that level lines are still accurate and haven’t moved due to settlement or other factors.
- Joint uniformity: Inspect mortar joints for consistency in width, depth, and alignment.
- Course straightness: Use a straightedge to check if courses remain straight. Any bowing or twisting should be noted.
- Documentation: Record all deviations, their causes, and corrective measures taken for future reference and improvement.
Quick rule: If deviations exceed acceptable limits, investigate the cause and implement corrective measures promptly to maintain wall straightness and plumb.
Final inspection pointers before finishing
Before applying finishes, conduct these checks to ensure overall quality and consistency.
- Straightness: Inspect all courses for straightness using a straightedge or laser level. Any bowing or twisting should be corrected.
- Plumb: Check that each course is plumb using a plumb bob or laser tool. Make any necessary adjustments.
- Level: Verify that all courses are level using a level tool. Address any variations in height.
- Joint uniformity: Inspect mortar joints for consistency and evenness across all courses. Repair any defective joints.
- Missing corrections: Recheck previous correction notes to ensure none were missed or incomplete.
- Wall surface: Examine the wall’s surface for any cracks, chips, or other defects that need repair before finishing.
Quick rule: Address and correct any significant issues found during final inspection to maintain high-quality standards before applying finishes.
Conclusion
A precise stringline keeps block walls straight, plumb, and durable, reducing rework and protecting safety on the job site. A steady, methodical setup now prevents costly mistakes later and helps you finish with a neat, professional appearance.
Check that posts are solid and square, batter boards are set and level, the stringline is tensioned within safe limits, and you test the layout with a dry run before laying any block; proceed in small steps, rechecking after every few courses and at key corners, while keeping your eye on plumb, level, and alignment throughout the process. Safe setup and verify alignment should guide every adjustment, and always wear proper PPE when handling tools and materials.
Common mistakes to avoid include over-tensioning the stringline, which can bow blocks and mask misplacement; neglecting to recheck after moving posts or boards; and skipping a final visual check before each course, which invites cumulative errors. Keep work within visible, daylight conditions, do not force a line into misaligned blocks, and always test a small area first to confirm the system behaves as expected.
If walls are tall, complex, or site conditions are challenging, or if you notice persistent misalignment despite careful adjustments, consider bringing in a professional for a quick check or a second set of eyes. Stay patient and steady, and use the checks you’ve learned to keep control of the build from start to finish.
FAQ
How do I recheck alignment after a post shift or stringline sag?
Recheck the stringline against reference points on both ends and at midspan. If it shows a deviation, resecure the posts and re-tension the line according to the manufacturer’s instructions.
What should I do if the stringline sags or becomes slack during setup?
Tighten the line evenly and recheck the distance to nearby reference points. If the sag recurs, inspect the posts, batter boards, and line hardware for wear or movement and correct as needed.
How can I account for uneven ground or slopes when placing posts?
Plan for additional batter boards and reference points on the higher and lower sides. Adjust post height consistently and verify the stringline readings from both ends and midspan to maintain a straight line.
When should I retire a stringline and start fresh?
If the line repeatedly stretches, kinks, or cannot be tensioned true without slipping, replace or reinstall the stringline setup. Check all connectors and posts for damage and ensure they are firmly anchored before starting anew.