

Introduction
Sanding and burnishing polished plaster is the process of smoothing and finishing the surface to remove trowel tracks and haze. This is done after the plaster has cured enough to work but while it’s still workable, using gentle abrasion and polish. The goal is a uniform, matte or soft sheen without gouges.
Before you start, clean the area and inspect the finish to spot trowel tracks and haze. Choose a mild abrasive and a soft pad or cloth, and do a light pass in consistent directions. If the haze won’t disappear, review the plaster instructions for rework and consider a burnish step or a fresh pass in the same direction.
Key takeaways
- Sand lightly only where tracks are visible; avoid over-sanding pristine plaster.
- Burnish with final pass after dust-removal to reduce haze risk.
- Inspect trowel marks under raking light to guide repair steps.
- Use compatible glaze or finish coats to match sheen without gaps.
- Keep dust control: seal surfaces, wear mask, and cleanup thoroughly.
- Document patch sequence to avoid creating new haze during repair.
Table of Contents
- Introduction
- Key takeaways
- When to Sand Vs When to Burnish
- Causes of Trowel Tracks and Haze
- Tools and Materials Checklist
- Step-by-Step Repair Workflow (no-Haze Approach)
- Preventing Haze While Fixing Tracks
- Visual Checkpoints and Testing Protocol
- Material Specs and Compatibility Explained
- Conclusion
- FAQ
When to Sand Vs When to Burnish
Begin by evaluating the surface for signs of wear, gloss level, and the depth of tracks. Decide whether the look you want requires refining or a more aggressive smoothing action. Aim for the least intervention that achieves the desired sheen without creating haze.
Always cross-check the plaster product’s instructions, labels, or data sheets to confirm which method is recommended. If in doubt, consult the manufacturer guidelines or a qualified pro for compatibility and safety notes.
Signs that sanding is appropriate
Sanding is your best bet when you see:
Raised trowel ridges. If you can feel them with your fingers, they’re too prominent for burnishing alone.
Cured ridges catching light. These are visible even if they’re not tactile. Sanding will smooth them out.
Localized roughness or imperfections. If an area feels rougher than the rest, sand it to level it with the surrounding surface.
Signs that burnishing is appropriate
Burnishing works well when you’ve got:
Faint trowel marks. These are barely visible and won’t require aggressive correction.
A slight surface texture without loose particles
Finishes that respond to compression rather than material removal. Some plasters, like microcements or thin setups, can be burnished for a deeper sheen.
When you must recoat or patch instead
Sometimes, surface correction isn’t enough. You’ll need to:
Recoot if there’s deep staining or a consistent lack of sheen. This means the entire surface needs another coat.
Skim or patch if you’ve got damage, like cracks or gouges. These need to be filled and leveled before any correction.
Causes of Trowel Tracks and Haze
Root causes include the temper of the mix, its set stage, and the pressure applied during troweling. Timing and technique also play a big role in leaving imprints or uneven sheen. Environmental factors like humidity and airflow can drive haze formation as the finish cures.
Review the product guidance to understand how these factors are addressed by the manufacturer. Look for notes on workability, cure times, and environmental limits to prevent recurrence.
Trowel Technique and Pressure Errors
Using the trowel incorrectly can leave visible tracks. Here are common mistakes to avoid:
- Incorrect angle: Troweling at too steep an angle leaves ridges.
- Inconsistent pressure: Varying pressure creates uneven compaction and marks.
- Improper passing sequence: Skipping passes or not allowing the plaster to rest can cause tracks.
To avoid these, maintain a consistent 45-degree angle, apply even pressure, and follow the recommended passing sequence.
Material and Mix Issues
The quality and preparation of your materials greatly impact the final result.
- Overworking: Excessive mixing can cause the plaster to lose its plasticity, leading to tracks.
- Incorrect water/content ratio: Too much or too little water affects workability and can leave marks. Look for a 3:1 sand-to-cement ratio for most plasters.
- Incompatible additives: Some additives can weaken the plaster, causing it to crack or stain under pressure. Always check compatibility before use.
Proper material preparation and selection are key to preventing trowel tracks.
Environmental and Drying Factors
Temperature, humidity, and drying conditions can all affect the appearance of your polished plaster.
High temperature: Rapid drying can cause surface haze or bloom. Keep the room temperature between 60-75°F (15-24°C) during application and curing.
Low humidity: Dry conditions can cause the plaster to dry too quickly, leading to cracks and marks. Maintain a relative humidity of at least 50% in the room.
Monitor these environmental factors to ensure your polished plaster cures evenly and without defects.
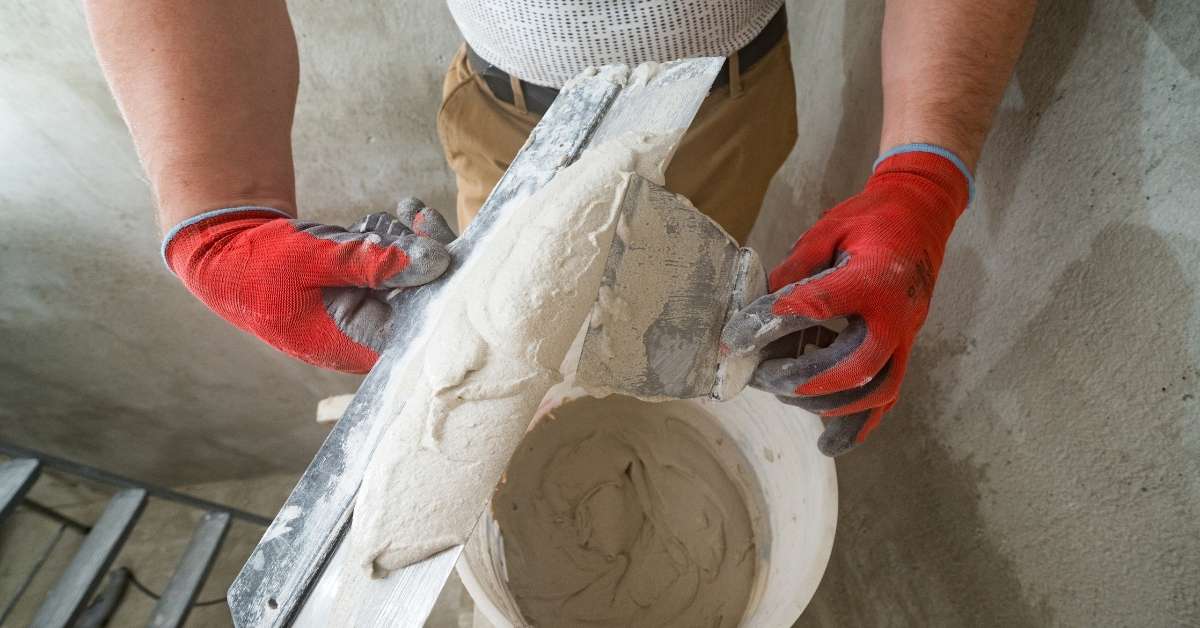
Tools and Materials Checklist
Gather abrasives, pad textures, and burnishing tools appropriate for the plaster type. Include finishing cloths, mild cleaners, and protective gear such as eye protection and a respirator. Ensure you have a clean, stable workspace for controlled correction.
Verify compatibility by reading the plaster product label or data sheet before mixing or applying any tool or chemical. If the documentation isn’t clear, call the manufacturer or consult the product fitter’s guidance for DIY use.
Choosing abrasives and pads
Before you start, ensure you’ve got the right tools for the job. Here’s a checklist to help you choose the best abrasives and pads.
- Very fine sandpaper: 220-grit or finer. It’s gentle on plaster yet effective in removing trowel tracks.
- Nonwoven pads: For burnishing, use soft, non-abrasive pads designed for polished plaster.
- Check manufacturer guidance: Always verify your chosen abrasives and pads are suitable for your specific plaster product.
- Avoid coarse grits: Using sandpaper coarser than 120-grit can damage the plaster finish.
Quick rule: Start with the finest grit that still effectively removes trowel tracks to avoid excessive sanding.
Burnishing tools and manual methods
For a haze-free finish, use the right burnishing tools and techniques. Here’s what you need to check.
- Handheld burnisher: A soft, non-abrasive pad attached to a handle for easy application of pressure.
- Soft cloths or microfiber buffs: For final polishing and removing any remaining haze.
- Mechanical polishers (optional): For larger areas, use a low-speed orbital sander with a nonwoven pad. Keep speed below 3000 RPM to avoid overheating.
- Pressure control: Apply even pressure across the surface to avoid creating new marks or haze.
Quick rule: Less is more with burnishing – use light, even pressure and don’t overdo it.
Cleaning and finishing supplies
Proper cleaning and finishing ensure a long-lasting, beautiful plaster surface. Here’s what you need to consider.
- pH-neutral cleaner: Use a cleaner specifically designed for polished plaster to avoid damaging the finish.
- Tack cloths: To remove dust and debris before final finishing.
- Sealer or wax (optional): Apply a suitable sealer or wax to protect the surface and enhance its appearance. Always test for compatibility first.
- Avoid harsh chemicals: Harsh cleaners can damage the plaster finish, so always use appropriate cleaning products.
Quick rule: Always test sealers or waxes on a small, hidden area first to ensure compatibility with your specific plaster product.
Step-by-Step Repair Workflow (no-Haze Approach)
Start with a quick assessment of the affected area and set up containment to minimize dust. Use a dry approach where possible and protect surrounding surfaces. Gather your tools so you can move through the sequence without backtracking.
Proceed with a staged refinement that targets the tracked lines first, then blends the corrected zone to match the surrounding finish. Check the plaster product instructions for any specific finishing steps or clean-up requirements to avoid haze.
Step-by-Step Repair Process
The following steps guide you through a no-haze approach to repairing trowel tracks on polished plaster. Safety, efficiency, and minimizing dust are key.
- Preparation: Check the area for any loose or damaged material. Ensure the plaster is fully cured (at least 28 days).
- Safety first: Wear appropriate PPE including safety glasses, gloves, and a respirator to protect against dust.
- Gather tools: Have your sanding machine, abrasives, burnishing tool, cleaning supplies, and sealant ready.
- Perform the repair: Follow the workflow outlined in this section – assess, mask, prepare, gently sand, burnish, and finish.
- Final checks: Inspect your work for any missed spots or imperfections. Clean up and dispose of waste responsibly.
Assess, Mask, and Prepare the Area
Before starting, visually inspect the area for trowel tracks. Test a small, hidden patch to ensure your repair method works with your specific plaster.
Masking adjacent surfaces protects them from dust and sanding debris. Use painter’s tape and plastic sheets for this.
Ensure the plaster is properly cured before starting work. If it feels cool or damp, wait a few more days to allow it to dry fully.
Gentle Sanding Workflow
Sanding is about carefully removing the top layer of plaster without creating new imperfections. Use a fine-grit abrasive (e.g., 2000 grit) and a sanding machine with minimal pressure.
Work in light, controlled passes, following the direction of the trowel tracks. This helps prevent smearing or overworking the plaster.
Use dust extraction to minimize haze. Regularly check your progress and stop if you see signs of excessive material removal or hazing.
Burnishing and Finishing Workflow
Burnishing compresses the plaster surface, bringing out its natural sheen. Start with light passes, gradually increasing pressure as needed.
Work in the direction of the trowel tracks, using a smooth, even motion. Regularly check your progress for any missed spots or imperfections.
Once satisfied with the burnished finish, immediately apply a suitable sealant to protect the repaired area and blend it with the surrounding plaster.
Preventing Haze While Fixing Tracks
Work in conditions that support stable drying and control dust with appropriate barriers. Limit water use and avoid overworking the surface to keep the finish consistent. Take care not to reintroduce marks during the correction sweep.
Adhere to process controls such as sequence, tool selection, and proper cloth application. After finishing, follow the product guidance for curing and any recommended screening or buffing steps to reduce haze risk.
Control of pressure, angle, and motion
To prevent haze while fixing tracks, maintain consistent light pressure when sanding. Too much pressure can disturb the surface and create haze.
Angle your trowel or hand at 45 degrees to the surface. This helps distribute pressure evenly and avoids creating deep scratches that could cause haze.
Use smooth, overlapping motions. Avoid circular motions as they can create swirl marks and contribute to haze formation.
Dust management and moisture control
Use a dust extractor or wet sanding (with a damp, not wet, cloth) to minimize dust. Dust particles can settle into the surface and cause haze.
After sanding, use a tack cloth to remove any remaining dust. This simple step can significantly reduce haze.
Avoid wet sanding on cured plaster as it can saponify binders, leaving residues that cause haze. Always test in a small area first.
Correct timing relative to cure stage
Wait for the plaster to reach the right cure window. Sanding too early can disturb uncured material, while sanding too late can create haze from over-curing.
Test a small, hidden area first. This allows you to check if the plaster is ready and gives you a chance to adjust your technique if needed.
After sanding, wait for the recommended time before burnishing. This ensures the surface is ready for the final step without creating haze.
Visual Checkpoints and Testing Protocol
Create a quick pre-correction visual check for gloss level, tracks, and uniformity. After correction, re-inspect for any residual lines, halos, or dull spots. Use a simple patch test protocol on an inconspicuous area to confirm success before proceeding widely.
Document what you see at each stage and note any deviations from the expected finish. Refer to the plaster product data sheet for approved test methods and acceptable results.
Small-area test protocol
Before treating larger areas, always test your chosen method on a small patch. This helps avoid costly mistakes.
- Choose spot: Select an inconspicuous area to minimize visibility of the test.
- Prepare surface: Clean and prep the test area as you would the entire job, ensuring consistency in results.
- Apply method: Use your chosen sanding or burnishing technique on the test patch.
- Observe for haze: Check for any signs of unwanted hazing or bloom immediately after application and at regular intervals over the recommended observation period (usually 24-48 hours).
- Check sheen change: Ensure the sheen level matches the desired finish. Too much sheen could indicate haze.
- Test adhesion: Gently touch the area to ensure no flaking or peeling, indicating poor adhesion.
- Compare with original: Compare the test patch with the surrounding untreated area to confirm any differences are acceptable.
- Document results: Note down your observations for future reference and to refine your technique if necessary.
Quick rule: If in doubt, wait. Observe the test patch over time before proceeding with larger areas.
How to read the surface for haze vs sheen change
Differentiating between unwanted hazing and acceptable changes in sheen is crucial for a successful finish.
- Cross-lighting: Inspect the area using cross-lighting (e.g., at an angle) to reveal any haze, which will appear as a milky or frosty patch.
- Touch test: Gently touch the area with clean fingers. Haze feels rough or gritty, while sheen change should feel smooth.
- Compare with original: Compare the treated area with the untreated surface to confirm any changes are as expected.
- Avoid direct light: Do not rely on direct lighting, as it can mask haze and give a false sense of sheen change.
- Consistency is key: Ensure your technique and conditions remain consistent across the entire job to avoid unwanted variations in finish.
Quick rule: If you’re unsure, wait. Observe the area over time and under different lighting conditions before making a final assessment.
Material Specs and Compatibility Explained
Clarify the differences between polished plasters, lime-based plasters, and gypsum or Venetian finishes and how they respond to smoothing or burnishing. Each type has its own tolerance for correction methods and sheen behavior. Always verify method suitability with the product documentation.
Check product data sheets for what corrections are permitted, recommended tools, and any cautions about haze or staining. When in doubt, contact the manufacturer or a qualified installer for guidance on compatibility.
Key manufacturer specs to check
Before you start, grab the product data sheets. They’re your best friend here.
First, look for recommended abrasives. Some plasters want fine grits, others can handle coarser. Don’t guess, check.
Next, find out about compatible cleaners and sealers. Not all are created equal. Some will haze up your finish, others won’t play nice with the plaster at all.
Lastly, note down the cure times. You don’t want to mess with the surface too early or too late in the curing process.
Topcoat and sealer compatibility
Now, let’s talk about sealers and waxes. They’re not all created equal either.
Some will enhance your burnish or sand finish, others might cause haze or dullness. You don’t want that.
So, before you slather it on the whole surface, do a small test patch. Let it cure, then give it a gentle sand or burnish. See how it behaves? That’s your compatibility test.
Remember, compatibility is key. Don’t skip this step. It’ll save you a lot of trouble in the long run.
Conclusion
Fixing trowel tracks and haze isn’t guesswork. Use the no-haze workflow, test small areas first, and protect the surrounding finish so you don’t create new damage or costly fixes.
Start by checking material compatibility, then confirm you have the right tools, ventilation, and PPE, and run a quick test in a hidden or inconspicuous spot. If the test passes, proceed in the same calm, incremental way: fix the tracks, burnish or sand as appropriate, wipe clean, recheck with a light visual pass, and document any changes so you know what to do next if needed.
Common mistakes to avoid are rushing through steps, overworking the plaster, and ignoring safety. Keep work light, monitor heat and dust, and stop if you see edge chipping or pigment change. If you encounter stubborn haze, deeply set tracks, or mixed materials, call a professional rather than forcing a finish, and keep the project moving with a clear plan and steady pace. Stay practical, stay safe, and you’ll finish with a durable, even surface you can be proud of.
FAQ
How do I tell if sanding is creating more haze than it fixes trowel tracks on polished plaster?
Look at the reflected light in a raking light. If haze spreads or the surface dulls after sanding, you may need lighter touch or different technique. Check the product label and manufacturer guidance before proceeding with another pass.
What steps should I take before starting a repair to minimize haze after sanding?
Clean the surface thoroughly and remove dust. Mask surrounding edges if needed and keep dust down with a vacuum and damp cloth between passes. Follow the repair product instructions for surface prep and compatibility.
How should I choose the sanding approach to avoid hazing while fixing tracks?
Use the least aggressive method first and only move to finer steps if you see scratches. Check the plaster’s compatibility with your sanding tool and finish with a light, even pass. If unsure, verify with the product label or manufacturer directions.
What safety checks should I perform before mixing or applying any repair products on polished plaster?
Wear eye protection, a mask, and gloves. Ensure good ventilation and no ignition sources in the area. Read the product label and local rules for handling, mixing, and curing requirements before starting.