
Introduction
Repointing brick mortar is the process of renewing the mortar between bricks to restore structure, weatherproofing, and appearance. It involves removing deteriorated mortar and packing in new mortar that bonds to the bricks. This is a hands-on repair that requires choosing the right mix and applying it carefully to avoid damaging the units.
To match hardness, color, and texture, assess the existing mortar and use a compatible mix, applying small sections and cleaning as you go. Visual inspections and a simple maintenance schedule help catch crumbling joints early and prevent damage to the brickwork.
Key takeaways
- Repointing prevents water intrusion and brick deterioration by sealing joints properly.
- Assess and match mortar hardness, permeability, and texture to existing units.
- Match color and tooling to preserve the wall’s visual uniformity with original mortar.
- Follow safety guidelines; wear eye/respiratory protection during dust-generating joint work.
- Develop a realistic plan for material selection, cost estimates, and inspections.
- Hire a qualified professional for complex repairs and ensure project oversight.
Table of Contents
- Introduction
- Key takeaways
- Why Repointing Matters and When to Act
- Assessing Existing Mortar and Masonry Units
- Matching Mortar Properties: Hardness, Permeability, and Strength
- Color, Texture, and Tooling for an Invisible Repair
- Step-by-Step Repointing That Protects the Units
- Tools, Materials, and Mortar Mix Options Explained
- DIY Vs Hiring a Professional and Choosing a Contractor
- Timing, Budgeting, Inspections, and Common Mistakes to Avoid
- Conclusion
- FAQ
Why Repointing Matters and When to Act
Repointing helps transfer loads through the masonry and maintains wall stability. Missing or degraded mortar can shrink the system’s ability to hold bricks in place, leading to cracks, leaning, or bulging over time. Early signs deserve attention to avoid bigger repair costs later.
The right mortar choice supports historic character and reduces damp or efflorescence caused by mismatched mixes. Acting when gaps widen, units loosen, or dampness increases protects the structure and preserves appearance. Seasonal conditions also affect work quality and performance, so plan accordingly.
Common signs of mortar deterioration
Mortar plays a crucial role in maintaining the structural integrity and aesthetic appeal of your masonry. Regularly inspecting it helps ensure long-term preservation. Here are some visual and tactile cues that signal repointing is needed:
Visual Cues: Look for visible gaps, cracks, or missing mortar from a safe distance. These can indicate that the mortar has degraded and needs to be replaced.
Tactile Cues: Gently touch the mortar joints. If they feel crumbly or sandy, it’s a sign that the mortar is deteriorating and should be repointed. Additionally, check for rising damp indicators like efflorescence (white salt deposits) or moisture stains.
If any of these signs are present, prompt repointing is necessary to prevent further deterioration.
Repointing vs brick repair or replacement
Before you start repointing, it’s essential to assess the condition of your bricks. Repointing alone may not be sufficient if the bricks themselves are damaged. Here’s how to identify when bricks need repair or replacement:
Visual Assessment: From a safe distance, visually inspect your bricks for cracks, crumbling, or other damage. Minor cracks or stains might only require repointing, but more severe issues may necessitate brick repair or replacement.
Structural Stability: Assess the extent of the damage and its impact on structural stability. If bricks are crumbling, have severe cracking, or show signs of movement, they should be repaired or replaced before repointing to ensure a successful job.
Promptly addressing any identified brick issues ensures a successful repointing job and maintains both structural integrity and aesthetic consistency cost-effectively.
Assessing Existing Mortar and Masonry Units
Develop a practical field protocol to identify binder type and mortar condition with quick tests and visual cues. Look for hardness, moisture, efflorescence, salinity, color, roughness, and exposed aggregates to gauge deterioration. Note suspected binder type from the visual impression and texture.
Pair the tests with a thorough visual inspection of joints and units. Record joint width, tooling pattern, cracking, and salt deposits. Distinguish issues in joints from problems in the masonry units themselves to guide remediation choices.
Visual and Field Hardness Checks
To assess the relative hardness of your existing mortar, perform safe in-situ tests using simple tools. This helps ensure compatibility with new repair materials.
Quick check: Compare the mortar’s hardness to known standards like the Mohs scale using visual and tactile assessments. A quick scratch test with a coin or nail can provide a rough estimate.
Pro check: Gently scrape the mortar with a non-abrasive tool, such as a plastic scraper or a screwdriver, to avoid damaging the units. Use your thumbnail or fingernail to test the hardness directly. Be cautious not to over-scrape and damage the units.
If the mortar is softer than expected, consider using a harder mortar mix for repairs. Conversely, if it’s harder than expected, review the original mix design or consider using a softer mortar for repairs. If unsure, consult a masonry professional.
Sampling and Lab Analysis: What to Request
To gain precise information about your mortar’s composition for informed repair decisions, consider laboratory analyses. Consult a lab or conservator if you’re unsure about sample collection or analysis methods.
Pro check: Collect representative samples from various locations, depths, and joint types. Follow proper sampling procedures, including labeling, packaging, and documentation to maintain the integrity of your samples during transit and analysis.
If unknown or composite binders are suspected, request a binder identification test. If significant deterioration is observed, consider requesting additional analyses such as carbonate content and sand grading.
Ensure that your samples are representative and properly preserved to maintain their integrity throughout the analysis process.
Matching Mortar Properties: Hardness, Permeability, and Strength
New mortar should generally be softer and more vapor-permeable than the units to avoid trapping moisture. Avoid harder mixes that can damage bricks or stones over time. The balance of hardness, permeability, and overall strength matters for long-term performance.
Assess existing mortar properties through visual cues, simple hardness checks, and signs of salt efflorescence. Use this information to guide decisions on lime-rich or lime-based blends and appropriate sand selection to achieve similar permeability.
Hardness and Compressive Strength Considerations
When repointing, it’s crucial to ensure the new mortar is softer than both the historic mortar and the masonry units to prevent damage. Harder mortars can exert excessive pressure on the units, leading to cracking or displacement.
The compressive strength of the new mortar should be around 75% of that of the masonry units. This helps distribute stress evenly across the wall and reduces the risk of damage during freeze-thaw cycles.
Before applying, compare the resistance of the new mortar with the historic mortar using simple tools like a hammer or cheese wire. If the new mortar is harder, adjust the mix design to achieve a softer result.
Common mistake: Using a mortar harder than the historic one can lead to damage during testing or after application. Always re-evaluate and adjust the hardness if necessary.
Vapor Permeability and Salt Movement
Breathable mortars allow moisture to escape, reducing the risk of freeze-thaw damage and salt crystallization. Trapped moisture can lead to efflorescence, spalling, or even structural damage.
The permeability of the new mortar should be similar to that of the historic mortar. A simple water drop test can help assess the breathability of the new mortar. If the water is absorbed quickly, the mortar is permeable enough.
Inspect the wall for signs of salt efflorescence or trapped moisture. If the new mortar shows low permeability or high water retention in tests, increase its permeability by adjusting the mix design.
Common mistake: Using a non-breathable mortar can trap moisture and lead to damage during testing or after application. Always re-evaluate and adjust the permeability if necessary.
Color, Texture, and Tooling for an Invisible Repair
Visual targets depend on sand size, overall color, and aggregate brightness near adjacent bricks. Define acceptable ranges so the repair blends in rather than stands out. Consistency in texture helps the joint disappear within the masonry face.
Choose sand grading and shapes that match local materials, and document color targets under controlled lighting. Plan tooling patterns and finishes that align with historic appearances while delivering proper performance.
Techniques for achieving color match
Matching the color of existing mortar is crucial for a seamless repair. Start by sourcing sand from the same location as your original materials, if possible. Consult Munsell color charts to ensure compatibility.
Pigments can be added to achieve the desired hue, but use them sparingly and follow manufacturer guidelines. Create small test panels to preview and validate color before full-scale application. If the match is not close enough, refine pigment dosage or source alternative sands for better matching.
Pro tip: Conduct a simple visual check under natural light to assess color similarity. Compare sand sources’ Munsell color charts to ensure compatibility with existing mortar.
Matching texture and joint profile
Maintaining consistent texture and joint profile is essential for preserving the masonry’s overall aesthetic and structural integrity. Begin by matching aggregate size distribution using a sieve analysis.
Grout consistency also plays a role in final texture. Compare your grout to existing joints by touching or observing under raked light. Tooling techniques—concave, flush, struck—can influence shadowing and joint depth. Practice these techniques on small-scale mockups before full repair.
Pro tip: Fabricate small-scale mockups to test and validate texture and joint profile before full repair. If the match is inconsistent, adjust aggregate size, grout consistency, or tooling technique for better matching.
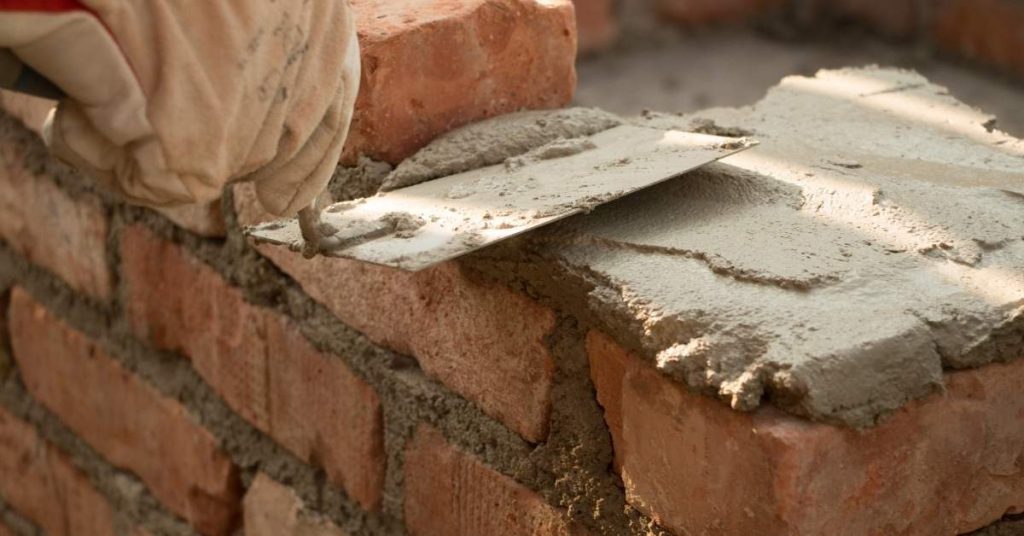
Step-by-Step Repointing That Protects the Units
A careful mortar removal sequence starts with using low-impact hand tools and controlled depth to protect brick faces while briefing on any fragile units so the overall vibration stays minimal. Dust control and surface protection are built into every step, with gentle, methodical removal that prevents spalling or cracking as the units respond to the revised joints. The plan emphasizes preventing contamination by clean tools and ensuring a steady workflow that reduces shock to the masonry while maintaining progress toward a sound, durable repointing result.
Cleaning follows removal, using bristle brushes and vacuums to remove dust without etching or staining the bricks, while moisture control and salt efflorescence management safeguard the surface finish. Backing materials and backer rods are chosen to suit the joint and prevent over-compression, with a phased packing sequence that avoids forcing new mortar into cracks or onto deteriorated units. Tooling, finish, and curing are coordinated to match color and texture and include a clear plan for curing temperature and humidity that minimizes shrinkage cracking and color mismatch, supported by checks for unit condition and fresh mix handling.
Repointing Brick Mortar Step-by-Step
This careful process minimizes damage to masonry units during repointing.
- Preparation: Inspect bricks for fragility or deterioration. Wear safety gear: gloves, goggles, and a dust mask.
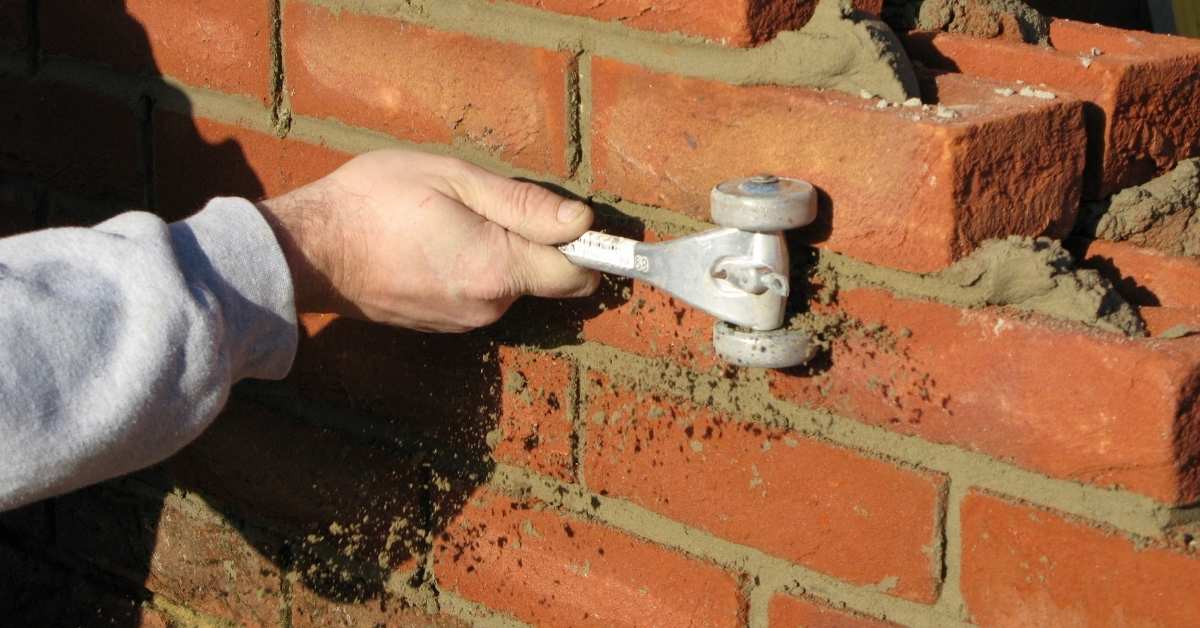
- Mortar Removal: Use hand tools like chisels and trowels, or low-impact methods such as grinders with diamond blades at slow speeds to avoid damaging brick faces. Remove mortar to a controlled depth of 1/2″ to 3/4″.
- Cleaning: Brush away loose debris using stiff-bristled brushes and vacuum up dust. Control moisture by misting the area lightly.
- Main Work: Fill joints with new mortar in layers, compacting each layer with a trowel or jointer. Ensure proper bonding without forcing mortar into cracks.
- Tooling and Finishing: Use appropriate tools to achieve desired joint profiles, color, and texture match. Apply sealants or lime-putty if necessary.
- Curing: Maintain optimal curing conditions: temperature between 40°F – 70°F, humidity around 50%, misting as needed to prevent shrinkage cracking and color mismatch.
- Final Checks: Inspect repointed areas for any signs of damage or improper curing. Make adjustments if necessary.
- Cleanup: Remove all tools, debris, and safety gear. Store materials properly for future use.
Safe Mortar Removal Methods
Preserving brick faces during repointing is crucial to maintain the structural integrity of your masonry units. Use hand tools and low-impact methods for careful mortar removal.
Hand Tools: Chisels, trowels, and scrapers are ideal for removing old mortar. They allow for controlled, precise work that minimizes damage to brick faces.
Avoid Aggressive Power Tools: High-speed grinders or other aggressive power tools can easily damage brick faces, leading to spalling or cracking. If using power tools, ensure they have diamond blades running at slow speeds and are equipped with proper safety guards.
Inspect your tools regularly for sharp edges or defects that could potentially harm the bricks. If brick faces appear soft or crumbly, use gentle, controlled hand tools to avoid further damage.
Repointing Joints: Layering, Packing, and Curing
To minimize shrinkage and bond failure in repointed joints, fill deeper or irregular joints in layers, compact each layer, and maintain optimal curing conditions.
Layering: For deep or irregular joints, apply mortar in thin layers to prevent over-compression and ensure proper bonding with the existing substrate.
Compaction: After applying each layer, use a trowel or jointer to compact it. This removes air pockets and promotes better adhesion between layers, reducing the risk of bond failure during curing.
Curing: Maintain optimal curing conditions to minimize shrinkage cracking and color mismatch. Keep temperatures within the range specified by your mortar’s manufacturer, typically 40°F – 70°F. Maintain humidity around 50%, and mist the area as needed. Closely monitor curing conditions to ensure proper setting of the new mortar.
Tools, Materials, and Mortar Mix Options Explained
Develop a practical materials checklist including lime putty, hydrated lime variants, sands, and optional additives. Decide between preblended or onsite mixes based on project needs and consistency goals. Each approach has trade-offs for performance and appearance.
Explore mix options such as lime-putty, lime-rich and hydraulic mixes, and cementitious blends. Consider how hardness, permeability, workability, and color will align with surrounding units and your mockups.
Comparing Mortar Types
Selecting the right mortar type is crucial for a successful repointing project. Here’s a comparison of lime-based, cement-rich, and blended mortars:
Lime-Based Mortars: These are typically used in historic structures to maintain compatibility and integrity. They offer excellent workability, permeability, and breathability but have lower strength compared to cement-rich mortars.
Cement-Rich Mortars: Commonly used in modern construction, these provide high initial strength and durability. However, they can be less permeable, leading to potential issues with moisture retention and vapor drive. They are not suitable for historic structures due to their incompatibility with lime-based mortars.
Blended Mortars: These combine lime and cement to balance workability, strength, and permeability. They can be used in both historic and modern structures but require careful blending to achieve the desired properties.
Tools and PPE Checklist
Having the right tools and safety equipment is essential for a successful and safe repointing project. Here’s a list of what you’ll need:
- Mixing Containers: Buckets or tubs for mixing mortar. Consider using plastic for easy cleaning.
- Scales or Measured Gauges: To accurately measure ingredients. Rent or borrow if necessary.
- Mixing Paddle or Drill: For efficient mixing of the mortar. Ensure it’s in good working condition before use.
- Trowels, Pointing Tools, and Hawk: For applying and shaping the mortar. Choose tools with comfortable handles for long-term use.
- Brushes: To clean joints and remove excess mortar. Use stiff-bristled brushes for better cleaning action.
- Moisture Meters or Flashlight Checks: To monitor the moisture content in walls before repointing. This helps prevent damage to units.
- Safety Glasses and Gloves: Protect your eyes and hands from mortar, debris, and other hazards.
- Respirator (optional): If working with hazardous materials like lead, use a respirator to protect against inhalation. Ensure it fits properly and is in good condition.
- Scaffolding: For repointing at height. Ensure it’s secure, stable, and compliant with local regulations. Consider renting if you don’t have your own.
DIY Vs Hiring a Professional and Choosing a Contractor
Evaluate whether the project scope is feasible for DIY, considering crack widths, mortar softness, access, height, and safety. Assess your capacity to manage materials, tools, weather, and curing requirements. A clear assessment helps avoid overreaching conditions.
When selecting a contractor, require licensing and insurance, proven historic masonry experience, and references. A sample panel is useful to verify color, texture, and tooling compatibility before full-scale work.
When DIY is appropriate and what to test first
DIY repointing can be suitable for simple, low-risk jobs where the damage is minimal. Before starting any work, perform small mockups to ensure your chosen mortar matches the existing color, texture, and joint profile.
Test the following:
- Color match: Ensure the new mortar blends seamlessly with the old.
- Texture: Check that the surface texture of the new mortar is similar to the existing units.
- Joint width and finish: Confirm the joint width and finish are consistent with the original work.
Contractor selection and contract tips
When hiring a professional, prioritize experience and proven track record. Check their references, especially those from similar historic masonry projects.
Require the following:
- A mockup panel to judge color match, texture, joint width/finish, and vapor-permeability.
- Written warranties or scopes of work that clearly define material specs, payment schedules, inspection points, and guarantees for color stability and moisture movement.
Timing, Budgeting, Inspections, and Common Mistakes to Avoid
Plan work within appropriate weather windows to support proper curing and performance. Consider seasonal effects on moisture movement and finish quality. Build in a realistic schedule that accounts for delays and field conditions.
Establish a budgeting approach with contingencies and a method for evaluating bids. Set up inspection milestones and document any color, texture, or bonding concerns to guide adjustments during the project.
Scheduling and Weather Considerations
Ensure optimal working conditions for your repointing project by considering the following weather factors.
- Temperature: Mortar sets best between 50°F – 90°F (10°C – 32°C). Check daily forecasts and avoid extreme temperatures.
- Humidity: Ideal humidity range is 40% – 70%. Monitor humidity levels to prevent poor curing.
- Rain: Avoid working in rain or during periods of high humidity. Protect work with covers if rain is imminent.
- Freezing/Thaw cycles: Avoid starting work when freezing temperatures are predicted within 72 hours after application, as this can cause damage.
- Wind: High winds can dry out mortar too quickly. Use barriers or schedule around windy periods to protect work.
- Curing conditions: Ensure the area remains consistently moist for at least 72 hours after repointing to allow proper curing.
- Start time: Begin work early in the day to allow sufficient curing time before nightfall or rain.
- Moisture content: Check mortar moisture content. It should be around 15%-20%. Adjust water content as needed.
Quick rule: Always monitor forecasts and adjust your schedule to avoid freezing/thaw cycles, rain, or high winds.
Budgeting, scope decisions, and common pitfalls
To avoid overspending and ensure quality work, consider these budgeting tips and scope decisions.
- Spot repairs vs full-wall: Assess the extent of damage. Spot repairs are cheaper but may not address underlying issues. Full-wall repointing ensures consistent mortar but is more expensive.
- Scaffolding costs: Factor in scaffolding rental and labor costs, especially for high walls or multi-story buildings.
- Labor costs: Obtain unit rates vs. fixed bids to compare offers accurately and avoid hidden fees.
- Color match vs compatibility: Prioritize mortar compatibility over color match to prevent future joint failures due to mismatched properties.
- Potential repeat work: Consider the risk of repeat work if joints fail or color mismatch occurs. Factor this into your budget.
By considering these factors, you can make informed decisions about the scope and cost of your repointing project, ensuring both quality and value for money.
Conclusion
Repointing with care protects the bricks and keeps a building’s appearance durable, so proceed with measured steps, check essential properties first, and work to keep moisture out of the wall. When done right, the repair supports the masonry for years and minimizes the risk of damage to adjacent units.
Before you begin, confirm the method with a small test area and follow a natural sequence: dampen the repair zone, verify hardness, permeability, and color compatibility, mix a consistent mortar that matches the existing units, work in suitable weather, use proper tooling, compact and finish so joints are clean, then inspect for gaps or leaks and allow appropriate curing. Safety, testing, and patience are the guiding rules, with any material or step that feels uncertain checked against manufacturer instructions or local rules before proceeding.
Common mistakes to avoid include using a cement that is too hard or too permeable for the masonry, applying mortar that is too wet or too dry, overworking joints or leaving residues that trap moisture, and neglecting to protect nearby units during cleaning. Always wear appropriate PPE, keep dust and debris to a minimum, and test any new technique in a small area first. If you are unsure about the existing mortar strength, color match, or the proper mix options, pause and verify with product labels or manufacturer guidance before continuing.
When to call a professional is clear: if the masonry shows significant cracking, units are loose, or the existing mortar is unusually soft or noncompliant with local rules, seek a contractor’s assessment. A careful evaluation early on prevents costly mistakes and protects both safety and appearance. Stay patient, document what you test, and you will complete a repair that stands up to weather and time.
FAQ
Why is repointing brick mortar necessary in some cases?
Repointing helps seal joints to prevent water intrusion and further masonry damage. It also restores the wall’s appearance and structural integrity when mortar has deteriorated or spalling has occurred. Check signs such as cracking, gaps, and powdery mortar to decide if repointing is needed.
What is involved in the repointing process and what techniques help protect the units?
Typically, damaged mortar is removed to a sound depth, then new mortar is carefully packed into joints and shaped to match the surrounding work. Use joints and tooling that minimize stress on brick faces and avoid over-hardened or under-filled joints. Consult manufacturer instructions or local guidelines for recommended techniques and joint profiles.
How do I ensure the new mortar matches hardness, color, and texture?
Match hardness by selecting a mortar mix with a similar compressive resistance as the existing mortar. Check color and texture by testing small batches on scrap material or a hidden area before full use. If needed, consider custom mixes or color-matched additives, following label directions and local rules.
What should I inspect regularly to maintain repointed brickwork?
Look for fresh cracks, mortar chipping, and water staining after rain. Perform inspections after seasonal shifts and after heavy weather. Develop a simple maintenance schedule and address issues promptly to protect the units.