
Introduction
Repairing plaster medallions and ornament means recreating missing decorative detail on a plaster ceiling or wall. It starts with shaping a patch of material to mimic the curve and edge you see around the piece, then pressing it in to blend with the surrounding plaster. Take your cues from the existing profile and work patiently to keep the relief looking like part of the original.
Use a compatible patch material and a simple hand-tool to reproduce the raised shapes, then let it set and blend into the surrounding surface. Apply in thin layers or small increments and feather the edges so the repair disappears from sight. Always check the product label and follow local rules or manufacturer instructions for mixing, curing, and safe handling.
Key takeaways
- Assess whether repair or conserve plaster medallion before any grinding or casting.
- Protect surrounding surfaces with drop cloths and eye protection during mold making.
- Clean loose plaster, seal cracks, and dampen surface lightly for better molding.
- Match texture by carving guidelines and test patches on scrap plaster.
- Label molds and replacements during casting to avoid misalignment and mixups.
- Wear respirator in dusty spaces; ventilate and inspect repairs for shedding or cracking.
Table of Contents
- Introduction
- Key takeaways
- When to Repair Versus Conserve
- Tools and Materials Checklist
- Preparing the Medallion and Site
- Simple Mold-Making Methods for Small Missing Details
- Casting and Integrating Replacement Pieces
- Matching Texture, Carving, and Tooling to Blend Repairs
- Color Matching, Patination, and Finishing
- Quality Checkpoints, Troubleshooting, and Maintenance
- Conclusion
- FAQ
When to Repair Versus Conserve
Assess the medallion for its historical, aesthetic, and structural significance before deciding on a repair. Consider whether a full conservation approach is preferable to a simple fix based on evidence of original craftsmanship and current condition.
If the piece appears unstable, highly valuable, or historically important, plan to consult a conservator and prioritize reversibility in your methods. Always verify recommendations against manufacturer instructions, product labels, and local guidance before proceeding.
Assessing condition and loss
First, grab a flashlight and get up close. You’re looking for any loose fragments, cracks, or missing chunks.
Gently tap the medallion with your knuckle. If it sounds hollow or feels unstable, that’s a red flag.
Check the substrate too – that’s the wall or ceiling behind the medallion. Any damage there could cause bigger problems later.
Conservation ethics and reversibility
The goal here is to keep the medallion looking original, not like a patch job. That’s conservation – minimum intervention.
Use materials that can be easily removed or replaced if needed. Like, use water-based adhesives instead of solvent ones. They’re easier to reverse.
And remember, reversibility is key. Choose methods and materials that won’t cause more harm than good in the long run.
When to call a professional
If you find major structural damage, it’s time to call in the pros. Holes, big cracks, or pieces falling off – that’s beyond DIY.
Also, if there are hazardous materials involved, like asbestos or lead paint, do not touch them. Get a professional who knows how to handle them safely.
And lastly, if the medallion is super valuable or historically important, it’s best to leave it to the experts. They have the skills and knowledge to preserve those pieces properly.
Tools and Materials Checklist
Put together a practical set of essential tools, consumables, and personal protective equipment for plaster repair. Include lower-cost alternatives and practical sourcing tips so both hobbyists and pros can complete the job safely.
Keep in mind how quality affects the final result; check product labels and manufacturer instructions for compatibility with plaster, resins, or oils. If in doubt, review local rules or standards and choose materials that offer reversibility where possible.
Casting compounds, plasters, and adhesives
Choose the right materials for your repair job. Here’s a checklist to help you.
- Plaster of Paris: Quick setting time, low cost. Not suitable for outdoor use or high humidity areas.
- Gypsum Cement: Slow setting, strong bond. Ideal for repairs needing strength and flexibility.
- Acrylic Casting Resin: Clear, durable, UV-resistant. Expensive, requires proper ventilation during application.
- Latex-based Adhesive: Good initial tack, flexible. Not suitable for heavy loads or high heat areas.
- Epoxy Adhesive: Strong bond, gap-filling. Toxic fumes, requires careful handling and ventilation.
- Compatibility: Check labels for compatible materials to avoid cracking or peeling.
- Working Time: Consider the working time to ensure you have enough time to complete the repair.
- Safety Data Sheet (SDS): Always check SDS for proper handling, storage, and disposal instructions.
Quick rule: Choose materials based on your repair needs, climate conditions, and safety guidelines.
Mold materials: silicone, latex, and DIY options
Select the right mold material for your project. Here’s a checklist to guide you.
- Silicone: High detail reproduction, flexible, durable. Expensive, takes longer to cure.
- Latex Caulk: Inexpensive, easy to use. Less detailed reproduction, not suitable for long-term use.
- Plaster of Paris (DIY): Cheap, easy to make. Breaks easily, not suitable for complex details or outdoor use.
- Alginate (DIY): Good detail reproduction, short setting time. Messy to work with, not suitable for long-term molds.
- Release Agent: Use a release agent to prevent the mold from sticking to the original piece.
- Cure Time: Consider the cure time to ensure you can demold your reproduction in a timely manner.
- Reusability: Think about how many times you’ll need to use the mold. Silicone is best for long-term use.
- Cleanliness: Ensure your original piece and tools are clean to prevent contamination of the mold material.
Quick rule: Choose a mold material based on detail requirements, budget, and intended use duration.
Small tools and finishing supplies
Gather the right tools for shaping, applying, and finishing your repairs. Here’s a checklist to help you.
- Sculpting Tools: Needle files, loop tools, carving knives. Essential for refining details.
- Brushes: Small paintbrushes, foam brushes. Needed for applying adhesives and plasters.
- Spatulas: Flexible putty knife, stiff spatula. Useful for spreading and shaping materials.
- Sandpaper: Fine-grit sandpaper (220-320). Necessary for smoothing surfaces after repairs.
- Sanding Block: Helps maintain even pressure while sanding to avoid creating divots or hollows.
- Putty Knife: Useful for filling small gaps and removing excess material.
- Finishing Materials: Sealers, primers, paint. Essential for protecting your repair and blending it with the surrounding area.
- Personal Protection: Safety glasses, gloves, dust mask. Crucial for protecting yourself during sanding and application processes.
Quick rule: Having the right tools ensures a smooth, professional-looking finish and protects your safety while working.
Preparing the Medallion and Site
Begin with safe cleaning to remove dust and loose particles, and carefully collect any fragments for possible reattachment. Stabilize weak areas to prevent further shedding while keeping the surface ready for molding.
Protect surrounding surfaces by containment and masking, and store loose pieces in labeled containers. Follow simple containment steps and reference labeling to ensure you don’t mix materials by mistake.
Cleaning and stabilization techniques
Start by gently cleaning your medallion. Use soft brushes, not water. Water can damage plaster.
Never use power washers or harsh chemicals. For loose fragments, carefully collect them for later use.
If the plaster is crumbly, apply a consolidant. This strengthens it. Use a small brush to apply it sparingly. Let it soak in before touching further.
Creating a secure perimeter for molding
Before you mold, create a dam around the medallion. This contains the mold material.
For small details, use clay or tape. For larger areas, board and clamps work well. Make sure it’s tight to prevent leaks.
Test your dam with water first. If it leaks, fix before proceeding.
Surface sealing and release agents
Seal porous plaster before molding. This prevents mold material from soaking in too much. Use a clear sealant spray or brush-on sealer.
Choose a release agent to prevent your cast from sticking. For silicone molds, use a mold release spray. For latex, use a liquid soap solution.
Test your release agent on a small area first. Make sure it works before casting the whole medallion.
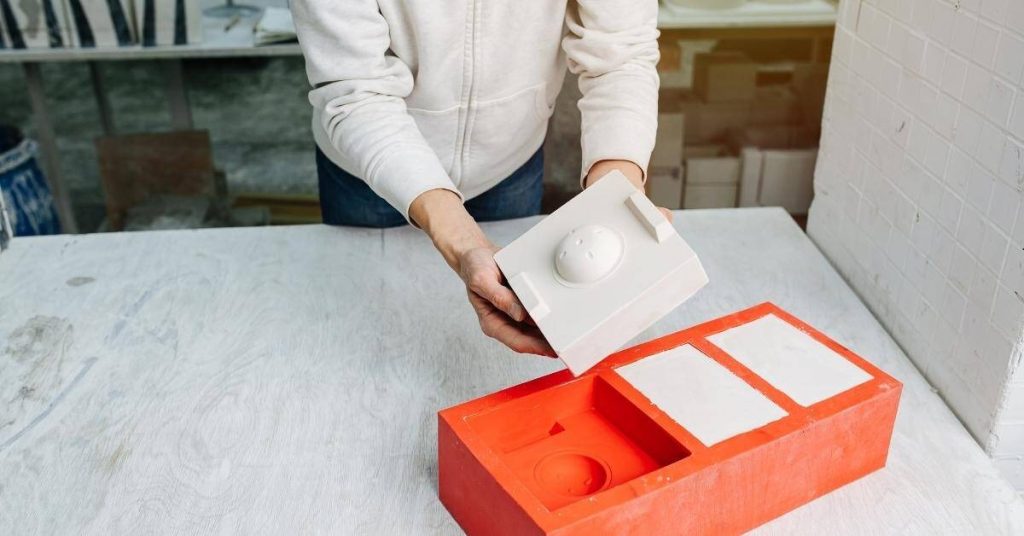
Simple Mold-Making Methods for Small Missing Details
Choose accessible mold-making techniques that capture fine ornamental features with minimal equipment. Opt for stepwise methods that suit small repairs and clear timelines for when to use quicker versus longer-lasting molds.
Verify mold materials against the original substrate and any expected chemical exposure. Consult product data sheets or instructions to confirm compatibility and cure handling before starting.
Brush-on silicone for fine detail
For capturing crisp relief and intricate details, brush-on silicone is your best bet. It’s easy to apply and allows you to build up layers without trapping air.
Tip: Use a small, soft-bristled brush to work the silicone into every nook and cranny. Start at the deepest points and work your way outwards.
To avoid air bubbles, apply the silicone in thin coats, letting each one cure slightly before adding another. This gives the silicone time to de-aerate naturally.
Latex or alginate for temporary molds
For quick, one-off casts and short-term work, latex or alginate is ideal. They’re flexible, easy to apply, and won’t damage delicate surfaces.
Note: These materials aren’t suitable for long-lasting molds. Latex can degrade over time, and both can dry out and crack if not stored properly.
Use latex for larger, more robust details, and alginate for fine, intricate work. Both can be mixed to various consistencies depending on the detail you’re capturing.
Low-cost two-part and DIY mold hacks
When professional materials aren’t available, don’t despair. There are plenty of low-cost alternatives you can use to create molds.
Two-part putty: This is a quick, easy option for small repairs. It’s like playdough – you mix two parts together and it hardens. Just press it into the detail you want to capture.
Hot-melt forms: For larger details or when you need a rigid mold, try using hot glue guns. Apply the glue directly onto your surface, building up layers until you’ve captured all the detail. Once set, carefully remove it.

Casting and Integrating Replacement Pieces
Follow best practices for pouring, curing, demolding, and aligning new pieces so they sit flush with the surrounding ornament. Emphasize bond strength and avoiding new stresses in the surrounding plaster.
Plan integration so the replacement matches the original scale and profile, and check that fasteners or adhesives do not interfere with the structure. Review labels and instructions to ensure correct mixing and application temperatures or times.
Choosing mixes and additives
When casting replacement pieces, it’s crucial to match the original plaster’s characteristics. Start by examining the existing medallion.
Weight: Original plasters can vary in weight. Lighter plasters are easier to cast but may not be suitable for heavy or structurally critical areas. Heavier mixes offer better strength but can be more challenging to work with.
Texture and Shrinkage: Match the texture by choosing a casting mix that mimics the original’s fine or coarse grain. Consider shrinkage during curing; some plasters shrink less than others, which could lead to gaps over time.
Additives like fibers can improve strength and reduce cracking. Use them sparingly, as too many can affect the plaster’s workability and final appearance.
Demolding and finishing cast parts
Once your cast pieces have cured, it’s time to remove them from their molds. Apply gentle pressure around the edges to release any suction.
Removing Flash: Use a sharp utility knife or chisel to carefully trim off any excess material (flash) that may have formed during casting. Be cautious not to damage the detail of your cast piece.
Cleaning Seams: If you’ve used multiple molds, clean up any seam lines with fine-grit sandpaper or a file. Wipe away dust with a damp cloth.
For a smooth finish, lightly sand your cast pieces using progressively finer grits of sandpaper. Start at 120-grit and work your way up to 400-grit for a glass-smooth surface.
Attachment methods and reinforcement
To ensure your replacement pieces last, use strong adhesives and reinforce them where necessary. Choose an adhesive that’s compatible with both the cast piece and the substrate it will be attached to.
Mechanical Pinning: For added strength, consider using small nails or pins driven into the back of the cast piece and into the substrate. This creates a mechanical bond that can help prevent the piece from falling off over time.
Internal Supports/Keys: If your replacement piece is large or heavy, consider adding internal supports or keys during the casting process. These are small protrusions that fit into corresponding recesses in the substrate, helping to lock the piece in place and distribute its weight evenly.
Always test your attachment methods on a scrap piece first to ensure they work with your specific materials and conditions.
Matching Texture, Carving, and Tooling to Blend Repairs
Use texture replication and careful edge re-cutting to make the repair read as part of the original medallion. Apply tooling marks subtly to mimic the interval pattern and depth of nearby details.
Micro-sculpting tips can help refine small differences, but work gradually and test on a sacrificial area when possible. If you’re unsure, compare with nearby features and follow guidance from relevant product instructions and local standards.
Hand-sculpting missing details
Start by building up forms in layers using your chosen material. Use a small trowel or putty knife for the base layer, ensuring it’s smooth and even.
Refine the form with smaller tools like dental tools or loop tools to create intricate details. Work in small sections at a time, comparing your work to the original ornament to maintain scale and profile.
Tip: Use a magnifying glass for precision work. Once you’re satisfied with the form, let it cure slightly before moving on to the next step.
Texture transfer and stamping hacks
To copy adjacent patterns quickly, use temporary stamps or life-casts. Press these firmly onto your repair area to transfer the texture.
For larger areas, create texture pads using silicone caulk or other flexible materials. Apply these to your repair area while the material is still wet for an instant texture match.
Pro tip: Use a release agent on stamps and pads to make removal easier once the material has cured.
Feathering edges and blending transitions
After your repair piece is in place, use fine-grit sandpaper or a sanding sponge to smooth the edges. Start with a coarse grit (e.g., 80) and work your way up to a finer grit (e.g., 220) for a smooth finish.
Use a micro-filler to fill any small gaps or imperfections along the edge. Apply it thinly, let it dry, then sand it flush with the surface.
Tip: For a seamless transition, feather the edges of your repair piece by gradually reducing the thickness towards the original ornament. This helps hide joins and creates a smooth visual flow.
Color Matching, Patination, and Finishing
Choose primers and finish layers that can age with the surrounding surfaces while staying breathable and, where feasible, reversible. Use aging techniques to replicate the surrounding patina and sheen without overcoating.
Test finishes on inconspicuous spots first and document the results for future caretakers. Always verify compatibility with the substrate and consult product labels for overcoat approvals and cautions.
Selecting primers and paints for plaster
When choosing primers and paints for your plaster medallions, consider these key factors:
Adhesion: Look for products specifically designed for plaster. They’ll have better adhesion than those meant for other surfaces.
Compatibility: Test your chosen primer and paint on a small, inconspicuous area first. This ensures they won’t react poorly with your existing plaster or cause discoloration.
Always follow the manufacturer’s instructions for application and drying times to ensure optimal results.
Layered glazing and aging techniques
To replicate the patina of old plaster, use a combination of glazes, washes, and dry-brushing. Here’s how:
Glazing: Apply a thin layer of colored glaze over your base paint. This adds depth and richness to the finish.
Washing: Use a wash – a dilute version of your glaze color – to mimic dirt accumulation in recesses. Apply it with a soft brush or rag, working from top to bottom.
Dry-brushing: With a dry brush and a small amount of paint on the tips, gently brush over raised areas to highlight them. This technique helps replicate wear and tear.
Sealers and protection options
Choosing the right sealer is crucial for protecting your plaster medallions while maintaining their breathability:
Breathable sealers: These allow moisture to evaporate, preventing mold growth. They’re ideal for interior ornaments in humid areas.
Non-breathable sealers: While they provide excellent protection against water and dirt, they can trap moisture, leading to condensation and potential damage.
For reversibility and conservation, opt for wax-based or shellac sealers. They offer good protection and can be removed when necessary without damaging the underlying plaster.
Quality Checkpoints, Troubleshooting, and Maintenance
Develop a practical checklist to assess repair success, identify common failure modes, and apply fixes without unnecessary rework. Include routine maintenance actions to slow future deterioration and preserve appearance.
Encourage documenting every repair step to aid future caretakers. When unsure, refer to conservator guidelines, product instructions, and local codes to ensure ongoing safety and reversibility.
Visual and Tactile Inspection Checklist
Before you sign off on your repair job, use this checklist to ensure everything is up to par.
- Alignment: Check that the new piece lines up perfectly with surrounding details. Misalignment can lead to an unnatural look and further damage over time.
- Bonding: Gently press around edges to ensure the repair is securely bonded. Poor bonding may cause pieces to fall off or crumble.
- Texture Match: Compare textures under different lighting. Inconsistencies can make repairs obvious.
- Color Match: Check under various lights and angles. Mismatches are hard to hide once painted.
- Structural Soundness: Gently tap repaired areas. Hollow or weak spots need attention.
- Seam Visibility: Inspect seams for any gaps or visible lines. Visible seams detract from the overall look and can collect dirt or moisture.
- Edge Feathering: Ensure edges blend smoothly into surrounding surfaces. Sharp transitions are noticeable and may cause further damage.
- Surface Integrity: Check for any cracks, chips, or other defects. These can worsen over time if not addressed.
Quick rule: If anything feels or looks off, double-check your work and make adjustments as needed.
Common Problems and Remedies
Even with careful planning, issues can arise. Here’s how to tackle them.
- Poor Adhesion: If pieces aren’t sticking, clean surfaces better and use appropriate primer. Poor adhesion leads to failures.
- Visible Seams: Sand, feather edges, or apply texture to hide seams. Visible seams detract from the overall look.
- Color Mismatch: Recheck your color matching process and touch up if needed. Mismatches are obvious once painted.
- Cracking or Shrinkage: Ensure proper curing, hydration, and mix design. Cracks allow moisture in, leading to further damage.
- Texture Disparity: Revisit your texture transfer or stamping techniques. Disparities are noticeable up close.
- Moisture Damage: Identify and fix the source of moisture, then treat affected areas. Moisture causes plaster to deteriorate.
- Delamination: Reassess your attachment methods and reinforce if necessary. Layers peeling off weakens the structure.
- Uneven Surfaces: Sand or apply skim coat to level surfaces before painting. Unevenness shows through paint.
Quick rule: Address problems promptly to prevent them from worsening.
Documenting Repairs and Future-Proofing
Proper documentation helps maintain your work’s longevity and aids future caretakers.
- Materials Used: Record all materials, mixes, and additives. Future repairs may require the same materials.
- Methods Employed: Describe techniques used for casting, attachment, etc. This helps others replicate your methods.
- Photograph Repairs: Take before-and-after shots and close-ups of details. Pictures tell the story of your work.
- Label Repairs: Mark repaired areas with discreet labels or tags. This helps future caretakers understand what they’re looking at.
- Maintenance Schedule: Note when and how to perform routine maintenance. Preventive care extends your repairs’ lifespan.
- Contact Information: Leave your contact details in case of questions or follow-ups. You might be the best person to answer future queries.
- Update Records: Keep records up-to-date with any additional repairs or changes. Accurate records ensure future caretakers have the most relevant information.
Quick rule: Good documentation is an investment in your work’s long-term success.
Conclusion
Repairing plaster medallions and ornament is about steady, deliberate work that protects the underlying structure and preserves the look. Do the work with safety in mind, test on small areas first, and keep the repairs reversible where possible so you don’t seal in a mistake.
Begin by confirming what really needs fixing, then follow a simple flow: inspect the piece and site, choose a repair or conserve approach, set up with the right tools, make or cast a precise replacement, and blend the texture, color, and patina until it reads as a single piece. Move in small steps, document what you try, and stop if something doesn’t fit or feel solid.
Common mistakes to avoid are trying to patch too large an area with a fragile add-on, under- or over-wetting the plaster during mold work, and rushing texture or color without testing on a hidden spot. Safety rules are simple: wear eye protection and a dust mask, seal off the work area, keep materials separate until you test a tiny patch, and never force a replacement piece into place if it won’t seat cleanly. If you’re unsure about the structural firmness, or the piece is historically significant, pause and reassess rather than pushing ahead.
When in doubt about the integrity of the plaster or the best way to reproduce a key detail, consider a pro. If the crack or loss goes beyond simple mold and cast, or the medallion is heavily damaged, a professional will save time and protect the finish. Stay deliberate, stay safe, and you’ll finish with a repair that holds up and looks right for years to come.
FAQ
What should I check before patching a missing detail in a plaster medallion?
Look at the surrounding texture and depth. Make sure you can reproduce the shape without masking nearby areas. If the detail is fragile, stabilize the edges gently before molding.
How do I choose a mold method for small missing pieces?
Use a simple mold for shallow gaps and a flexible material for curved edges. Follow the product instructions for release, cure time, and safety notes. If in doubt, test on a scrap piece first.
What steps help blend the repair with texture and tooling?
Match general grain, stipple, or brush marks by copying the surrounding pattern. Carve or tool while the patch is still workable, then lightly refine after it sets. Avoid overworking the area and keep subsequent layers thin.
How can I color-match the repaired area safely?
Start with neutral tones that match the wall or medallion base. Apply color in thin layers and compare in natural light. If you’re unsure about a shade, check the manufacturer’s instructions or test on a hidden edge first.