
Introduction
Pinholes in floor coatings are tiny voids that form when the surface isn’t sealed and moisture or air escapes as the coating cures. They undermine moisture control and adhesion, especially if the primer or first coat isn’t applied correctly. Check that your primer is stated for moisture control and compatible with the topcoat you’re using.
Plan your primer coat first, follow the manufacturer’s guidance, and don’t skip it when moisture transmission is a concern. Use even squeegee technique to push out trapped air and keep a steady tempo with the roller or squeegee to avoid creating new voids. Keep the work environment within reasonable temperature and humidity limits, ventilate to manage offgassing, and confirm you’re following the coating’s instructions for application and cure.
Key takeaways
- Prevent pinholes and improve adhesion by ensuring proper primer seals pores.
- Primer coats control moisture; choose primer with moisture barrier function to resist vapor transmission.
- Squeegee technique: steady passes minimize air entrapment and pinholes; aids adhesion.
- Offgassing control: ventilate during install and cure to reduce defects.
- Planning makes perfect: accurate material quantities prevent shortfalls and waste; saves cost.
- Safety: always wear PPE and follow manufacturer instructions for coatings.
Table of Contents
- Introduction
- Key takeaways
- What Causes Pinholes and Why They Matter
- Primer Coats: Types, Functions, and How to Choose
- Moisture Vapor Control — Testing and Permanent Barrier Options
- Squeegee Technique and Application Workflow to Minimize Pinholes
- Offgassing Control During and After Installation
- Preventing and Repairing Pinholes — Inspection and Corrective Steps
- Planning, Material Quantities, Coverage, and Cost Estimation
- Tools, Safety, Standards, and Long-Term Maintenance
- Conclusion
- FAQ
What Causes Pinholes and Why They Matter
Pinholes are tiny voids or openings in a coating film that betray incomplete film formation. They form from air entrapment, residual moisture, surface contaminants, or improper primer/coat interaction, and they differ from surface imperfections that merely look rough or dull.
These defects compromise barrier properties and adhesion, and they can allow moisture or vapor to penetrate. Aesthetically, pinholes can telegraph underlying substrates and dull gloss. Start with diagnosing substrate moisture, surface cleanliness, primer compatibility, and mixing or application errors before deciding on repair or recoat plans.
Entrapped air and application errors
Pinholes can form when air gets trapped during mixing, troweling, or applying your floor coating too quickly.
- Mixing: Avoid whipping air into the material. Mix slowly and stop if you see bubbles.
- Troweling: Use smooth, steady strokes to avoid trapping air under the trowel.
- Application speed: Apply at a consistent pace to prevent rapid curing that traps air.
- Squeegee technique: Maintain even pressure and angle to ensure complete contact with the surface.
Regularly check your work for signs of trapped air, and adjust your technique as needed.
Substrate offgassing and moisture
Concrete and toppings can release moisture and vapors that create pinholes. Identifying the source is crucial.
Moisture: Test your substrate for excess moisture before applying any coating. Moisture meters are inexpensive and easy to use.
Offgassing: New concrete, toppings, or other substrates can release vapors that interfere with curing. Allow sufficient time for offgassing before applying a coating.
If you suspect offgassing or excess moisture, address the issue before proceeding with your coating application to avoid pinholes.
Rapid cure, pot-life and environmental drivers
High temperatures and low humidity can cause your floor coating to cure too quickly, leading to pinholes.
Pot life: Follow the manufacturer’s guidelines for mixing and application. Don’t let the material sit too long before applying it.
Temperature: Apply coatings in a controlled environment, ideally between 65°F – 85°F (18°C – 29°C).
Humidity: Maintain relative humidity between 40% – 70% during application and curing to prevent rapid cure.
Primer Coats: Types, Functions, and How to Choose
Primer categories include adhesion primers, moisture-mitigating primers, and aesthetic/high-gloss primers. Each serves a core role: adhesion, moisture control, or gloss/appearance, with pinholes in mind.
Compare properties like adhesion strength, moisture mitigation, seal/porosity fill, and compatibility with topcoats. Also check VOCs, cure/recoat times, and surface prep requirements to match the job. Use a simple framework to decide which primer fits a new slab, a damp slab, or a previously coated floor.
Adhesion primers and surface wetting
Adhesion primers are your first line of defense against pinholes caused by poor bonding. They improve the bond between concrete and your topcoat, ensuring no air or moisture gets trapped at the interface.
Use adhesion primers when you’ve got a dusty, oily, or porous substrate. They’ll help seal the surface and provide a better anchor for your topcoat.
Before application, perform visual checks to ensure the surface is clean and free of debris. After application, perform adhesion tests like the pull-off test to confirm proper bonding.
Tip: Don’t skimp on primer. Apply enough to get full coverage but not so much that it pools or drips.
Vapor-mitigation and moisture-barrier primers
Moisture-vapor primers act as a barrier, preventing moisture from the substrate from migrating into your topcoat. This helps prevent pinholes caused by offgassing or trapped moisture.
Use these primers when you’ve got high moisture vapor emission rates (MVS), relative humidity (RH) above 75%, or calcium chloride test results indicating high moisture content in the slab.
Before specifying, check product data and relevant standards like ASTM D6208 to ensure the primer meets your job’s requirements. Some primers may require a separate sealer for optimal performance.
Caution: Not all moisture-barrier primers are created equal. Always check compatibility with your topcoat to prevent pinholes.
High-gloss primers and finish enhancement
High-gloss or aesthetic primers contribute to a smooth, uniform finish by sealing the surface and providing a consistent base for your topcoat. They’re ideal when you want a high-gloss, clear, or colored finish.
Use these primers in multi-coat systems where appearance is critical. They work well with epoxy and polyurethane topcoats but may not be suitable for all environments due to their lower chemical resistance.
Apply high-gloss primers using a roller or sprayer for even coverage. Follow the manufacturer’s recommendations for film build, cure time, and compatibility with your topcoat to prevent pinholes.
Remember: High-gloss primers won’t mitigate moisture issues. If you’ve got a damp slab, use a moisture-barrier primer first, then apply a high-gloss primer as a second coat.
Moisture Vapor Control — Testing and Permanent Barrier Options
Moisture issues drive pinhole formation, especially on substrates like new concrete, densified slabs, or radiant floors. Understand how vapor moves through the slab and affects coatings.
On-site tests include quick moisture checks and formal measurements such as MVER and RH tests, plus practical checks like substrate temperature. Interpret results against manufacturer tolerances and project conditions to decide if and when a permanent barrier is needed.
Calcium chloride and relative-humidity testing procedures
Before applying any floor coating, it’s crucial to test for moisture. Two common methods are the calcium chloride test (MVER) and relative humidity (RH) testing.
Calcium Chloride Test (ASTM F1869): This test measures the amount of water vapor passing through a sample of calcium chloride in 24 hours. Follow these steps:
- Place calcium chloride on a flat surface.
- Cover it with a plastic sheet, leaving an opening for air circulation.
- Weigh and record the initial weight.
- After 24 hours, reweigh and calculate the moisture vapor emission rate (MVER).
Relative Humidity Test (ASTM F2170): This in-situ test measures RH at various depths within the slab. Follow manufacturer’s guidelines for probe placement and interpretation of results.
Choosing a vapor-barrier system and compatibility checks
Selecting a vapor barrier involves considering several factors. First, understand your slab’s condition and moisture source.
Next, consider the expected service environment – will it be heated, cooled, or both? Check compatibility with your chosen coating system to ensure adhesion and gloss aren’t compromised.
Long-term performance goals also play a role. Some barriers are more durable than others but may require additional maintenance or cost more upfront.
Consult product datasheets for performance claims and manufacturer recommendations. Barrier options include:
- Physical vapor barriers (poly/foil sheets, 15–60+ mil barriers)
- Integral moisture-mitigation primers
- Cementitious or epoxy-based barriers
When to involve a specialist
While DIY testing and barrier installation can save you money, complex humidity issues may require professional help. Here’s when to consider it:
1. Conflicting test results: If your tests indicate high moisture levels but the slab feels dry or vice versa, consult a specialist.
2. Unusual conditions: Radiant-heated floors, densified slabs, or new concrete with rapid drying can pose unique challenges. A specialist can provide tailored solutions.
3. Warranty implications: Some coating manufacturers require professional testing and barrier installation for warranties to apply. Always check your specific warranty terms.
Squeegee Technique and Application Workflow to Minimize Pinholes
Define a precise mixing and batching routine, noting pot life, temperature, and additive compatibility to avoid air entrapment. Consistency here sets up the rest of the workflow for success.
Choose squeegee equipment appropriate for the coat thickness and substrate porosity, and outline a step-by-step stroke and overlap method. Follow a clear sequencing plan with priming, waits, and environmental controls to preserve film integrity.
Mixing, batch size and pot-life management
The key to a pinhole-free floor coating is starting with the right mix. Always follow the product’s mix ratio. Pre-wet your tools before mixing to ensure consistent application.
Batch size matters too. Make enough for one pass, no more. This keeps pot life manageable. Too big a batch and you’re fighting a race against time.
Pot life is critical. It’s the time your mix stays workable after mixing. Check your product data sheet. Stick to it. Once pot life’s up, so are your chances of pinholes.
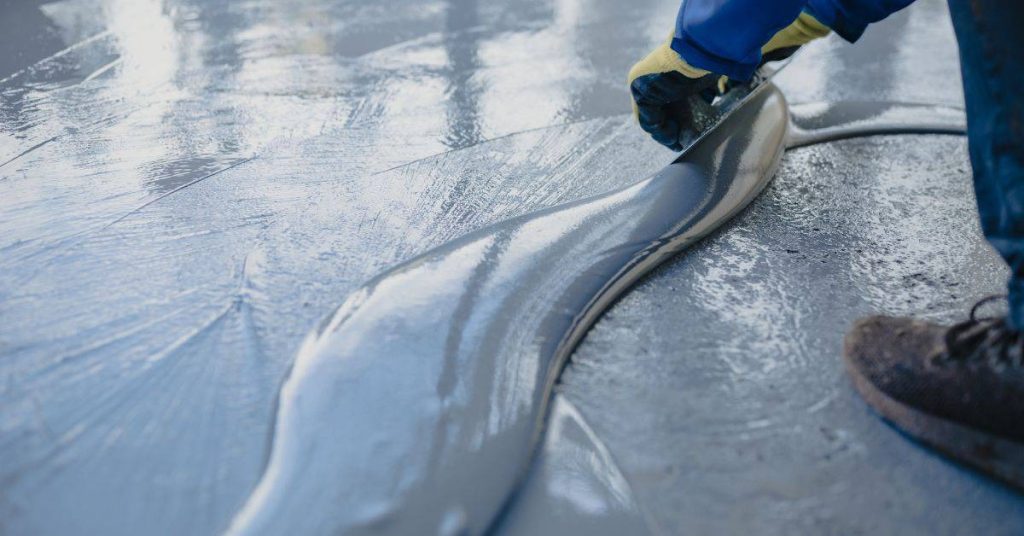
Squeegee setup, angle, and stroke patterns
Choose the right squeegee. For thin coats, use a narrow blade (1/8″ to 3/16″). Thicker coats need wider blades (1/4″ to 3/8″). Use a 70-90 durometer blade. It’s flexible enough for good contact, stiff enough to avoid bending.
Angle matters. Start at 45 degrees. As you gain experience, adjust to find your sweet spot. Too steep and you’ll entrap air. Too shallow and you’ll leave dry spots.
Stroke patterns matter too. Overlap each pass by about half the blade width. This ensures even film build. Backtrack occasionally to break up any air pockets.
Backrolling, cross-rolling and finish passes
After squeegeeing, use a backroller or cross-roller. This helps collapse any remaining air pockets. Use a roller with a 1/8″ to 1/4″ nap. It’s dense enough to smooth out the coating but not so dense it leaves marks.
Make your finish passes at right angles to your initial strokes. This helps even out any remaining high or low spots. Be gentle. You’re just smoothing, not adding more material.
Let each pass cure according to the manufacturer’s recommendations before moving on. Rushing can lead to pinholes.

Offgassing Control During and After Installation
Offgassing relates to trapped moisture, solvents, or uncured resins releasing during cure, which can form pinholes or gloss defects. Identify potential gas sources early in the project.
Prepare the substrate with appropriate moisture barriers or primers and control the environment during install. Plan product selections and cure timelines to minimize vapor transmission and ensure a stable final finish.
Pre-application mitigation (drying, priming, patching)
Before applying any coating, tackle moisture and air pockets at the source.
Dry out the substrate thoroughly. Use dehumidifiers if needed. Aim for relative humidity below 75%. Let it sit until dry to touch.
Patch any cracks or holes with a suitable filler, let it cure, then sand smooth. This seals off air pockets and prevents moisture from rising.
Apply an appropriate moisture-barrier primer, following the manufacturer’s instructions. Vacuum the surface to remove any remaining dust or debris that could trap air.
In-process controls: ventilation, temperature and humidity
During application, keep conditions optimal to minimize offgassing.
Ventilate the area. Open windows, use fans, or set up temporary ventilation systems. Maintain a cross-breeze for best results.
Maintain temperature between 65-85°F (18-29°C). Too cold or hot can speed up offgassing and cause pinholes.
Keep relative humidity below 70%. Monitor it with a hygrometer. If conditions are outside manufacturer specs, delay application until they’re right.
Post-application airing, cure monitoring and recoat windows
After applying the coating, let it air out. Offgassing continues even after application.
Monitor the cure. Check for skin formation and solvent smell. Use a moisture meter to ensure no trapped moisture remains.
Before recoating or exposing to traffic, wait until the coating is fully cured. This could take 24-72 hours, depending on product and conditions. Follow manufacturer’s guidelines.
If pinholes appear during cure, they might need to be sanded, primed, and recoated. Always address them before applying subsequent layers.
Preventing and Repairing Pinholes — Inspection and Corrective Steps
Pinholes arise from air entrapment, moisture, contamination, or sequencing missteps. Learn the common signs so you can catch issues early on.
Develop a practical inspection flow, including adhesion checks and surface cleanliness, and apply fresh or cured-coat repair steps with compatible materials. Recoat sequencing and proper priming help restore a uniform, sealed surface.
Visual checkpoints and acceptance criteria
Use this checklist immediately after application to accept or reject a coating, and document defects for remediation.
- Uniform gloss: Check for consistent sheen across the entire surface. Inconsistencies may indicate air pockets or contamination.
- Speckling: Look for tiny, raised specks. These could be contaminants or trapped particles.
- Tiny cavities: Inspect for small holes or depressions. These might be pinholes caused by air entrapment or moisture.
- Blisters: Check for any raised, water-blister-like formations. These indicate trapped moisture or offgassing.
- Cracking: Inspect for hairline cracks. These can form due to improper curing or substrate movement.
- Delamination: Gently press the surface. Any give could indicate poor adhesion.
- Uneven film thickness: Check for areas that look thicker or thinner than others. This can cause variations in appearance and performance.
- Color variation: Inspect for discoloration, which might indicate contamination or improper mixing.
Quick rule: If any defects are found, document them and address immediately to prevent further issues.
Repair methods for wet and cured pinholes
Use this guide to determine the best repair method based on whether the film is still tacky or fully cured.
- Tacky surface: If the coating is still sticky, use a compatible epoxy/urethane filler to fill pinholes. Carefully reseal voids using a squeegee or brush.
- Cured surface: For fully cured coatings, spot-fill pinholes with matching material and smooth until flush with the surrounding film.
- Edge feathering: When repairing, ensure edges are well-feathered to blend with the surrounding area.
- Film integrity: Maintain film integrity during cure by avoiding excessive handling or exposure to contaminants.
- Reapplication window: Reapply coating within the specified re-coat window to ensure proper adhesion and appearance.
Quick rule: Always test repaired areas for seal, adhesion, and surface appearance before considering the job complete.
Quality-control checklist to avoid recurrence
Use this QC checklist to prevent repeat pinhole problems by addressing potential issues at each stage of the workflow.
- Surface prep: Ensure substrate is clean, dry, and free of contaminants. Any imperfections can cause pinholes or poor adhesion.
- Mix protocol: Follow manufacturer’s mixing instructions to avoid introducing air into the coating.
- Environment: Maintain optimal temperature and humidity levels during application to prevent offgassing or moisture-related issues.
- Application technique: Use a flat squeegee technique, avoiding air entrapment. Backroll and cross-roll for even film thickness.
- Priming: Apply primer as recommended by the manufacturer to seal the substrate and improve adhesion.
- Ventilation: Ensure proper ventilation during application and curing to prevent offgassing-related problems.
Quick rule: Regularly review and update your QC checklist based on lessons learned from each job to continually improve your process.
Planning, Material Quantities, Coverage, and Cost Estimation
Begin with a surface assessment to drive primer choice, prep requirements, and subsequent coat thickness. Map how these factors affect material quantities and coverage expectations.
Work out a takeoff for primers and topcoats, including waste allowances and contingency. Factor in recoat windows, environmental conditions, and potential delays to create a realistic project plan.
Calculating Coverage Rates and Material Needs
The right materials make all the difference. They ensure your floor coating lasts, looks good, and doesn’t crack or stain.
- Manufacturer’s Data: Start with the datasheet. It’ll tell you how much area one unit of material covers. For example, ‘1 gallon covers 250 sq ft’.
- Convert to Your Area: Measure your floor area. Divide by the coverage rate from the datasheet to find out how many units you need.
- Account for Porosity: If your substrate’s porous, you’ll need more material. Check the datasheet or ask a pro.
- Avoid Over-Applying: Too much can cause delamination and waste. Stick to recommended rates.
- Test Patch: Before rolling out, test on a small area. This helps you fine-tune your calculations and see how the material behaves.
Scheduling, Pot-Life Staging and Crew Coordination
Timing is crucial. You need to mix, apply, and let your coatings cure at the right times.
Check each product’s datasheet for pot life (how long it stays usable after mixing) and open time (when you can recoat). Plan your work around these.
For example, if your primer has a 30-minute pot life, mix just before you need it. If the topcoat has a 2-hour open time, plan to apply it within that window.
Communicate with your crew. They need to know when to start mixing, applying, and cleaning up. Keep everyone on schedule to avoid waste and ensure a quality finish.
Budgeting Line Items and Contingency Planning
A solid budget helps you stay on track. Include these common cost items:
Materials: Primer, topcoat, primers for vapor control, sealers, and any special materials like patch compounds.
Tools and Equipment: Squeegees, backrolls, trowels, mixers, and safety gear like gloves and goggles. Don’t forget drop cloths and tape.
Labor: Calculate labor costs based on your crew’s size and the project’s complexity. Include time for prep, application, and cleanup.
Contingency: Plan for 10-20% extra material in case of errors or repairs. Also, add a buffer for price fluctuations and delays. This helps you stay on budget even if things don’t go exactly as planned.
Tools, Safety, Standards, and Long-Term Maintenance
Build a practical toolkit list with essential squeegees, rollers, moisture meters, primers, and sealers, plus substitution options for common pinhole scenarios. Plan quantities so you’re not short on a critical pass.
Address ventilation, respirator use, eye/skin protection, and ladder safety. Reference relevant standards and codes for moisture, adhesion, and VOC compliance, and schedule routine maintenance checks to sustain performance.
Tools and materials checklist
Before you start your concrete project, use this checklist to ensure you have everything you need. It’s best to gather all tools and materials before mixing your first batch of concrete.
- Squeegees: Check for straight edges and no damage. Ensure they’re the right size for your project (6″ – 12″).
- Rollers: Inspect for intact covers and proper naps (3/8″ – 1/2″ for concrete).
- Mixing equipment: Verify your mixer’s capacity matches your project needs. Check paddles for damage.
- Vacuums: Ensure they’re in working order and have sufficient power (5 – 7 HP) for your job.
- Test kits: Confirm pH test strips or litmus paper are within their expiration dates.
- Concrete mix: Check labels to ensure you’ve got the right type and strength (3000 – 4500 psi) for your project. Verify water-cement ratio is correct (0.45 – 0.6).
- Consumables: Gather enough plastic sheeting, tape, and other supplies to protect your forms.
- Miscellaneous tools: Check trowels, edgers, and levels for damage or wear. Ensure you have proper safety gear (gloves, glasses, etc.).
Quick rule: Always check your tools and materials before starting. Skipping this can lead to delays, rework, and wasted concrete.
Safety, ventilation and PPE best practices
First off, always check the safety data sheets that come with your concrete products. They know their stuff better than anyone.
Now, let’s talk about keeping you safe while you’re mixing and pouring:
- PPE: Wear a hard hat, safety glasses, gloves, and steel-toed boots. Long sleeves and long pants are a good idea too.
- Ventilation: Concrete dust can be harmful if inhaled. So, keep your work area well-ventilated. If you’re working in an enclosed space, use a respirator with a particulate filter.
- Handling: Never mix or pour concrete alone. Always have someone nearby to help in case of accidents. And remember, wet concrete can cause chemical burns, so keep it off your skin and out of your eyes.
Material specs, standards and maintenance schedule
The right materials ensure your concrete project lasts and looks good. Here’s what you need to know.
- Concrete mix design: Look for a mix designed for your task (e.g., C80 for driveways, C25 for foundations). Check the bag for ‘conforms to BS EN 206-1’ standard. Avoid cheap mixes with low cement content.
- Cement: Use ordinary Portland cement (OPC) or blended cements like CEM II/A-L or CEM III/A. Check the label for strength class (e.g., 32.5R, 42.5N). Avoid rapid-setting cements unless specified.
- Aggregates: Use clean, well-graded aggregates. Check the size (e.g., 10mm, 20mm) and grading (e.g., 6F2, 40mm down). Avoid recycled aggregates for structural work unless specified.
- Admixtures: Use air-entraining admixtures for durability in cold regions. Check the label for compliance with BS EN 934-1/2 standards. Avoid using too much, as it can weaken concrete.
- Waterproofing membrane: For basements and water-retaining structures, use a bituminous or polymer-based membrane. Check for compatibility with your concrete mix. Avoid cheap membranes that don’t stick well.
- Concrete sealers: Use acrylic, epoxy, or polyurethane sealers to protect the surface. Check for UV resistance and ease of application. Avoid cheap sealers that yellow over time.
Pro tip: Always buy materials from reputable suppliers who can provide test certificates. Store cement in a dry place, and use aggregates within 30 minutes of mixing to prevent segregation. When mixing, use clean water and follow the manufacturer’s guidelines for admixtures.
Conclusion
Keeping pinholes from spoiling a floor coating comes down to safety, proper prep, and disciplined execution. When moisture is controlled, primers are chosen correctly, and the squeegee workflow is followed, you get a durable finish that looks right and lasts.
Check in this order: verify substrate moisture with the recommended test, confirm the primer type and application plan, perform a small-area test for pinholes, apply the squeegee workflow consistently, manage offgassing during and after installation, inspect for pinholes and seal any gaps, then nail down material quantities, coverage, and safety steps before full coating and final maintenance.
Avoid these pitfalls: rushing the test or skipping it, using the wrong primer for the surface or moisture level, skipping ventilation or PPE, and rushing repairs without curing time. Always follow the manufacturer guidelines, test in a small area first, and don’t pull layers or cover critical edges until the coating is set and dry.
If moisture is high, the substrate is complex, pinholes persist after repair, or offgassing continues beyond expected times, call a professional. Stay practical, stay safe, and you’ll finish with a floor that holds up and looks solid for years to come.
FAQ
What steps reliably prevent pinholes during coating application?
Start with a clean, properly profiled surface. Use the recommended primer and follow the manufacturer’s layering and drying times exactly. Watch for dust traps, lingering moisture, and improper roller or squeegee passes that can leave gaps.
Why are primer coats important for moisture control and pinhole prevention?
Primer helps seal the substrate and provides a uniform bite for the top coating. It reduces moisture movement and improves adhesion, which cuts down on pinholes. Check the product label or datasheet for specific moisture notes and cure times.
How should I use a squeegee to minimize pinholes and ensure even coverage?
Apply even pressure, keep a consistent angle, and make one smooth pass in each direction as instructed by the coating system. Avoid stopping mid-pass and watch for air entrainment that can trap bubbles. If you see streaks, back up and rework the area per the manufacturer’s guidance.
How do I manage offgassing and vapor release during and after installation?
Use a proper vapor barrier system and ensure all components are compatible with the substrate. Ventilate as recommended and follow curing guidance from the product instructions. If you detect prolonged odors, consult the label for safe handling and possible ventilation changes.