
Introduction
A drip edge on stucco bands is metal flashing that keeps water from wicking back into the wall. If it’s missing, water can run behind the finish and cause staining or damage. In DIY terms, assess the area by looking for exposed edge along the band and note the flashing orientation.
To fix it, you’ll need to install proper flashing under the stucco band and seal joints. Check local rules and product instructions for flashing type and weatherproof sealants. Take care not to trap moisture and test the repair with a gentle water spray after you’re done.
Key takeaways
- Check for missing drip edge causing water tracking along stucco bands before repair.
- Confirm correct drip edge orientation and sealant compatibility with masonry surfaces.
- Use appropriate flashing and weather barrier re-installation during repair steps.
- Safety: wear goggles, gloves, and harness when working at height near edges.
- Verify with water spray or approved testing method after repairs to confirm sealing.
- Document junctions and maintenance plan to prevent future drip-edge failure.
Table of Contents
- Introduction
- Key takeaways
- What a Drip Edge on a Stucco Band Is and Why It Matters
- Diagnosing a Missing or Failing Drip Edge
- Common Causes and Scenarios That Lead to Missing Drip Edges
- Tools and Materials Checklist for a Repair
- Step-by-Step Repair Workflow (Overview)
- Critical Junctions and Tricky Detail Solutions
- Testing, Verification, and Quality Checkpoints After Repair
- Maintenance, Prevention, and When to Call a Professional
- Conclusion
- FAQ
What a Drip Edge on a Stucco Band Is and Why It Matters
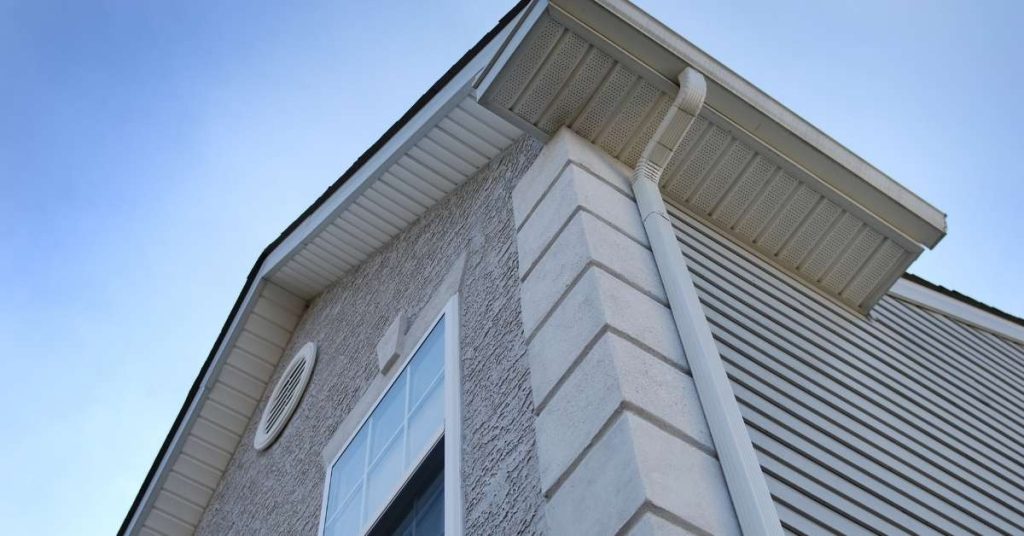
A drip edge on a stucco band is a small flashing detail that protects the wall below the siding. It helps shed water away from the face of the wall and toward the exterior. Its absence can allow water to track behind the band and leave staining or moisture issues that mimic bigger problems.
Use this section to set the repair scope, distinguishing a fix for the detail from a full wall replacement. Check manufacturer instructions or local code guidance if you need a spec to follow, and verify whether your project requires a complete weather barrier inspection as well.
Anatomy of a stucco band and associated flashing
A stucco band is more than just a strip of stucco. It’s a system designed to control moisture around windows, doors, and other openings. Here’s what makes it up:
Metal Flashing/Drip: This is the drip edge we’re talking about. It’s a piece of metal that slopes away from the wall, encouraging water to drip off instead of soaking in.
Cap Bead: This plastic or metal strip goes over the top of the flashing, holding it in place and preventing stucco from getting behind it.
Lath/Mesh, Scratch/Finish Coats: These are the supports and layers that make up the stucco itself. They’re designed to be porous, allowing moisture to escape while keeping out bulk water.
Weep Screed: This is a small gap at the bottom of the band, usually filled with gravel or a weep tube. It allows any trapped moisture to drain out.
How water tracking develops without a drip edge
When the drip edge is missing, water doesn’t just roll off. Instead, it starts to wick into the stucco and behind it.
Capillary Action: This is when water moves through tiny spaces by itself, like how a paper towel soaks up a spill. Without the drip edge, water can move right into the wall.
Wind-Driven Rain: When it rains hard and windy, rain can be forced behind the stucco band. If there’s no drip edge to stop it, this water can get trapped and cause problems.
Overflow: Even if the stucco itself is doing its job, if there’s too much water (like during a heavy storm), it can overflow the top of the band and start seeping into the wall. Without a drip edge, there’s nothing to stop this.
Diagnosing a Missing or Failing Drip Edge
Start with a careful visual walk-around to spot missing flashing or misfits at the stucco band. Look for gaps, pulled seals, or exposed substrate where flashing should be. Note any staining, soft spots, or peeling paint that may indicate water ingress near the band.
Correlate findings with roof edge conditions and trim connections to confirm how water could enter. If you’re unsure about the exact flashing type, label it or consult the manufacturer instructions to match the correct part before proceeding.
Visual checkpoints for exterior inspection
Use this checklist when inspecting your home’s exterior to identify signs of a missing or failing drip edge on stucco bands.
- Staining patterns: Look for dark, discolored areas below the stucco band. These could indicate water tracking.
- Flake-off paint: Peeling or bubbling paint at the band’s edge might signal trapped moisture.
- Rust streaks: Vertical rust lines on metal trim near the band could mean water is wicking up from below.
- Cracked stucco: Cracks in the stucco band itself or at its edges may allow water intrusion.
- Gaps at band edges: Spaces between the stucco band and adjacent surfaces can let water seep behind the band.
- Photograph problem areas: Document any issues you find to aid in diagnosis and future reference.
Quick rule: Don’t skip any visible signs. Each could point to a bigger issue hidden behind the stucco.
Moisture checks and non-destructive testing
Before you start invasive testing, use these tools and techniques to locate hidden moisture and assess the severity of the issue.
Moisture meters: These devices measure the moisture content in materials. Use them on stucco, wood, and drywall to detect water intrusion. Start at the suspected problem areas and work outwards.
Infrared imaging: This technology detects temperature differences, which can indicate moisture behind surfaces. It’s especially useful for large-scale inspections or when other methods are inconclusive.
Gentle probes: Use a small, sharp tool to carefully probe suspected problem areas. Look for soft spots, discoloration, or dampness. If you find any, consider escalating to invasive testing like opening up walls or removing stucco.
Common Causes and Scenarios That Lead to Missing Drip Edges
Common scenarios include original construction omissions, remodels that didn’t account for flashing, or incompatible materials that fail over time. Long-term exposure to weather can degrade metal flashings and sealants. These factors often combine to allow water tracking behind the stucco band.
Use this section to map typical failures you might encounter on your project, so you can plan the repair path. Check project notes or local guidance if you’re dealing with historic or tied-in structures that have special requirements.
Construction and detailing errors
During construction, mistakes can happen that lead to improper drip edge installation. Here are some common detailing errors to avoid:
- Improper laps: Flashing should overlap, not be lapped over. This ensures water runs off the face.
- Reversed flashing orientation: Drip edges must slope downwards and outwards to direct water away from the wall.
- Failure to integrate with weep screed: The drip edge should align with the weep screed to allow water to escape at the base.
- Inadequate attachment: Securely fasten flashings to prevent them from moving or peeling off.
Proper detailing during installation is crucial to prevent water tracking and damage.
Damage from weather and corrosion
Over time, weather conditions and corrosion can take a toll on drip edges. Here’s how:
Corrosion: Metal flashings can corrode over time, especially in humid or salty environments. This weakens the material and causes it to fail.
Impact damage from falling branches, ladders, or other objects can displace or dent drip edges, allowing water to seep behind.
Movement of adjacent components like roofing or gutters can also cause flashings to shift out of place. Regular inspections and timely repairs are key to preventing these issues.
Tools and Materials Checklist for a Repair
Assemble a practical kit that covers assessment and repair, including basic hand tools, a pry bar for edge checks, and appropriate flashing materials. PPE such as gloves and eye protection is essential. Have a suitable sealant and compatible exterior flashing on hand as options.
Note alternatives in case you need to rent or borrow items. Always verify product labels and manufacturer instructions to confirm compatibility with stucco and the existing siding setup, and follow local rules for weather barriers.
Material specs and compatibility to check
Before you start, ensure your materials are compatible and up to code.
- Metal type and coating: Check if it’s galvanized steel or aluminum. Coating should be suitable for exterior use.
- Sealant compatibility with stucco: Ensure the sealant won’t damage or repel your existing stucco.
- Fastener type: Use pop rivets or screws that match your metal’s thickness and meet local codes.
- Local code requirements: Check if your materials comply with local building codes.
- Manufacturer integration requirements: Follow the manufacturer’s guidelines for their products.
Quick rule: Always double-check material compatibility to prevent future issues.
Essential tools and safety gear
Gather these tools and safety equipment before you begin your repair.
- Metal snips: For cutting the drip edge to size. Use aviation snips for thin metal.
- Pop rivet/counter-sink tool: To secure the drip edge in place.
- Caulk gun: For applying sealant around the drip edge.
- Ladders: You’ll need a sturdy ladder to reach the stucco bands. Ensure it’s tall enough and stable.
- Safety glasses: Protect your eyes from debris during cutting and nailing.
- Work gloves: To protect your hands while handling materials and tools.
- Hard hat (optional): If working above ground level, a hard hat can prevent head injuries.
Quick rule: Always prioritize safety. Use stable ladders and follow fall-prevention practices.
Step-by-Step Repair Workflow (Overview)
Outline a high-level sequence from initial assessment to final finish. Start with access and substrate prep, then install the correct flashing to direct water away from the band. Finish with proper sealing and paint or finish work as needed to prevent future tracking.
Keep the focus on preventing water from infiltrating behind the stucco band and maintaining the weather barrier. If uncertain about a step, verify requirements from the flashing manufacturer or local regulations before proceeding.
Step-by-Step Repair Process
This section guides you through a clear, numbered sequence of practical steps to repair your missing drip edge on stucco bands effectively.
- Safety first: Put on gloves, safety glasses, and a dust mask. Tie back long hair.
- Inspect the area: Check for any hidden damage or rot using a flashlight and mirror.
- Remove damaged stucco: Carefully chip away loose or cracked stucco with a cold chisel and hammer.
- Examine substrate: Inspect the lath and sheathing. If damaged, replace before proceeding.
- Clean up: Remove all debris from the work area to ensure proper adhesion of new materials.
- Install drip edge/flashing (next step): Follow the detailed instructions in the next section.
- Seal details: Apply sealant at all joints, overlaps, and terminations as directed by the manufacturer.
- Re-lath and finish stucco (final step): Repair lath, apply scratch and finish coats, and match texture/color for a seamless repair.
- Final check: Inspect your work from various angles to ensure proper installation and aesthetics. If unsure, consult a professional.
Removing/ preparing the stucco band and substrate
Carefully removing or trimming the damaged stucco band and preparing the substrate is crucial for a successful repair.
Use a cold chisel and hammer to carefully chip away damaged stucco. Protect surrounding finishes with drop cloths or cardboard.
Be cautious not to damage adjacent finishes or penetrate the sheathing unless necessary to expose it for inspection.
If you encounter rotten lath or framing, replace it before proceeding. Ensure the substrate is clean, dry, and sound before installing new drip edge/flashing.
Installing new drip edge/flashing and sealing details
Correctly installing the new drip edge/flashing is vital to prevent future water tracking.
Position the flashing with the drip edge facing down, overlapping existing flashings by at least 2 inches. Secure it with corrosion-resistant fasteners spaced no more than 6 inches apart.
Seal all joints, overlaps, and terminations using a compatible sealant as directed by the manufacturer. Ensure the drip edge ties into adjacent flashings and the weep screed for proper water management.
Proper installation ensures that water is directed away from the stucco band, preventing future tracking and damage.
Re-lath, patching, and finishing the stucco band
Repairing the lath, applying new stucco coats, and matching texture/color are essential for restoring weatherproofing and aesthetics.
Replace any damaged lath with new material. Apply a scratch coat of stucco, allowing it to cure as directed by the manufacturer. Then apply a finish coat, ensuring it matches the existing texture and color.
Proper curing is crucial for the longevity of your repair. Follow manufacturer guidelines for optimal results. Inspect your work from various angles to ensure a seamless repair.
If you’re unsure about any aspect of the finishing process, consult a professional stucco contractor for guidance.
Critical Junctions and Tricky Detail Solutions
Concentrate on junctions that commonly fail, such as corners, window and door heads, and roof-to-wall transitions. Provide detail-level fixes that ensure continuity of the weather barrier and proper flashing overlap. Sequence these steps to avoid creating new water paths during repair.
When in doubt, document the existing condition and confirm with the manufacturer guidance or code requirements for each junction. Avoid improvising a fix without understanding how the flashing and sealants interact at that point.
Corners, returns, and continuous flashing strategies
At corners, form inside and outside corner returns to direct water away from the wall. Use a flexible flashing tape or metal flashing for these returns.
Key: Lap the flashing on the outside of the corner to ensure water runs off smoothly.
Never create a collection point for water by lapping flashing inwards at corners. This can lead to water buildup and leaks.
Integrating with windows, doors, and trim
Start by installing head flashings on windows and doors. This creates a barrier that prevents water from entering above the opening.
Tip: Back-flash the drip edge under the head flashing to ensure water is directed away from the window or door.
Next, install trim pieces. Make sure they overlap the drip edge slightly to maintain a continuous weather barrier. Never leave gaps that could allow water to seep in.
Testing, Verification, and Quality Checkpoints After Repair
Describe practical methods to verify the repair is effective, such as visual checks and basic water-testing ideas appropriate to your site. Record findings for warranty purposes and future maintenance plans. Plan for a follow-up inspection after a weather event or seasonal changes.
Document the steps taken and the materials used, so you have a clear record for future work or contractor warranties. If you’re unsure about test methods, consult product data sheets or local guidance for recommended verification practices.
Simple water tests and observation tactics
Before you call the job done, make sure your repair is holding up against moisture. Use this checklist after rain or during a controlled hose test.
- Check for runback: Look for water tracking down the stucco band. If present, it’s a sign that the drip edge isn’t doing its job.
- Inspect for staining: Water stains can indicate where moisture is getting in or behind the stucco.
- Observe sealant joints: Ensure all sealant joints are intact and haven’t been dislodged by water pressure.
- Examine corners: Corners are critical junctions. Make sure water isn’t pooling or tracking there.
- Check windows and doors: Ensure water isn’t running behind trim or getting into window/door frames.
- Inspect flashing terminations: Check that all flashing ends are properly sealed and haven’t been compromised.
- Look for efflorescence: White, powdery deposits can indicate moisture migration through the stucco.
- Photograph findings: Keep before-and-after photos to track progress and troubleshoot any future issues.
Quick rule: If you find any signs of water intrusion, don’t wait. Address them immediately to prevent further damage.
Documentation and homeowner sign-off checklist
Before the job is considered complete, both contractors and homeowners should verify that all work meets quality standards. Use this checklist for a thorough sign-off.
- Materials used: Confirm that all specified materials were indeed used in the repair.
- Visible terminations: Check that all flashing and sealant terminations are visible and properly installed.
- Sealant continuity: Ensure there are no gaps or breaks in the sealant beads at junctions and corners.
- Photographic record: Take photos of all repaired areas for future reference and warranty purposes.
- Warranty information: Provide homeowners with clear details about any warranties covering materials or labor.
- Maintenance guidelines: Offer advice on how to maintain the repair and prevent future issues.
- Contact information: Leave your contact details in case homeowners have questions after you’ve left.
Quick rule: A thorough sign-off checklist helps protect both contractors and homeowners, ensuring everyone’s on the same page about the repair’s quality and longevity.
Maintenance, Prevention, and When to Call a Professional
Offer preventive actions homeowners can perform to keep the drip edge functioning, such as periodic caulking checks and clear drainage paths. Look for signs that maintenance is needed, like new stains or peeling paint near the band. Regular checks help catch issues before they worsen.
Explain red flags that mean a building-envelope specialist or contractor should be involved. Rely on labeled product instructions, manufacturer guidance, and local rules when deciding to hire a pro for complex junctions or structural concerns.
Routine inspection and maintenance tips
Regular upkeep is key to preventing water tracking issues. Use this checklist quarterly, or after severe weather.
- Spring/Summer: Clear debris from stucco bands and gutters. Check for any cracks or gaps that might have formed over winter.
- Fall: Ensure all joints are properly caulked to prevent water intrusion during heavy rain and snow melt.
- Winter: Inspect for ice dams, which can cause water to back up under the stucco and find its way inside.
- Year-round: Check all sealants around windows, doors, and other openings. Re-caulk if necessary.
- After storms: Inspect for any damage caused by high winds or heavy rain. Repair immediately to prevent further issues.
Quick rule: Regular maintenance is cheaper than repairs. Don’t wait until it’s too late.
When to hire a contractor or specialist
While DIY repairs are great, there are times when professional help is needed. Here are some signs:
Interior moisture: If you’re seeing water stains on ceilings or walls, or finding damp spots in your home, it’s time to call a pro. This could indicate a serious leak that needs immediate attention.
Large or multiple compromised bands: If several stucco bands are damaged or one is severely compromised, it might be best to leave the repair to a specialist. They have the tools and experience to handle big jobs safely and effectively.
Structural rot: If you suspect there’s structural damage due to water intrusion, do not attempt repairs yourself. This is a job for a licensed contractor who can ensure your home’s safety and stability.
Roof rework or invasive investigation: If the repair requires significant work on the roof or involves cutting into walls or ceilings, it’s best to hire a professional. They know how to minimize damage and get the job done right.
Conclusion
This fix matters because a proper drip edge stops water from tracking into the band and stucco, protecting the framing, keeping the finish dry, and avoiding costly damage. Do it right and you gain safety, durability, and a clean look that lasts.
Check in plain terms: inspect the existing edge and its condition, confirm grading and drip at each window and seam, gather the exact tools and materials, follow the repair workflow in sequence, test the system in a small area first, verify that water runs away from the wall, and then monitor for a few cycles after the repair, repeating touch-ups as needed. Keep the work tight and work deliberate, not rushed, and document any changes for future reference.
Avoid these mistakes: skip testing the repair, try to hide bad flashing under stucco, or rush the detail with improper sealants or fasteners. Always work from dry, safe surfaces, use fall protection when above ground, and clean joints before applying any coating or flashing. Simple rules: slow, methodical upgrades first, then test thoroughly before calling it a wrap.
If the project demands unfamiliar details, or you hit stubborn flashing or compromised framing, it makes sense to call a professional. When in doubt, stop and verify the critical junctions with a second opinion. Stay patient, stay safe, and you’ll finish with a solid, lasting result.
FAQ
Can I repair a missing drip edge on stucco bands myself?
You can do a basic repair, but make sure you understand the underlying flashing and drainage needs. Follow manufacturer instructions for any products you choose and verify local rules if they apply to your area.
What materials should I use for reinstating a drip edge on a stucco band?
Use materials rated for exterior use and compatible with stucco. Check product labels and install per the instructions—seal the joints, and ensure it’s sloped to shed water away from the wall.
How do I ensure proper flashing and water drainage after the repair?
Create a small drip at the edge to direct water away, and verify that downstream flashing or weep paths remain clear. After installation, test with light rain or a hose to confirm water sheds rather than pools.
What red flags mean I should call a professional?
If you see structural damage, persistent leaks, or you’re unsure about the flashing path, stop and get advice. Get the exact product instructions and any local guidance before proceeding.