

Introduction
Raking light uses side-on illumination to highlight surface irregularities in concrete and plaster. This technique helps you spot waves and tool marks early, so you can address them before finishing. Set up an adjustable light at a low angle and sweep it across the area to reveal texture.
Use a portable light with a focused beam and position it along the edge of the surface for best contrast. Move the light slowly across the area to scan for high and low spots while you work. Always check manufacturer instructions and local guidelines for safe electrical setups and suitable tools.
Key takeaways
- Use raking light at low angle to reveal surface waves in concrete/plaster.
- Schedule inspections during early finishing and final curing stages to catch defects.
- Prepare adjustable lighting, scrims, and flags to minimize glare and shadows.
- Document findings with photos from raking angles for comparison later.
- Safety: wear eye protection, avoid ladder overreaches, and secure cords.
- Align lighting technique with finish goals; adjust for hollows, waves, and flatness.
Table of Contents
- Introduction
- Key takeaways
- What Raking Light Is and Why It Matters for Finishes
- When to Inspect: Project Stages and Inspection Frequency
- Equipment Types and What to Look for
- Tools and Materials Checklist for a Raking-Light Inspection
- Step-by-Step Raking Light Inspection Process
- Common Defects Raking Light Reveals and How to Interpret Them
- Mistakes to Avoid and Troubleshooting Common Issues
- Safety, Cost Considerations, and Planning for Inspections
- Conclusion
- FAQ
What Raking Light Is and Why It Matters for Finishes
Raking light is oblique illumination that highlights surface texture, waviness, and hidden deviations on concrete and plaster. It exaggerates micro-roughness without requiring drastic scene edits. This technique is most effective during initial finish evaluation and before shaping the final skim or leveling work.
The optical principle is approachable: grazing incidence creates long shadows and bright highlights that reveal irregularities as waves or pinholes. Under raking light, tiny defects become perceptible even when they are not visible under diffuse lighting. Use this to guide patching, troweling, and refinement decisions before closing the surface.
Definition and Optical Principle
Raking light, also known as grazing light, is an oblique illumination technique used to accentuate surface texture and micro-waviness. It’s most effective when the light source is positioned at a low angle to the surface, typically within 10 to 20 degrees.
The optical principle behind raking light relies on grazing incidence, where light rays hit the surface at a shallow angle. This creates long shadows that emphasize even minor deviations, making them visible as waves or imperfections. Additionally, it produces specular highlights, which are intense reflections that further accentuate these defects.
To ensure effective finish work, understand how raking light operates. To verify your comprehension, ask yourself: How does oblique illumination exaggerate surface texture? If you’re having difficulty identifying defects under raking light, review optical principles and practice setting up lighting conditions.
The Consequences of Missed Waves
Missing waves or imperfections during finish work can lead to costly rework, cosmetic issues, and even functional problems. Typical rework scenarios include additional passes with a trowel for concrete surfaces or respraying plaster skim coats.
Cosmetically, missed waves can result in visible inconsistencies on the finished surface, marring its smooth appearance. Functionally, they can compromise the integrity of the finish, leading to issues like peeling paint or cracked plaster over time.
To understand the potential costs of missing waves before finishing, consider: additional labor for touch-ups, extra materials required for rework, and extended project timelines. If waves are detected after painting or finishing, plan for these additional resources.
To prevent such issues, implement a staged inspection protocol using raking light to catch problems early. This will help ensure finish quality and save time and material costs in the long run.
When to Inspect: Project Stages and Inspection Frequency
Link project stages to raking-light checks by pairing substrate preparation, form work, pour, initial set, curing, and finish with specific light-check goals. Each phase benefits from a tailored inspection focus and timing. Build checks into the workflow so flaws are spotted early.
Establish a practical cadence that matches pace and critical moments, such as after pours, during early set, and just before sealing or patching. Define triggers for additional checks during busy periods or extended curing. Keep a simple log to document location, severity, and actions taken.
Key Project Milestones for Checks
Inspect your concrete or plaster finish at these critical stages to ensure timely detection of waves.
- After screeding/leveling: Check for any initial flatness issues before proceeding with the pour.
- Post-pour form removal: Inspect the surface for waves or other defects caused by forms.
- During early set (initial trowel pass): Ensure the surface is smooth and free of waves as it begins to harden.
- Mid-curing: Check for any waves that may have developed during the curing process.
- Before patching or sealing: Inspect for waves before applying any final finishes.
- Final sign-off: Perform a thorough inspection to ensure the finish meets quality standards.
Quick rule: Always inspect after each major finish pass and before proceeding to the next stage.
How Often and Who Should Check
Establish a regular inspection schedule and assign roles to maintain quality control throughout your project.
- Installer: Perform daily checks during critical pours and finish work. Focus on visual inspections with raking light after each major pass.
- Supervisor: Conduct weekly or per-cycle checks during the curing process to monitor progress and address any issues early.
- Quality Assurance (QA): Perform final sign-off inspections to ensure the finish meets project requirements and quality standards.
- Additional checks: Triggered by visual observations, weather changes, or equipment malfunctions. Always inspect after any significant event that could affect the finish.
Quick rule: Regular inspections by assigned roles help maintain quality control and prevent delays.
Equipment Types and What to Look for
Introduction
For construction site inspections, consider the following light sources: handheld LED work lights, adjustable stand-mounted floodlights, and small portable tripods. Each is suited to different tasks:
- Handhelds are ideal for tight spots on concrete.
- Stand lights are suitable for broader plaster surfaces.
- Tripods provide steady overhead angles.
Prioritize the following features when selecting lighting equipment:
- High Color Rendering Index (CRI) of 90+ for accurate color representation.
- Color temperature range of 3500–5000K for natural light appearance.
- Adequate lumen output and a wide, controllable beam to illuminate the work area effectively.
- Flicker-free operation to avoid eye strain during long sessions.
- Effective heat management to ensure longevity.
Additionally, consider:
- Battery life and recharge time for cordless units.
- Corded or cordless operation based on your site’s power availability.
- Durability, indicated by IP rating and impact resistance.
- Portability for easy transportation between sites.
- Quick setup to minimize installation time.
On site, briefly test the beam angle and adjust height and angle to reveal subtle waves without creating glare or shadow masking defects. To avoid color distortion and hidden defects, choose high CRI (90+) lighting.
To select suitable options, weigh cost-to-performance ratio, reliability, battery life, and after-sales support. This will help you make an informed decision based on your specific needs and budget.
Handheld Inspection Lights and Torches
Consider the following factors when choosing handheld LED work lights for raking inspections.
- Beam angle: Opt for an adjustable beam to accommodate various surface types. A too narrow beam may cause harsh shadows, hindering defect detection.
- Lumen output: Ensure the light provides sufficient brightness (500-1000 lumens) for clear visibility in different conditions.
- Battery life: Verify the battery lasts long enough (2-4 hours) to complete thorough inspections without frequent recharging. Check the product label or manufacturer instructions for specific details.
- Dimmer feature: Prefer lights with adjustable brightness to suit different inspection needs.
- CRI (Color Rendering Index): Ensure it’s 90+ for accurate representation of surface defects’ true colors. Refer to the product specifications or manufacturer claims.
- Color temperature: Check if it falls within the range of 3500-5000K for accurate surface reading. Consult the product label or manufacturer instructions.
- Flicker-free performance: Confirm this feature to avoid eye strain and ensure clear visibility during long sessions.
- Heat management: Ensure lights do not overheat, causing discomfort or damage during prolonged use. Check local safety guidelines for specific heat limits.
Guideline: For detailed inspections, prioritize portability, focused beams, adjustable brightness, and sufficient battery life to ensure optimal performance.
LED panels, strip lights, and adjustable fixtures
When choosing LED lighting for raking inspections, consider the following:
Diffuse vs concentrated grazing light: Diffuse light (like LED panels or strip lights) is ideal for large areas and even coverage. Concentrated grazing light (adjustable fixtures with narrow beam angles) helps detect fine defects.
Adjustable angle and brightness: Prefer fixtures that offer adjustable beam angle and lumen output to optimize lighting conditions during inspections.
CRI and color temperature: Ensure the fixture offers high CRI (90+) and a color temperature range of 3500-5000K for accurate surface reading.
Stands, clamps, batteries, and mounting accessories
Supporting gear plays a crucial role in keeping lights steady and at the correct height/angle during thorough inspections. Consider the following:
Lightweight, stable stands: Prefer stands that are lightweight yet sturdy to keep lights steady during inspections.
Clamps for versatile mounting: Choose clamps that are compatible with your light fixtures and offer flexible mounting options for hard-to-reach areas.
Sufficient battery life or power supply: Ensure your lighting equipment has enough power to last through inspections without interruptions.
Tools and Materials Checklist for a Raking-Light Inspection
Use a portable adjustable rake-light setup that can reach across areas of interest. Include eye protection, gloves, and a stable mount to free your hands for scanning. Have a clear path for moving between zones safely.
Bring marking supplies, multiple tape colors, and small pre-marked sample boards for texture comparison. Pack measuring aids, a rigid ruler, and a moisture or adhesion gauge if applicable. Carry a camera or smartphone for photos and a notebook for notes.
Inspection and Measurement Tools
Accurately assess your concrete or plaster finish work with these essential tools for a thorough raking-light inspection:
- Straightedges: Detect waves or undulations in surfaces. Use rigid straightedges or aluminum rulers (6′ – 10′) to quickly scan surfaces, then verify with a level.
- Long Levels: Check horizontal surfaces for flatness. Use torpedo or magnetic spirit levels (48” – 96”) to ensure accurate readings.
- Feeler Gauges/Depth Probes: Measure gaps or inconsistencies. Use feeler gauges or depth probes (0.1mm – 5mm) at intervals to check depths and ensure consistent finish.
- Camera/Phone: Record findings and document progress. Capture images of notable areas, flagged zones, and calibration points using a smartphone or camera with macro capability.
Marking and Documenting Materials
Choose the right marking supplies to efficiently track and communicate findings during your inspection:
- Marking Pens: Use appropriate pens for different surface types. Opt for dark-soft pencils or markers rated for concrete, plaster, or other specific surfaces to avoid staining.
- Flagging Tape: Highlight issues and mark areas of concern. Use painter’s tape in multiple colors (e.g., red for critical issues, yellow for warnings) to quickly identify problem zones.
- Logging Template/Photo Naming Convention: Maintain organized records. Develop a simple logging template or photo naming convention (e.g., date_area_issue) to keep track of findings and facilitate repair planning.
Site Setup and Protective Gear
Ensure a safe, clean workspace for efficient inspection by using the following equipment:
- Personal Protective Equipment (PPE): Wear appropriate gear at all times. Include safety glasses or goggles to protect eyes from debris, gloves to handle tools and surfaces safely, and hard hats in case of falling objects.
- Cable Management Items: Prevent tripping hazards. Use cable ties, cord organizers, or cable channels to keep cords and cables tidy and out of walkways.
- Temporary Surface Protection: Minimize damage or contamination. Use drop cloths, covers, or surface protectors to shield surfaces from tools, debris, or spills.
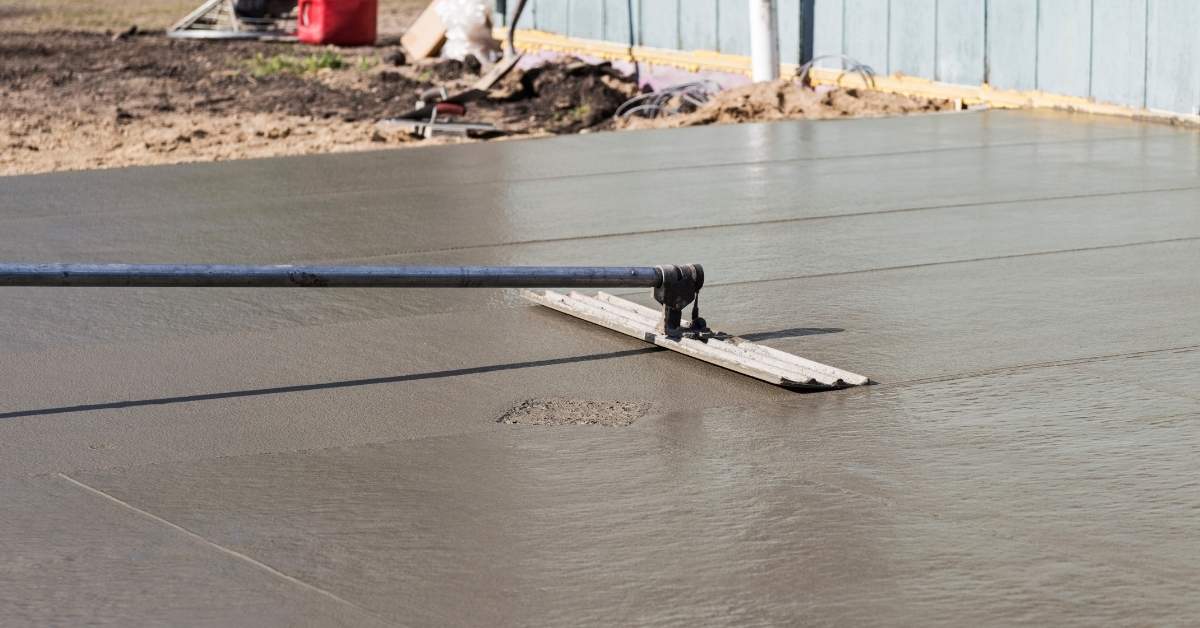
Step-by-Step Raking Light Inspection Process
Prepare the surface with cleaning and dust control, plus the appropriate PPE. Set up the rake light at a repeatable angle and position to ensure consistency. Create a calm, controlled inspection environment.
Follow a repeatable sequence: assess a drying state, sweep the area with the light, and divide the surface into zones. Document findings with templates and photos that include scale references. Use clear criteria to guide remediation decisions and next steps.
Step-by-Step Process
The following steps outline a thorough, consistent raking light inspection process for concrete and plaster surfaces.
- Preparation and Safety: Ensure site safety, access, and review equipment, tools, and materials checklist. Wear appropriate PPE and maintain good working conditions to prevent accidents.
- Surface Preparation: Clean and dry the surface using the provided checklist to eliminate false positives from dust or reflections.
- Lighting Setup: Position lights low to the plane, sweep across surfaces, and vary distance/angle to reveal subtle defects. Ensure light stands/clamps are secure and adjust intensity as needed.
- Inspection: Inspect the surface in a systematic grid or zone method, following the drying state and timing after plaster/concrete set for accurate readings.
- Documentation: Document defects using standardized note templates, color-coded defect codes, and mandatory photo sequences with scale references. Review equipment, tools, and materials checklist to ensure all items are accounted for.
- Evaluation and Remediation: Classify waves by height and frequency, set thresholds for acceptable finish, and recommend corrective actions or rework steps based on evaluation criteria.
- Repeatability and Training: Use checklists for inspectors, quick-reference cues, and a simple QA loop to verify consistency across crews and shifts. Train staff on the process and provide regular refresher courses.
Preparing the surface and workspace
Before starting the raking light inspection, follow this checklist to prepare the surface and workspace for accurate results.
- Surface Cleanliness: Remove visible dirt, debris, and loose material using a soft-bristled brush or vacuum. Ensure the surface is dry to touch.
- Dust Control: Use compressed air or a damp cloth to remove residual dust. Allow the surface to dry completely before proceeding.
- Lighting Control: Minimize reflections by adjusting lighting angles and using anti-glare materials if necessary.
- Safety: Ensure the workspace is clear of obstacles, and there are no tripping hazards.
- Accessibility: Make sure all areas to be inspected are accessible. Remove any obstructions or coverings.
- Temperature Control: Maintain a consistent temperature in the workspace to prevent thermal expansion or contraction of the surface.
- Moisture Control: If inspecting after concrete pouring, ensure the surface has reached the appropriate moisture content for inspection.
- Protective Gear: Wear appropriate PPE, including safety glasses and gloves, to protect against potential hazards.
Quick rule: Always prioritize safety and accessibility when preparing the workspace.
Positioning Lights and Selecting Angle
Proper positioning of raking light is crucial for accurate surface inspection. Follow these guidelines to set up your lighting effectively.
- Light Height: Position the light source low to the plane of the surface, typically around 45 degrees from horizontal.
- Sweep Angle: Sweep the light across the surface at a consistent angle, usually between 30 to 60 degrees from vertical.
- Distance and Intensity: Vary the distance of the light source from the surface and adjust its intensity to reveal subtle defects. Start close with low intensity, then move away and increase intensity as needed.
- Light Source Type: Use a suitable light source, such as LED, with adjustable intensity for better control.
- Stand or Clamp Security: Ensure the light stand or clamp is secure to prevent accidental movement during inspection.
- Shadow Control: Minimize shadows by using multiple light sources or adjusting their positions.
- Consistency: Maintain a consistent lighting setup across all inspections for accurate comparisons.
Safety Tip: Always test your lighting setup on a small, hidden area before starting the inspection to ensure it reveals defects accurately.
Marking defects and next-step assessment
Once defects are identified during the raking light inspection, follow this checklist to mark them and decide on the next course of action.
- Mark Highs/Lows: Mark high spots with a visible, durable material, such as paint or chalk. Use a different color for low spots if necessary.
- Note Severity: Document the severity of each defect using a standardized note template and color-coded defect codes.
- Scale References: Include scale references in photos to provide context for defect size.
- Immediate Remediation: If defect severity is high, recommend immediate remediation or rework. Consult with the project supervisor if necessary.
- Monitoring: If defect severity is low, recommend monitoring and re-inspection at a later stage to track progress.
- Documentation: Ensure all defects are documented accurately, with clear photos and notes.
- Consistency: Maintain consistent marking and documentation methods across all inspections for easy comparison.
Quick rule: Always prioritize accurate defect documentation to facilitate timely remediation and quality control.
Common Defects Raking Light Reveals and How to Interpret Them
Describe how waves and surface texture appear under raking light, distinguishing between superficial texture and deeper waviness. Separate flatness issues from subtle irregularities for accurate assessment. Keep the focus on finish impact rather than isolated flaws.
Group defect types by concrete versus plaster, such as level faults, laitance, air voids, or pull-outs. Use light angle, distance, and moisture as clues to probable causes. Align remediation with the surface type and finish requirements, then document findings for repair planning.
Continuous waves and ripples
Under raking light, continuous undulations or waves across your concrete or plaster surface may indicate issues with the screeding process or trowel technique. These waves can affect the overall flatness and smoothness of your finish.
Observe the pattern consistency across the surface. If waves are consistent and widespread, it suggests a problem with the initial screeding or troweling skill. Rework may be necessary to achieve a smoother finish.
Common mistake: Inconsistent screeding or improper trowel technique can lead to these continuous waves. To fix this, re-screed the surface and adjust your troweling technique or retrain applicators.
Localized High and Low Spots
Raking light can reveal localized high and low spots on your surface. These may be due to over-troweling, ridges, or improper aggregate distribution. However, some spots might also be optical artifacts.
Compare these spots with formwork lines and control joints to confirm if they are genuine defects. Inspect the surrounding area for consistency. If spots are isolated and minor, monitor them. If widespread or significant, further investigation is needed, potentially requiring rework.
Common Mistake: Over-troweling can create low spots, while ridges or improper aggregate distribution can cause high spots. To address this, remove any ridges, manage aggregate distribution, or adjust your troweling technique to avoid over-troweling.
Texture inconsistencies and trowel marks
Under grazing light, texture inconsistencies and directional trowel marks become apparent. These may impact the overall finish integrity of your surface.
Observe the directionality of trowel marks and evaluate the surface under different light angles to assess the severity of these inconsistencies. If texture is inconsistent and marks are prominent, surface remediation may be feasible to improve the finish.
Common mistake: Uneven texture or prominent trowel marks can detract from the final appearance. To address this, apply skim coats, re-trowel the surface, or grind it to even out the texture and minimize trowel marks.
Mistakes to Avoid and Troubleshooting Common Issues
The section highlights common inspection errors when using raking light, such as the wrong light angle, relying on a single sweep, and misreading glare as defects, which can cause missed waves or false positives. It emphasizes that consistent evaluation across surfaces and times of day depends on understanding how light interacts with texture and how each error skews interpretation. A practical, repeatable approach builds reliable judgments rather than quick guesses.
For DIY readers, this matters because accurate detection saves time and materials by catching waviness early and avoiding unnecessary rework. A simple light-angle checklist, multiple passes from different angles, and adjustable diffusers help minimize shadows and glare while fostering a repeatable workflow on site. On-site cues—steady casts, consistent shadows, and cross-checks with ambient light—support quick verification and a reliable photoreview routine without relying on a single viewpoint. Stake: Skipping proper raking light setup may lead to missed waves or false positives; Quick checks and pro tips reinforce good practice; If shadows are too harsh or glare obscures details, adjust distance or angle and consider diffusers or anti-glare measures.
Wrong angle, distance, or lighting intensity
Inadequate raking light can hide defects, leading to missed issues and potential rework costs. Ensure your light source is positioned at a suitable angle (not too steep or distant) and intensity (not excessively bright).
If shadows are weak or non-existent, reduce light intensity or move the source closer to the surface. Conversely, if defects are barely visible or not visible at all, increase light angle or distance, ensuring distinct and clear shadows cast.
Common mistake: Not re-evaluating the lighting setup based on decision outcomes, leading to suboptimal defect visibility.
Misreading reflections and surface moisture
Reflections, wet patches, or dust can create false positives, leading to unnecessary rework. Allow surfaces to dry before inspection, and if reflections are present, adjust light position or use a diffuser.
Inspect the area with raking light, then cross-check with ambient light or a different angle to validate suspected defects. If a suspected defect appears only under raking light, cross-check with ambient light or a different angle to confirm its legitimacy.
Common mistake: Not re-inspecting areas using decision outcomes, leading to inaccurate defect identification and interpretation.
Practical fixes and quick remediation options
Minor waves can be addressed on-site, saving time and resources. For minor waves (less than 1/8 inch), spot sand, feather, or apply a localized skim coat. However, for severe issues (greater than 1/4 inch) or extensive ones, call for rework to address the underlying issue.
Before deciding on corrective action, assess wave severity and extent. This will help you determine whether the issue can be addressed on-site or if rework is necessary.
Common mistake: Not implementing decision outcomes, leading to minor waves not being addressed on-site and severe issues not being escalated for rework.
Safety, Cost Considerations, and Planning for Inspections
Safety first governs lighting on site, with PPE, electrical precautions, and clear no-go zones around wet concrete or plaster operations. Budget considerations guide gear choices, including whether to rent or buy and how to manage cords and slip risks. Plan raking-light checks into the workflow so inspections can reveal waves before finish work proceeds.
On-site checks can be quick: observe the light’s reflection on the wet surface; if it appears wavy, further inspection is needed. A pro check: an experienced installer typically ensures lights are positioned at a consistent 45-degree angle to the surface for optimal wave detection. If Waves are detected during a raking-light check, then Immediately halt work, document findings, and notify relevant crew members and project managers for corrective action.
Safety Precautions and Site Best Practices
Before starting any work on-site, ensure you’re familiar with these safety guidelines to prevent accidents.
- Electrical Safety: Inspect all electrical equipment before use. Use GFCIs in damp areas. Follow lockout/tagout procedures.
- Ladder/Height Risks: Inspect ladders before use. Maintain three points of contact. Do not overreach or lean too far.
- Secure Trip Hazards: Keep cables secured and out of walkways. Use cable covers or tape to prevent tripping.
- PPE Reminder: Wear appropriate PPE, including hard hats, safety glasses, and high-visibility vests.
- Wet Concrete/Plaster Operations: Establish clearly defined ‘no-go’ zones around operations. Keep personnel away from freshly poured or applied surfaces.
- Temporary Wiring: Use temporary wiring sparingly and only as necessary. Follow manufacturer guidelines for extension cord use.
- Elevated-Worksite Precautions: Secure work platforms. Use guardrails where possible. Do not overload platforms.
- Emergency Procedures: Know emergency procedures, including evacuation routes and first aid.
Quick rule: Perform daily site walkthroughs to identify and mitigate potential hazards.
Cost Comparison and Budget Guidance
When selecting lighting equipment, consider these factors to optimize expenses without compromising quality.
- Price Tiers: Evaluate basic handhelds, LED panels, full kits or rentals. Consider your budget and project needs.
- Durability vs Cost: Balance cost with durability, especially in damp environments. Check product reviews for longevity.
- Cord Management: Assess cord length and management features to prevent tripping hazards.
- Anti-Slip Setups: Ensure lights have stable bases or come with anti-slip accessories to prevent accidents.
- Local Prices/Reviews: Check local prices and reviews to make informed decisions. Consider buying or renting based on project duration and budget.
- Moisture Resistance: Ensure equipment is suitable for damp environments, especially around wet concrete or plaster.
- Heat Output: Consider heat output, especially in enclosed spaces or hot climates.
- Maintenance Costs: Factor in maintenance costs and potential downtime for repairs.
Quick rule: Regularly inspect equipment for signs of wear and replace as needed to maintain safety and efficiency.
Scheduling and Incorporating Checks into Quality Control
Integrate raking-light inspections into your project timeline and quality control processes for thorough finish assessment.
- Daily/Shift Plans: Schedule light checks into daily or shift plans. Allocate sufficient time for each inspection.
- Plaster/Finish Crews: Coordinate with crews to perform light checks at optimal times, such as after initial set or before final finish application.
- Quality Milestones: Align light checks with required inspections or quality milestones. Document findings for both internal records and client transparency.
- Local Codes: Consult relevant regulations regarding temporary lighting compliance. Obtain necessary permits if required.
- Documentation: Use checklists, photo/video logs to document finish quality under raking light. Update as needed.
- Sign-Off Points: Establish sign-off points for each stage of the project, including final approval based on raking-light inspections.
- Adaptability: Review and update inspection schedules as needed to address any missed or incomplete checks.
Quick rule: Regularly review and update inspection schedules to ensure timely and thorough finish assessments.
Conclusion
Raking-light inspections are a practical way to catch waves and surface defects early, protecting the final finish from costly redo work and helping keep a durable, smooth surface for years to come. Stay focused on safety, verify results with tests in small areas, and follow a clear plan to avoid irreversible damage.
Carefully sequence your checks as you move from preparation to review: confirm you have the right light setup and protective gear, test a small patch to calibrate your eyes, inspect the entire area in a consistent pass, note any waviness or irregularities, and plan targeted touch-ups with the appropriate materials and drying times. Keep notes and photos that document what was found, what was repaired, and what remains to be checked at the next inspection, and ensure each step is complete before proceeding.
Common mistakes to avoid include rushing the inspection, skipping a test patch, or relying on a single pass to judge the finish. Always recheck after any adjustment, maintain stable lighting conditions, and use only approved materials and methods for patching or skim coating. Follow basic safety rules: wear eye protection and a respirator or mask where appropriate, avoid overworking a finish, and test repairs in a small area first to confirm compatibility and drying behavior.
If the project involves complex textures, deep repairs, or uncertain results, or if you consistently see unexpected irregularities after adjustments, seek a professional for a fresh assessment. With careful planning, steady inspection cadence, and disciplined repairs, you can achieve a reliable finish and protect the integrity of the work without delay.
FAQ
What lighting techniques are effective for revealing waves in concrete and plaster?
Raking or grazing light at a low angle across the surface helps cast shadows in texture, making waves more visible. Use a narrow beam or controlled spot light to focus along the plane without glare. Adjust the light height and distance to balance highlight and shadow for your finish.
Why is raking-light inspection important for finish work?
It highlights surface irregularities that may not show under typical overhead lighting. Early visibility allows for corrective work before the finish is sealed or too difficult to fix. It supports consistent texture and a smoother final appearance.
What tools and equipment should I have for an effective lighting setup?
Prepare a portable, adjustable light source and a means to position it at various low angles. Include a stable stand or mount, a flashlight or handheld beacon for spot checking, and protective coverings if working near wet materials. Always follow manufacturer instructions for heat and electrical safety.
How can I interpret lighting results using common architectural terms?
Look for terms like consistency of plane, highlight edge, and shadow depth to describe surface behavior under raking light. If waves vary in depth or direction, note the affected areas and potential causes. Use these observations to plan targeted fixes before finishing.