
Introduction
Keene’s cement plaster is a lime-based plaster mix that hardens to a solid wall finish.
Hardness in this plaster helps durability, but it can cause cracks if it’s applied or cured improperly.
To avoid crazing, follow proper mixing, priming, and curing practices and check product instructions for recommended working times and environmental limits.
If you’re unsure, read the label, follow local guidance, and adjust your approach for temperature and humidity on the job.
Key takeaways
- Inspect substrate cleanliness and moisture before applying Keene’s plaster to prevent crazing.
- Mix with manufacturer guidance and avoid overworking surface to minimize hairline cracks.
- Use proper wall preparation and compatible backing to reduce crazing risk.
- Control curing environment; wear PPE and protect fresh plaster from rapid drying.
- Apply thin, even coats and observe visual checkpoints for uniform hardness.
- If crazing appears, repair promptly and consult a professional for advanced cases.
Table of Contents
- Introduction
- Key takeaways
- Quick Overview: What Keene’s Cement Plaster Is and Common Uses
- Why Hardness Can Be an Advantage
- Understanding Crazing: What It Is and Why It Happens
- Substrate Preparation and Compatibility to Reduce Crazing Risk
- Mixing and Application Best Practices to Avoid Crazing
- Curing, Finishing Techniques, and Visual Checkpoints
- Repairing Crazing and When to Call a Professional
- Conclusion
- FAQ
Quick Overview: What Keene’s Cement Plaster Is and Common Uses
Keene’s cement plaster is a lime-based plaster that combines lime putty with cement and aggregate to form a hard, durable surface. It differs from standard Portland cement plasters in composition and feel, often offering a balance between rigidity and breathability. In renovation and new construction, it is used on interior and exterior walls where a strong, traditional finish is desired.
Look at the product label or data sheet to confirm ingredients and suitability for your project. Check with the manufacturer or local building rules if you are unsure how it compares to other plasters you might consider.
Composition and how it differs from other plasters
Keene’s Cement Plaster is a unique mix, different from your standard Portland cement plaster. It’s made with a blend of cement, fine sand, and specific additives that give it its signature hardness and set behavior.
The key lies in the functional additives. These are what make Keene’s harder and less prone to cracking than other plasters. But remember, they also make it more rigid, which can lead to crazing if not applied correctly.
Unlike regular plasters, Keene’s doesn’t rely on lime for plasticity. This means it sets faster but has less flexibility once set.
Typical applications and pros/cons
Keene’s Cement Plaster is a workhorse, used in various places where hardness matters. It’s great for floors, countertops, and even ornamental work that needs to stand up to wear and tear.
Pros: Keene’s is hard-wearing, durable, and resistant to scratching and chipping. It’s also easy to clean and maintain once sealed.
Cons: Because it’s so rigid, Keene’s can be more prone to crazing if not applied correctly or if the substrate isn’t stable enough. It also sets faster than regular plasters, so you’ve got less working time.
Why Hardness Can Be an Advantage
Higher hardness in Keene’s cement plaster translates to better abrasion resistance on high-traffic surfaces. It can contribute to longer service life in areas subject to wear, such as hallways or utility rooms. For homeowners, that means fewer touch-ups and more durable performance over time.
Think about real-world scenarios like foot traffic, furniture movement, or impact exposure when considering hardness. Verify notional performance claims with the product instructions or a masonry supplier if you need a direct comparison to other finishes.
Durability and wear resistance in service conditions
Hardness in Keene’s Cement Plaster means it holds up better to everyday use. It’s less likely to scratch or chip compared to softer plasters.
In high-traffic areas like hallways or kitchens, harder surfaces last longer. You won’t need to refinish as often, saving you time and money in the long run.
Even in wet environments, like bathrooms or outdoor surfaces, Keene’s Cement Plaster resists erosion better. It maintains its finish even with frequent exposure to water.
When to choose Keene’s over softer alternatives
Keene’s Cement Plaster is ideal for surfaces that see heavy use or foot traffic. If you’re planning a high-traffic area, opt for Keene’s to minimize maintenance.
Consider the load your surface will bear. For heavier loads, like countertops or hearths, Keene’s provides better support and durability compared to softer plasters.
If you want a finish that lasts and maintains its appearance over time, choose Keene’s. Its hardness ensures longer-lasting beauty, even in demanding conditions.
Understanding Crazing: What It Is and Why It Happens
Crazing refers to a network of fine surface cracks that may form as the plaster sets. It is different from shrinkage cracks, which usually appear as longer, wider lines, and from surface dusting, which is a powdery finish. Crazing often shows as a web-like pattern that is visible and can feel slightly rough to the touch.
Use the product label or manufacturer guidance to confirm how crazing is defined for your specific mix. If you notice signs, compare them to the described patterns to identify the issue accurately.
Primary material causes (shrinkage, rapid stiffening, additives)
The materials you use can make or break your plaster job. Here’s how they affect crazing:
- Improper water content: Too much or too little water affects the plaster’s ability to bind and set properly. Use the recommended water-cement ratio. Spec/look for a consistent, workable mix. Avoid adding extra water to speed up the job.
- Rapid stiffening additives: Some additives speed up setting time but can cause internal stresses. Use accelerators sparingly and follow manufacturer’s guidelines. Spec/look for compatible additives. Avoid overusing them.
- Incompatible additives: Some additives don’t play nice with Keene’s Cement Plaster. Use only recommended additives. Spec/look for compatibility information. Avoid mixing unknown substances.
- Shrinkage-prone aggregates: Some sands and other aggregates shrink as they dry, causing tension. Use well-graded, clean sand. Spec/look for low shrinkage properties. Avoid using expansive clays.
- Low-quality cement: Poor quality cement can lead to weak bonds and crazing. Use high-quality, ASTM C150-compliant cement. Spec/look for strength and durability ratings. Avoid cheap, unknown brands.
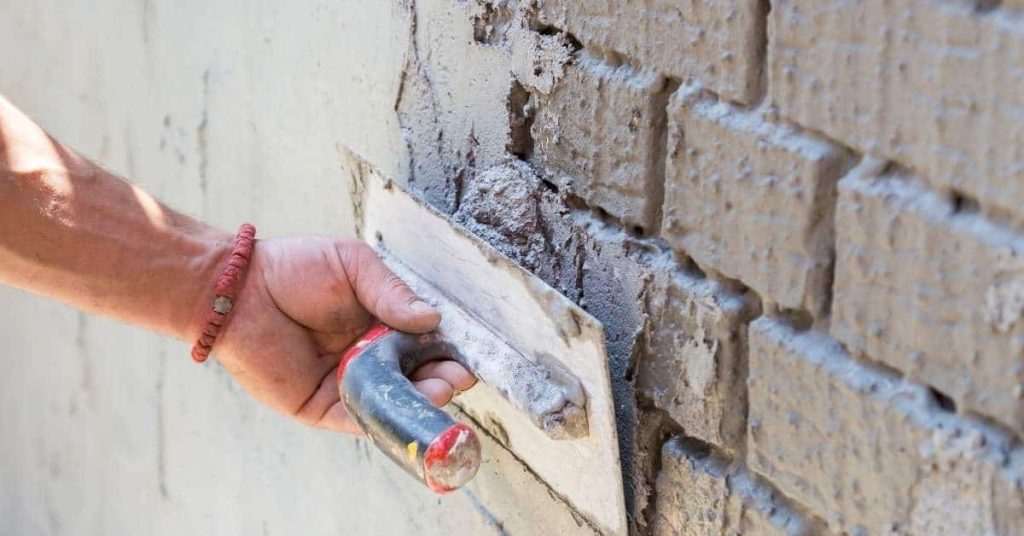
Application and timing causes (trowelling, finishing, drying)
The way you apply and finish your plaster can also cause crazing. Here’s what to watch out for:
Trowel passes: Too many or too few trowel passes can leave the surface under- or over-worked. Use the recommended number of passes (usually 3-4). Avoid rushing through the process.
Finishing technique: Over-troweling or using a wrong technique can create surface tension. Use smooth, even strokes. Avoid dragging the trowel or going over the same spot too many times.
Drying time: Premature drying can cause microcracking and crazing. Allow the plaster to dry slowly and evenly. Avoid exposing it to direct sunlight or strong winds immediately after application.
Substrate Preparation and Compatibility to Reduce Crazing Risk
Start with a clean, sound surface free of loose material, oil, and dust. Ensure the substrate is properly moistened and prepared to receive a bonding agent or primer as recommended. Inspect moisture conditions and compatibility with Keene’s plaster before applying any product.
Consult the bonding agent or primer instructions and verify that the substrate meets those guidelines. If in doubt, refer to the product data sheet or talk to a contractor about your specific wall condition.
Assessing and preparing common substrates (concrete, masonry, drywall)
Before you start, check your substrate. It’s the base that’ll hold your Keene’s Cement Plaster.
Concrete: Remove any loose bits with a wire brush. Ensure it’s been cured for at least 28 days to avoid moisture issues. A rough surface helps bonding.
Masonry (brick, block): Brush off dust and loose material. Check for soundness – tap it, listen for hollow spots. Remove any damaged bits. A porous surface is best.
Drywall: Ensure it’s primed and sanded smooth. Keene’s needs a solid base to bond with.
Addressing moisture, contamination, and movement joints
Moisture control is key. Too much can cause crazing. Too little might lead to poor bonding.
Moisture: Check your substrate’s moisture content. If it’s high, consider using a moisture barrier primer or let the surface dry out before applying Keene’s.
Contamination: Ensure there’s no dirt, grease, or other contaminants on the surface. They can prevent bonding and lead to crazing.
Movement joints: Incorporate expansion and control joints into your design. This allows for natural movement of the substrate without stressing the plaster finish.

Mixing and Application Best Practices to Avoid Crazing
Mix in small batches and follow the manufacturer directions closely to achieve a uniform consistency. Control water quantity to prevent an overly rich mix, which can stress the film as it cures. Apply in a sequence that avoids excessive work time and helps with even set.
Always verify the mixing and application steps on the product label or instructions. When unsure, ask the supplier or manufacturer for the exact guidelines for your climate and surface type.
Tools and materials checklist
Before you start, make sure you have all the right tools and consumables. This list will help ensure a smooth process and high-quality finish.
- Electric mixer: To blend the plaster thoroughly. A slow-speed, heavy-duty model works best.
- Trowels (3-4 sizes): For applying and finishing the plaster. Keep them clean and sharp for a smooth finish.
- Measuring tools: Tape measure, level, and straight edge to ensure accurate application.
- Protective gear: Safety glasses, gloves, and clothing to protect from dust and splashes.
- Plastic mixing tub: For preparing the mix. A large, sturdy tub is essential.
- Water source: Clean water for mixing. Avoid using hard or contaminated water.
- Keene’s Cement Plaster: High-quality product from a reputable manufacturer. Check the bag for freshness and consistency.
- Sand (if needed): For adding to the mix, if required by your project. Ensure it’s clean and free of contaminants.
Quick rule: Always check your tools before starting. Dull or damaged tools can ruin a finish.
Mixing water control, workability, and timing
The key to a successful mix lies in controlling the water content. Too much or too little can lead to crazing.
First, check your product datasheet for the recommended water-to-plaster ratio. This is usually around 4:1 by volume, but it can vary.
When mixing, add water slowly and mix thoroughly between additions. Overwatering leads to weak mixes that dry too quickly, causing crazing.
Maintain consistent batch-to-batch workability. The mix should be stiff enough to hold its shape but still spread easily. If it’s too stiff, add a little more water. If it’s too runny, add more plaster. Remember, a little water goes a long way.
Curing, Finishing Techniques, and Visual Checkpoints
Manage curing conditions by protecting the plaster from rapid drying, drafts, and direct heat. Use appropriate environmental controls during set to promote a uniform finish. Plan the finishing sequence to reduce surface tension and tension cracking.
Watch for signs such as rapid surface hardening or uneven texture during cure. Check the product instructions for recommended curing practices and any allowable variations for your environment.
Curing strategies and environmental controls
Use this checklist during the first hours and days to manage temperature, humidity, and airflow. This slows drying where needed and reduces surface crazing risk.
- Monitor temperature: Keep it between 50-70°F (10-21°C). Too high speeds up drying, too low slows setting.
- Control humidity: Maintain around 80% relative humidity. Too dry encourages crazing, too wet causes efflorescence.
- Regulate airflow: Allow some air circulation but avoid drafts. Drafts can cause uneven drying and crazing.
- Cover with plastic: After initial set (3-4 hours), cover with plastic to retain moisture and slow further drying.
- Wet cure if needed: For high risk areas, mist or wet the surface lightly after plastic covering. Follow manufacturer’s guidelines.
- Avoid direct sunlight: Sunlight speeds up drying and can cause crazing. Keep the area shaded.
- Check for signs of shrinking: Look for cracks or gaps forming at edges or corners. This indicates rapid drying.
- Monitor substrate moisture: If using concrete, ensure it’s dry enough (below 75% RH) to prevent moisture migration.
Quick rule: Think ‘slow and steady’ for curing. Avoid extremes in temperature, humidity, or airflow.
Visual checkpoints during application and after curing
Use this checklist during application and after curing to catch early signs of crazing or improper cure. Timely action can prevent major issues.
- Check trowel marks: After initial application, ensure trowel marks are smooth and even. Uneven marks indicate poor workability or mix issues.
- Look for surface blisters: Blisters form when air gets trapped during mixing or application. They can lead to crazing.
- Monitor drying time: Keep track of how long it takes the plaster to lose its glossy sheen. Too fast indicates rapid stiffening and potential crazing.
- Feel for surface tension: Gently touch the surface after initial set. It should feel even and firm, not tight or brittle.
- Check for cracks at joints: Look around movement joints and edges. Cracks here indicate rapid drying or shrinkage.
- Observe color changes: A uniform color indicates proper curing. Dark patches may signal moisture issues or improper setting.
- Inspect after plastic removal: After removing the plastic, check for signs of crazing or efflorescence. These indicate issues during cure.
- Test surface hardness: Gently press on the surface with a finger or coin. It should feel hard and uniform, not soft or spongy.
Quick rule: Regular visual checks help catch problems early. Address any issues promptly to prevent major repairs.
Repairing Crazing and When to Call a Professional
Triage the problem by assessing the crack size, depth, and the affected area to decide between cosmetic sealing, localized recoat, or full removal and reapplication. Cosmetic fixes may be suitable for hairline cracks that do not compromise structure. More extensive crazing may require professional evaluation.
If you are unsure about the severity or safety, consult a licensed contractor or manufacturer guidance before proceeding. Refer to the repair options listed on the product label or data sheet to determine the appropriate method.
DIY repair steps for hairline crazing
If you’re seeing fine, hairline cracks on your Keene’s cement plaster, don’t panic. You might be able to tackle this yourself.
First, clean the area thoroughly. Use a mild detergent and water, then rinse and let it dry. This ensures any repair material will stick properly.
Next, lightly sand the crazed area with fine-grit sandpaper. Be careful not to sand too aggressively or you’ll make things worse. Wipe off dust with a damp cloth and let it dry.
Note: If the cracks are wider than a hairline, or if they’re growing or changing shape, stop here and call a professional. You might be dealing with a bigger issue.
Remediation for structural or widespread crazing
If you’re seeing large cracks, or if they’re spreading across your plaster, it’s time to take a closer look. These could be signs of deeper problems.
Check if the cracks are growing or changing shape. If so, stop any further work immediately and call a professional. You might have structural issues that need immediate attention.
Look for other signs of trouble too. Bulging plaster, moisture stains, or musty smells could indicate underlying problems with your substrate.
If you find any of these: Don’t try to fix it yourself. The affected layer needs to be removed and the substrate investigated. This is a job for professionals who can assess the damage, repair the substrate if necessary, and reinstall new plaster safely.
Conclusion
One core idea stands out: a solid, well-judged approach to Keene’s Cement Plaster protects safety, durability, and appearance. Start with a plan you can follow, and don’t rush through curing and finishing.
First, check substrate compatibility and surface cleanliness, then confirm mixing ratios and workable pot life, test a small area first, apply in the correct conditions, let it cure properly, finish with the right technique, and inspect the repair area before declaring it done. Keep these steps in a natural rhythm, and treat each task as a performance check before you move on.
Common mistakes to avoid are overworking the mix, skipping the small-area test, and speeding curing or ignoring temperature and humidity limits. Always follow a safety rule set: wear eye protection and gloves, work in a well-ventilated space, and monitor the plaster for any signs of creep or hairline cracks as you go so you can stop early if something looks off.
If you’re unsure after your first try, or the area is large or structurally critical, call a professional sooner rather than later. With careful steps, you’ll finish with a strong, even surface that stands up to use and time. Stay steady, stay safe, and you’ll see the results you want.
FAQ
What should I look for on the bag or datasheet to know if Keene’s Cement Plaster is suitable for my project?
Check the label or datasheet for substrate compatibility and cure instructions. Look for recommended mixes, application thickness, and any surface prep notes. If unsure, follow manufacturer guidance or ask the supplier for clarification.
Why might I choose a plaster mix with higher hardness, and what should I watch out for?
Harder plaster can resist denting and wear in busy areas. However, it can crack if the substrate moves or if there’s improper curing. Ensure proper curing conditions and substrate control to avoid new cracks.
How can I prevent crazing when applying Keene’s Cement Plaster over different substrates?
Match the substrate with the plaster’s recommendations and use appropriate primer or bonding agents if required. Keep the surface clean and dry, and apply in even coats with consistent thickness. If you see crazing start, stop and reassess before continuing.
What routine checks should I do during curing to avoid future cracks or surface flaws?
Keep the area free from rapid temperature swings and heavy moisture exposure while it cures. Protect from direct sunlight and drafts that can dry out unevenly. If you notice signs of movement or cracking, address them early before finishing.