
Introduction
Joint backer rod sizing means choosing a rod diameter slightly larger than the joint opening and a depth that lets the sealant form the right profile; pick a rod that compresses to fill the gap and check the sealant or product label for recommended joint depth. Use backer rod when you need to control sealant thickness, prevent three-sided adhesion, and save sealant by displacing volume instead of guessing exact specs.
Closed-cell rods resist water and bounce back, while open-cell rods compress more and can allow sealant to contact the substrate if drainage or adhesion needs dictate—read the product label and consider the conditions. Install by pushing the rod to the correct depth with a blunt tool, avoid overcompressing, and verify recommended depth and compatibility with the sealant you plan to use.
Key takeaways
- Backer rods save sealant by establishing depth and preventing squeeze-out.
- Choose closed-cell for damp environments; open-cell for flexible, non-pressurized joints.
- Always verify joint width and depth guidelines from manufacturer instructions before installation.
- Position rod slightly below surface to maintain correct sealant depth.
- Understand movement capability, environmental limits, and wear safety gear during work.
- Flag potential issues early: gaps, compression, or improper tooling trigger safety concerns.
Table of Contents
- Introduction
- Key takeaways
- Why Backer Rods Matter: Benefits, Durability, and Cost Savings
- When to Use a Backer Rod — Decision Checklist
- Types of Backer Rods and Material Specs (Closed-Cell, Open-Cell, Hybrid)
- How to Choose the Right Backer Rod Diameter
- How to Determine Proper Backer Rod and Sealant Depth
- Proper Installation Techniques: Tools, Steps, and Visual Checkpoints
- Sealant Compatibility, Movement Capability, and Environmental Considerations
- Common Installation Mistakes, Troubleshooting, and Safety
- Conclusion
- FAQ
Why Backer Rods Matter: Benefits, Durability, and Cost Savings
Backer rods improve sealant elasticity, control sealant depth, reduce three-sided adhesion, and cut material use by replacing excess sealant where it isn’t needed. These functions directly affect how a joint moves, how the sealant cures, and how often the seam will require maintenance.
Choosing the correct rod diameter and depth extends service life and lowers life-cycle cost by ensuring proper compression, preventing bottom adhesion, and producing the intended sealant bead shape. Check product labels or the manufacturer’s technical data to match rod diameter to joint width and to confirm depth-to-width guidance for your chosen sealant and application.
Performance and longevity
Properly sized backer rods extend sealant life by controlling geometry and stress. They ensure optimal compression for a tight, long-lasting seal.
Too small, and the sealant can’t compress enough to fill the joint properly. Too large, and it won’t compress at all, leading to gaps and weak points.
Depth-to-width ratio is crucial. Aim for 1:3 or 1:4 for static joints, 1:2 for dynamic ones. This keeps stress evenly distributed, preventing premature failure.
Material and labor cost savings
Backer rods reduce sealant volume needed, saving material costs. They also minimize rework by preventing common installation issues.
- Open-cell foam: Suitable for wide joints (1/4″ – 1″) with moderate movement. Look for high ILD (indentation load deflection) ratings to prevent crushing. Avoid in narrow joints or where insulation is crucial.
- Closed-cell foam: Ideal for narrow joints (1/8″ – 3/16″) and where moisture control is vital. High R-value provides insulation. Expect higher cost but lower long-term maintenance.
- Polyurethane: Compatible with most sealants, including silicone and hybrid. Provides good compression set resistance for dynamic joints.
- Silicone: Works well with open-cell foam in wide joints. Avoid in narrow joints as it can adhere to the substrate, causing issues during movement.
- Hybrid sealants: Compatible with both open and closed-cell foams. Choose based on joint width and movement potential.
When to Use a Backer Rod — Decision Checklist
Use a backer rod when a joint will move, when depth and width require a bond-break to control sealant geometry, or when a repair or new-construction detail calls for controlled sealant thickness. Consider if the joint is shallow, very narrow, or otherwise unsuitable for a rod—manufacturer instructions or local code may rule it out.
On site, run a quick yes/no checklist: does the joint expect movement, is depth sufficient for a rod, is the width within the product’s recommended range, is the sealant compatible, is this repair versus new work, and do codes or specs require a backer rod. If any item is unclear, verify with the product data sheet or project specifications before proceeding.
Joint geometry triggers
Use this checklist to determine if a joint requires a backer rod based on its size and shape.
- Depth over 1/4 inch: Joints deeper than 1/4 inch need a backer rod for proper sealant depth. Too shallow? Sealant won’t bond well.
- Width over 1/2 inch: Wider joints need rods to maintain even sealant bead size. Too wide? Sealant may sag or be inconsistent.
- Irregular shapes: Backer rods help maintain consistent sealant depth in oddly shaped joints. Irregularities without a rod? Sealant may not fill properly.
- Beveled edges: Beveled joints need backer rods to keep sealant from sagging or being too thick at the edge. No rod? Sealant may look uneven or peel off.
Quick rule: If your joint is deeper than 1/4 inch, wider than 1/2 inch, irregular, or beveled, use a backer rod.
Location and exposure factors
Consider these location and exposure factors when deciding if a joint needs a backer rod.
- Wet areas: Joints in wet areas need rods to prevent water from getting behind the sealant. No rod? Water may cause delamination or substrate damage.
- Exterior locations: Exterior joints require rods for UV protection and to keep out dirt, debris, and pests. No rod? Sealant may degrade faster or allow contaminants in.
- Vertical surfaces: Vertical joints need backer rods to maintain consistent sealant bead size. No rod? Sealant may sag or be inconsistent.
- High movement areas: Joints with high movement (like expansion joints) need rods for proper sealant performance. High movement without a rod? Sealant may crack, tear, or fail prematurely.
Quick rule: If your joint is in a wet area, exterior location, on a vertical surface, or experiences high movement, use a backer rod.
New construction vs. retrofit
These considerations help determine if a joint in new construction or retrofit needs a backer rod.
- New construction: Use rods as per manufacturer’s recommendations for new joints. No rod? Sealant performance may not meet expectations.
- Retrofit repairs: Assess existing substrates and conditions before installing rods. Damaged or incompatible substrates? Rods won’t help seal properly.
- Glazing: Glazing joints need backer rods for proper sealant depth and to prevent glass breakage due to movement. No rod? Glass may crack or fall out.
- Expansion joints: Expansion joints require rods to accommodate movement and maintain a consistent seal. No rod? Sealant may fail prematurely under stress.
Quick rule: In new construction, follow manufacturer’s recommendations; in retrofit repairs, assess substrates first; for glazing and expansion joints, always use a backer rod.
Types of Backer Rods and Material Specs (Closed-Cell, Open-Cell, Hybrid)
Closed-cell rods resist water absorption and usually push into joints with firmer rebound, while open-cell rods compress more and can allow moisture transmission; hybrids combine characteristics for specific use cases. Each type behaves differently under compression, in wet conditions, and with different sealant chemistries, so pick the construction that fits the joint exposure and movement profile.
Before buying, review the manufacturer’s technical data sheet and applicable standards to confirm compressibility, density, recommended diameters, and sealant compatibility. Use the product specs and an on-site checklist (fit, cell structure, moisture behavior, and expected movement) to avoid common pitfalls like improper fit or moisture-related failure.
Closed-cell backer rods
Closed-cell backer rods are made from materials like polyethylene or polyurethane foam, featuring tightly packed cells that don’t absorb water. They’re ideal for moisture-prone joints, like those in driveways, patios, and pool decks.
Check product data sheets for these specs:
- Density: Higher density means better durability and resistance to compression.
- Cell structure: Tightly packed cells ensure minimal water absorption.
- Compatibility: Ensure they’re compatible with your chosen sealant.
Open-cell backer rods
Open-cell backer rods, typically made from polyurethane foam, have a more porous structure. They’re flexible and allow airflow, making them suitable for joints subject to movement or expansion.
Consider these factors:
- Compression set: Lower compression set means better recovery after compression.
- Thermal/mechanical properties: Ensure they can handle your joint’s expected temperature and movement ranges.
Hybrids and specialty rods
Hybrid backer rods combine closed-cell and open-cell properties, offering a balance between moisture resistance and flexibility. They’re great for joints with moderate movement and some moisture exposure.
Specialty rods, like those designed for hot-pour applications or high-temperature environments, require careful selection based on your specific needs. Always consult supplier specs to ensure the best fit.
How to Choose the Right Backer Rod Diameter
Measure the joint width at multiple points with a caliper or feeler gauge to establish a representative dimension before selecting a rod diameter. Convert that measured gap to a rod diameter that yields a snug compression fit; consult the manufacturer’s fit chart for the material you intend to use.
Undersized rods leave gaps and undermine sealant support, while oversized rods can be hard to insert and change the sealant depth. If fit guidance is unclear, check the product documentation and perform a trial fit on a sample section to verify compression and seating behavior.
Step-by-Step Process
Follow these practical steps to choose the right backer rod diameter for a long-lasting seal.
- Preparation: Gather your tools – calibrated caliper or feeler gauge, notepad, and measuring tape. Ensure safety by wearing gloves and eye protection.
- Identify Joints: Locate all expansion joints in the concrete surface you’re working on.
- Measure Width: Use your caliper or feeler gauge to measure joint width at multiple points and orientations. Record readings in millimeters or inches.
- Calculate Average: Determine the average joint width from your measurements.
- Check Fit Charts: Consult manufacturer fit charts to find a backer rod diameter that matches your average joint width, allowing for compression (typically 15-30%).
- Inspect Joints: Ensure there’s no debris or damage in the joints. Clean if necessary.
- Acclimate Materials: Allow backer rods and sealant to reach the same temperature as the concrete surface before installation.
- Final Check: Verify joint width, rod diameter, and conditions before applying sealant.
Measuring Joint Width and Tolerance
Accurate measurement is key to choosing the right backer rod. Here’s how:
Use a calibrated caliper or feeler gauge for precise readings. Measure at multiple points along the joint, including narrow spots.
Record measurements in millimeters or inches. To find the average, add up all readings and divide by the number of measurements taken.
Tolerance: Account for compression by selecting a rod slightly larger than the measured gap. A 15-30% increase is typical.
Rule of Thumb for Snug Fit and Compression
The goal is to have the backer rod compress slightly when inserted, creating a snug fit.
Select a rod diameter that’s about 15-30% larger than your measured joint width. This allows for compression and ensures the rod seats securely in the joint.
Too little compression means the rod won’t fill the joint properly; too much can cause excessive pressure on the sealant, leading to failure.
Problems from Wrong Diameter
Undersized Rods: Poor seal, gaps between rod and joint sides. Sealant can sag or flow out of the joint.
Excessive sealant use may be needed to fill voids, wasting material. Joint depth is compromised, reducing longevity.
Oversized Rods: Difficult to press into the joint. The rod may not sit properly, leaving a gap at the bottom that traps water and debris.
Excessive pressure on sealant can cause it to bulge or fail prematurely. Wasted material due to trimming excess length.
How to Determine Proper Backer Rod and Sealant Depth
Backer rod depth sets the sealant bead height and prevents three-point bonding by creating a clean bond-break at the joint base. The correct relationship ties joint width to sealant depth—confirm recommended depth ranges from the sealant and rod manufacturers and follow applicable codes or standards for your project.
On site, measure joint width, select a rod diameter that achieves the target depth, and verify depth with calipers or a simple gauge before tooling the sealant. If you cannot confirm guidance from product literature or authorities, pause and request clarification to avoid incorrect bead geometry and premature failure.
Step-by-Step Process
Follow these steps to determine the proper backer rod and sealant depth for a lasting seal.
- Prepare your workspace: Clear debris, ensure surfaces are clean and dry. Safety first – wear gloves and eye protection.
- Measure joint width: Use a tape measure or caliper. Note down the measurement to the nearest 1/32 inch.
- Select backer rod diameter: Refer to your chosen sealant’s data sheet for recommended rod sizes based on joint width. A general rule is to use a rod that’s about 60-75% of the joint width.
- Confirm depth: Use a simple depth gauge or caliper to ensure the selected backer rod will achieve the target sealant depth. Check manufacturer guidelines for recommended compression ranges.
- Verify bond-breaker position: Ensure the backer rod sits in the joint so the sealant bonds only to the sides, not the bottom. This prevents three-point bonding and ensures a strong, flexible seal.
- Perform final checks: After substrate movement or temperature cycles, recheck that your sealant bead is within recommended compression ranges before applying the sealant.
Target Sealant Geometry and Depth Categories
Joint depth influences flexibility, adhesion, and overall performance. Here are safe depth categories for common joint widths:
Shallow joints (1/8″ – 3/16″): Use a thin backer rod (e.g., 1/4″) to achieve a sealant depth of around 1/8″. These joints need less flexibility but more adhesion.
Moderate joints (3/16″ – 5/16″): Opt for a medium backer rod (e.g., 3/8″) to achieve a sealant depth of around 1/4″. These joints require balance in flexibility and adhesion.
Deep joints (5/16″ – 3/4″): Choose a thick backer rod (e.g., 1/2″) for a sealant depth of around 3/8″ to 1/2″. These joints need more flexibility and less adhesion.
Always consult product data sheets for exact depths and recommended ranges. Local building codes may also have specific requirements.
Backer Rod Placement — Creating a Correct Bond-Breaker
The backer rod should sit in the joint so that the sealant bonds only to the sides, not the bottom. This prevents three-point bonding and ensures a strong, flexible seal.
To achieve this:
– Insert the backer rod into the joint.
– Ensure it’s centered and runs continuously along the joint line.
– The top of the rod should be level with or slightly below the surface of the substrate. This ensures the sealant bonds only to the sides, creating a proper bond-breaker.
If the backer rod is too high, it can cause three-point bonding, reducing flexibility and adhesion. If it’s too low, the sealant may not fill the joint properly.
When to Use Multiple or Layered Rods
In some cases, you might need to use multiple or layered backer rods. This is typically required for:
– Wide joints (over 3/4″) that can’t be filled with a single rod.
– Joints where the substrate movement is significant and needs extra support.
To do this, stack or step backer rods of varying diameters to achieve the desired sealant depth. However, using multiple rods requires careful planning and may need technical advice:
– Ensure each rod is properly seated in the joint.
– Check that the combined height of the rods allows for proper sealant compression.
– Consult a professional if you’re unsure about the complexity or critical nature of the joint.
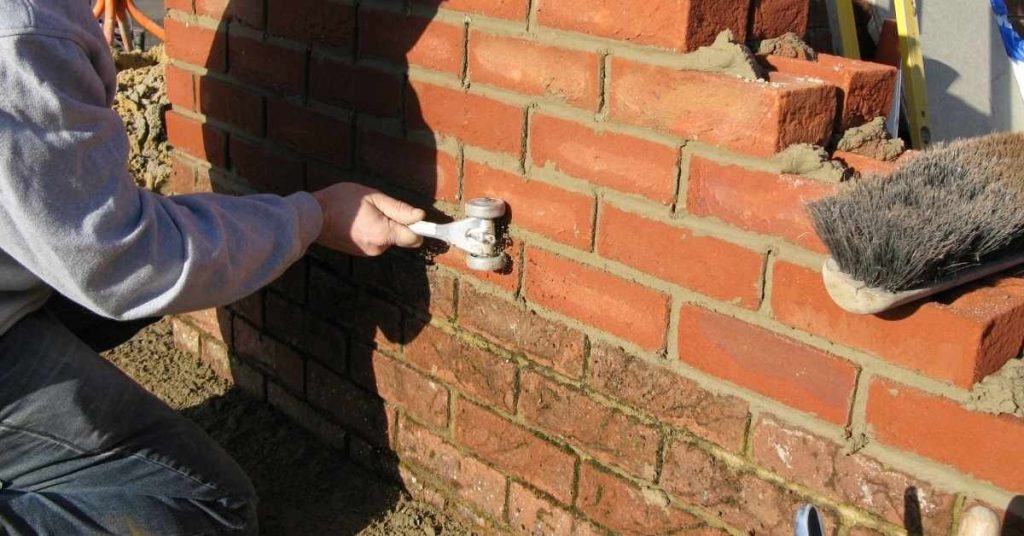
Proper Installation Techniques: Tools, Steps, and Visual Checkpoints
Start with surface prep—clean, remove dust and contaminants, and check for moisture—then assemble tools like a utility knife, snips, a compression tool or ram, sealant gun, and PPE. Choose the correct rod type and diameter before insertion and reference a diameter chart on site to prevent guesswork.
Insert the rod so it sits at the specified depth below the surface, compressing it to a snug seat without bottoming out, then apply and tool the sealant to the intended bead profile. Visually confirm the rod is uniform, there are no gaps behind it, and the sealant bead is consistent before allowing the sealant to cure.
Tools and materials checklist
Before you start, ensure you have all the necessary tools and materials for a successful backer rod installation.
- Backer rod diameter chart: To pick the right size rod for your joint width.
- Utility knife: For cutting rods to length. Skipping this can lead to improperly sized rods.
- Snips: For trimming rods if needed.
- Straightedge: To ensure rod alignment in the joint.
- Compression tool/ram: To press the rod into the joint. Without this, you won’t achieve proper compression.
- Sealant gun: For applying sealant over the rod.
- Personal Protective Equipment (PPE): Gloves, safety glasses, etc. Safety first!
- Closed-cell vs. open-cell rods: Choose based on joint type and environment. See earlier section for details.
- Sealant: Compatible with your chosen rod type. Check manufacturer guidelines.
Quick rule: Always check compatibility between backer rod and sealant to avoid adhesion issues.
Step-by-step insertion and sealant application
Follow these steps for a smooth installation process, from cleaning to final tooling.
- Clean the joint: Remove dust, debris, and moisture. Dirty joints lead to poor adhesion.
- Measure joint width: Use your backer rod chart to pick the right diameter. See earlier section for details.
- Cut rod to length: Trim with utility knife, allowing 1/2″ extra on each side.
- Insert rod: Place it in the joint, using a straightedge to keep it aligned. Misaligned rods cause bridging and poor seals.
- Compress rod: Use your compression tool to press it into the joint until it’s flush with the surface. Insufficient compression leads to gaps and leaks.
- Apply sealant: Squeeze a continuous bead over the rod, filling the gap completely.
- Tool joint: Use a sealant smoother or trowel to create a uniform sealant profile. Irregular profiles can trap dirt and water.
- Allow curing time: Follow manufacturer guidelines for proper sealant cure before exposing it to traffic or moisture.
Quick rule: Always follow the manufacturer’s instructions for best results.
Visual and tactile quality checkpoints
Inspect your work during and after installation to ensure a quality seal.
- Rod alignment: Check that the rod sits flush with the surface, not bridging or floating. Misaligned rods cause leaks.
- No gaps behind rod: Feel for any voids or spaces behind the rod. Gaps allow water intrusion.
- Uniform rod depth: Ensure the rod is consistently compressed across the joint’s length. Inconsistent compression leads to weak points in the seal.
- Sealant bead width/appearance: Check that the sealant covers the rod completely and has a uniform profile. Irregular beads can trap dirt and water.
- Adhesion: Gently pull on the sealant after cure time to ensure it adheres well to both surfaces. Poor adhesion leads to peeling or cracking.
- Joint integrity: After curing, check for any cracks, gaps, or signs of movement in the joint. Compromised joints can lead to seal failures.
Quick rule: Always inspect your work during and after installation to catch any issues early.
Sealant Compatibility, Movement Capability, and Environmental Considerations
Select a backer rod that is compatible with your sealant chemistry—some sealants require primers or have inhibitors that affect foam types—so verify compatibility in product documentation. Account for expected joint movement when sizing rod diameter and density to ensure the sealant can relax and stretch as intended under thermal or structural cycles.
Consider environmental factors such as UV exposure, temperature swings, moisture, and sustainability goals when choosing rod materials; check manufacturer claims and certifications for recyclability or low-VOC formulations. If compatibility or durability data is missing, ask the manufacturer or consult standards before installation to avoid long-term degradation.
Matching sealant type to rod type
When choosing a backer rod, it’s crucial to consider the type of sealant you’ll be using. Different sealants interact differently with rods.
Polyurethanes and MS polymers typically work well with both closed-cell and open-cell foam rods. However, they may require a primer or chemical inhibitor to prevent adhesion issues.
Silicones, on the other hand, usually need open-cell foam rods for proper adhesion. Always check your sealant’s technical data sheet for specific recommendations.
Movement ratings and expected joint dynamics
Joint movement is a critical factor in choosing the right backer rod. Most joints move by ±25% of their width, but this can vary.
Thermal expansion and contraction, structural deflections, and traffic-induced movements all play a role. For larger movements, you’ll need denser, thicker rods that can accommodate the stretch without breaking down.
If your joint is expected to move more than ±50%, consider consulting with a structural or façade engineer. They can provide specific recommendations based on your building’s design and materials.
Sustainability and end-of-life considerations
Choosing eco-friendly backer rods can help reduce your project’s environmental impact. Look for rods made from recycled materials or that are recyclable at the end of their life.
Some manufacturers offer low-VOC or non-toxic options, which can improve indoor air quality and reduce emissions. Also, consider long-term durability under UV exposure, temperature changes, and moisture to minimize waste.
When disposing of old rods, follow local regulations. Some materials may need to be sent to a specialized recycling facility.
Common Installation Mistakes, Troubleshooting, and Safety
Frequent errors include wrong diameter or depth selection, poor surface preparation, and allowing three-sided adhesion, all of which can cause early failure. If a seal is underperforming, inspect fit, depth, substrate cleanliness, and sealant bead geometry, and consider removing and redoing the joint if these cannot be corrected in place.
Follow basic safety: use gloves, eye protection, adequate ventilation, and store materials per the label to reduce exposure and material degradation. When in doubt about handling or disposal, refer to product safety data sheets and local regulations before proceeding.
Typical mistakes and how to fix them
Avoid these common pitfalls for a successful seal.
- Voids in the joint: Ensure proper surface preparation. Clean, dry substrate prevents voids.
- Poor adhesion: Check for three-sided adhesion. Sealant needs all sides to bond properly.
- Misplaced rods: Re-dimension and reapply if rod is not centered in the joint.
- Insufficient sealant: Remove failed sealant, re-prep joint, and re-seal with correct amount.
Fix these issues promptly to maintain a strong seal.
Safety, PPE, and ventilation
Wear appropriate gloves when handling foam rods. Follow product SDS for specific recommendations.
Use adequate ventilation. Work in a well-ventilated area or use fans to direct fumes away from you.
Store materials safely and dispose of them responsibly, following local regulations. Always refer to the product’s safety data sheet for specific handling and disposal instructions.
Maintenance and inspection tips
Inspect your seal annually to ensure longevity.
- Check for cracks: Inspect the entire joint for hairline cracks.
- Feel for movement: Gently press on the seal. It should feel firm, not spongy or soft.
- Look for discoloration: Changes in color may indicate moisture intrusion or UV damage.
- Inspect rod placement: Ensure rod is still centered and intact.
- Check sealant depth: Sealant should be level with the joint. If not, reapply.
- Examine substrate: Look for signs of substrate damage or movement.
- Inspect corners: Corners are high-stress areas; check for any issues here first.
Quick rule: If in doubt, replace. Better to be safe than sorry with sealant and backer rod maintenance.
Conclusion
Getting the backer rod sizing right protects the seal, keeps moisture out, and saves you from costly fixes later. It also helps the joint look clean and stay durable in real-world conditions.
First, run a quick check in the actual joint: confirm the gap size matches the rod diameter, verify the depth puts the rod well below the surface but above the bottom so the sealant can bond correctly, ensure the rod material works with your chosen sealant, and then install it flush with the joint edge. Next, test movement by gently pressing the rod to confirm it sits firmly but leaves space for the sealant to compress, and finally inspect after the sealant cures to confirm even lines and no gaps.
Avoid these common mistakes: forcing a rod that’s too large or too small for the gap, using the wrong cell type for your environment, or skipping cleaning and inspection steps. Safety matters—wear gloves, protect yourself from dust and sharp edges, and don’t mix sealants on wet or dirty joints. If you’re unsure about joint movement, material compatibility, or environmental exposure, don’t hesitate to call in a pro rather than push on and risk damage.
When in doubt, pause and assess, then proceed with a limited test area to confirm results. You’ve got this—set the right rod, follow the depth rules, and you’ll seal up a lasting joint with less risk of failure.
FAQ
When should I use a backer rod, and why is it worth it?
Use a backer rod for wide joints where you want the sealant depth correct and to save material. It keeps the sealant from sinking too deep or sticking to the substrate, which improves durability and movement capability. Always check the joint width and the sealant manufacturer guidelines for your exact project.
Closed-cell vs open-cell backer rods — which one do I choose?
Closed-cell rods resist compression a bit more and don’t soak up water, so they’re common for exterior or wet areas. Open-cell rods compress more and can work in irregular joints where a snug fill is hard to reach. Read the product label or manufacturer instructions to pick the right type for your joint and environment.
What’s the proper installation technique for backer rods?
Place the rod on the bottom of the joint so the sealant will create the correct depth. Keep it flat with no twists, cut the ends square, and ensure it sits without gaps. If in doubt, follow the rod’s installation notes and verify with the sealant manufacturer’s guidance.
How do joint width and depth affect diameter choice?
Choose a rod diameter that fills the joint to the recommended sealant depth without compressing too much. Too small, and the sealant sinks or oozes; too large, and you’ll squeeze out excess material. If you’re unsure, review the product labeling or ask the supplier for the right size range for your joint.