
Introduction
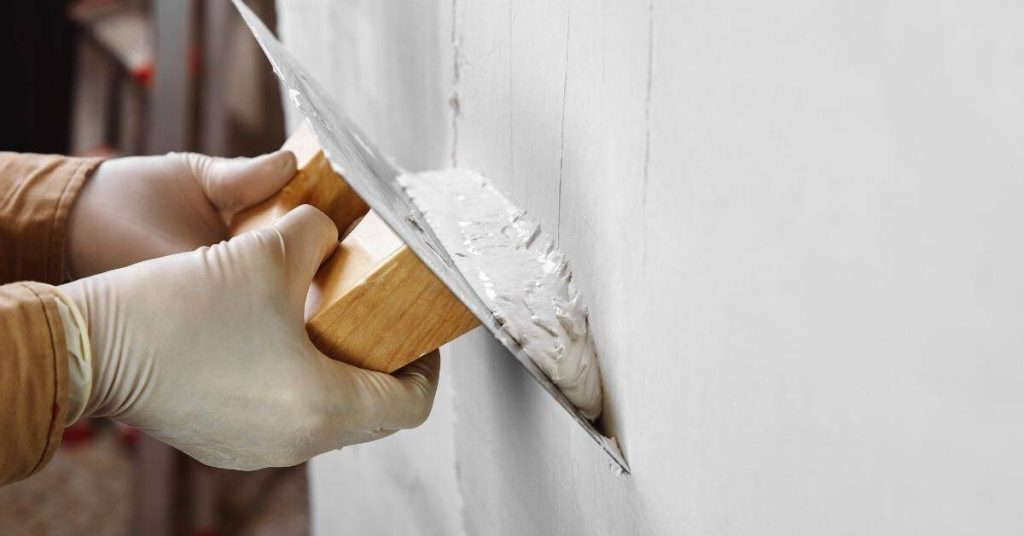
Interior limewash on plaster is a breathable, traditional finish applied in thin coats to even color and texture. Prep steps include cleaning the wall, dampening the surface, repairing cracks, and applying a compatible breathable primer. Always check the primer and limewash compatibility on the product label or with the manufacturer instructions.
Apply multiple thin coats, letting each coat set before the next to build depth and even tone. If blotches show up, blend them by re-wetting slightly and applying light coats to smooth uneven areas. Use a limewash designed for plaster and follow local rules or manufacturer directions for surface prep and timing.
Key takeaways
- Inspect plaster for cracks; repair with compatible patch before limewash.
- Clean and dampen surface; remove dust before priming for best adhesion.
- Choose a breathable primer or sealer suited for plaster before base coat.
- Apply multiple thin coats; allow appropriate drying between coats per product.
- Address blotches by uniform base color; lightly mist surface between coats.
- PPE and ventilation essential; mix limewash away from heat or sparks.
Table of Contents
- Introduction
- Key takeaways
- Why Choose Limewash for Interior Plaster
- Tools and Materials Checklist
- Preparing Plaster Surfaces for Limewash
- Priming and Base-Coating: Creating the Right Absorbent Base
- Multi-Coat Limewash Application Technique
- Fixing Blotches, Streaks, and Other Unevenness
- Common Mistakes, Planning, and Project Scheduling
- Maintenance, Touch-Ups, and Longevity
- Conclusion
- FAQ
Why Choose Limewash for Interior Plaster
Limewash on interior plaster provides a breathable, mineral finish that ages gracefully and develops depth over time. It helps manage interior humidity without sealing the wall like modern emulsions do. This approach pairs well with traditional lime plasters and can highlight a historic or rustic aesthetic when you want a patina rather than a plastic sheen.
Consider limewash when you’re working with damp or poorly ventilated spaces, or when you want a finish that remains permeable to moisture. It’s compatible with plaster types that rely on mineral chemistry for stability, and it offers a timeless look that many homeowners prefer over contemporary paints. If your aim is washable or opaque coverage, you may want to explore alternative finishes or assess different treatments after testing a sample patch.
Breathability and plaster compatibility
Limewash is a porous material, allowing moisture vapor to pass through it. This breathability protects your lime-based plasters from trapped moisture that could otherwise cause damage.
When applied to traditional lime plasters, limewash complements and enhances their natural properties. It allows the plaster to ‘breathe’, preventing dampness and mold growth.
Tip: Limewash is not suitable for use on gypsum or cement-based plasters as it can react with them, causing damage.
Aesthetic qualities and finish varieties
Limewash creates a characteristic matte, textured finish that develops a beautiful patina over time. It accentuates the natural beauty of your plaster, giving it depth and character.
The appearance can be altered by your application technique. Thicker coats create a more pronounced texture, while multiple thin coats give a smoother, more even finish.
Limewash is available in various colors, allowing you to achieve different looks. From soft whites to rich earthy tones, it can complement any interior design scheme.
When not to use limewash
Limewash is not recommended for areas with severe damp or condensation issues. In such cases, the source of moisture should be addressed before application.
It’s also not suitable for unstable substrates. Any cracks or damage to the plaster should be repaired before applying limewash.
Caution: Limewash should not be applied over modern impermeable paints as it can cause peeling and other issues. Always ensure your surface is compatible with limewash.
Tools and Materials Checklist
Gather authentic limewash options such as lime putty-based wash and pigment choices, noting that premixed limewash behaves differently than truly mixed batches. Avoid additives that can interfere with curing unless specified by the manufacturer and always check curing expectations on the label. You’ll also need surface primers if the substrate calls for them and materials for surface prep.
Prepare limewash compatible primers or sealers as advised by product directions, and perform moisture checks and porosity tests on the plaster before starting. Assemble brushes, lambswool applicators, or a spray setup for larger areas, plus containers for dilution and clean water for rinsing. Plan for PPE, ventilation, and spill containment, and keep a cleanup plan for leftover wash and rinse water ready.
Limewash types, primers, and compatibility
Before you start, check your materials. Here’s what you need.
- Authentic lime putty: Traditional, breathable. Use for historic projects or where longevity matters.
- Lime putty-based wash: Ready-to-use, easier application. Good for DIYers.
- Premixed limewash: Convenient but less breathable. Okay for small jobs or modern homes.
- Avoid: Hydrochloric additives. They damage plaster and harm the environment.
- Pigments: Natural or synthetic. Test before use to ensure colorfastness.
- Silicate primer: For porous surfaces. Enhances adhesion, prevents blotching.
- Bonding primer: For non-porous surfaces. Creates a key for limewash to adhere.
- Moisture check: Use a moisture meter. Limewash needs dry plaster (less than 16% moisture).
- Plaster porosity test: Apply water with a damp cloth. If it’s absorbed quickly, your plaster is ready.
- Damp-proofing: Check for rising damp. Treat if necessary before applying limewash.
Quick rule: Always test pigments and primers on a small area first to ensure compatibility.
Applicators and ancillary tools
Gather your application tools before you start. Here’s what you need.
- Brushes: Natural bristle for authentic lime putty. Synthetic for premixed paints.
- Lambswool rollers/applicator pads: For large areas or smooth finishes. Use with a pole for high walls.
- Sprayers (optional): For very large areas. Requires proper dilution and technique.
- Mixing buckets: Essential for consistent color and texture.
- Whisk: To mix pigments thoroughly into limewash.
- Scaffolding/step-ladders: For high walls or ceilings. Ensure stability before use.
- Damp-proofing tools (if needed): Brush, roller, or sprayer for applying damp-proof membrane.
Quick rule: Always dilute limewash according to manufacturer’s instructions. Too thick can cause blotching.
Safety, ventilation, and PPE
Safety first! Here’s what you need to protect yourself and your workspace.
- Respirator/mask: Protect against lime dust when prepping or applying. Use a P100 filter for limewash.
- Eye protection: Safety glasses or goggles to prevent eye irritation.
- Gloves: Disposable gloves for handling limewash and cleaning up spills.
- Ventilation: Open windows, use fans, or hire a ventilation system for enclosed spaces.
- Spill containment: Have rags, towels, or spill kits ready to contain any mess.
- Limewash disposal: Rinse water and leftover limewash are alkaline. Neutralize with vinegar before disposing of in the drain.
Quick rule: Always work in a well-ventilated area when handling lime-based products.
Preparing Plaster Surfaces for Limewash
Inspect the plaster for soundness, cracks, delamination, and porosity to gauge how it will accept limewash. Identify any loose edges or weak spots that require attention before applying a primer or finish. The goal is a stable, uniform base that won’t telegraph through the finish.
Screen for moisture sources, rising damp, and efflorescence, and plan damp treatment if needed. Clean the surface thoroughly and lightly abrade to create a key without damaging the plaster. Decide between patching or re-plastering based on stability and porosity changes observed during inspection.
Assessing and diagnosing substrate condition
Before you start, check your plaster’s condition. It needs to be sound and ready for limewash.
Soundness: Tap the wall. A hollow sound could mean delamination or loose fillers. Crumbly areas need attention too.
Efflorescence: White salt deposits on the surface indicate rising damp. Address this before applying limewash.
Old paint systems: Check for flaking, peeling, or failing paint. Remove any loose bits and consider stripping old coatings if they’re incompatible with limewash.
Cleaning and treating salts or mould
Start by removing dust, grease, and loose paint. Use a soft brush or vacuum to avoid damaging the surface.
Efflorescence: If you find salt deposits, treat them with a solution of 1 part muriatic acid to 20 parts water. Rinse thoroughly afterwards.
Mould: If there’s mould, use a bleach solution (1 cup bleach per gallon of water) and scrub gently. Let it dry before proceeding.
If damp or mould persists, consult a specialist. They can advise on professional treatments.
Repairs, consolidation, and compatible fillers
Fill cracks with a lime-based filler or putty. These are compatible with limewash and won’t affect its breathability.
Consolidation: If plaster is friable (crumbly), use a lime-based consolidant to strengthen it. Apply with a brush, let it soak in, then wipe off excess.
For larger issues, consider a skim coat or re-plastering. These will seal the surface and provide a uniform base for limewash. But remember, they’ll also affect final color and suction.
Priming and Base-Coating: Creating the Right Absorbent Base
Choose primers based on plaster condition and moisture history to influence how limewash absorbs into the wall. Silicate primers behave differently from bonding primers, so verify compatibility with your plaster and the limewash you’re using. The right primer helps control suction and leads to a more even result.
Pre-wet the wall or apply a limewash slurry to build a consistent, absorbent base, following guidelines from the product label. Test a small area to confirm absorption and adjust your approach before full application. Use surface cleaning and identify high-absorption zones to plan primer or slurry application accordingly.
Choosing and applying primers
Primers are crucial for a successful limewash job. Choose between silicate and bonding primers based on your plaster’s condition.
Silicate primers are ideal for new or fresh plasters, providing a uniform surface and enhancing adhesion. They create a micro-porous layer that allows breathability while preventing excessive absorption.
Bonding primers are suitable for old or damaged plasters with poor suction. They fill microscopic voids, improve adhesion, and prepare the surface for even limewash absorption.
Apply primers using a brush or roller, following the manufacturer’s instructions. Ensure full coverage and allow the recommended drying time before proceeding.
Slaking and pre-wetting vs. sealing
Pre-wetting or applying a diluted first coat (slurry) is essential for achieving an even, consistent finish.
For pre-wetting, lightly mist the wall with water using a spray bottle. This helps to open up the plaster’s pores and promotes uniform absorption. Allow it to sit for 10-15 minutes before applying the first limewash coat.
Alternatively, you can create a slurry by mixing limewash with water (around 1:3 ratio) and applying it as a thin, even layer using a brush or roller. This seals the surface slightly while maintaining breathability, preventing patchy absorption, and ensuring consistent colour uptake.
Test different areas to find the best method for your plaster type and conditions. Always allow the base to dry completely before applying subsequent coats.
Environmental and drying considerations before top coats
Temperature, humidity, and ventilation play significant roles in achieving a successful limewash finish. Ensure these conditions are optimal before applying additional coats.
Temperature: Apply limewash when the temperature is between 50°F (10°C) and 80°F (27°C). Avoid extreme temperatures, as they can affect curing and adhesion.
Humidity: Maintain a relative humidity of around 50-60% for optimal results. Excessive humidity can lead to poor absorption and increased drying times.
Ventilation: Ensure adequate ventilation in the work area. Open windows or use fans to promote air circulation, allowing the limewash to dry evenly and thoroughly. Allow each coat to cure completely before applying the next one, following the manufacturer’s recommendations.
Multi-Coat Limewash Application Technique
Think of the process as a base layer, middle tones, and a finish coat that builds depth and patina. Each coat should contribute to an even overall appearance while avoiding heavy saturation on any single pass. Document how each test area behaves to guide full-scale work.
Prepare the substrate with a thorough check of moisture, porosity, and any cracks that need repair. Pre-wet or use a slurry as needed to control suction and achieve uniform absorption. Choose brushes or rollers and apply with deliberate, even strokes to minimize lap lines.
Mixing and consistency for each coat
The first coat is like a primer, so mix it thin – about 1:4 lime to water. Stir well, avoid lumps. Test on a small area first.
For mid-tone coats, thicken it up to around 1:2 or 1:3. This helps build depth. Mix well, check consistency with a drag test – it should leave a smooth line.
The final sepia coat can be thicker, about 1:1.5 or 1:1. Mix well, ensure no pigment settles at the bottom.
Application methods and stroke technique
Brushing gives best control for detail work. Use a good quality brush, synthetic or natural bristle. Work in small sections, about 2′ x 2′.
Rolling is faster but can be less controlled. Use a medium nap roller. Work in ‘W’ or ‘M’ patterns to avoid lap marks.
Sponging gives a textured look. Dip the sponge, squeeze out excess, dab onto wall. Vary pressure for different effects.
Spraying is fastest but hardest to control. Use a fine mist sprayer. Work in even strokes, overlap each pass slightly.
Number of coats and timing between them
The number of coats depends on the look you want. Start with one base coat, then add mid-tones until you get the desired depth. Test on a small area first.
Let each coat dry before applying the next. This could take 12 to 48 hours, depending on temperature and humidity. Check the surface – it should feel dry but not dusty.
If you’re in a hurry, you can recoat after 6-8 hours, but this increases the risk of lifting or blotching. Keep an eye out for any issues as the coat dries.
Fixing Blotches, Streaks, and Other Unevenness
Diagnose blotches and unevenness by looking for substrate absorption variance, moisture issues, or contamination. Quick visual checks and simple tests help determine if you should recoat or spot-treat. Keep a simple mental map of where issues originate to guide repairs.
Use feathering, targeted dilution, or localized passes to even out color and texture. Decide whether a second coat or a full recoat is required based on drying conditions and adhesion tests. Maintain prep discipline to prevent recurrence in subsequent coats.
Diagnosing blotches and their causes
Blotches on your limewash can be frustrating, but understanding the cause is key to fixing them. Here’s how to diagnose:
Substrate variation: Check for uneven suction or moisture levels in the plaster. Darker patches absorb more water, causing blotches.
Application error: Inconsistent application thickness or missed spots can lead to blotches. Inspect your work and tools.
Drying conditions: Rapid drying due to heat or low humidity can cause blotches. Check the room temperature and ventilation.
Product inconsistency: If the limewash wasn’t mixed well, or if there are impurities in the materials, this could be the culprit. Inspect your materials and mixing process.
Local repair and feathering techniques
Before you strip off the entire coat, try these local repairs to fix small blotches:
Rewetting and softening: Lightly mist the blotchy area with water. Let it sit for a few minutes, then gently rub with a damp sponge or soft brush to blend.
Feathering re-coats: Apply a thin layer of diluted limewash around the edges of the blotch, blending into the existing coat. This helps hide imperfections.
Applying a thin scumble: Mix your limewash with more water to create a thin, translucent wash. Apply this over the blotch to even out the appearance without adding too much thickness.
When to strip and restart
Sometimes, spot fixes just won’t cut it. Here’s when to bite the bullet and start over:
Severe blotches: If the blotches are large or cover a significant area, it’s best to remove the entire coat.
Poor adhesion: If the limewash is peeling or flaking off in places, this indicates poor adhesion. Strip and restart for better results.
Removal methods: To strip, use a scraper or putty knife to gently remove the limewash. Be careful not to damage the underlying plaster. For re-coating, follow the same prep steps as your initial application.
Common Mistakes, Planning, and Project Scheduling
Avoid incompatible primers, skipped porosity tests, and rushing coats, as these undermine cure and finish. Poor environmental control can also hinder limewash performance, so plan for stable conditions during each stage. Use a rational workflow to prevent backtracking on repairs or coats.
Assess plaster type, moisture risk, and any efflorescence before committing to a course of action. Run small tests to gauge adhesion and absorbency, and set expectations for drying times with the actual conditions you’ll face. Build in buffers for weather and unexpected repairs to keep the project on track.
Typical mistakes and how to avoid them
Knowing common pitfalls helps you steer clear of trouble. Here are some limewash blunders to dodge.
- Over-thinning: Too watery mix reduces adhesion, causes dripping. Stick to recommended consistency.
- Incompatible substrates: Limewash hates shiny surfaces, fresh paint. Ensure plaster is porous, old finishes are sound.
- Insufficient prep: Skipping repairs, cleaning lets dirt spoil limewash. Fix cracks, remove dust before applying.
- Rushing coats: Not waiting long enough between layers causes poor bonding. Follow drying times religiously.
- Ignoring efflorescence: Salt deposits undermine limewash. Treat with a suitable cleaner before applying.
Remember, prevention’s cheaper than cure. Keep these in mind to save time and money.
Project planning and scheduling checklist
Before you start slaking lime, use this checklist to get organized.
- Assess plaster: Check type, condition. Wrong substrate leads to poor results.
- Check moisture risk: Look for damp spots. Moisture ruins limewash.
- Inspect efflorescence: Spot salt deposits. Efflorescence weakens bond.
- Repair cracks: Fix before priming. Cracks let moisture in, spoil finish.
- Test absorbency: Check water absorption rate. Wrong porosity needs primer adjustment.
- Check adhesion: Test on small patch. Poor bond means stripping and restarting.
- Plan drying times: Allow for curing between coats. Rushing coats causes problems.
- Allocate daylight: Plan for sufficient light. Dark rooms hinder application, curing.
- Factor seasonality: Account for temperature ranges. Wrong conditions slow drying, weaken limewash.
- Budget contingency: Allow time for touch-ups. Unexpected repairs happen.
Quick rule: Plan like you’d build – solid foundation first, then layers with proper curing in between.
Cost and material estimation guidance
Estimating materials right ensures you’ve got enough, don’t waste cash. Here’s how to do it.
- Coverage: Check manufacturer’s coverage per litre. More coats needed with low coverage.
- Surface area: Calculate wall/floor size. Wrong area means not enough material.
- Coats needed: Estimate number of layers. Too few coats leaves surface unprotected.
- Waste allowance: Add 10-15% for waste, testing. No waste means no room for error.
- Sealer/stabilizer: Consider if needed between coats. Extra materials add to cost.
- Quality matters: Cheap materials save now, cost later. Low-quality limewash cracks, stains easily.
Remember, you get what you pay for. Spend wisely on quality materials to save in the long run.
Maintenance, Touch-Ups, and Longevity
Define maintenance goals that preserve patina, breathability, and washability without sacrificing the mineral character of limewash. Gentle cleaning is essential to longevity, so use appropriate methods that do not erode the finish. Regular checks help you spot issues early.
Approach in-situ touch-ups by blending new limewash with the surrounding patina, applying thin coats and building color gradually. Consider how humidity, moisture intrusion, and previous coatings affect longevity, and plan reapplication or professional maintenance when needed. Keep quick checks on moisture, cracks, and color uniformity to spot potential repairs early.
Cleaning and routine maintenance
Limewash is breathable, but gentle cleaning is key to its longevity. Avoid harsh detergents that can strip the finish.
Dust removal: Use a soft brush or microfiber cloth for daily dusting. Vacuum occasionally if possible.
Minor staining: For light stains, dampen a cloth with warm water and mild dish soap. Wring it out well before gently wiping the stain. Rinse with clean water and dry immediately.
Water-heavy cleaning can damage limewash. Avoid it unless absolutely necessary, and always spot test first.
Matching patina for touch-ups
Touch-ups should blend seamlessly with the original finish. Here’s how:
Prepare matching mix: Keep records of your original limewash recipe. When touching up, recreate it as closely as possible.
Feather new material into old: Apply thin coats, working from the edge towards the center to blend the new with the old.
Test first: Before large repairs, apply a small sample area to verify color and texture match with the existing finish.
When to reapply and long-term considerations
Regular checks help maintain your limewash. Here’s what to look for:
Flaking, cracking, loss of sheen, discoloration: These signs indicate it’s time for a touch-up or full reapplication.
Repainting frequency depends on traffic and conditions. High-traffic areas may need touching up every 1-3 years.
Prolong the finish: Control humidity, moisture intrusion, and substrate movement to extend your limewash’s life. Regularly inspect for efflorescence, mold risk, and color consistency.
Conclusion
Finish that interior look with limewash done right, and you get a durable, breathable finish that can look great for years. Safety and proper prep protect the plaster and your investment, so plan the steps and stay steady.
First, check the surface and test a small patch to confirm how the plaster absorbs limewash, then mix and apply the base coat in thin layers, letting each coat dry fully before the next. Prime and base-coat if you need a uniform absorbency, then proceed with the multi-coat technique, inspecting after each coat for blotches or streaks and touching up while the wall is still workable. Keep the area protected, ventilated, and free of dust, and schedule the project in daylight to see true color and coverage.
Avoid these common missteps: rushing the base coat or skipping primer when the wall is inconsistent, applying coats too thick or too rapidly, and neglecting to seal off adjacent surfaces or fixtures. Always wear basic safety gear, work in a well-ventilated space, dampen or wipe as needed to prevent dust or splatter, and test a small area first to avoid irreversible changes.
If you encounter structural cracks, dampness, or plaster damage, or if the plaster is old and poorly bonded, consider calling a professional rather than pushing on. When in doubt, weigh the risk and plan for a measured approach, then get to work with confidence and finish a durable, even, and attractive limewashed plaster surface.
FAQ
What prep steps are essential before applying limewash on plaster?
Clean the surface and remove any loose material. Repair cracks or damaged spots with the right filler. Check for moisture and address dampness before you start. Roughen glossy areas so the limewash can grab hold.
How do you apply multiple coats of limewash?
Apply the first coat and let the wall absorb it. Inspect for uniform absorption and even color. Apply additional coats as needed, following the product’s instructions for recoat intervals and drying times.
How can you fix blotches or uneven surfaces during application?
Identify the cause—moisture, porosity differences, or contaminants. Re-wet and blend blotchy areas as you go. If needed, re-prime the patchy spots and apply another coat to even out the finish.
How should you handle damp issues before painting and when painting over existing layers?
Address leaks or moisture sources first and ensure the wall dries properly. Use a primer suited for damp or previously limewashed surfaces if required by the product instructions. If the wall has hairline cracks, deal with them per the filler or plaster manufacturer’s guidance before continuing.